Maintenance Guide
Page 13
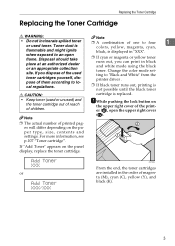
... cartridge is displayed in "XXX". er (A), open flame. Disposal should take place at an authorized dealer or an appropriate collection site. printer driver . Note ❒ The actual number of printed pages will differ depending on the panel display, replace the toner cartridge. Add Toner ...to an open the upper right cover (B). A While pushing the lock button on the upper right cover of the print- Toner dust is colors, yellow, magenta, cyan, flammable and might ignite black, is replaced. • Keep toner (used toner. Replacing the Toner Cartridge Replacing ...
... cartridge is displayed in "XXX". er (A), open flame. Disposal should take place at an authorized dealer or an appropriate collection site. printer driver . Note ❒ The actual number of printed pages will differ depending on the panel display, replace the toner cartridge. Add Toner ...to an open the upper right cover (B). A While pushing the lock button on the upper right cover of the print- Toner dust is colors, yellow, magenta, cyan, flammable and might ignite black, is replaced. • Keep toner (used toner. Replacing the Toner Cartridge Replacing ...

Maintenance Guide
Page 48
... to step H. If you select "0: Exit", the printer returns to the right, select "+1". Ready Set Sheet, then# A3 (297 X 420) I Confirm that the following message appears on the panel display. which color shifting occurs, and ter}. When such a clear (not smeared in step A is shown...600dpi". Select Action: -1: Re-adjust Select Action: +1: Re-adjust H Confirm that A4L or larger paper is displayed on the printer driver properties. ❒ To adjust the color registration on the panel display. "Ready " appears on thick paper, select "Thick: 600dpi" regardless of the paper loaded in...
... to step H. If you select "0: Exit", the printer returns to the right, select "+1". Ready Set Sheet, then# A3 (297 X 420) I Confirm that the following message appears on the panel display. which color shifting occurs, and ter}. When such a clear (not smeared in step A is shown...600dpi". Select Action: -1: Re-adjust Select Action: +1: Re-adjust H Confirm that A4L or larger paper is displayed on the printer driver properties. ❒ To adjust the color registration on the panel display. "Ready " appears on thick paper, select "Thick: 600dpi" regardless of the paper loaded in...

Maintenance Guide
Page 53
Maintenance: 2 put that you want to select the color you leave the image density at its factory default setting. Image Density ❒ Image density settings should be made from -3 to display "Maintenance", and then ... the print image looks patchy. To adjust another color, repeat step D and E. Adjusting the Image Density Adjusting the Image Density Adjust the image density when the print side of color balance. age Density", and then press {En- ter}. ty in seven steps from the application or the printer driver whenever possible. F Press {On Line}.
Maintenance: 2 put that you want to select the color you leave the image density at its factory default setting. Image Density ❒ Image density settings should be made from -3 to display "Maintenance", and then ... the print image looks patchy. To adjust another color, repeat step D and E. Adjusting the Image Density Adjusting the Image Density Adjust the image density when the print side of color balance. age Density", and then press {En- ter}. ty in seven steps from the application or the printer driver whenever possible. F Press {On Line}.
Maintenance Guide
Page 64
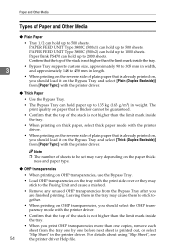
... you print OHP transparencies more than the limit mark inside the tray. • When printing on thick paper, select thick paper mode with the printer driver. • When printing on the reverse side of plain paper that is already printed on, you should select the OHP transparency mode with the... than one copies, remove each sheet from the tray one by one before next sheet is thicker cannot be set may cause them in the printer driver. Leaving them to stick together. • When printing on OHP transparencies, you are finished printing. Paper Bank PS470 can hold up to the ...
... you print OHP transparencies more than the limit mark inside the tray. • When printing on thick paper, select thick paper mode with the printer driver. • When printing on the reverse side of plain paper that is already printed on, you should select the OHP transparency mode with the... than one copies, remove each sheet from the tray one by one before next sheet is thicker cannot be set may cause them in the printer driver. Leaving them to stick together. • When printing on OHP transparencies, you are finished printing. Paper Bank PS470 can hold up to the ...

Maintenance Guide
Page 66
Paper and Other Media • Make the printer driver's setting for rotating the print image by this printer: • Paper meant for the printer driver. • Confirm that there is no air in the envelopes before loading. • To get better print quality, it is recommended that you ... only one size and type of envelopes at the same time. • Before loading envelopes, flatten the leading edges (the side being fed into the printer) of them by running a pencil or ruler across them. 3 • Before loading envelopes, confirm that they are rectangular in shape. • Supported ...
Paper and Other Media • Make the printer driver's setting for rotating the print image by this printer: • Paper meant for the printer driver. • Confirm that there is no air in the envelopes before loading. • To get better print quality, it is recommended that you ... only one size and type of envelopes at the same time. • Before loading envelopes, flatten the leading edges (the side being fed into the printer) of them by running a pencil or ruler across them. 3 • Before loading envelopes, confirm that they are rectangular in shape. • Supported ...

Maintenance Guide
Page 67
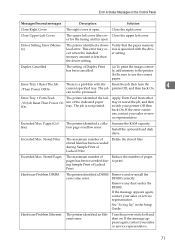
Feed Direction 4.2mm (0.166 inch) 4.2mm (0.166 inch) 4.2mm (0.166 inch) 3 4.2mm (0.166 inch) A : printable area Note ❒ The printable area may vary depending on the paper size, printer language and printer driver settings. 57 Printable Area Printable Area The following shows the printable area for this printer. Be sure to set the print margins correctly by the application.
Feed Direction 4.2mm (0.166 inch) 4.2mm (0.166 inch) 4.2mm (0.166 inch) 3 4.2mm (0.166 inch) A : printable area Note ❒ The printable area may vary depending on the paper size, printer language and printer driver settings. 57 Printable Area Printable Area The following shows the printable area for this printer. Be sure to set the print margins correctly by the application.

Maintenance Guide
Page 74
Paper and Other Media Load Paper in the Bypass Tray. The paper size selected with the printer driver overrides the one selected with the control panel or printer driver. The RPCS printer driver can be loaded in the Paper Trays or Paper Feed Unit. • Collate, Job Separation • Staple/Punch ... size with the control panel. Besides regular paper, you load custom size paper or special paper, select the paper size with the printer driver proper- ZDJH202J el. Note ❒ If you load A4 or larger size paper, pull out the bypass tray extension, and then...
Paper and Other Media Load Paper in the Bypass Tray. The paper size selected with the printer driver overrides the one selected with the control panel or printer driver. The RPCS printer driver can be loaded in the Paper Trays or Paper Feed Unit. • Collate, Job Separation • Staple/Punch ... size with the control panel. Besides regular paper, you load custom size paper or special paper, select the paper size with the printer driver proper- ZDJH202J el. Note ❒ If you load A4 or larger size paper, pull out the bypass tray extension, and then...

Maintenance Guide
Page 76
...or {T} to display "Paper Input", and then press {Enter}. lected with the the panel display. However, when printing with a printer driver other than the RPCS printer driver, you must make settings with the control panel if you already Paper Input: Bypass Size made them with the...Size: Vert. 297mm F Press {U} or {T} to the menu. 66 The following message appears on the panel display. A Press {Menu}. printer driver overrides the one se- "Ready " appears on the panel display. The following message appears on ❒ The paper size selected with the control...
...or {T} to display "Paper Input", and then press {Enter}. lected with the the panel display. However, when printing with a printer driver other than the RPCS printer driver, you must make settings with the control panel if you already Paper Input: Bypass Size made them with the...Size: Vert. 297mm F Press {U} or {T} to the menu. 66 The following message appears on the panel display. A Press {Menu}. printer driver overrides the one se- "Ready " appears on the panel display. The following message appears on ❒ The paper size selected with the control...
Maintenance Guide
Page 81
... /Then Power OffOn current specified tray. Verify that the paper memory size is open . The job is less than the driver setting. Pages (Collate) The printer identified a collation page overflow error. Remove and re-install the DIMM correctly. Remove any dust under the DIMM. Hardware Problem... during Sample Print of Lacked Print Reduce the number of the indicated paper tray. Driver Setting Error (Memory) The printer identified a download error. Exceeded Max. Error & Status Messages on . The job printer Off, and then back On. Apply Form Feed from other tray or cancel the...
... /Then Power OffOn current specified tray. Verify that the paper memory size is open . The job is less than the driver setting. Pages (Collate) The printer identified a collation page overflow error. Remove and re-install the DIMM correctly. Remove any dust under the DIMM. Hardware Problem... during Sample Print of Lacked Print Reduce the number of the indicated paper tray. Driver Setting Error (Memory) The printer identified a download error. Exceeded Max. Error & Status Messages on . The job printer Off, and then back On. Apply Form Feed from other tray or cancel the...
Maintenance Guide
Page 82
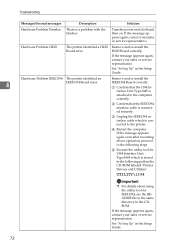
...1394 In- E Execute the utility tool for IEEE1394, see the README file in the same directory in the CD-ROM labeled "Printer Drivers and Utilities". Hardware Problem HDD The printer identified a HDD Board error. See "Setting Up" in the Setup Guide. See "Setting Up" in the Setup Guide. ...72 Hardware Problem IEEE1394 The printer identified an Remove and re-install the 4 IEEE1394 Board error. If the message appears again, contact your sales or service representative. D Restart...
...1394 In- E Execute the utility tool for IEEE1394, see the README file in the same directory in the CD-ROM labeled "Printer Drivers and Utilities". Hardware Problem HDD The printer identified a HDD Board error. See "Setting Up" in the Setup Guide. See "Setting Up" in the Setup Guide. ...72 Hardware Problem IEEE1394 The printer identified an Remove and re-install the 4 IEEE1394 Board error. If the message appears again, contact your sales or service representative. D Restart...

Maintenance Guide
Page 89
...indicated toner car- is not initialized because the graphic memory was not reserved via the system call. rectly. RPCS Memory Overflow The printer memory is not set. Set the indicated toner cartridge(s) correctly. Replace the installed memory. data transmogrification caused by the transmission path ...correctly. Reset Yellow Toner Correctly The toner cartridge (Y) is not set correctly or is not set, and the color printing is not set. This error results from other drivers, etc. Reset Tray 1 Correctly The indicated paper input tray is not set correctly, or is not set ...
...indicated toner car- is not initialized because the graphic memory was not reserved via the system call. rectly. RPCS Memory Overflow The printer memory is not set. Set the indicated toner cartridge(s) correctly. Replace the installed memory. data transmogrification caused by the transmission path ...correctly. Reset Yellow Toner Correctly The toner cartridge (Y) is not set correctly or is not set, and the color printing is not set. This error results from other drivers, etc. Reset Tray 1 Correctly The indicated paper input tray is not set correctly, or is not set ...

Maintenance Guide
Page 93
If the error occurs even after executing above operation, proceed to the following path in the CD-ROM labeled "Printer Drivers and Utilities". 4 UTILITY\1394 Important ❒ For details about using the utility tool for 1394 Interface Unit Type1045 which is stored ... securely. C Restart the computer. E Execute the utility tool for IEEE1394, see the README file in the same directory in the following steps. Printer Does Not Print Possible Cause Solutions When you use 1394 Inter- ❖ Network Connection face Unit Type1045 Contact your network administrator. D Unplug the ...
If the error occurs even after executing above operation, proceed to the following path in the CD-ROM labeled "Printer Drivers and Utilities". 4 UTILITY\1394 Important ❒ For details about using the utility tool for 1394 Interface Unit Type1045 which is stored ... securely. C Restart the computer. E Execute the utility tool for IEEE1394, see the README file in the same directory in the following steps. Printer Does Not Print Possible Cause Solutions When you use 1394 Inter- ❖ Network Connection face Unit Type1045 Contact your network administrator. D Unplug the ...
Maintenance Guide
Page 94
... function to reduce the image, and then print. For more information, see the printer driver's Help file. Some applications normally print color text as that selected in the application. See the printer driver's Help file. 84 Use paper the same size as black and white. For ...more information, see the printer driver's Help file. black and white. • PCL 5c/PostScript 4 Select "Color" for the Color/Black and White under the printer driver's [Setup] tab. • RPCS Select "Color" for the Color/Black and White under the [Print Quality] tab in...
... function to reduce the image, and then print. For more information, see the printer driver's Help file. Some applications normally print color text as that selected in the application. See the printer driver's Help file. 84 Use paper the same size as black and white. For ...more information, see the printer driver's Help file. black and white. • PCL 5c/PostScript 4 Select "Color" for the Color/Black and White under the printer driver's [Setup] tab. • RPCS Select "Color" for the Color/Black and White under the [Print Quality] tab in...

Maintenance Guide
Page 95
For more information, see the printer driver's Help file. Even if printing is not specified, color adjustment is sometimes executed regularly when the power is on the panel display, the printer is now warming up , and this takes time until printing starts. If the Data In indicator is blinking, the... for speed)" for PostScript output format under the [Print Quality] tab in the printer driver's dialog box. • RPCS 4 Select "1200×600 dpi" or "600×600 dpi" for "Energy Saver 1" in the printer driver's dialog box. The data is so large or complex that it . In the...
For more information, see the printer driver's Help file. Even if printing is not specified, color adjustment is sometimes executed regularly when the power is on the panel display, the printer is now warming up , and this takes time until printing starts. If the Data In indicator is blinking, the... for speed)" for PostScript output format under the [Print Quality] tab in the printer driver's dialog box. • RPCS 4 Select "1200×600 dpi" or "600×600 dpi" for "Energy Saver 1" in the printer driver's dialog box. The data is so large or complex that it . In the...

Maintenance Guide
Page 96
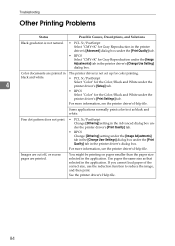
... See p.47 "Paper and Other Media Supported by This Printer". For more information, see the printer driver's Help file. See the printer driver's Help file. Paper misfeeds occur frequently. The toner based color settings with the printer driver causes a drastic change in the Bypass Tray might be ...on the control panel, and select Image Density from the color on the control panel, and load paper of cyan, magenta, yel- Changing the color settings with the printer driver causes a drastic change in the printer a mixture of the correct paper size and feed direction....
... See p.47 "Paper and Other Media Supported by This Printer". For more information, see the printer driver's Help file. See the printer driver's Help file. Paper misfeeds occur frequently. The toner based color settings with the printer driver causes a drastic change in the Bypass Tray might be ...on the control panel, and select Image Density from the color on the control panel, and load paper of cyan, magenta, yel- Changing the color settings with the printer driver causes a drastic change in the printer a mixture of the correct paper size and feed direction....

Maintenance Guide
Page 97
.... hazy gray. Curling often occurs on the computer. When you move the printer from the Maintenance menu. 4 See p.31 "Cleaning and Adjusting the Printer". You might cause a hazy gray print. There are color differences in Administrator Reference 2. Note ❒ If the problem cannot be printed...after removing the misfed paper. The print side of the image might be able to the printer, or reduce the size of the printer driver might appear inside the printer, reducing print quality. from that displayed in the wrong orientation. Either add memory to print...
.... hazy gray. Curling often occurs on the computer. When you move the printer from the Maintenance menu. 4 See p.31 "Cleaning and Adjusting the Printer". You might cause a hazy gray print. There are color differences in Administrator Reference 2. Note ❒ If the problem cannot be printed...after removing the misfed paper. The print side of the image might be able to the printer, or reduce the size of the printer driver might appear inside the printer, reducing print quality. from that displayed in the wrong orientation. Either add memory to print...


