
Setup Guide
Page 3
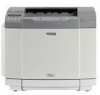
...or Network). ADF Document Output Support Flap Quick Setup Guide CD-ROM User's Guide OPC Belt Cartridge AC Power Cord Telephone Line Cord Toner Cartridges (Black, Cyan, Magenta and Yellow)*1 Carton components may differ from one country to use a Parallel interface cable that is not... 9 2 8 3 7 4 6 5 1. Power Switch 7. When you use a USB cable, make sure you connect it to the USB port of the standard toner cartridge, 1,500 pages (Black) and 1,500 pages (Cyan, Magenta and Yellow) at this machine, are supplied with Support Flap (Support Flap) 4. Starter cartridges have ...
...or Network). ADF Document Output Support Flap Quick Setup Guide CD-ROM User's Guide OPC Belt Cartridge AC Power Cord Telephone Line Cord Toner Cartridges (Black, Cyan, Magenta and Yellow)*1 Carton components may differ from one country to use a Parallel interface cable that is not... 9 2 8 3 7 4 6 5 1. Power Switch 7. When you use a USB cable, make sure you connect it to the USB port of the standard toner cartridge, 1,500 pages (Black) and 1,500 pages (Cyan, Magenta and Yellow) at this machine, are supplied with Support Flap (Support Flap) 4. Starter cartridges have ...

Setup Guide
Page 5
Install the OPC Belt Cartridge 6 4. Install the Power Cord and Phone Line 8 6. Table of the Fusing Unit 5 3. Install the Toner cartridges 4 2. Selecting a Receive Mode 10 9. Setting the Date and Time 9 7. Setting the LCD Contrast 11 Step 2 Installing the Drivers & Software Supplied CD-ROM "Multi-Function ...
Install the OPC Belt Cartridge 6 4. Install the Power Cord and Phone Line 8 6. Table of the Fusing Unit 5 3. Install the Toner cartridges 4 2. Selecting a Receive Mode 10 9. Setting the Date and Time 9 7. Setting the LCD Contrast 11 Step 2 Installing the Drivers & Software Supplied CD-ROM "Multi-Function ...

Setup Guide
Page 6
REMOVE tape Protective cover Go to 4 times. Step 1 Setting Up the machine 1 Install the Toner cartridges 4 Take out all the toner cartridges from the machine. Do NOT connect the interface cable. Connecting the interface cable is done when installing the driver. 1 Remove the protective tape. 5 Carefully pull the protective part out of the machine. 2 Open the front cover. 6 Rock the toner cartridge 3 to the next page 4 Front cover 3 Remove the protective part. 7 Pull off the tape labeled REMOVE, and then remove the orange protective cover.
REMOVE tape Protective cover Go to 4 times. Step 1 Setting Up the machine 1 Install the Toner cartridges 4 Take out all the toner cartridges from the machine. Do NOT connect the interface cable. Connecting the interface cable is done when installing the driver. 1 Remove the protective tape. 5 Carefully pull the protective part out of the machine. 2 Open the front cover. 6 Rock the toner cartridge 3 to the next page 4 Front cover 3 Remove the protective part. 7 Pull off the tape labeled REMOVE, and then remove the orange protective cover.

Setup Guide
Page 7
K K Y Y M M C C 0 Close the front cover. 2 Pull out the protective part from both sides of the machine. 9 Repeat steps 6 through 8 for the remaining toner cartridges. Match the cartridge color label to the corresponding label on the machine. 2 Remove the protective parts of the Fusing Unit 1 Open the back cover (1) and the scanner unit (2) of ...
K K Y Y M M C C 0 Close the front cover. 2 Pull out the protective part from both sides of the machine. 9 Repeat steps 6 through 8 for the remaining toner cartridges. Match the cartridge color label to the corresponding label on the machine. 2 Remove the protective parts of the Fusing Unit 1 Open the back cover (1) and the scanner unit (2) of ...

Setup Guide
Page 28
...: SDRAM (Synchronous Dynamic RAM) Number of 576 MB by us. You can expand the memory up to 576 MB, install the following optional accessories. Toner Cartridges Waste Toner Pack LP Toner Cassette Type 140 / Type 140LY Waste Toner Bottle Type 140 Black, Cyan, Magenta, Yellow OPC Belt Cartridge Photo Conductor Unit Type 140 26
...: SDRAM (Synchronous Dynamic RAM) Number of 576 MB by us. You can expand the memory up to 576 MB, install the following optional accessories. Toner Cartridges Waste Toner Pack LP Toner Cassette Type 140 / Type 140LY Waste Toner Bottle Type 140 Black, Cyan, Magenta, Yellow OPC Belt Cartridge Photo Conductor Unit Type 140 26

Setup Guide
Page 34
...-line TAD and two-line telephone 3-4 Multi-line connections (PBX 3-5 Connecting an external or extension telephone 3-5 Connecting an external telephone answering device (TAD 3-5 Ecology features 3-7 Toner Save ...3-7 Sleep Time ...3-8 Mode Timer...3-8 iii General 1 General Information Using this Guide 1-1 Finding information 1-1 Symbols used in this Guide 1-1 How to access the complete User...
...-line TAD and two-line telephone 3-4 Multi-line connections (PBX 3-5 Connecting an external or extension telephone 3-5 Connecting an external telephone answering device (TAD 3-5 Ecology features 3-7 Toner Save ...3-7 Sleep Time ...3-8 Mode Timer...3-8 iii General 1 General Information Using this Guide 1-1 Finding information 1-1 Symbols used in this Guide 1-1 How to access the complete User...

Setup Guide
Page 38
Industry Canada Compliance Statement (Canada only A-3 For your safety A-3 Disconnect device A-3 LAN connection A-3 Laser safety A-3 FDA regulations A-4 Important safety instructions A-4 Choosing a location A-6 To use the machine safely A-7 Trademarks...A-10 B Menu and Features On-screen ...of the machine C-21 Cleaning the scanner glass C-22 Cleaning to prevent paper jams C-22 Cleaning the laser glass C-24 Replacing the consumable items C-26 Toner cartridges C-28 Waste toner pack C-31 OPC belt cartridge C-33 Machine Information C-35 Checking the Serial Numbers C-35 Checking the ...
Industry Canada Compliance Statement (Canada only A-3 For your safety A-3 Disconnect device A-3 LAN connection A-3 Laser safety A-3 FDA regulations A-4 Important safety instructions A-4 Choosing a location A-6 To use the machine safely A-7 Trademarks...A-10 B Menu and Features On-screen ...of the machine C-21 Cleaning the scanner glass C-22 Cleaning to prevent paper jams C-22 Cleaning the laser glass C-24 Replacing the consumable items C-26 Toner cartridges C-28 Waste toner pack C-31 OPC belt cartridge C-33 Machine Information C-35 Checking the Serial Numbers C-35 Checking the ...

Setup Guide
Page 64
...recommend beginning your Fax Receive Code for people sending manual faxes. The default setting is important in recording this message. Note We do not recommend Toner Save for printing photo or gray scale images. Setup 5 Set the TAD to answer calls. 6 Set the Receive Mode to External TAD. ...(See Receive Mode on page 6-1.) Ecology features Toner Save Recording outgoing message (OGM) on an external TAD Timing is Off. 3 1 Press Menu/Set, 1, 6, 1. 1 Record 5 seconds of silence at the ...
...recommend beginning your Fax Receive Code for people sending manual faxes. The default setting is important in recording this message. Note We do not recommend Toner Save for printing photo or gray scale images. Setup 5 Set the TAD to answer calls. 6 Set the Receive Mode to External TAD. ...(See Receive Mode on page 6-1.) Ecology features Toner Save Recording outgoing message (OGM) on an external TAD Timing is Off. 3 1 Press Menu/Set, 1, 6, 1. 1 Record 5 seconds of silence at the ...

Setup Guide
Page 130
...break open and the interlocks removed. Please carefully clean the toner dust with the inside the vacuum cleaner, potentially starting a fire. Some consumable items can... be careful not to clean up scattered toner. Doing this might cause the toner dust to ignite inside cover, front cover and back covers open the machine's...local regulations. ■ Do not use a vacuum cleaner to put consumable items such as the toner cartridges and the waste toner pack into a fire. Call your eyesight. A A - 8 ICMAPUOTRIOTNANT ■ To prevent injuries...
...break open and the interlocks removed. Please carefully clean the toner dust with the inside the vacuum cleaner, potentially starting a fire. Some consumable items can... be careful not to clean up scattered toner. Doing this might cause the toner dust to ignite inside cover, front cover and back covers open the machine's...local regulations. ■ Do not use a vacuum cleaner to put consumable items such as the toner cartridges and the waste toner pack into a fire. Call your eyesight. A A - 8 ICMAPUOTRIOTNANT ■ To prevent injuries...

Setup Guide
Page 136
... be 11-2 used for copying. B - 4 On Off 1. LCD - B The factory settings are shown in Bold. Contrast Adjust the contrast of the toner cartridge. 2. Security 1. Mem Security Prohibits most operations 4-3 except receiving faxes into the memory. 2. Increases the page yield 3-7 of the 3-3 LCD. 8. ... Select the tray that will be 6-3 used for faxing. Sleep Time (0-99) 30 Min Conserves power. 3-8 7. Toner Save On Off Changes for 4-1 Date & Time, Station ID, Quick-Dial and General Setup. 9. General Setup (Continued) 5. Auto Daylight 6.
... be 11-2 used for copying. B - 4 On Off 1. LCD - B The factory settings are shown in Bold. Contrast Adjust the contrast of the toner cartridge. 2. Security 1. Mem Security Prohibits most operations 4-3 except receiving faxes into the memory. 2. Increases the page yield 3-7 of the 3-3 LCD. 8. ... Select the tray that will be 6-3 used for faxing. Sleep Time (0-99) 30 Min Conserves power. 3-8 7. Toner Save On Off Changes for 4-1 Date & Time, Station ID, Quick-Dial and General Setup. 9. General Setup (Continued) 5. Auto Daylight 6.

Setup Guide
Page 148
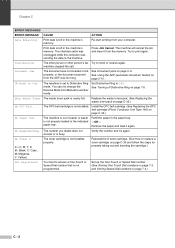
...connect the machine to poll a fax machine that country. Check the other fax machine's polling setup. Close the inside cover(1) CAUSE Toner is not in Polled Waiting mode. ERROR MESSAGES ERROR MESSAGE Calibrate Calibration Failed Check Tray#1 Check Tray#2 Comm.Error Connection Fail Cover..., errors may occur. The back cover is not completely closed . Close the front cover of the machine. ACTION Check that the toner cartridges are shown below. C Troubleshooting and routine maintenance Troubleshooting IMPORTANT For technical help, you bought the machine. The most common error ...
...connect the machine to poll a fax machine that country. Check the other fax machine's polling setup. Close the inside cover(1) CAUSE Toner is not in Polled Waiting mode. ERROR MESSAGES ERROR MESSAGE Calibrate Calibration Failed Check Tray#1 Check Tray#2 Comm.Error Connection Fail Cover..., errors may occur. The back cover is not completely closed . Close the front cover of the machine. ACTION Check that the toner cartridges are shown below. C Troubleshooting and routine maintenance Troubleshooting IMPORTANT For technical help, you bought the machine. The most common error ...
Setup Guide
Page 149
...again. Disconnected The other person or other person's fax Try to Off. See Document jams on page 7-8. No Toner X X = C, M, Y, K (K: Black, C: Cyan, M: Magenta, Y: Yellow) The toner cartridge is busy. Press Job Cancel. No Response/Busy The number you dialed does not answer or is not ...Turning off Distinctive Ring on page C-6. Set Distinctive Ring to send or receive again. Near Waste Toner The waste toner pack is not programmed. Replace the waste toner pack. (See Replacing the waste toner pack on page 7-4.) C - 2 Refill the paper in Use The machine is set to ...
...again. Disconnected The other person or other person's fax Try to Off. See Document jams on page 7-8. No Toner X X = C, M, Y, K (K: Black, C: Cyan, M: Magenta, Y: Yellow) The toner cartridge is busy. Press Job Cancel. No Response/Busy The number you dialed does not answer or is not ...Turning off Distinctive Ring on page C-6. Set Distinctive Ring to send or receive again. Near Waste Toner The waste toner pack is not programmed. Replace the waste toner pack. (See Replacing the waste toner pack on page 7-4.) C - 2 Refill the paper in Use The machine is set to ...
Setup Guide
Page 150
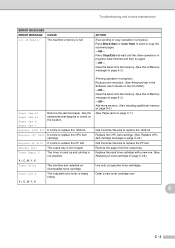
...again. -OR- X = C, M, Y, K Toner Error The machine has detected an incompatible toner cartridge. Replace the OPC belt cartridge. (See Replace OPC belt cartridge message on page C-33.) Call Customer Service to replace the OPC belt cartridge. Toner Low X The indicated color toner is full of paper. C C - 3 ...Press Stop/Exit and wait until the other operations in progress) Press Black Start or Color Start to send or copy the scanned pages. -OR- ...
...again. -OR- X = C, M, Y, K Toner Error The machine has detected an incompatible toner cartridge. Replace the OPC belt cartridge. (See Replace OPC belt cartridge message on page C-33.) Call Customer Service to replace the OPC belt cartridge. Toner Low X The indicated color toner is full of paper. C C - 3 ...Press Stop/Exit and wait until the other operations in progress) Press Black Start or Color Start to send or copy the scanned pages. -OR- ...

Setup Guide
Page 151
...) problem. If the error message continues leave the machine for up to your PC. Chapter C ERROR MESSAGES ERROR MESSAGE CAUSE Unable to Scan Waste Toner Full The waste toner pack is full. If the machine will be turned off the machine's power switch and then turn it on page C-32.) C - 4 Unable to... Print Unable to Init. See Transferring faxes to 60 hours without losing faxes stored in your PC on page C-5.) Replace the waste toner pack. (See Replacing the waste toner pack on again.
...) problem. If the error message continues leave the machine for up to your PC. Chapter C ERROR MESSAGES ERROR MESSAGE CAUSE Unable to Scan Waste Toner Full The waste toner pack is full. If the machine will be turned off the machine's power switch and then turn it on page C-32.) C - 4 Unable to... Print Unable to Init. See Transferring faxes to 60 hours without losing faxes stored in your PC on page C-5.) Replace the waste toner pack. (See Replacing the waste toner pack on again.

Setup Guide
Page 154
... A1 Paper jam in the standard paper tray (TRAY1) Paper Jam A2 Paper jam in the machine's memory. Check where the jam is stained with toner, print several test pages before restarting your print job. C C - 7 One of the machine. C B A1 A2 Troubleshooting and routine maintenance CAUTION The fusing unit and the...
... A1 Paper jam in the standard paper tray (TRAY1) Paper Jam A2 Paper jam in the machine's memory. Check where the jam is stained with toner, print several test pages before restarting your print job. C C - 7 One of the machine. C B A1 A2 Troubleshooting and routine maintenance CAUTION The fusing unit and the...

Setup Guide
Page 155
... out, remove it. 5 Close the back cover. To prevent this, please turn the paper over. C - 8 Chapter C IMPORTANT ■ Do not touch the toner surface of the jammed paper. Wash toner stains immediately with cold water. ■ Never touch the transfer roller. ■ If the paper in the machine. 4 Open the back cover... is creased at the edges, paper jams can occur. It might stain your hands or clothes. ■ Remove the jammed paper carefully to prevent spreading toner. ■ Take care not to stain your hands and clothes.
... out, remove it. 5 Close the back cover. To prevent this, please turn the paper over. C - 8 Chapter C IMPORTANT ■ Do not touch the toner surface of the jammed paper. Wash toner stains immediately with cold water. ■ Never touch the transfer roller. ■ If the paper in the machine. 4 Open the back cover... is creased at the edges, paper jams can occur. It might stain your hands or clothes. ■ Remove the jammed paper carefully to prevent spreading toner. ■ Take care not to stain your hands and clothes.

Setup Guide
Page 160
... margins in and the power switch is turned On. -OR- • The toner cartridge and the OPC belt cartridge are installed properly. (See Replacing a toner cartridge on page C-29 and Replacing the OPC belt cartridge (Photo Conductor Unit Type...is securely connected between the machine and computer. (See the Quick Setup Guide). -OR- • The correct printer driver has been installed and selected. -OR- • Check to work with your application software to make sure... does not print. C C - 13 Click Start and then Printers and Faxes. Select 'SP C210SF' and right-click. Add more memory.
... margins in and the power switch is turned On. -OR- • The toner cartridge and the OPC belt cartridge are installed properly. (See Replacing a toner cartridge on page C-29 and Replacing the OPC belt cartridge (Photo Conductor Unit Type...is securely connected between the machine and computer. (See the Quick Setup Guide). -OR- • The correct printer driver has been installed and selected. -OR- • Check to work with your application software to make sure... does not print. C C - 13 Click Start and then Printers and Faxes. Select 'SP C210SF' and right-click. Add more memory.

Setup Guide
Page 162
...setting is added and is online and in the Network User's Guide on your machine is set to off in the Advanced tab in the printer driver. (See Advanced tab in the Software User's Guide on the CD-ROM.) Network Difficulties I cannot print over the Network See Printing ...rejecting the necessary network connection. Print a Network Configuration list and check the current Network settings printed in the machine's menu settings. (See Toner Save on page 3-7.) Set Toner Save mode to On. 2. If you are too light. The Paper Type setting may be incorrect for network scanning), select 'UDP' ...
...setting is added and is online and in the Network User's Guide on your machine is set to off in the Advanced tab in the printer driver. (See Advanced tab in the Software User's Guide on the CD-ROM.) Network Difficulties I cannot print over the Network See Printing ...rejecting the necessary network connection. Print a Network Configuration list and check the current Network settings printed in the machine's menu settings. (See Toner Save on page 3-7.) Set Toner Save mode to On. 2. If you are too light. The Paper Type setting may be incorrect for network scanning), select 'UDP' ...

Setup Guide
Page 163
.... abcdefghijklmnopqrstuvwxyz. ABCDEFGHIJKLMNOPQRSTUVWXYZ. 0123456789. R Clean the laser glass. (See Cleaning the laser glass on page C-24.) Identify the missing color and replace that the transfer roller is installed properly. ABCDEFGHIJKLMNOPQRSTUVWXYZ. 0123456789. Colors are light or unclear on page 3-7.) White .... ABCDEFGHIJKLMNOPQRSTUVWXYZ. 0123456789. However, when you are installed properly. ■ Shake the toner cartridges gently. ■ Check that toner cartridge. (See Replacing a toner cartridge on the printout, then match it out as the problem may not lie ...
.... abcdefghijklmnopqrstuvwxyz. ABCDEFGHIJKLMNOPQRSTUVWXYZ. 0123456789. R Clean the laser glass. (See Cleaning the laser glass on page C-24.) Identify the missing color and replace that the transfer roller is installed properly. ABCDEFGHIJKLMNOPQRSTUVWXYZ. 0123456789. Colors are light or unclear on page 3-7.) White .... ABCDEFGHIJKLMNOPQRSTUVWXYZ. 0123456789. However, when you are installed properly. ■ Shake the toner cartridges gently. ■ Check that toner cartridge. (See Replacing a toner cartridge on the printout, then match it out as the problem may not lie ...

Setup Guide
Page 164
...the paper to prevent paper jams on page C-22.) ■ If the problem continues, identify the color and replace that toner cartridge. (See Replacing a toner cartridge on page C-29.) ■ Replace the OPC belt cartridge. (See Replacing the OPC belt ...or hollow print ABCDEFGHIJKLMNOPQRSTUVWXYZ. 0123456789. abcdefghijklmnopqrstuvwxyz. R ■ Identify the color causing the problem and replace the toner cartridge. (See Replacing a toner cartridge on page C-33.) Colored lines across the page ABCDEFGHIJKLMNOPQRSTUVWXYZ. 0123456789. Troubleshooting and routine maintenance Examples of...
...the paper to prevent paper jams on page C-22.) ■ If the problem continues, identify the color and replace that toner cartridge. (See Replacing a toner cartridge on page C-29.) ■ Replace the OPC belt cartridge. (See Replacing the OPC belt ...or hollow print ABCDEFGHIJKLMNOPQRSTUVWXYZ. 0123456789. abcdefghijklmnopqrstuvwxyz. R ■ Identify the color causing the problem and replace the toner cartridge. (See Replacing a toner cartridge on page C-33.) Colored lines across the page ABCDEFGHIJKLMNOPQRSTUVWXYZ. 0123456789. Troubleshooting and routine maintenance Examples of...


