
Setup Guide
Page 1
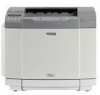
Setting Up the machine Windows® USB Windows® Parallel Installing the Drivers & Software Quick Setup Guide SP C210SF Before you must set up the hardware and install the software. Windows NT® 4.0 Parallel Windows® Network For Network ...Users Read this manual carefully before using the machine. Step 1 Setting Up the machine Step 2 Installing the Drivers & Software Setup is Complete! Please...
Setting Up the machine Windows® USB Windows® Parallel Installing the Drivers & Software Quick Setup Guide SP C210SF Before you must set up the hardware and install the software. Windows NT® 4.0 Parallel Windows® Network For Network ...Users Read this manual carefully before using the machine. Step 1 Setting Up the machine Step 2 Installing the Drivers & Software Setup is Complete! Please...

Setup Guide
Page 5
Install the Toner cartridges 4 2. Install the OPC Belt Cartridge 6 4. Setting the LCD Contrast 11 Step 2 Installing the Drivers & Software Supplied CD-ROM "Multi-Function Suite 12 For USB Interface Cable Users (For Windows® 98/98SE/Me/2000 Professional/XP 14 For Parallel ...
Install the Toner cartridges 4 2. Install the OPC Belt Cartridge 6 4. Setting the LCD Contrast 11 Step 2 Installing the Drivers & Software Supplied CD-ROM "Multi-Function Suite 12 For USB Interface Cable Users (For Windows® 98/98SE/Me/2000 Professional/XP 14 For Parallel ...

Setup Guide
Page 6
Step 1 Setting Up the machine 1 Install the Toner cartridges 4 Take out all the toner cartridges from the machine. REMOVE tape Protective cover Go to 4 times. Front cover 3 Remove the protective part. 7 Pull off the tape labeled REMOVE, and then remove the orange protective cover. Do NOT connect the interface cable. Connecting the interface cable is done when installing the driver. 1 Remove the protective tape. 5 Carefully pull the protective part out of the machine. 2 Open the front cover. 6 Rock the toner cartridge 3 to the next page 4
Step 1 Setting Up the machine 1 Install the Toner cartridges 4 Take out all the toner cartridges from the machine. REMOVE tape Protective cover Go to 4 times. Front cover 3 Remove the protective part. 7 Pull off the tape labeled REMOVE, and then remove the orange protective cover. Do NOT connect the interface cable. Connecting the interface cable is done when installing the driver. 1 Remove the protective tape. 5 Carefully pull the protective part out of the machine. 2 Open the front cover. 6 Rock the toner cartridge 3 to the next page 4

Setup Guide
Page 13
... contrast. -OR- Press Menu/Set. 5 Press Stop/Exit. Windows NT® 4.0 Parallel Windows® Network For Network Users Go to Next page to install the drivers & software 11
... contrast. -OR- Press Menu/Set. 5 Press Stop/Exit. Windows NT® 4.0 Parallel Windows® Network For Network Users Go to Next page to install the drivers & software 11

Setup Guide
Page 14
Install Optional Applications You can install the Multi-Function Suite and multifunction drivers. Printing and scanning). 12 Multi-Function Suite includes Printer Driver, Scanner Driver, ScanSoft® PaperPort® 9.0SE, ControlCenter2 and ScanSoft® OmniPage®. Repair Multi-Function Suite (For ...9.0SE is an OCR application that converts an image into text and inserts it into your default word processor. Step 2 Installing the Drivers & Software Supplied CD-ROM "Multi-Function Suite" The CD-ROM includes the following items: Install Multi-Function Suite You can install ...
Install Optional Applications You can install the Multi-Function Suite and multifunction drivers. Printing and scanning). 12 Multi-Function Suite includes Printer Driver, Scanner Driver, ScanSoft® PaperPort® 9.0SE, ControlCenter2 and ScanSoft® OmniPage®. Repair Multi-Function Suite (For ...9.0SE is an OCR application that converts an image into text and inserts it into your default word processor. Step 2 Installing the Drivers & Software Supplied CD-ROM "Multi-Function Suite" The CD-ROM includes the following items: Install Multi-Function Suite You can install ...

Setup Guide
Page 15
... Professional/XP) Windows NT® Workstation Version 4.0 Users........... Setting Up the machine Windows® USB Windows® Parallel Windows NT® 4.0 Parallel Step 2 Installing the Drivers & Software Follow the instructions on this page for your operating system and interface cable. USB Interface Cable Users Go to page 14 (For Windows®...
... Professional/XP) Windows NT® Workstation Version 4.0 Users........... Setting Up the machine Windows® USB Windows® Parallel Windows NT® 4.0 Parallel Step 2 Installing the Drivers & Software Follow the instructions on this page for your operating system and interface cable. USB Interface Cable Users Go to page 14 (For Windows®...

Setup Guide
Page 16
The installation of PaperPort® 9.0SE will appear. ROM drive. Step 2 Installing the Drivers & Software For USB Interface Cable Users (For Windows® 98/98SE/Me/2000 Professional/XP) Make sure that you agree to run the setup.exe ...
The installation of PaperPort® 9.0SE will appear. ROM drive. Step 2 Installing the Drivers & Software For USB Interface Cable Users (For Windows® 98/98SE/Me/2000 Professional/XP) Make sure that you agree to run the setup.exe ...
Setup Guide
Page 17
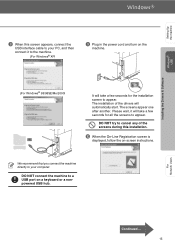
...to your PC, and then connect it will automatically start. DO NOT connect the machine to appear. DO NOT try to cancel any of the drivers will take a few seconds for the installation screen to your computer. Please wait, it to the machine. (For Windows® XP) 9... for all the screens to a USB port on -screen instructions. For Network Users Continued ... 15 Setting Up the machine Windows® USB Installing the Drivers & Software 8 When this installation. 0 When the On-Line Registration screen is displayed, follow the on a keyboard or a nonpowered USB hub. The ...
...to your PC, and then connect it will automatically start. DO NOT connect the machine to appear. DO NOT try to cancel any of the drivers will take a few seconds for the installation screen to your computer. Please wait, it to the machine. (For Windows® XP) 9... for all the screens to a USB port on -screen instructions. For Network Users Continued ... 15 Setting Up the machine Windows® USB Installing the Drivers & Software 8 When this installation. 0 When the On-Line Registration screen is displayed, follow the on a keyboard or a nonpowered USB hub. The ...

Setup Guide
Page 18
Step 2 Installing the Drivers & Software For USB Interface Cable Users (For Windows® 98/98SE/Me/2000 Professional/XP) A Click Finish to restart your computer. (After restarting the computer, for Windows® 2000 Professional/XP, you must be logged on with Administrator rights.) The Multi-Function Suite, Printer Driver and Scanner driver have been installed and the installation is now complete. 16
Step 2 Installing the Drivers & Software For USB Interface Cable Users (For Windows® 98/98SE/Me/2000 Professional/XP) A Click Finish to restart your computer. (After restarting the computer, for Windows® 2000 Professional/XP, you must be logged on with Administrator rights.) The Multi-Function Suite, Printer Driver and Scanner driver have been installed and the installation is now complete. 16

Setup Guide
Page 19
... of PaperPort® 9.0SE will appear. ROM drive. If the language screen appears, select your language. Setting Up the machine Windows® USB Installing the Drivers & Software Windows® Parallel For Parallel Interface Cable Users (For Windows® 98/98SE/Me/2000 Professional/XP) Make sure that you must be logged...
... of PaperPort® 9.0SE will appear. ROM drive. If the language screen appears, select your language. Setting Up the machine Windows® USB Installing the Drivers & Software Windows® Parallel For Parallel Interface Cable Users (For Windows® 98/98SE/Me/2000 Professional/XP) Make sure that you must be logged...

Setup Guide
Page 20
... the screens during this screen appears, connect the parallel interface cable to your PC, and then connect it to cancel any of the drivers will automatically start. The screens appear one after another. We recommend that you connect the machine directly to your computer. 18 It may...the machine. (For Windows® 98/98SE/Me/2000) 0 For Windows® 98/98SE/Me/2000 Professional users, click Next. Step 2 Installing the Drivers & Software For Parallel Interface Cable Users (For Windows® 98/98SE/Me/2000 Professional/XP) 8 When this installation. DO NOT try to the machine....
... the screens during this screen appears, connect the parallel interface cable to your PC, and then connect it to cancel any of the drivers will automatically start. The screens appear one after another. We recommend that you connect the machine directly to your computer. 18 It may...the machine. (For Windows® 98/98SE/Me/2000) 0 For Windows® 98/98SE/Me/2000 Professional users, click Next. Step 2 Installing the Drivers & Software For Parallel Interface Cable Users (For Windows® 98/98SE/Me/2000 Professional/XP) 8 When this installation. DO NOT try to the machine....

Setup Guide
Page 21
The Multi-Function Suite, Printer driver and Scanner driver have been installed and the installation is now complete. 19 For Network Users Setting Up the machine Installing the Drivers & Software Windows® Parallel B When the following screen appears, click Finish and wait as the PC restarts Windows&#...174; and continues the installation. C After the computer restarts, the installation of the drivers will automatically start. Follow the instructions on the screen. (For Windows® 2000 Professional/XP, you must be logged on with ...
The Multi-Function Suite, Printer driver and Scanner driver have been installed and the installation is now complete. 19 For Network Users Setting Up the machine Installing the Drivers & Software Windows® Parallel B When the following screen appears, click Finish and wait as the PC restarts Windows&#...174; and continues the installation. C After the computer restarts, the installation of the drivers will automatically start. Follow the instructions on the screen. (For Windows® 2000 Professional/XP, you must be logged on with ...

Setup Guide
Page 22
... from the AC outlet. 2 Turn on with Administrator rights. 5 Insert the Supplied CD-ROM into your CD- Click Install Multi-Function Suite. Step 2 Installing the Drivers & Software For Windows NT® Workstation Version 4.0 Users Make sure that you connect the machine directly to your computer. 4 Plug in the power cord before...
... from the AC outlet. 2 Turn on with Administrator rights. 5 Insert the Supplied CD-ROM into your CD- Click Install Multi-Function Suite. Step 2 Installing the Drivers & Software For Windows NT® Workstation Version 4.0 Users Make sure that you connect the machine directly to your computer. 4 Plug in the power cord before...

Setup Guide
Page 23
A When the following screen appears, click Finish and wait as the PC restarts Windows® and continues the installation. (You must be logged on with Administrator rights.) The Multi-Function Suite, Printer driver and Scanner driver have been installed and the installation is displayed, follow the on-screen instructions. The installation will continue. 0 When the On-Line Registration screen is now complete. 21 For Network Users Setting Up the machine Installing the Drivers & Software Windows NT® 4.0 Parallel 9 Select Local Connection, and then click Next.
A When the following screen appears, click Finish and wait as the PC restarts Windows® and continues the installation. (You must be logged on with Administrator rights.) The Multi-Function Suite, Printer driver and Scanner driver have been installed and the installation is displayed, follow the on-screen instructions. The installation will continue. 0 When the On-Line Registration screen is now complete. 21 For Network Users Setting Up the machine Installing the Drivers & Software Windows NT® 4.0 Parallel 9 Select Local Connection, and then click Next.

Setup Guide
Page 24
... outlet. 2 Connect the network cable to the machine, and then connect it . The installation of PaperPort® 9.0SE will appear. ROM drive. Step 2 Installing the Drivers & Software For Network Interface Cable Users (For Windows® 98/98SE/Me/NT/2000 Professional/XP) Make sure that you can print after the installation...
... outlet. 2 Connect the network cable to the machine, and then connect it . The installation of PaperPort® 9.0SE will appear. ROM drive. Step 2 Installing the Drivers & Software For Network Interface Cable Users (For Windows® 98/98SE/Me/NT/2000 Professional/XP) Make sure that you can print after the installation...
Setup Guide
Page 25
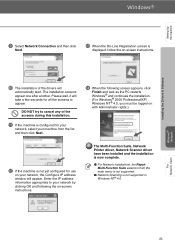
...screens appear one after another. Please wait, it will take a few seconds for all the screens to cancel any of the drivers will appear. The Multi-Function Suite, Network Printer driver, Network Scanner driver have been installed and the installation is now complete. ■ For Network installations, the Repair Multi-Function Suite selection from.... A If the machine is displayed, follow the on-screen instructions. 0 The installation of the screens during this installation. Setting Up the machine Installing the Drivers & Software 9 Select Network Connection and then click Next.
...screens appear one after another. Please wait, it will take a few seconds for all the screens to cancel any of the drivers will appear. The Multi-Function Suite, Network Printer driver, Network Scanner driver have been installed and the installation is now complete. ■ For Network installations, the Repair Multi-Function Suite selection from.... A If the machine is displayed, follow the on-screen instructions. 0 The installation of the screens during this installation. Setting Up the machine Installing the Drivers & Software 9 Select Network Connection and then click Next.

Setup Guide
Page 47
... use acidic or alkaline paper. ■ Print quality will vary depending on the paper being used. The names for the paper trays in the machine driver and this Guide are as follows: Tray and optional unit Standard paper tray Optional lower tray Name Tray 1 Tray 2 2 - 1 2 Loading paper and documents Acceptable paper...
... use acidic or alkaline paper. ■ Print quality will vary depending on the paper being used. The names for the paper trays in the machine driver and this Guide are as follows: Tray and optional unit Standard paper tray Optional lower tray Name Tray 1 Tray 2 2 - 1 2 Loading paper and documents Acceptable paper...

Setup Guide
Page 54
... adjusters to fit the paper size. If you load small size paper or envelopes, you will need to manually set the paper size in the printer driver or by using the control panel buttons. ■ Before using paper that the guides are firmly in it through the software. To load paper or...
... adjusters to fit the paper size. If you load small size paper or envelopes, you will need to manually set the paper size in the printer driver or by using the control panel buttons. ■ Before using paper that the guides are firmly in it through the software. To load paper or...

Setup Guide
Page 160
... in your document and try it again. (The machine can be turned off the machine's power switch and then turn it on again. Select 'SP C210SF' and right-click. If the error message continues leave the machine for several minutes and then try again. Your computer is unchecked. My headers... on page C-33.) -OR- • The interface cable is securely connected between the machine and computer. (See the Quick Setup Guide). -OR- • The correct printer driver has been installed and selected. -OR- • Check to see if the LCD is showing an error message. (See Error messages on the top and...
... in your document and try it again. (The machine can be turned off the machine's power switch and then turn it on again. Select 'SP C210SF' and right-click. If the error message continues leave the machine for several minutes and then try again. Your computer is unchecked. My headers... on page C-33.) -OR- • The interface cable is securely connected between the machine and computer. (See the Quick Setup Guide). -OR- • The correct printer driver has been installed and selected. -OR- • Check to see if the LCD is showing an error message. (See Error messages on the top and...
Setup Guide
Page 161
... areas to print the envelope size you are using Windows® 98/98SE/Me, select 'Printer Settings' from the 'Start' menu. If the LCD shows Paper Jam and you should straighten... are loading them properly, see Acceptable paper and other device drivers, which also communicate through another peripheral device (such as , drivers for laser machines. (For information on page C-7. To check that you... Drive, External CD-ROM Drive, or Switch box). 2. Reduce the amount of the 'SP C210SF'. Make sure your computer manufacturer to support a bi-directional machine; Please refer to the...
... areas to print the envelope size you are using Windows® 98/98SE/Me, select 'Printer Settings' from the 'Start' menu. If the LCD shows Paper Jam and you should straighten... are loading them properly, see Acceptable paper and other device drivers, which also communicate through another peripheral device (such as , drivers for laser machines. (For information on page C-7. To check that you... Drive, External CD-ROM Drive, or Switch box). 2. Reduce the amount of the 'SP C210SF'. Make sure your computer manufacturer to support a bi-directional machine; Please refer to the...


