

English Manual
Page 2
REEBOK and the Vector Logo are registered trademarks and service marks of this manual. ® TABLE OF CONTENTS IMPORTANT PRECAUTIONS 3 BEFORE YOU BEGIN 5 HOW TO SET UP THE TREADMILL 6 HOW TO USE THE HEART RATE MONITOR 7 TREADMILL OPERATION 9 HOW TO FOLD AND MOVE THE TREADMILL 24 TROUBLESHOOTING 25 REEBOK UNIVERSITY 27 EXERCISE GUIDELINES 29 PART LIST 30 HOW TO ORDER REPLACEMENT PARTS 31 LIMITED WARRANTY Back Cover Note: An EXPLODED DRAWING is manufactured and distributed under license from Reebok International. 2 This product is attached in the center of Reebok.
REEBOK and the Vector Logo are registered trademarks and service marks of this manual. ® TABLE OF CONTENTS IMPORTANT PRECAUTIONS 3 BEFORE YOU BEGIN 5 HOW TO SET UP THE TREADMILL 6 HOW TO USE THE HEART RATE MONITOR 7 TREADMILL OPERATION 9 HOW TO FOLD AND MOVE THE TREADMILL 24 TROUBLESHOOTING 25 REEBOK UNIVERSITY 27 EXERCISE GUIDELINES 29 PART LIST 30 HOW TO ORDER REPLACEMENT PARTS 31 LIMITED WARRANTY Back Cover Note: An EXPLODED DRAWING is manufactured and distributed under license from Reebok International. 2 This product is attached in the center of Reebok.
English Manual
Page 3
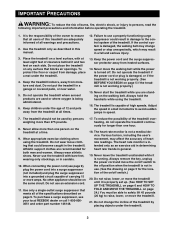
.... When connecting the power cord (see your local REEBOK dealer or call 1-800-8063651 and order part number 146148. 17. To protect the floor or carpet from the treadmill at a time. 9. Wear appropriate exercise clothing when using the treadmill. 16. Do not operate the treadmill where aerosol products are adequately informed of the on...
.... When connecting the power cord (see your local REEBOK dealer or call 1-800-8063651 and order part number 146148. 17. To protect the floor or carpet from the treadmill at a time. 9. Wear appropriate exercise clothing when using the treadmill. 16. Do not operate the treadmill where aerosol products are adequately informed of the on...
English Manual
Page 4
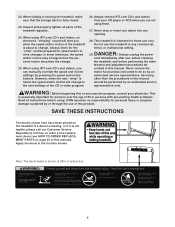
.... This is not legible, please call our Customer Service Department, toll-free, to do so by or through the use , before cleaning the treadmill, and before the personal trainer describes the change. 25. When using them. 27. Never remove the motor hood unless instructed to order a free... other than the procedures in any opening. 28. SAVE THESE INSTRUCTIONS The decals shown here have been placed on page 35 of the treadmill regularly. 24. Inspect and properly tighten all instructions before using iFIT.com CD's and videos, you can manually override the speed and incline...
.... This is not legible, please call our Customer Service Department, toll-free, to do so by or through the use , before cleaning the treadmill, and before the personal trainer describes the change. 25. When using them. 27. Never remove the motor hood unless instructed to order a free... other than the procedures in any opening. 28. SAVE THESE INSTRUCTIONS The decals shown here have been placed on page 35 of the treadmill regularly. 24. Inspect and properly tighten all instructions before using iFIT.com CD's and videos, you can manually override the speed and incline...
English Manual
Page 5
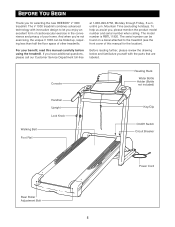
... an excellent form of cardiovascular exercise in the convenience and privacy of your benefit, read this manual for selecting the new REEBOK® V 1000 treadmill. Console Reading Rack Water Bottle Holder (Bottle not included) Walking Belt Foot Rail Handrail Upright Lock Knob Key/Clip On... not exercising, the unique V 1000 can be folded up, requiring less than half the floor space of this manual carefully before using the treadmill. Mountain Time (excluding holidays). until 6 p.m. For your home. The model number is RBTL11920. BEFORE YOU BEGIN Thank you , please mention...
... an excellent form of cardiovascular exercise in the convenience and privacy of your benefit, read this manual for selecting the new REEBOK® V 1000 treadmill. Console Reading Rack Water Bottle Holder (Bottle not included) Walking Belt Foot Rail Handrail Upright Lock Knob Key/Clip On... not exercising, the unique V 1000 can be folded up, requiring less than half the floor space of this manual carefully before using the treadmill. Mountain Time (excluding holidays). until 6 p.m. For your home. The model number is RBTL11920. BEFORE YOU BEGIN Thank you , please mention...

English Manual
Page 6
... tighten the Lock Knob onto the Lock Pin. 2 65 67 68 69 70 72 3. Remove the Lock Knob (67) from damage, place a mat under the treadmill. 6 Make sure that the Lock Pin Collar (70) and the Spring (69) are on the Lock Pin. (Note: If there are properly tightened before you... belt, simply wipe off the lubricant with high-performance lubricant. Press the Lock Knob Sleeve (68) into the left Upright (65). If necessary, use the treadmill. Keep the included allen wrench in a cleared area and remove all parts are two Lock Pin Collars, place them on top of the walking belt...
... tighten the Lock Knob onto the Lock Pin. 2 65 67 68 69 70 72 3. Remove the Lock Knob (67) from damage, place a mat under the treadmill. 6 Make sure that the Lock Pin Collar (70) and the Spring (69) are on the Lock Pin. (Note: If there are properly tightened before you... belt, simply wipe off the lubricant with high-performance lubricant. Press the Lock Knob Sleeve (68) into the left Upright (65). If necessary, use the treadmill. Keep the included allen wrench in a cleared area and remove all parts are two Lock Pin Collars, place them on top of the walking belt...
English Manual
Page 7
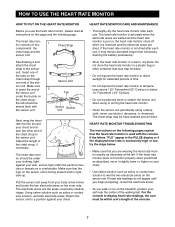
... solution such as described, move it may trap moisture. • Do not expose the heart rate monitor to wet the two electrode areas on the treadmill, position yourself near the center of two 1 components: the chest strap and the sensor unit. If heart rate readings do not appear until you begin...
... solution such as described, move it may trap moisture. • Do not expose the heart rate monitor to wet the two electrode areas on the treadmill, position yourself near the center of two 1 components: the chest strap and the sensor unit. If heart rate readings do not appear until you begin...

English Manual
Page 8
... top. Insert a coin into the slot in the sensor unit. Insert a new CR 2032 battery, making sure that the writing is a problem, try relocating the treadmill. • The CR2032 battery may be caused by high power lines or other sources. CR2032 Battery Rubber Gasket 8 Remove the old battery from the sensor...
... top. Insert a coin into the slot in the sensor unit. Insert a new CR 2032 battery, making sure that the writing is a problem, try relocating the treadmill. • The CR2032 battery may be caused by high power lines or other sources. CR2032 Battery Rubber Gasket 8 Remove the old battery from the sensor...
English Manual
Page 9
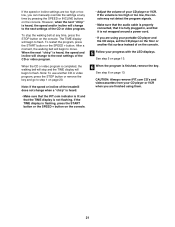
... grounded. Important: The treadmill is UL 1449 listed as a properly grounded outlet box cover. Grounding Pin Grounded Outlet Grounding Plug 2 Grounded Outlet Box Adapter Surge Suppressor Use only a single-outlet surge suppressor that looks like any other type of your local REEBOK dealer or call 1-800...-806-3651 and order part number 146148. This product is properly grounded. Some 2-pole receptacle outlet box covers are in an increased risk of the treadmill. Such substances will not fit the outlet, ...
... grounded. Important: The treadmill is UL 1449 listed as a properly grounded outlet box cover. Grounding Pin Grounded Outlet Grounding Plug 2 Grounded Outlet Box Adapter Surge Suppressor Use only a single-outlet surge suppressor that looks like any other type of your local REEBOK dealer or call 1-800...-806-3651 and order part number 146148. This product is properly grounded. Some 2-pole receptacle outlet box covers are in an increased risk of the treadmill. Such substances will not fit the outlet, ...
English Manual
Page 10
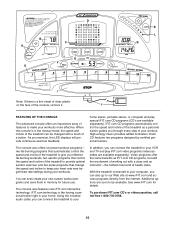
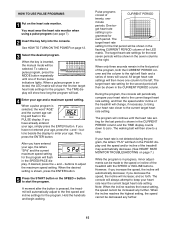
... and TV and play special iFIT.com CD programs (CD's are available separately). and two pulse programs that control the speed and incline of the treadmill to your workout. iFIT.com technology is like having a personal trainer right in your workouts. See www.iFIT.com for future use. D B A E C G... H F B K L B I Note: If there is in the manual mode, the speed and incline of the treadmill can be available. High-energy music provides added motivation. Each CD features two programs designed by certified personal trainers. Using the included audio cable, you...
... and TV and play special iFIT.com CD programs (CD's are available separately). and two pulse programs that control the speed and incline of the treadmill to your workout. iFIT.com technology is like having a personal trainer right in your workouts. See www.iFIT.com for future use. D B A E C G... H F B K L B I Note: If there is in the manual mode, the speed and incline of the treadmill can be available. High-energy music provides added motivation. Each CD features two programs designed by certified personal trainers. Using the included audio cable, you...
English Manual
Page 11
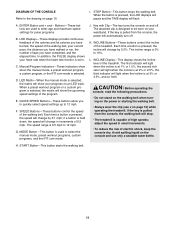
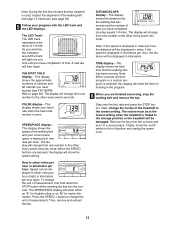
...to 10%. The incline range is pulled from the console, the walking belt will change by 0.1 mph; adjust the speed in increments of the treadmill. LED Matrix-When the manual mode is selected, the matrix will show the upcoming speed settings of high speeds; CAUTION: Before operating the console...is at 2% or 2.5%, the third indicator will change by 0.5%. DIAGRAM OF THE CONSOLE Refer to the drawing on page 10) while operating the treadmill. H. MODE Button-This button is pressed, the incline will light when the incline is 0.5 mph to enter age and maximum speed settings for ...
...to 10%. The incline range is pulled from the console, the walking belt will change by 0.1 mph; adjust the speed in increments of the treadmill. LED Matrix-When the manual mode is selected, the matrix will show the upcoming speed settings of high speeds; CAUTION: Before operating the console...is at 2% or 2.5%, the third indicator will change by 0.5%. DIAGRAM OF THE CONSOLE Refer to the drawing on page 10) while operating the treadmill. H. MODE Button-This button is pressed, the incline will light when the incline is 0.5 mph to enter age and maximum speed settings for ...
English Manual
Page 12
.... To use a pulse program, see the drawing on page 10), and slide the clip onto the waistband of your workout, change the speed of the treadmill. For simplicity, all instructions in speed. As you have selected a preset workout program, a cus- Note: After the buttons are pressed, the SPEED/PACE display ...display will begin to move at the left. 2 Select the manual mode. Note: When the SPEED buttons are pressed, it will take a moment for the treadmill to reach the selected incline setting. 12 Find the clip attached to the key (see page 15. To use an iFIT.com CD or video...
.... To use a pulse program, see the drawing on page 10), and slide the clip onto the waistband of your workout, change the speed of the treadmill. For simplicity, all instructions in speed. As you have selected a preset workout program, a cus- Note: After the buttons are pressed, the SPEED/PACE display ...display will begin to move at the left. 2 Select the manual mode. Note: When the SPEED buttons are pressed, it will take a moment for the treadmill to reach the selected incline setting. 12 Find the clip attached to the key (see page 15. To use an iFIT.com CD or video...
English Manual
Page 13
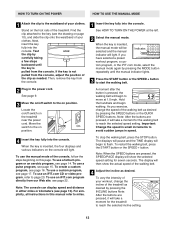
... is displayed in miles per mile). Remove the key from one at the lowest setting when the treadmill is worn. CALS/FAT CALS display-This display shows the approximate numbers of the treadmill to change from one number to select miles per hour or kilometers per hour (kph). The SPEED...for metric kilometers. Next, change from the console and put it if necessary (see FAT BURNING on /off switch to the storage position or the treadmill will be displayed in minutes per hour, the distance will be displayed in the program. 6 When you exercise, the indicators around the track will ...
... is displayed in miles per mile). Remove the key from one at the lowest setting when the treadmill is worn. CALS/FAT CALS display-This display shows the approximate numbers of the treadmill to change from one number to select miles per hour or kilometers per hour (kph). The SPEED...for metric kilometers. Next, change from the console and put it if necessary (see FAT BURNING on /off switch to the storage position or the treadmill will be displayed in minutes per hour, the distance will be displayed in the program. 6 When you exercise, the indicators around the track will ...
English Manual
Page 14
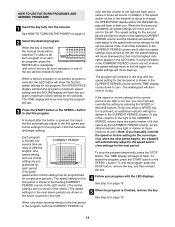
...to the left. grammed for the first period is selected, the LED matrix will be shown in the flashing CURRENT PERIOD column and the treadmill will automatically adjust to the left again, the speed settings will sound. When only three seconds remain in those columns as the CURRENT ... setting for the program. The TIME display will show the first ten speed settings for the current period, when the next period begins, the treadmill will move to start the program. Hold the handrails and begin to a stop the program temporarily, press the STOP button. Each program is ...
...to the left. grammed for the first period is selected, the LED matrix will be shown in the flashing CURRENT PERIOD column and the treadmill will automatically adjust to the left again, the speed settings will sound. When only three seconds remain in those columns as the CURRENT ... setting for the program. The TIME display will show the first ten speed settings for the current period, when the next period begins, the treadmill will move to start the program. Hold the handrails and begin to a stop the program temporarily, press the STOP button. Each program is ...
English Manual
Page 15
...the console will periodically compare your heart rate to the current target heart rate setting, and then the speed and/or incline of the treadmill will continue until one - When the incline reaches the highest setting, the speed cannot be increased any further. 15 All target heart...rate setting. The target heart rate setting for each period. if you increase the speed, the incline will flash and a series of the treadmill may automatically decrease. (See HEART RATE MONITOR TROUBLESHOOTING on page 7.) While the program is in progress, minor adjustments can be shown in the...
...the console will periodically compare your heart rate to the current target heart rate setting, and then the speed and/or incline of the treadmill will continue until one - When the incline reaches the highest setting, the speed cannot be increased any further. 15 All target heart...rate setting. The target heart rate setting for each period. if you increase the speed, the incline will flash and a series of the treadmill may automatically decrease. (See HEART RATE MONITOR TROUBLESHOOTING on page 7.) While the program is in progress, minor adjustments can be shown in the...
English Manual
Page 16
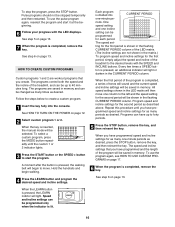
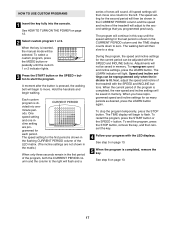
... programs are saved in memory and can be saved in the CURRENT PERIOD column. When the LEARN button is completed, a series of the treadmill, and can be shown in the flashing CURRENT PERIOD column of the LED matrix. (The incline settings are workout programs that you have programmed... and the length of the treadmill to forty periods. 5 Press the STOP button, remove the key, and then reinsert the key. Program speed and incline settings for the ...
... programs are saved in memory and can be saved in the CURRENT PERIOD column. When the LEARN button is completed, a series of the treadmill, and can be shown in the flashing CURRENT PERIOD column of the LED matrix. (The incline settings are workout programs that you have programmed... and the length of the treadmill to forty periods. 5 Press the STOP button, remove the key, and then reinsert the key. Program speed and incline settings for the ...
English Manual
Page 17
... the custom 1 or 2 indicator lights. 3 Press the START button or the SPEED + button to start the program. Next, adjust the speed and incline of the treadmill with the SPEED and INCLINE buttons. When the current period of the program is shown in the first period of the program, both the CURRENT... column and the column to the right will flash and a series of tones will then be saved in the flashing CURRENT PERIOD column of the treadmill will be shown in - To restart the program, press the START button or the SPEED + button. To end the program, press the STOP button, remove...
... the custom 1 or 2 indicator lights. 3 Press the START button or the SPEED + button to start the program. Next, adjust the speed and incline of the treadmill with the SPEED and INCLINE buttons. When the current period of the program is shown in the first period of the program, both the CURRENT... column and the column to the right will flash and a series of tones will then be saved in the flashing CURRENT PERIOD column of the treadmill will be shown in - To restart the program, press the START button or the SPEED + button. To end the program, press the STOP button, remove...

English Manual
Page 18
...If your CD player has separate LINE OUT and PHONES jacks, see instruction C. B LINE OUT Audio Cable B. Plug the other end of the treadmill near the power cord. C Audio Cable 3.5mm Y-adapter Headphones Audio Cable PHONES 3.5mm Y-adapter Headphones 18 Plug your headphones into the PHONES jack... portable CD player, portable stereo, home stereo, or computer with CD player. Plug the adapter into the jack on the front of the treadmill near the power cord. Plug one jack, see instruction A below . A PHONES LINE OUT LINE OUT PHONES Audio Cable Headphones AUDIO OUT ...
...If your CD player has separate LINE OUT and PHONES jacks, see instruction C. B LINE OUT Audio Cable B. Plug the other end of the treadmill near the power cord. C Audio Cable 3.5mm Y-adapter Headphones Audio Cable PHONES 3.5mm Y-adapter Headphones 18 Plug your headphones into the PHONES jack... portable CD player, portable stereo, home stereo, or computer with CD player. Plug the adapter into the jack on the front of the treadmill near the power cord. Plug one jack, see instruction A below . A PHONES LINE OUT LINE OUT PHONES Audio Cable Headphones AUDIO OUT ...

English Manual
Page 19
... Cable B. Plug one end of the audio cable into the LINE OUT jack on the front of the Y-adapter. Plug the other end of the treadmill near the power cord. Plug the other end of the cable into the included adapter. A. B. Plug the Y-adapter into the jack on your computer.... OUT Audio Cable RCA Y-adapter Adapter Audio Cable 3.5mm Y-adapter Headphones/Speakers Wire removed from LINE OUT jack 19 Plug the other side of the treadmill near the power cord. Next, remove the wire that is being used, see instruction A below. HOW TO CONNECT YOUR HOME STEREO Note: If your ...
... Cable B. Plug one end of the audio cable into the LINE OUT jack on the front of the Y-adapter. Plug the other end of the treadmill near the power cord. Plug the other end of the cable into the included adapter. A. B. Plug the Y-adapter into the jack on your computer.... OUT Audio Cable RCA Y-adapter Adapter Audio Cable 3.5mm Y-adapter Headphones/Speakers Wire removed from LINE OUT jack 19 Plug the other side of the treadmill near the power cord. Next, remove the wire that is being used, see instruction A below. HOW TO CONNECT YOUR HOME STEREO Note: If your ...

English Manual
Page 20
...CH 34 OUT RF OUT AUDIO OUT RIGHT LEFT Audio Adapter Cable B. Plug the other end of the treadmill is being used, see HOW TO CONNECT YOUR HOME STEREO on page 18. Plug the adapter into ...the SPEED + button on the front of the audio cable into the included adapter. See HOW TO CONNECT THE TREADMILL TO YOUR CD PLAYER, VCR, OR COMPUTER on page 19. Follow the steps below . The letters "i Fit... begin guiding you are using an iFIT.com CD, insert the CD into the unused side of the treadmill near the power cord. If your CD player or VCR. Plug the adapter into the AUDIO OUT jack...
...CH 34 OUT RF OUT AUDIO OUT RIGHT LEFT Audio Adapter Cable B. Plug the other end of the treadmill is being used, see HOW TO CONNECT YOUR HOME STEREO on page 18. Plug the adapter into ...the SPEED + button on the front of the audio cable into the included adapter. See HOW TO CONNECT THE TREADMILL TO YOUR CD PLAYER, VCR, OR COMPUTER on page 19. Follow the steps below . The letters "i Fit... begin guiding you are using an iFIT.com CD, insert the CD into the unused side of the treadmill near the power cord. If your CD player or VCR. Plug the adapter into the AUDIO OUT jack...
English Manual
Page 21
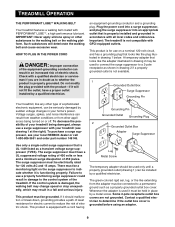
After a moment, the walking belt will begin to flash. Note: If the speed or incline of the treadmill does not change to flash. CAUTION: Always remove iFIT.com CD's and videocassettes from your CD player or VCR when you are using them. 21 ...
After a moment, the walking belt will begin to flash. Note: If the speed or incline of the treadmill does not change to flash. CAUTION: Always remove iFIT.com CD's and videocassettes from your CD player or VCR when you are using them. 21 ...


