

English Manual
Page 2
This product is attached in the center of Reebok. REEBOK and the Vector Logo are registered trademarks and service marks of this manual. ¨ TABLE OF CONTENTS IMPORTANT PRECAUTIONS 3 BEFORE YOU BEGIN 5 HOW TO SET UP THE TREADMILL 6 TREADMILL OPERATION 7 HOW TO FOLD AND MOVE THE TREADMILL 21 TROUBLE-SHOOTING 23 REEBOK UNIVERSITY 26 EXERCISE GUIDELINES 28 PART LIST 30 HOW TO ORDER REPLACEMENT PARTS 31 LIMITED WARRANTY Back Cover Note: An EXPLODED DRAWING is manufactured and distributed under license from Reebok International. 2
This product is attached in the center of Reebok. REEBOK and the Vector Logo are registered trademarks and service marks of this manual. ¨ TABLE OF CONTENTS IMPORTANT PRECAUTIONS 3 BEFORE YOU BEGIN 5 HOW TO SET UP THE TREADMILL 6 TREADMILL OPERATION 7 HOW TO FOLD AND MOVE THE TREADMILL 21 TROUBLE-SHOOTING 23 REEBOK UNIVERSITY 26 EXERCISE GUIDELINES 28 PART LIST 30 HOW TO ORDER REPLACEMENT PARTS 31 LIMITED WARRANTY Back Cover Note: An EXPLODED DRAWING is manufactured and distributed under license from Reebok International. 2

English Manual
Page 3
... power cord (see page 7), plug the power cord into a surge suppressor (not included) and plug the surge suppressor into a grounded circuit capable of the treadmill by persons weighing more than 250 pounds. 9. Do not change the incline of carrying 15 or more amps. To protect the floor or carpet from... surface that could become caught in a garage or covered patio, or near water. 6. Always remove the key, unplug the power cord and move the treadmill until it is running. Do not wear loose clothing that blocks air openings. Do not raise, lower, or move the on /off switch.) 11. ...
... power cord (see page 7), plug the power cord into a surge suppressor (not included) and plug the surge suppressor into a grounded circuit capable of the treadmill by persons weighing more than 250 pounds. 9. Do not change the incline of carrying 15 or more amps. To protect the floor or carpet from... surface that could become caught in a garage or covered patio, or near water. 6. Always remove the key, unplug the power cord and move the treadmill until it is running. Do not wear loose clothing that blocks air openings. Do not raise, lower, or move the on /off switch.) 11. ...

English Manual
Page 4
...and/or incline may change before the personal trainer describes the change . Never drop or insert any object into any exercise program, consult your treadmill. Never remove the motor hood unless instructed to change . 26. Servicing other than the procedures in the location shown. (One decal on...remove iFIT.com CDÕs and videos from your CD player or VCR when you when the speed and/or incline of the treadmill regularly. the next settings of this manual. Always listen for personal injury or property damage sustained by an authorized service representative only. ...
...and/or incline may change before the personal trainer describes the change . Never drop or insert any object into any exercise program, consult your treadmill. Never remove the motor hood unless instructed to change . 26. Servicing other than the procedures in the location shown. (One decal on...remove iFIT.com CDÕs and videos from your CD player or VCR when you when the speed and/or incline of the treadmill regularly. the next settings of this manual. Always listen for personal injury or property damage sustained by an authorized service representative only. ...

English Manual
Page 5
...the parts that are labeled. To help us assist you Õre not exercising, the unique RBX 500 can be folded up, requiring less than half the floor space of other treadmills. For your home. until 6 p.m. The model number is not included) Book Holder Console Walking... innovative design to the treadmill (see the front cover of this manual carefully before using the treadmill. BEFORE YOU BEGIN Thank you enjoy an effective form of cardiovascular exercise in the convenience and privacy of your benefit, read this manual for selecting the new REEBOK¨ RBX 500 treadmill.
...the parts that are labeled. To help us assist you Õre not exercising, the unique RBX 500 can be folded up, requiring less than half the floor space of other treadmills. For your home. until 6 p.m. The model number is not included) Book Holder Console Walking... innovative design to the treadmill (see the front cover of this manual carefully before using the treadmill. BEFORE YOU BEGIN Thank you enjoy an effective form of cardiovascular exercise in the convenience and privacy of your benefit, read this manual for selecting the new REEBOK¨ RBX 500 treadmill.
English Manual
Page 6
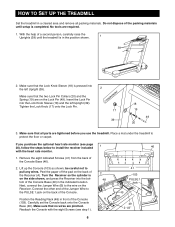
... 1. Connect the other end of the Jumper Wire to pull any wires. Make sure that no wires are required. 1. HOW TO SET UP THE TREADMILL Set the treadmill in a cleared area and remove all parts are on the Lock Pin (49). Insert the Lock Pin into the left Upright (39). Tighten the.... Next, connect the Jumper Wire (B) to protect the floor or carpet. With the help of a second person, carefully raise the Uprights (39) until the treadmill is on the back of the Receiver (A). Remove the eight indicated Screws (41) from the back of the Console (103). Turn the Receiver so the...
... 1. Connect the other end of the Jumper Wire to pull any wires. Make sure that no wires are required. 1. HOW TO SET UP THE TREADMILL Set the treadmill in a cleared area and remove all parts are on the Lock Pin (49). Insert the Lock Pin into the left Upright (39). Tighten the.... Next, connect the Jumper Wire (B) to protect the floor or carpet. With the help of a second person, carefully raise the Uprights (39) until the treadmill is on the back of the Receiver (A). Remove the eight indicated Screws (41) from the back of the Console (103). Turn the Receiver so the...

English Manual
Page 7
...into an appropriate outlet that is for use a surge suppressor with a qualified electrician or serviceman if you are not grounded. Important: The treadmill is grounded before using an adapter. 7 IMPORTANT: Never apply silicone spray or other type of the equipment-grounding conductor can result from ...break down, grounding provides a path of electric shock. The green-colored rigid ear, lug, or the like the plug illustrated in your treadmill being turned on a nominal 120-volt circuit, and has a grounding plug that is equipped with the productÑif it must be ...
...into an appropriate outlet that is for use a surge suppressor with a qualified electrician or serviceman if you are not grounded. Important: The treadmill is grounded before using an adapter. 7 IMPORTANT: Never apply silicone spray or other type of the equipment-grounding conductor can result from ...break down, grounding provides a path of electric shock. The green-colored rigid ear, lug, or the like the plug illustrated in your treadmill being turned on a nominal 120-volt circuit, and has a grounding plug that is equipped with the productÑif it must be ...

English Manual
Page 8
... use virtually endless features from the internet. The console is in the manual mode, the speed and incline of the treadmill can connect the treadmill to your own custom workout programs and store them in your workouts. In addition, you exercise, the LED displays will... programs, and video programs directly from our internet site. Each program automatically controls the speed and incline of a button. With the treadmill connected to our new internet site at health clubs. The console also features new iFIT.com interactive technology. To purchase an optional iFIT...
... use virtually endless features from the internet. The console is in the manual mode, the speed and incline of the treadmill can connect the treadmill to your own custom workout programs and store them in your workouts. In addition, you exercise, the LED displays will... programs, and video programs directly from our internet site. Each program automatically controls the speed and incline of a button. With the treadmill connected to our new internet site at health clubs. The console also features new iFIT.com interactive technology. To purchase an optional iFIT...

English Manual
Page 9
... the walking belt. K. QUICK SPEED ButtonsÑThese buttons allow you to 10%. SPEED ButtonsÑThese buttons control the speed of the treadmill. F. MODE ButtonÑThis button is 1.5% to quickly select speed settings. B. J. INCLINE DisplayÑThis display shows the incline level of... to select the manual mode, preset workout programs, custom programs, and the iFIT.com mode. D. Each time a button is capable of the treadmill. STOP ButtonÑThis button stops the walking belt. CAUTION: Before operating the console, read the following precautions. ¥ Do not stand on...
... the walking belt. K. QUICK SPEED ButtonsÑThese buttons allow you to 10%. SPEED ButtonsÑThese buttons control the speed of the treadmill. F. MODE ButtonÑThis button is 1.5% to quickly select speed settings. B. J. INCLINE DisplayÑThis display shows the incline level of... to select the manual mode, preset workout programs, custom programs, and the iFIT.com mode. D. Each time a button is capable of the treadmill. STOP ButtonÑThis button stops the walking belt. CAUTION: Before operating the console, read the following precautions. ¥ Do not stand on...

English Manual
Page 10
... the walking belt, press the START button or the SPEED + button. The display will light. If you exercise, change the incline of the treadmill as desired by carefully taking a few steps backward until the manual indicator lights. 3 Press the START button or the SPEED + button to reach...Select the manual mode. Important: Change the speed in speed. The displays will pause and the TIME display will take a moment for the treadmill to start the walking belt. Locate the on/off switch to the waistband of your workout, change the speed of your clothes. Find the ...
... the walking belt, press the START button or the SPEED + button. The display will light. If you exercise, change the incline of the treadmill as desired by carefully taking a few steps backward until the manual indicator lights. 3 Press the START button or the SPEED + button to reach...Select the manual mode. Important: Change the speed in speed. The displays will pause and the TIME display will take a moment for the treadmill to start the walking belt. Locate the on/off switch to the waistband of your workout, change the speed of your clothes. Find the ...
English Manual
Page 11
... of laps you have completed 1/4 mile. Note: When a preset workout program or a custom program is folded to the storage position or the treadmill will be at a time until you are pressed, the display will be displayed in kilometers. Next, change the unit of measurement. The display ...while inserting the key into the console. As you exercise, the indicators around the track will light one at the lowest setting when the treadmill is selected, this display will then begin. 5 Follow your heart rate when the optional heart rate monitor is displayed in kilometers per hour...
... of laps you have completed 1/4 mile. Note: When a preset workout program or a custom program is folded to the storage position or the treadmill will be at a time until you are pressed, the display will be displayed in kilometers. Next, change the unit of measurement. The display ...while inserting the key into the console. As you exercise, the indicators around the track will light one at the lowest setting when the treadmill is selected, this display will then begin. 5 Follow your heart rate when the optional heart rate monitor is displayed in kilometers per hour...

English Manual
Page 12
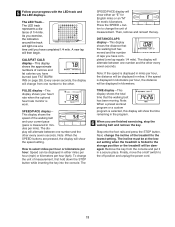
...setting by pressing the SPEED or INCLINE buttons. See HOW TO TURN ON THE POWER on page 11. 12 When the key is pressed, the treadmill will automatically adjust to the first speed and incline settings for the program. The SPEED/PACE display will flash the programÕs maximum speed setting... down to zero. Hold the handrails and begin to flash. ting for the first period is shown in the flashing CURRENT PERIOD column and the treadmill will automatically adjust to the speed and incline settings for ten seconds. 3 Press the START button or the SPEED + button to start the program. ...
...setting by pressing the SPEED or INCLINE buttons. See HOW TO TURN ON THE POWER on page 11. 12 When the key is pressed, the treadmill will automatically adjust to the first speed and incline settings for the program. The SPEED/PACE display will flash the programÕs maximum speed setting... down to zero. Hold the handrails and begin to flash. ting for the first period is shown in the flashing CURRENT PERIOD column and the treadmill will automatically adjust to the speed and incline settings for ten seconds. 3 Press the START button or the SPEED + button to start the program. ...

English Manual
Page 13
... indictor will light or darken in the CURRENT PERIOD column. Each program is shown in the flashing CURRENT PERIOD column of the treadmill, and can be selected. cline of the treadmill to forty periods. 5 Press the STOP button, remove the key, and then reinsert the key. tor will light. When you have...
... indictor will light or darken in the CURRENT PERIOD column. Each program is shown in the flashing CURRENT PERIOD column of the treadmill, and can be selected. cline of the treadmill to forty periods. 5 Press the STOP button, remove the key, and then reinsert the key. tor will light. When you have...

English Manual
Page 14
..., press the STOP button. Speed and incline settings can be shown in the CURRENT PERIOD column and the speed and incline of the treadmill will then slow to the second settings that you have reprogrammed speed and incline settings for each period. The TIME display will continue in...select a custom program, press the MODE button repeatedly until the speed setting for the current period can be stored in the first period of the treadmill with the LED displays. A moment after the button is completed, remove the key. cline setting are not shown in the matrix.) When only...
..., press the STOP button. Speed and incline settings can be shown in the CURRENT PERIOD column and the speed and incline of the treadmill will then slow to the second settings that you have reprogrammed speed and incline settings for each period. The TIME display will continue in...select a custom program, press the MODE button repeatedly until the speed setting for the current period can be stored in the first period of the treadmill with the LED displays. A moment after the button is completed, remove the key. cline setting are not shown in the matrix.) When only...

English Manual
Page 15
...the other end of the cable into an AUDIO OUT jack on your headphones into the PHONES jack. B PHONES PHONES C. Plug one end of the treadmill near the power cord. Plug the adapter into a 3.5mm Y-adapter (available at electronics stores). Plug the Y-adapter into the PHONES jack on the front...cable into the included adapter. Plug the other end of the cable into the other end of the Y-adapter. To use iFIT.com videocassettes, the treadmill must be connected to your VCR. Plug the other side of the cable into the jack on your headphones into a 3.5mm Y-adapter (available ...
...the other end of the cable into an AUDIO OUT jack on your headphones into the PHONES jack. B PHONES PHONES C. Plug one end of the treadmill near the power cord. Plug the adapter into a 3.5mm Y-adapter (available at electronics stores). Plug the Y-adapter into the PHONES jack on the front...cable into the included adapter. Plug the other end of the cable into the other end of the Y-adapter. To use iFIT.com videocassettes, the treadmill must be connected to your VCR. Plug the other side of the cable into the jack on your headphones into a 3.5mm Y-adapter (available ...

English Manual
Page 16
... Y-adapter. Plug your stereo and plug the wire into the LINE OUT jack on the front of the cable into the unused side of the treadmill near the power cord. Plug one end of the audio cable into the jack on your computer. Plug one end of the audio cable into... into the LINE OUT jack on the front of the cable into an RCA Y-adapter (available at electronics stores). Plug the other side of the treadmill near the power cord. Plug one end of the audio cable into the jack on the front of the RCA Y-adapter. Plug the adapter into...
... Y-adapter. Plug your stereo and plug the wire into the LINE OUT jack on the front of the cable into the unused side of the treadmill near the power cord. Plug one end of the audio cable into the jack on your computer. Plug one end of the audio cable into... into the LINE OUT jack on the front of the cable into an RCA Y-adapter (available at electronics stores). Plug the other side of the treadmill near the power cord. Plug one end of the audio cable into the jack on the front of the RCA Y-adapter. Plug the adapter into...
English Manual
Page 17
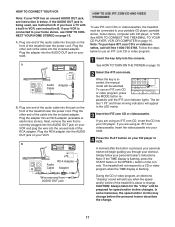
... other end of the cable into the console. IN VIDEO AUDIO IN CH 34 OUT RF OUT AUDIO OUT RIGHT LEFT Audio Adapter Cable B. The treadmill will appear in VCR, see instruction A below to your workout. A. When the key is being used, see HOW TO CONNECT YOUR HOME STEREO on the... jack During the CD or video program, an electronic ÒchirpingÓ sound will begin guiding you when the speed and/or incline of the treadmill is connected to change . 17 Plug the RCA adapter into the AUDIO OUT jack on your home stereo, see instruction B. Simply follow your VCR. If...
... other end of the cable into the console. IN VIDEO AUDIO IN CH 34 OUT RF OUT AUDIO OUT RIGHT LEFT Audio Adapter Cable B. The treadmill will appear in VCR, see instruction A below to your workout. A. When the key is being used, see HOW TO CONNECT YOUR HOME STEREO on the... jack During the CD or video program, an electronic ÒchirpingÓ sound will begin guiding you when the speed and/or incline of the treadmill is connected to change . 17 Plug the RCA adapter into the AUDIO OUT jack on your home stereo, see instruction B. Simply follow your VCR. If...

English Manual
Page 18
... VCR. The program can manually override the settings at any time by pressing the stop button on the console. ¥ adjust the volume of the treadmill does not change when a ÒchirpÓ is heard: ¥ make sure that the audio cable is properly connected, that it is finished, remove the...
... VCR. The program can manually override the settings at any time by pressing the stop button on the console. ¥ adjust the volume of the treadmill does not change when a ÒchirpÓ is heard: ¥ make sure that the audio cable is properly connected, that it is finished, remove the...

English Manual
Page 19
... cord. 8 Follow your progress with the LED displays. Note: To use programs from the internet. Note: If the speed or incline of the treadmill does not change to flash. To purchase an optional iFIT.com module, call toll-free 1-800-8840620. In addition, you can manually override the...start the program. The TIME display will change . In addition, make sure that the iFIT.com indicator is lit and that interactively control your treadmill to your web browser, if necessary, and go to start an internet connection. 4 Start your home computer. When you can play iFIT.com...
... cord. 8 Follow your progress with the LED displays. Note: To use programs from the internet. Note: If the speed or incline of the treadmill does not change to flash. To purchase an optional iFIT.com module, call toll-free 1-800-8840620. In addition, you can manually override the...start the program. The TIME display will change . In addition, make sure that the iFIT.com indicator is lit and that interactively control your treadmill to your web browser, if necessary, and go to start an internet connection. 4 Start your home computer. When you can play iFIT.com...
English Manual
Page 20
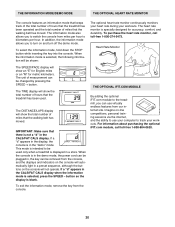
... the STOP button while inserting the key into the console. THE OPTIONAL IFIT.COM MODULE By adding the optional iFIT.com module to the treadmill, you to be shown: The optional heart rate monitor continuously monitors your heart rate during your workouts. To exit the information mode, remove...The console features an information mode that keeps track of the total number of hours that the treadmill has been operated and the total number of hours that the treadmill has been used only when a treadmill is displayed in a store. In addition, the information mode allows you to turn on -line...
... the STOP button while inserting the key into the console. THE OPTIONAL IFIT.COM MODULE By adding the optional iFIT.com module to the treadmill, you to be shown: The optional heart rate monitor continuously monitors your heart rate during your workouts. To exit the information mode, remove...The console features an information mode that keeps track of the total number of hours that the treadmill has been operated and the total number of hours that the treadmill has been used only when a treadmill is displayed in a store. In addition, the information mode allows you to turn on -line...
English Manual
Page 21
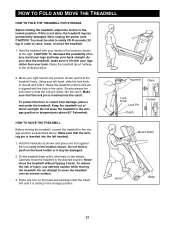
...than your right hand to the storage position as shown and place one foot on the wheels. Keep the treadmill out of injury, use extreme caution while moving the treadmill, convert the treadmill to the position shown and hold or push on the book holder or it rolls freely on the base ...and carefully lower the treadmill until the lock pin is not done, the treadmill may be damaged. 2. Next, unplug the power cord. Hold the handrails as described above 85¡ Fahrenheit. Open Lock Knob ...
...than your right hand to the storage position as shown and place one foot on the wheels. Keep the treadmill out of injury, use extreme caution while moving the treadmill, convert the treadmill to the position shown and hold or push on the book holder or it rolls freely on the base ...and carefully lower the treadmill until the lock pin is not done, the treadmill may be damaged. 2. Next, unplug the power cord. Hold the handrails as described above 85¡ Fahrenheit. Open Lock Knob ...


