

Canadian English Manual
Page 2
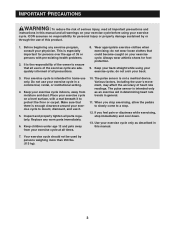
... is missing or illegible, call the telephone number on the front cover of Reebok. Note: The decal may not be shown at actual size. TABLE OF CONTENTS WARNING DECAL PLACEMENT 2 IMPORTANT PRECAUTIONS 3 BEFORE YOU BEGIN 4 ASSEMBLY 5 EXERCISE CYCLE OPERATION 10 MAINTENANCE AND TROUBLESHOOTING 19 EXERCISE GUIDELINES 20 PART LIST 21 EXPLODED DRAWING...
... is missing or illegible, call the telephone number on the front cover of Reebok. Note: The decal may not be shown at actual size. TABLE OF CONTENTS WARNING DECAL PLACEMENT 2 IMPORTANT PRECAUTIONS 3 BEFORE YOU BEGIN 4 ASSEMBLY 5 EXERCISE CYCLE OPERATION 10 MAINTENANCE AND TROUBLESHOOTING 19 EXERCISE GUIDELINES 20 PART LIST 21 EXPLODED DRAWING...
Canadian English Manual
Page 3
...including the userʼs movement, may affect the accuracy of heart rate readings. The pulse sensor is not a medical device. Use your exercise cycle only as an exercise aid in determining heart rate trends in general. 11. ICON assumes no responsibility for home use of this product. 1. ... responsibility of the owner to protect the floor or carpet. Do not use it to ensure that could become caught on your exercise cycle. IMPORTANT PRECAUTIONS WARNING: To reduce the risk of serious injury, read all important precautions and instructions in this manual and all warnings ...
...including the userʼs movement, may affect the accuracy of heart rate readings. The pulse sensor is not a medical device. Use your exercise cycle only as an exercise aid in determining heart rate trends in general. 11. ICON assumes no responsibility for home use of this product. 1. ... responsibility of the owner to protect the floor or carpet. Do not use it to ensure that could become caught on your exercise cycle. IMPORTANT PRECAUTIONS WARNING: To reduce the risk of serious injury, read all important precautions and instructions in this manual and all warnings ...
Canadian English Manual
Page 4
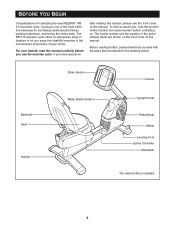
...Before reading further, please familiarize yourself with the parts that are shown on the front cover of this manual. The RB 310 exercise cycle offers an impressive array of features to let you , note the product model number and serial number before you have questions after reading... serial number decal are labeled in the convenience and privacy of the most effective exercises for selecting the new REEBOK® RB 310 exercise cycle. If you use the exercise cycle. For your home. To help us assist you enjoy this manual carefully before contacting us. Pulse Sensor Console...
...Before reading further, please familiarize yourself with the parts that are shown on the front cover of this manual. The RB 310 exercise cycle offers an impressive array of features to let you , note the product model number and serial number before you have questions after reading... serial number decal are labeled in the convenience and privacy of the most effective exercises for selecting the new REEBOK® RB 310 exercise cycle. If you use the exercise cycle. For your home. To help us assist you enjoy this manual carefully before contacting us. Pulse Sensor Console...
Canadian English Manual
Page 5
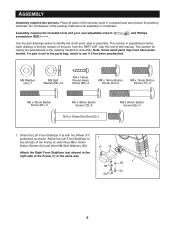
... (62)-1 M8 x 50mm Button Screw (52)-4 1. If a part is the key number of the part, from the PART LIST near the end of the exercise cycle in assembly.
... (62)-1 M8 x 50mm Button Screw (52)-4 1. If a part is the key number of the part, from the PART LIST near the end of the exercise cycle in assembly.
Canadian English Manual
Page 7
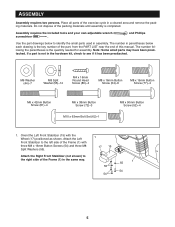
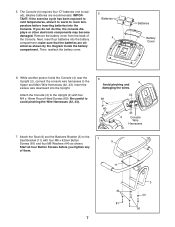
The Console (4) requires four "D" batteries (not included); alkaline batteries are oriented as shown. IMPORTANT: If the exercise cycle has been exposed to cold temperatures, allow it to warm to the Upright (2) with four M6 x 42mm Button 7 9 Screws (81) and four M6 Washers (44) ...
The Console (4) requires four "D" batteries (not included); alkaline batteries are oriented as shown. IMPORTANT: If the exercise cycle has been exposed to cold temperatures, allow it to warm to the Upright (2) with four M6 x 42mm Button 7 9 Screws (81) and four M6 Washers (44) ...
Canadian English Manual
Page 8
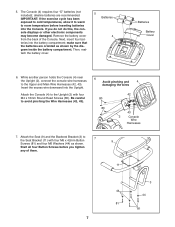
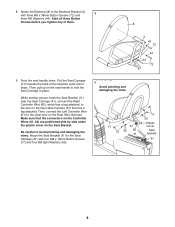
Start all three Button Screws before you tighten any of the exercise cycle until it stops. While another person holds the Seat Bracket (11) near the Seat Carriage (41), connect the Right Controller Wire (82), which has a tag ...
Start all three Button Screws before you tighten any of the exercise cycle until it stops. While another person holds the Seat Bracket (11) near the Seat Carriage (41), connect the Right Controller Wire (82), which has a tag ...
Canadian English Manual
Page 9
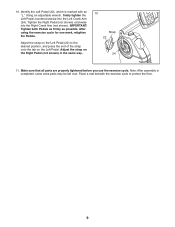
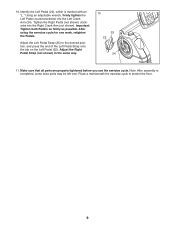
10. IMPORTANT: Tighten both Pedals as firmly as possible. Make sure that all parts are properly tightened before you use the exercise cycle. Place a mat beneath the exercise cycle to the desired position, and press the end of the strap onto the tab on the Left Pedal. Using an adjustable wrench, firmly tighten... (not shown) clockwise into the Left Crank Arm (24). Adjust the strap on the Left Pedal (22) to protect the floor. 9 After using the exercise cycle for one week, retighten the Pedals.
10. IMPORTANT: Tighten both Pedals as firmly as possible. Make sure that all parts are properly tightened before you use the exercise cycle. Place a mat beneath the exercise cycle to the desired position, and press the end of the strap onto the tab on the Left Pedal. Using an adjustable wrench, firmly tighten... (not shown) clockwise into the Left Crank Arm (24). Adjust the strap on the Left Pedal (22) to protect the floor. 9 After using the exercise cycle for one week, retighten the Pedals.
Canadian English Manual
Page 10
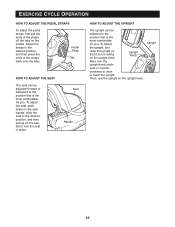
... The upright can be adjusted to the desired position, and then press the ends of the straps off the tabs on the upright knob. EXERCISE CYCLE OPERATION HOW TO ADJUST THE PEDAL STRAPS To adjust the pedal straps, first pull the ends of the straps back onto the tabs. Upright 10...
... The upright can be adjusted to the desired position, and then press the ends of the straps off the tabs on the upright knob. EXERCISE CYCLE OPERATION HOW TO ADJUST THE PEDAL STRAPS To adjust the pedal straps, first pull the ends of the straps back onto the tabs. Upright 10...
Canadian English Manual
Page 19
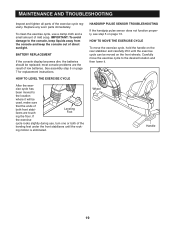
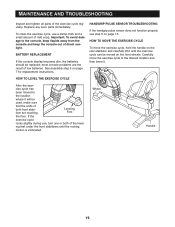
...damp cloth and a small amount of the leveling feet under the front stabilizers until the exercise cycle can be moved on page 13. HOW TO MOVE THE EXERCISE CYCLE To move the exercise cycle to the console, keep liquids away from the console and keep the console out of the ... both of mild soap. IMPORTANT: To avoid damage to the desired location and then lower it until the rock- HOW TO LEVEL THE EXERCISE CYCLE After the exer- See assembly step 5 on page 7 for replacement instructions. Wheel Handle 19 Replace any worn parts immediately. MAINTENANCE AND TROUBLESHOOTING ...
...damp cloth and a small amount of the leveling feet under the front stabilizers until the exercise cycle can be moved on page 13. HOW TO MOVE THE EXERCISE CYCLE To move the exercise cycle to the console, keep liquids away from the console and keep the console out of the ... both of mild soap. IMPORTANT: To avoid damage to the desired location and then lower it until the rock- HOW TO LEVEL THE EXERCISE CYCLE After the exer- See assembly step 5 on page 7 for replacement instructions. Wheel Handle 19 Replace any worn parts immediately. MAINTENANCE AND TROUBLESHOOTING ...
Canadian English Manual
Page 2
...may not be shown at actual size. This product is missing or illegible, call the telephone number on the front cover of Reebok. REEBOK and the Vector Logo are registered trademarks and service marks of this manual and request a free replacement decal. TABLE OF CONTENTS ...WARNING DECAL PLACEMENT 2 IMPORTANT PRECAUTIONS 3 BEFORE YOU BEGIN 4 ASSEMBLY 5 HOW TO OPERATE THE EXERCISE CYCLE 10 MAINTENANCE AND TROUBLESHOOTING 19 EXERCISE GUIDELINES 20 PART LIST 21 EXPLODED DRAWING 22 ORDERING REPLACEMENT PARTS Back Cover LIMITED WARRANTY Back Cover ...
...may not be shown at actual size. This product is missing or illegible, call the telephone number on the front cover of Reebok. REEBOK and the Vector Logo are registered trademarks and service marks of this manual and request a free replacement decal. TABLE OF CONTENTS ...WARNING DECAL PLACEMENT 2 IMPORTANT PRECAUTIONS 3 BEFORE YOU BEGIN 4 ASSEMBLY 5 HOW TO OPERATE THE EXERCISE CYCLE 10 MAINTENANCE AND TROUBLESHOOTING 19 EXERCISE GUIDELINES 20 PART LIST 21 EXPLODED DRAWING 22 ORDERING REPLACEMENT PARTS Back Cover LIMITED WARRANTY Back Cover ...
Canadian English Manual
Page 3
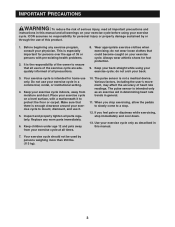
...of 35 or persons with a mat beneath it . 5. When you feel pain or dizziness while exercising, stop . 12. Use your exercise cycle on a level surface, with pre-existing health problems. 2. ICON assumes no responsibility for foot protection. 9. If you stop exercising, allow ...all parts regularly. Before beginning any worn parts immediately. 6. Keep your back straight while using your exercise cycle; Keep your exercise cycle indoors, away from your exercise cycle to a stop immediately and cool down. 13. IMPORTANT PRECAUTIONS WARNING: To reduce the risk of serious injury...
...of 35 or persons with a mat beneath it . 5. When you feel pain or dizziness while exercising, stop . 12. Use your exercise cycle on a level surface, with pre-existing health problems. 2. ICON assumes no responsibility for foot protection. 9. If you stop exercising, allow ...all parts regularly. Before beginning any worn parts immediately. 6. Keep your back straight while using your exercise cycle; Keep your exercise cycle indoors, away from your exercise cycle to a stop immediately and cool down. 13. IMPORTANT PRECAUTIONS WARNING: To reduce the risk of serious injury...
Canadian English Manual
Page 4
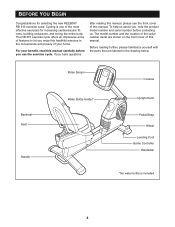
... an impressive array of features to let you use the exercise cycle. For your home. The model number and the location of the serial number decal are labeled in the ... have questions after reading this manual, please see the front cover of the most effective exercises for selecting the new REEBOK® RB 310 exercise cycle. If you , note the product model number and serial number before you enjoy this healthful exercise in the drawing .../Strap Wheel Leveling Foot Game Controller Handlebar *No water bottle is one of this manual. To help us . Cycling is included 4
... an impressive array of features to let you use the exercise cycle. For your home. The model number and the location of the serial number decal are labeled in the ... have questions after reading this manual, please see the front cover of the most effective exercises for selecting the new REEBOK® RB 310 exercise cycle. If you , note the product model number and serial number before you enjoy this healthful exercise in the drawing .../Strap Wheel Leveling Foot Game Controller Handlebar *No water bottle is one of this manual. To help us . Cycling is included 4
Canadian English Manual
Page 5
... same way. 1 55 55 54 54 5 If a part is the key number of the part, from the PART LIST near the end of the exercise cycle in parentheses below to see if it has been preattached. ASSEMBLY Assembly requires two persons. Attach the Left Front Stabilizer to the left side of...
... same way. 1 55 55 54 54 5 If a part is the key number of the part, from the PART LIST near the end of the exercise cycle in parentheses below to see if it has been preattached. ASSEMBLY Assembly requires two persons. Attach the Left Front Stabilizer to the left side of...
Canadian English Manual
Page 7
... may become damaged. Start all four Button Screws before inserting batteries into the Console. If you tighten any of the Console. IMPORTANT: If the exercise cycle has been exposed to cold temperatures, allow it to warm to avoid pinching the Wire Harnesses (42, 43). 6 4 Avoid pinching and damaging the wires. 42...
... may become damaged. Start all four Button Screws before inserting batteries into the Console. If you tighten any of the Console. IMPORTANT: If the exercise cycle has been exposed to cold temperatures, allow it to warm to avoid pinching the Wire Harnesses (42, 43). 6 4 Avoid pinching and damaging the wires. 42...

Canadian English Manual
Page 8
8. Start all three Button Screws before you tighten any of the exercise cycle until it stops. Attach the Seat Bracket (11) to the wire on the Rear Wire Harness (51) that the connectors on the Controller Wires (61, ...
8. Start all three Button Screws before you tighten any of the exercise cycle until it stops. Attach the Seat Bracket (11) to the wire on the Rear Wire Harness (51) that the connectors on the Controller Wires (61, ...
Canadian English Manual
Page 9
..., firmly tighten the Left Pedal counterclockwise into the Right Crank Arm (not shown). Note: After assembly is marked with an "L." Place a mat beneath the exercise cycle to the desired position, and press the end of the Left Pedal Strap onto the tab on the Left Pedal (22). Identify the Left Pedal... parts may be left over. Adjust the Right Pedal Strap (not shown) in the same way. 10 25 22 24 11. After using the exercise cycle for one week, retighten the Pedals. Make sure that all parts are properly tightened before you use the exercise...
..., firmly tighten the Left Pedal counterclockwise into the Right Crank Arm (not shown). Note: After assembly is marked with an "L." Place a mat beneath the exercise cycle to the desired position, and press the end of the Left Pedal Strap onto the tab on the Left Pedal (22). Identify the Left Pedal... parts may be left over. Adjust the Right Pedal Strap (not shown) in the same way. 10 25 22 24 11. After using the exercise cycle for one week, retighten the Pedals. Make sure that all parts are properly tightened before you use the exercise...

Canadian English Manual
Page 10
EXERCISE CYCLE OPERATION HOW TO ADJUST THE PEDAL STRAPS To adjust the pedal straps, first pull the ends of the straps back onto the tabs. Upright 10 ...
EXERCISE CYCLE OPERATION HOW TO ADJUST THE PEDAL STRAPS To adjust the pedal straps, first pull the ends of the straps back onto the tabs. Upright 10 ...
Canadian English Manual
Page 19
...make sure that the ends of mild soap. Wheel Handle 19 Carefully move the exercise cycle, hold the handle on the front wheels. ing feet under the front stabilizers until the exercise cycle can be replaced; Replace any worn parts immediately. most console problems are touching Leveling... Foot the floor. See assembly step 5 on page 13. If the exercise cycle rocks slightly during use a damp cloth and a small amount of both of direct sunlight. cise cycle has been moved to the location where it until the rocking motion is eliminated. HANDGRIP ...
...make sure that the ends of mild soap. Wheel Handle 19 Carefully move the exercise cycle, hold the handle on the front wheels. ing feet under the front stabilizers until the exercise cycle can be replaced; Replace any worn parts immediately. most console problems are touching Leveling... Foot the floor. See assembly step 5 on page 13. If the exercise cycle rocks slightly during use a damp cloth and a small amount of both of direct sunlight. cise cycle has been moved to the location where it until the rocking motion is eliminated. HANDGRIP ...