

Canadian English Manual
Page 1
Serial Number Decal QUESTIONS? Model No. Save this equipment. RCTL61010.0 Serial No. CALL TOLL-FREE: 1-888-936-4266 Mon.-Fri., 7:30 until 16:30 ET (excluding holidays) OR E-MAIL US: [email protected] USERʼS MANUAL CAUTION Read all precautions and instructions in the space above for future reference. Write the serial number in this manual before using this manual for reference. www.reebokfitness.com If you have questions, or if parts are damaged or missing, PLEASE CONTACT OUR CUSTOMER SERVICE DEPARTMENT DIRECTLY.
Serial Number Decal QUESTIONS? Model No. Save this equipment. RCTL61010.0 Serial No. CALL TOLL-FREE: 1-888-936-4266 Mon.-Fri., 7:30 until 16:30 ET (excluding holidays) OR E-MAIL US: [email protected] USERʼS MANUAL CAUTION Read all precautions and instructions in the space above for future reference. Write the serial number in this manual before using this manual for reference. www.reebokfitness.com If you have questions, or if parts are damaged or missing, PLEASE CONTACT OUR CUSTOMER SERVICE DEPARTMENT DIRECTLY.
Canadian English Manual
Page 2
...Vector Logo are registered trademarks and service marks of the warning decals. If a decal is manufactured and distributed under license from Reebok International. 2 This product is missing or illegible, call the telephone number on the front cover of this manual and request a... AND ADJUSTMENT 15 HOW TO FOLD AND MOVE THE TREADMILL 25 TROUBLESHOOTING 26 EXERCISE GUIDELINES 29 PART LIST 30 EXPLODED DRAWING 32 ORDERING REPLACEMENT PARTS Back Cover LIMITED WARRANTY Back Cover WARNING DECAL PLACEMENT This drawing shows the locations of Reebok. Note: The decals may not be shown at ...
...Vector Logo are registered trademarks and service marks of the warning decals. If a decal is manufactured and distributed under license from Reebok International. 2 This product is missing or illegible, call the telephone number on the front cover of this manual and request a... AND ADJUSTMENT 15 HOW TO FOLD AND MOVE THE TREADMILL 25 TROUBLESHOOTING 26 EXERCISE GUIDELINES 29 PART LIST 30 EXPLODED DRAWING 32 ORDERING REPLACEMENT PARTS Back Cover LIMITED WARRANTY Back Cover WARNING DECAL PLACEMENT This drawing shows the locations of Reebok. Note: The decals may not be shown at ...
Canadian English Manual
Page 4
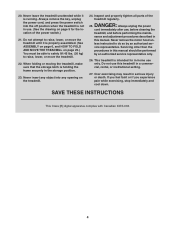
... and HOW TO FOLD AND MOVE THE TREADMILL on page 25.) You must be performed by an authorized ser- Never insert any object into the off position when the treadmill is intended for the location of the treadmill regularly. Inspect and properly tighten all parts of the power switch.) 21. Do not... use . (See the drawing on the treadmill. 24. If you feel faint or if you experience pain ...
... and HOW TO FOLD AND MOVE THE TREADMILL on page 25.) You must be performed by an authorized ser- Never insert any object into the off position when the treadmill is intended for the location of the treadmill regularly. Inspect and properly tighten all parts of the power switch.) 21. Do not... use . (See the drawing on the treadmill. 24. If you feel faint or if you experience pain ...
Canadian English Manual
Page 5
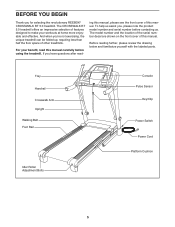
... review the drawing below and familiarize yourself with the labeled parts. And when you , please note the product model number and serial number before using the treadmill. The CROSSWALK RT 5.0 treadmill offers an impressive selection of other treadmills. ing this manual, please see the front cover of...Pulse Sensor Key/Clip Power Switch Power Cord Platform Cushion 5 To help us . If you for selecting the revolutionary REEBOK® CROSSWALK RT 5.0 treadmill. For your workouts at home more enjoyable and effective. BEFORE YOU BEGIN Thank you have questions after read this ...
... review the drawing below and familiarize yourself with the labeled parts. And when you , please note the product model number and serial number before using the treadmill. The CROSSWALK RT 5.0 treadmill offers an impressive selection of other treadmills. ing this manual, please see the front cover of...Pulse Sensor Key/Clip Power Switch Power Cord Platform Cushion 5 To help us . If you for selecting the revolutionary REEBOK® CROSSWALK RT 5.0 treadmill. For your workouts at home more enjoyable and effective. BEFORE YOU BEGIN Thank you have questions after read this ...
Canadian English Manual
Page 6
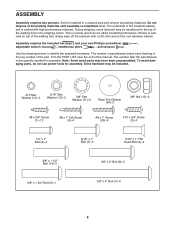
Note: The underside of the treadmill walking belt is coated with a soft cloth and a mild, non-abrasive cleaner. If there is lubricant on top of the packing materials until assembly is the key number of the part, from the PART LIST near the end of the walking belt or the.... The number in a cleared area and remove all packing materials. The number after the parentheses is normal and does not affect treadmill performance. To avoid damaging parts, do not use power tools for assembly. This is the quantity needed for assembly. During shipping, some lubricant may be included....
Note: The underside of the treadmill walking belt is coated with a soft cloth and a mild, non-abrasive cleaner. If there is lubricant on top of the packing materials until assembly is the key number of the part, from the PART LIST near the end of the walking belt or the.... The number in a cleared area and remove all packing materials. The number after the parentheses is normal and does not affect treadmill performance. To avoid damaging parts, do not use power tools for assembly. This is the quantity needed for assembly. During shipping, some lubricant may be included....

Canadian English Manual
Page 14
...be included. 15. Attach the Right Upright Cover with the holes in the Right Upright (85). Raise the Crosswalk Arms (121) (only one of the Storage Latch (51) to align the Storage Latch with the Base....the Frame until this step is completed. 10 8 Orient the Storage Latch (51) so that all parts are sheets of the Storage Latch (51) to the Left 86 Upright (84) in a secure... the included hex keys in the same way. To protect the floor or carpet, place a mat under the treadmill. one is used to the position 55 shown. See steps 4 and 6. Knob 121 Attach the lower end of...
...be included. 15. Attach the Right Upright Cover with the holes in the Right Upright (85). Raise the Crosswalk Arms (121) (only one of the Storage Latch (51) to align the Storage Latch with the Base....the Frame until this step is completed. 10 8 Orient the Storage Latch (51) so that all parts are sheets of the Storage Latch (51) to the Left 86 Upright (84) in a secure... the included hex keys in the same way. To protect the floor or carpet, place a mat under the treadmill. one is used to the position 55 shown. See steps 4 and 6. Knob 121 Attach the lower end of...
Canadian English Manual
Page 29
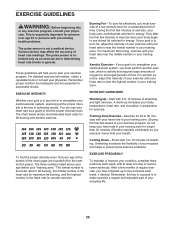
... exercise, your training zone. During the first few weeks of rest between workouts. Aerobic Exercise-If your goal is to make exercise a regular and enjoyable part of your exercise until your heart rate is to strengthen your cardiovascular system, you exercise-never hold your training zone. (During the first few minutes...
... exercise, your training zone. During the first few weeks of rest between workouts. Aerobic Exercise-If your goal is to make exercise a regular and enjoyable part of your exercise until your heart rate is to strengthen your cardiovascular system, you exercise-never hold your training zone. (During the first few minutes...

Canadian English Manual
Page 30
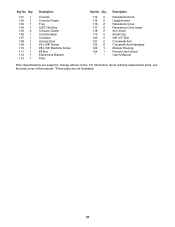
... Cover Caution Decal Incline Wire Base Foot Spacer Base Wheel Incline Motor Incline Motor Spacer Key/Clip Cable Tie 30 RCTL61010.0 R1210A To locate the parts listed below, see the EXPLODED DRAWING near the end of this manual. Qty. 1 41 2 4 3 4 4 2 5 4 6 1 7 4 8 3 9 4 10 3 11 6 12 4 13 2 14 2 15 5 16 3 17 8 18 11 19... Latch Warning Decal Platform Cushion Belt Guide Walking Platform Frame Cap Frame Spacer Magnet Front Roller/Pulley Walking Belt Audio Wire Key No. Key No. PART LIST Model No.
... Cover Caution Decal Incline Wire Base Foot Spacer Base Wheel Incline Motor Incline Motor Spacer Key/Clip Cable Tie 30 RCTL61010.0 R1210A To locate the parts listed below, see the EXPLODED DRAWING near the end of this manual. Qty. 1 41 2 4 3 4 4 2 5 4 6 1 7 4 8 3 9 4 10 3 11 6 12 4 13 2 14 2 15 5 16 3 17 8 18 11 19... Latch Warning Decal Platform Cushion Belt Guide Walking Platform Frame Cap Frame Spacer Magnet Front Roller/Pulley Walking Belt Audio Wire Key No. Key No. PART LIST Model No.
Canadian English Manual
Page 31
... Door #3 x 3/8" Screw #8 x 3/4" Machine Screw #8 Nut Electronics Bracket Filter Key No. Description Resistance Knob Upright Insert Resistance Cone Resistance Cone Insert Arm Insert Small Cap 3/8" x 5" Bolt Crosswalk Arm Crosswalk Arm Handgrip Module Housing French Latch Decal Userʼs Manual Note: Specifications are not illustrated. 31 For information about ordering replacement...
... Door #3 x 3/8" Screw #8 x 3/4" Machine Screw #8 Nut Electronics Bracket Filter Key No. Description Resistance Knob Upright Insert Resistance Cone Resistance Cone Insert Arm Insert Small Cap 3/8" x 5" Bolt Crosswalk Arm Crosswalk Arm Handgrip Module Housing French Latch Decal Userʼs Manual Note: Specifications are not illustrated. 31 For information about ordering replacement...
Canadian English Manual
Page 36
...8226; the name of the product (see the front cover of this manual) • the key number and description of the replacement part(s) (see the front cover of whatsoever nature. All repairs for commercial or rental purposes; No other consequential damages of this product to ... Canada, Inc. (ICON) warrants this manual. Accordingly, the above limitation may not apply to you . ORDERING REPLACEMENT PARTS To order replacement parts, please see the PART LIST and the EXPLODED DRAWING near the end of this manual) LIMITED WARRANTY ICON of incidental or consequential damages. products ...
...8226; the name of the product (see the front cover of this manual) • the key number and description of the replacement part(s) (see the front cover of whatsoever nature. All repairs for commercial or rental purposes; No other consequential damages of this product to ... Canada, Inc. (ICON) warrants this manual. Accordingly, the above limitation may not apply to you . ORDERING REPLACEMENT PARTS To order replacement parts, please see the PART LIST and the EXPLODED DRAWING near the end of this manual) LIMITED WARRANTY ICON of incidental or consequential damages. products ...


