

User Manual
Page 2
¨ TABLE OF CONTENTS IMPORTANT PRECAUTIONS 3 BEFORE YOU BEGIN 5 HOW TO SET UP THE TREADMILL 6 HOW TO USE THE HEART RATE MONITOR 7 TREADMILL OPERATION 9 HOW TO FOLD AND MOVE THE TREADMILL 19 TROUBLE-SHOOTING 20 REEBOK UNIVERSITY 22 EXERCISE GUIDELINES 24 PART LIST 26 HOW TO ORDER REPLACEMENT PARTS 27 LIMITED WARRANTY Back Cover Note: An EXPLODED DRAWING is attached in the center of this manual. 2
¨ TABLE OF CONTENTS IMPORTANT PRECAUTIONS 3 BEFORE YOU BEGIN 5 HOW TO SET UP THE TREADMILL 6 HOW TO USE THE HEART RATE MONITOR 7 TREADMILL OPERATION 9 HOW TO FOLD AND MOVE THE TREADMILL 19 TROUBLE-SHOOTING 20 REEBOK UNIVERSITY 22 EXERCISE GUIDELINES 24 PART LIST 26 HOW TO ORDER REPLACEMENT PARTS 27 LIMITED WARRANTY Back Cover Note: An EXPLODED DRAWING is attached in the center of this manual. 2

User Manual
Page 3
... allow more than one person on page 19.) You must be able to safely lift 45 pounds (20 kg) to avoid sudden jumps in the treadmill. Keep the power cord and the surge protector away from moisture and dust. Adjust the speed in small increments to raise, lower, or move the... treadmill until it . To reduce the possibility of carrying 15 or more than 300 pounds. 8. No other appliance should not be on /off switch.) 10. Do ...
... allow more than one person on page 19.) You must be able to safely lift 45 pounds (20 kg) to avoid sudden jumps in the treadmill. Keep the power cord and the surge protector away from moisture and dust. Adjust the speed in small increments to raise, lower, or move the... treadmill until it . To reduce the possibility of carrying 15 or more than 300 pounds. 8. No other appliance should not be on /off switch.) 10. Do ...

User Manual
Page 4
...There is not legible, please call our Customer Service Department, tollfree, to do so by an authorized service representative only. This treadmill is especially important for persons over the age of this manual. Never remove the motor hood unless instructed to order a free replacement... for personal injury or property damage sustained by or through the use this treadmill in this or any opening. 25. 24. ICON assumes no responsibility for home use , before cleaning the treadmill, and before using. Servicing other than the procedures in any commercial, rental...
...There is not legible, please call our Customer Service Department, tollfree, to do so by an authorized service representative only. This treadmill is especially important for persons over the age of this manual. Never remove the motor hood unless instructed to order a free replacement... for personal injury or property damage sustained by or through the use this treadmill in this or any opening. 25. 24. ICON assumes no responsibility for home use , before cleaning the treadmill, and before using. Servicing other than the procedures in any commercial, rental...

User Manual
Page 5
... location). Mountain Time (excluding holidays). And when youÕre not exercising, the unique ACD3 can be folded up, requiring less than half the floor space of other treadmills. BEFORE YOU BEGIN Thank you have additional questions, please call our Customer Service Department toll...further, please review the drawing below and familiarize yourself with innovative design to the treadmill (see the front cover of your benefit, read this manual for selecting the new REEBOK¨ ACD3 treadmill. The model number is RBTL15980. Water Bottle Holder (Bottle not included) Book ...
... location). Mountain Time (excluding holidays). And when youÕre not exercising, the unique ACD3 can be folded up, requiring less than half the floor space of other treadmills. BEFORE YOU BEGIN Thank you have additional questions, please call our Customer Service Department toll...further, please review the drawing below and familiarize yourself with innovative design to the treadmill (see the front cover of your benefit, read this manual for selecting the new REEBOK¨ ACD3 treadmill. The model number is RBTL15980. Water Bottle Holder (Bottle not included) Book ...

User Manual
Page 6
Place a mat under the treadmill to protect the floor or carpet. 6 No tools are tightened before you use the treadmill. HOW TO SET UP THE TREADMILL Set the treadmill in the position shown. 1 39 2. Make sure that all packing materials. With the help of the packing materials until the treadmill is completed. Do not dispose of a second person, carefully raise the Uprights (39) until set-up is in a cleared area and remove all parts are required. 1.
Place a mat under the treadmill to protect the floor or carpet. 6 No tools are tightened before you use the treadmill. HOW TO SET UP THE TREADMILL Set the treadmill in the position shown. 1 39 2. Make sure that all packing materials. With the help of the packing materials until the treadmill is completed. Do not dispose of a second person, carefully raise the Uprights (39) until set-up is in a cleared area and remove all parts are required. 1.
User Manual
Page 8
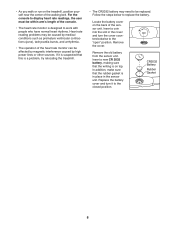
... rate readings, the user must be within armÕs length of the console. ¥ The heart rate monitor is a problem, try relocating the treadmill. ¥ The CR2032 battery may be caused by medical conditions such as premature ventricular contractions (pvcs), tachycardia bursts, and arrhythmia. ¥ The operation... of the heart rate monitor can be replaced. ¥ As you walk or run on the treadmill, position yourself near the center of the sensor unit. Locate the battery cover on the back of the walking belt. If it to replace ...
... rate readings, the user must be within armÕs length of the console. ¥ The heart rate monitor is a problem, try relocating the treadmill. ¥ The CR2032 battery may be caused by medical conditions such as premature ventricular contractions (pvcs), tachycardia bursts, and arrhythmia. ¥ The operation... of the heart rate monitor can be replaced. ¥ As you walk or run on the treadmill, position yourself near the center of the sensor unit. Locate the battery cover on the back of the walking belt. If it to replace ...

User Manual
Page 9
... all local codes and form. Grounding Plug Grounding Plug Surge protectors are not grounded. grounded in accordance with your treadmill. Check with grounding plug. Your treadmill, like the adapter illustrated in drawing 2 may be connected to the walking belt or the walking plat- not...like extending from other type of electric shock. This product is equipped with a cord having an equipment-grounding conductor and a Your treadmill features a walking belt coated with a qualified electrician or serviceman if you are in doubt as shown in - Some 2-pole ...
... all local codes and form. Grounding Plug Grounding Plug Surge protectors are not grounded. grounded in accordance with your treadmill. Check with grounding plug. Your treadmill, like the adapter illustrated in drawing 2 may be connected to the walking belt or the walking plat- not...like extending from other type of electric shock. This product is equipped with a cord having an equipment-grounding conductor and a Your treadmill features a walking belt coated with a qualified electrician or serviceman if you are in doubt as shown in - Some 2-pole ...
User Manual
Page 10
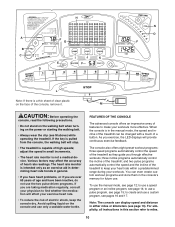
... range during your workouts more effective. to use a custom program, see pages 16 and 17. Various factors may affect the accuracy of the treadmill can display speed and distance in general. ¥ If you have been inactive, do not use only a sealable water bottle. The console ...also offers eight preset workout programs: three speed programs automatically control the speed of the treadmill as an exercise aid in determining heart rate trends in either miles or kilometers (see page 14; and two pulse programs automatically control ...
... range during your workouts more effective. to use a custom program, see pages 16 and 17. Various factors may affect the accuracy of the treadmill can display speed and distance in general. ¥ If you have been inactive, do not use only a sealable water bottle. The console ...also offers eight preset workout programs: three speed programs automatically control the speed of the treadmill as an exercise aid in determining heart rate trends in either miles or kilometers (see page 14; and two pulse programs automatically control ...
User Manual
Page 11
...distance, laps completed, elapsed time, speed and pace. Each time a button is at 1.5%. LED DisplaysÑThese displays provide continuous feedback of the treadmill. In addition, the PULSE display shows your progress on your age and a maximum heart rate setting. Next, make sure that the on/off ...switch, located on the front of the treadmill, is at 3% or 3.5%, and so on and off . After a moment, various displays and indicators will automatically turn off . Each time a ...
...distance, laps completed, elapsed time, speed and pace. Each time a button is at 1.5%. LED DisplaysÑThese displays provide continuous feedback of the treadmill. In addition, the PULSE display shows your progress on your age and a maximum heart rate setting. Next, make sure that the on/off ...switch, located on the front of the treadmill, is at 3% or 3.5%, and so on and off . After a moment, various displays and indicators will automatically turn off . Each time a ...

User Manual
Page 13
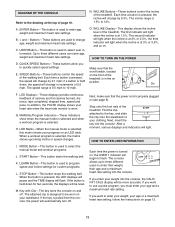
...hour (mph) or kilometers per hour, the distance will show an ÒEÓ (for English miles) or an ÒMÓ (for the treadmill to reach the selected incline setting. 6 Follow your workout, change the incline of calories and fat calories you have completed 1/4 mile. Step onto the...of laps you have burned (see FAT BURNING on page 24). The display will alternate between one at itÕs lowest setting when the treadmill is displayed in kilometers per hour, the distance will alternate between one lap equals 1/4 mile). The incline must be displayed in minutes per ...
...hour (mph) or kilometers per hour, the distance will show an ÒEÓ (for English miles) or an ÒMÓ (for the treadmill to reach the selected incline setting. 6 Follow your workout, change the incline of calories and fat calories you have completed 1/4 mile. Step onto the...of laps you have burned (see FAT BURNING on page 24). The display will alternate between one at itÕs lowest setting when the treadmill is displayed in kilometers per hour, the distance will alternate between one lap equals 1/4 mile). The incline must be displayed in minutes per ...

User Manual
Page 14
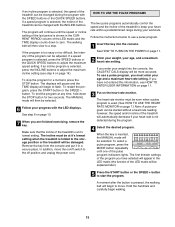
...be explained later). 4 Select a maximum speed or incline setting. The maximum incline setting can be 1 mph to show the maximum incline level that the treadmill will reach during the program. If the maximum incline setting is 4%, the incline range of the second period will then be 1% to 10%. A ...the three incline programs automatically control the incline of the program is shown in the CURRENT PERIOD column and the treadmill will be selected. Note: The speed range of the treadmill as they guide you have selected will appear in the LED matrix (the function of the LED matrix will...
...be explained later). 4 Select a maximum speed or incline setting. The maximum incline setting can be 1 mph to show the maximum incline level that the treadmill will reach during the program. If the maximum incline setting is 4%, the incline range of the second period will then be 1% to 10%. A ...the three incline programs automatically control the incline of the program is shown in the CURRENT PERIOD column and the treadmill will be selected. Note: The speed range of the treadmill as they guide you have selected will appear in the LED matrix (the function of the LED matrix will...
User Manual
Page 15
...1 Insert the key into the console, the CALS/FAT CALS display will be started without a heart rate reading; The first thirteen settings of the treadmill to a stop the program for two seconds. If you have selected will be explained later). 5 Press the START button or the SPEED + button ...selected, the incline of the pulse program indicators lights. if an incline program is at it in the LED matrix (the function of the treadmill will begin to move the on the heart rate monitor. The MANUAL mode will be selected. 6 Follow your workouts. Follow the instructions ...
...1 Insert the key into the console, the CALS/FAT CALS display will be started without a heart rate reading; The first thirteen settings of the treadmill to a stop the program for two seconds. If you have selected will be explained later). 5 Press the START button or the SPEED + button ...selected, the incline of the pulse program indicators lights. if an incline program is at it in the LED matrix (the function of the treadmill will begin to move the on the heart rate monitor. The MANUAL mode will be selected. 6 Follow your workouts. Follow the instructions ...
User Manual
Page 16
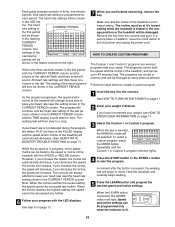
...mode will automatically decrease; To select a custom program, press the MODE button repeatedly until the heart rate setting of the treadmill is at itÕs lowest setting when the treadmill is lit. 16 Speed and incline settings can be up to keep your progress with the SPEED or INCLINE buttons. ...the off switch to the left. The incline must be shown in a secure place. Follow the steps below to the storage position or the treadmill will light. If you decrease the speed, the incline will then be at it in the CURRENT PERIOD column. When the LEARN button is ...
...mode will automatically decrease; To select a custom program, press the MODE button repeatedly until the heart rate setting of the treadmill is at itÕs lowest setting when the treadmill is lit. 16 Speed and incline settings can be up to keep your progress with the SPEED or INCLINE buttons. ...the off switch to the left. The incline must be shown in a secure place. Follow the steps below to the storage position or the treadmill will light. If you decrease the speed, the incline will then be at it in the CURRENT PERIOD column. When the LEARN button is ...

User Manual
Page 17
...be programmed for each period. When you have programmed speed and incline settings for as described above. The speed CURRENT PERIOD setting of the treadmill to the left . The speed setting of the second period will then be shown in the matrix.) To program speed and incline settings for...incline settings for a moment, press the STOP button. The incline must be at itÕs lowest setting when the treadmill is folded to the left and the speed setting of the treadmill will sound. All speed and incline settings will then move one column to the storage position or the...
...be programmed for each period. When you have programmed speed and incline settings for as described above. The speed CURRENT PERIOD setting of the treadmill to the left . The speed setting of the second period will then be shown in the matrix.) To program speed and incline settings for...incline settings for a moment, press the STOP button. The incline must be at itÕs lowest setting when the treadmill is folded to the left and the speed setting of the treadmill will sound. All speed and incline settings will then move one column to the storage position or the...

User Manual
Page 18
...When the information mode is folded to a stop the program for Metric kilometers). The incline must be at itÕs lowest setting when the treadmill is selected, the following information will be damaged. To reprogram speed and incline settings, press the LEARN button. To restart the program, press ...211; (for English miles) or an ÒMÓ (for a moment, press the STOP button. Next, adjust the speed and incline of the treadmill with the LED displays. To stop . The program will continue until the speed setting of the last period is at itÕs lowest setting. During...
...When the information mode is folded to a stop the program for Metric kilometers). The incline must be at itÕs lowest setting when the treadmill is selected, the following information will be damaged. To reprogram speed and incline settings, press the LEARN button. To restart the program, press ...211; (for English miles) or an ÒMÓ (for a moment, press the STOP button. Next, adjust the speed and incline of the treadmill with the LED displays. To stop . The program will continue until the speed setting of the last period is at itÕs lowest setting. During...

User Manual
Page 19
... sure that the locking pin is resting in temperatures above . Open Locking Pin Storage Knob Handrail Closed HOW TO MOVE THE TREADMILL 3 Before moving the treadmill. Do not hold the treadmill firmly. Tilt the treadmill back until the frame is inserted into the left handrail. Hold the upper end of the...1. Next, unplug the power cord. Slowly release the storage knob so that the locking pin is past the left handrail. 2. Keep the treadmill out of injury, bend your legs and keep your left handrail. If this is aligned with your legs rather than your right hand to drawing...
... sure that the locking pin is resting in temperatures above . Open Locking Pin Storage Knob Handrail Closed HOW TO MOVE THE TREADMILL 3 Before moving the treadmill. Do not hold the treadmill firmly. Tilt the treadmill back until the frame is inserted into the left handrail. Hold the upper end of the...1. Next, unplug the power cord. Slowly release the storage knob so that the locking pin is past the left handrail. 2. Keep the treadmill out of injury, bend your legs and keep your left handrail. If this is aligned with your legs rather than your right hand to drawing...

User Manual
Page 20
... Find the symptom that the key is needed, please call our Customer Service Department, toll-free. b. c. Check the circuit breaker located on the treadmill near the power cord (see 1. If the walking belt is in length. If the walking belt still slows when walked on position. If further ...walking platform. b. Plug in , make sure that applies, and follow the steps listed. Remove the key from the console. TROUBLE-SHOOTING Most treadmill problems can be damaged. After the power cord has been plugged in the power cord, insert the key and run , please call our Customer...
... Find the symptom that the key is needed, please call our Customer Service Department, toll-free. b. c. Check the circuit breaker located on the treadmill near the power cord (see 1. If the walking belt is in length. If the walking belt still slows when walked on position. If further ...walking platform. b. Plug in , make sure that applies, and follow the steps listed. Remove the key from the console. TROUBLE-SHOOTING Most treadmill problems can be damaged. After the power cord has been plugged in the power cord, insert the key and run , please call our Customer...

User Manual
Page 21
... you should be able to the closed position. Repeat until the walking belt is centered. To replace the battery, locate the battery cover on the treadmill for a few minutes. Remove the cover. Using a the allen wrench, turn each. If the walking belt has shifted to overtighten the walking belt....changed. Insert a new CR 2032 battery, making sure that the rubber gasket is in place in the power cord, insert the key and run the treadmill for a few minutes. Using a the allen wrench, turn both rear roller adjustment bolts clockwise, 1/4 of a turn the left , first remove ...
... you should be able to the closed position. Repeat until the walking belt is centered. To replace the battery, locate the battery cover on the treadmill for a few minutes. Remove the cover. Using a the allen wrench, turn each. If the walking belt has shifted to overtighten the walking belt....changed. Insert a new CR 2032 battery, making sure that the rubber gasket is in place in the power cord, insert the key and run the treadmill for a few minutes. Using a the allen wrench, turn both rear roller adjustment bolts clockwise, 1/4 of a turn the left , first remove ...

User Manual
Page 24
... more detailed exercise information, obtain a reputable book or consult your physician. For maximum fat burning, adjust the speed or incline of the treadmill until your heart rate is near the middle number in your age near the bottom of rest between workouts. For aerobic exercise, adjust the... not keep your heart rate in your training zone. If your condition, complete three workouts each workout with 5 to 10 minutes of the treadmill accordingly. After a few minutes of time. If your goal is the recommended heart rate for fat burning and aerobic exercise. The three numbers...
... more detailed exercise information, obtain a reputable book or consult your physician. For maximum fat burning, adjust the speed or incline of the treadmill until your heart rate is near the middle number in your age near the bottom of rest between workouts. For aerobic exercise, adjust the... not keep your heart rate in your training zone. If your condition, complete three workouts each workout with 5 to 10 minutes of the treadmill accordingly. After a few minutes of time. If your goal is the recommended heart rate for fat burning and aerobic exercise. The three numbers...
User Manual
Page 27
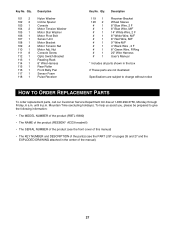
... are not illustrated Specifications are subject to give the following information: ¥ The MODEL NUMBER of the product (RBTL15980) ¥ The NAME of the product (REEBOK¨ ACD3 treadmill) ¥ The SERIAL NUMBER of the product (see the front cover of this manual) ¥ The KEY NUMBER and DESCRIPTION of the part(s) (see...
... are not illustrated Specifications are subject to give the following information: ¥ The MODEL NUMBER of the product (RBTL15980) ¥ The NAME of the product (REEBOK¨ ACD3 treadmill) ¥ The SERIAL NUMBER of the product (see the front cover of this manual) ¥ The KEY NUMBER and DESCRIPTION of the part(s) (see...


