
English Manual
Page 2
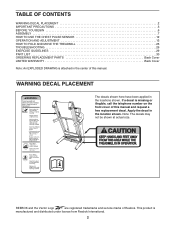
... at actual size. 259345 REEBOK and the Vector Logo are registered trademarks and service marks of this manual. TABLE OF CONTENTS WARNING DECAL PLACEMENT 2 IMPORTANT PRECAUTIONS 3 BEFORE YOU BEGIN 6 ASSEMBLY 7 HOW TO USE THE CHEST PULSE SENSOR 12 OPERATION AND ADJUSTMENT 13 HOW TO FOLD AND MOVE THE TREADMILL 25 TROUBLESHOOTING 26 EXERCISE...
... at actual size. 259345 REEBOK and the Vector Logo are registered trademarks and service marks of this manual. TABLE OF CONTENTS WARNING DECAL PLACEMENT 2 IMPORTANT PRECAUTIONS 3 BEFORE YOU BEGIN 6 ASSEMBLY 7 HOW TO USE THE CHEST PULSE SENSOR 12 OPERATION AND ADJUSTMENT 13 HOW TO FOLD AND MOVE THE TREADMILL 25 TROUBLESHOOTING 26 EXERCISE...

English Manual
Page 4
... by placing objects under the treadmill. 22. Never leave the treadmill unattended while it is in particular, specifies that the unit is properly assembled. (See ASSEMBLY on page 7, and HOW TO FOLD AND MOVE THE TREADMILL on page 6 for the location of the treadmill regularly. 24. tenance and ...adjustment procedures de- When folding or moving the treadmill, make sure that the frame is ...
... by placing objects under the treadmill. 22. Never leave the treadmill unattended while it is in particular, specifies that the unit is properly assembled. (See ASSEMBLY on page 7, and HOW TO FOLD AND MOVE THE TREADMILL on page 6 for the location of the treadmill regularly. 24. tenance and ...adjustment procedures de- When folding or moving the treadmill, make sure that the frame is ...
English Manual
Page 7
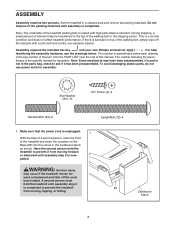
...Tek Screw (58)-4 Note: The underside of the walking belt, sSimppalcyewr Sipcereowff (60)-2 Assembly requires the included hex key and your own Phillips screwdriver . Have the second person hold the treadmill until assembly is not in the cardboard stand as shown. board stand. Note: Some small parts may...key number of the walking belt or the shipping carton. A second person must hold the treadmill to see the drawings below each drawing is unplugged. 1 With the help identifying the assembly hardware, see if it from moving , tipping, or falling. For help of a second ...
...Tek Screw (58)-4 Note: The underside of the walking belt, sSimppalcyewr Sipcereowff (60)-2 Assembly requires the included hex key and your own Phillips screwdriver . Have the second person hold the treadmill until assembly is not in the cardboard stand as shown. board stand. Note: Some small parts may...key number of the walking belt or the shipping carton. A second person must hold the treadmill to see the drawings below each drawing is unplugged. 1 With the help identifying the assembly hardware, see if it from moving , tipping, or falling. For help of a second ...
English Manual
Page 9
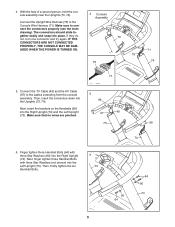
... pinched. 97 49 73 99 74 6. With the help of a second person, hold the console assembly near the Uprights (73, 74). 4 Console Assembly Connect the Upright Wire Harness (75) to the cables extending from the console assembly. Connect the TV Cable (49) and the AV Cable (97) to the Console Wire Harness (71...
... pinched. 97 49 73 99 74 6. With the help of a second person, hold the console assembly near the Uprights (73, 74). 4 Console Assembly Connect the Upright Wire Harness (75) to the cables extending from the console assembly. Connect the TV Cable (49) and the AV Cable (97) to the Console Wire Harness (71...
English Manual
Page 10
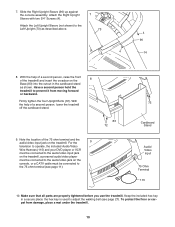
... place; With the help of a second person, raise the front of a second person, lower the treadmill off the cardboard stand. 9. Slide the Right Upright Sleeve (96) up against the console assembly. 7. Have a second person hold the treadmill to adjust the walking belt (see page 11). 83 72 72 Cardboard Stand Audio/ Video Input...
... place; With the help of a second person, raise the front of a second person, lower the treadmill off the cardboard stand. 9. Slide the Right Upright Sleeve (96) up against the console assembly. 7. Have a second person hold the treadmill to adjust the walking belt (see page 11). 83 72 72 Cardboard Stand Audio/ Video Input...
English Manual
Page 33
Specifications are not illustrated. Description 99 1 100 1 101 1 102 1 103 1 104 1 105 2 106 1 107 1 108 1 109 1 110 1 111 2 112 1 113 1 114 4 115 1 116 2 Handrail Latch Assembly Latch Warning Decal AV Cable Nut Filter Wire Power Cord Grommet Rear Roller Washer Incline/Controller Wire Incline Stop Bracket Stop Bracket Spacer Static Decal ...
Specifications are not illustrated. Description 99 1 100 1 101 1 102 1 103 1 104 1 105 2 106 1 107 1 108 1 109 1 110 1 111 2 112 1 113 1 114 4 115 1 116 2 Handrail Latch Assembly Latch Warning Decal AV Cable Nut Filter Wire Power Cord Grommet Rear Roller Washer Incline/Controller Wire Incline Stop Bracket Stop Bracket Spacer Static Decal ...