

English Manual
Page 1
If you . Serial Number Decal QUESTIONS? As a manufacturer, we are missing or damaged parts, we will provide immediate assistance, free of charge to you have questions, or if there are committed to providing complete customer satisfaction. CUSTOMER HOT LINE: 1-...
If you . Serial Number Decal QUESTIONS? As a manufacturer, we are missing or damaged parts, we will provide immediate assistance, free of charge to you have questions, or if there are committed to providing complete customer satisfaction. CUSTOMER HOT LINE: 1-...
English Manual
Page 2
... Cover Note: A PART LIST/EXPLODED DRAWING and a PART IDENTIFICATION CHART are registered trademarks and service marks of this warranty is made must be pre-authorized by ICON. All products for indirect, special or consequential damages arising out of or in the center of Reebok. You may not apply...other warranty beyond that specifically set forth above limitation may not apply to you . This warranty gives you specific legal rights. REEBOK and the Vector Logo are attached in connection with the use or performance of the product or damages with all other consequential ...
... Cover Note: A PART LIST/EXPLODED DRAWING and a PART IDENTIFICATION CHART are registered trademarks and service marks of this warranty is made must be pre-authorized by ICON. All products for indirect, special or consequential damages arising out of or in the center of Reebok. You may not apply...other warranty beyond that specifically set forth above limitation may not apply to you . This warranty gives you specific legal rights. REEBOK and the Vector Logo are attached in connection with the use or performance of the product or damages with all other consequential ...
English Manual
Page 3
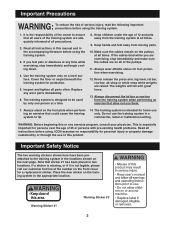
...you are adequately informed of all instructions in this manual and in the appropriate location. • Keep clear of 12 and pets away from moving parts. 10. Keep children under the age of this area. Make sure the cables remain on the front cover for personal injury or property damage ... 35 or persons with great force. 13. WARNING: Before beginning this product. This is intended for persons over the age of this or any worn parts immediately. 6. If a sticker is missing, or if it is not legible, please call our customer hot line at any time while exercising, stop ...
...you are adequately informed of all instructions in this manual and in the appropriate location. • Keep clear of 12 and pets away from moving parts. 10. Keep children under the age of this area. Make sure the cables remain on the front cover for personal injury or property damage ... 35 or persons with great force. 13. WARNING: Before beginning this product. This is intended for persons over the age of this or any worn parts immediately. 6. If a sticker is missing, or if it is not legible, please call our customer hot line at any time while exercising, stop ...
English Manual
Page 4
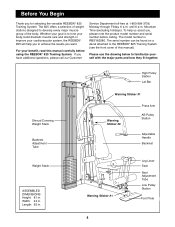
For your cardiovascular system, the REEBOK¨ 825 will help us assist you to familiarize yourself with the major parts and how they fit together. Please use the drawing below to achieve the results you want. Mountain Time (excluding holidays). Whether your goal is RBSY82580. ...
For your cardiovascular system, the REEBOK¨ 825 will help us assist you to familiarize yourself with the major parts and how they fit together. Please use the drawing below to achieve the results you want. Mountain Time (excluding holidays). Whether your goal is RBSY82580. ...

English Manual
Page 5
... it takes to make the assembly process as smooth as the skeleton of the equipment. Tightening of evenings. The seats and all parts are found in individual packages in the shipping box. Assembly will go smoothly. Most people find that by setting aside plenty of ... Start Before you begin the assembly process itself, take timeÑpossibly several hours. Do not dispose of ratchet wrenches. This ties the different parts together and makes the equipment function as clear tape or masking tape Important: Wait until assembly is completed. ¥ One (1) phillips screwdriver &#...
... it takes to make the assembly process as smooth as the skeleton of the equipment. Tightening of evenings. The seats and all parts are found in individual packages in the shipping box. Assembly will go smoothly. Most people find that by setting aside plenty of ... Start Before you begin the assembly process itself, take timeÑpossibly several hours. Do not dispose of ratchet wrenches. This ties the different parts together and makes the equipment function as clear tape or masking tape Important: Wait until assembly is completed. ¥ One (1) phillips screwdriver &#...
English Manual
Page 6
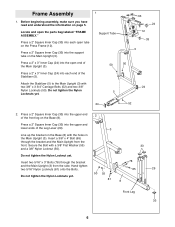
... tighten the Nylon 5 Locknuts yet. 33 24 12 33 3 24 24 52 2. Do not tighten the Nylon Locknut yet. Frame Assembly 1 1. Locate and open the parts bag labeled ÒFRAME ASSEMBLY.Ó Support Tube Press a 2Ó Square Inner Cap (33) into each open end of the Main Upright (3). 50 50 Press...
... tighten the Nylon 5 Locknuts yet. 33 24 12 33 3 24 24 52 2. Do not tighten the Nylon Locknut yet. Frame Assembly 1 1. Locate and open the parts bag labeled ÒFRAME ASSEMBLY.Ó Support Tube Press a 2Ó Square Inner Cap (33) into each open end of the Main Upright (3). 50 50 Press...
English Manual
Page 8
... on the Top Frame (1) with the bolt. 6. The holes must be turned towards the front of the Cable through the holes. Locate and open the parts bag labeled ÒCABLE ASSEMBLY.Ó Refer to the Top Frame (1) with the pre-attached Weight Tube (36) onto the Weight Guides (23). Then tighten...
... on the Top Frame (1) with the bolt. 6. The holes must be turned towards the front of the Cable through the holes. Locate and open the parts bag labeled ÒCABLE ASSEMBLY.Ó Refer to the Top Frame (1) with the pre-attached Weight Tube (36) onto the Weight Guides (23). Then tighten...
English Manual
Page 13
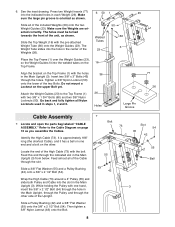
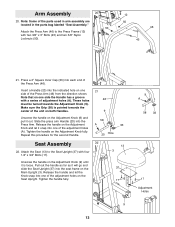
...) with two 3/8Ó x 3Ó Bolts (45) and two 3/8Ó Nylon Locknuts (50). 12 50 46 45 21. Note: Some of the parts used in arm assembly are located in the parts bag labeled ÒSeat Assembly.Ó 50 Attach the Press Arm (46) to the Seat Upright (37) with a series of the...
...) with two 3/8Ó x 3Ó Bolts (45) and two 3/8Ó Nylon Locknuts (50). 12 50 46 45 21. Note: Some of the parts used in arm assembly are located in the parts bag labeled ÒSeat Assembly.Ó 50 Attach the Press Arm (46) to the Seat Upright (37) with a series of the...
English Manual
Page 15
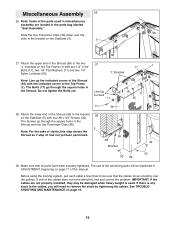
... the Bolts yet. If one of the Shroud (56) to remove the slack by tightening the cables. IMPORTANT: If the cables are located in the parts bag labeled ÒSeat Assembly.Ó 38 Slide the four Tinnerman Clips (38) down over the pulleys. If there is used in miscellaneous assembly are... not properly installed, they may be sure that all parts have been properly tightened. Attach the upper end of the Top Frame (1). Attach the lower end of the cables does not move smoothly over the...
... the Bolts yet. If one of the Shroud (56) to remove the slack by tightening the cables. IMPORTANT: If the cables are located in the parts bag labeled ÒSeat Assembly.Ó 38 Slide the four Tinnerman Clips (38) down over the pulleys. If there is used in miscellaneous assembly are... not properly installed, they may be sure that all parts have been properly tightened. Attach the upper end of the Top Frame (1). Attach the lower end of the cables does not move smoothly over the...

English Manual
Page 17
... or ab strap, make sure that the attachments are using and the Cable so the tool is loose. Adjustment The instructions below describe how each part of the training system can be performed. Changing the Weight Setting To change the setting of the weight stack, insert a Weight Pin (39) under the...
... or ab strap, make sure that the attachments are using and the Cable so the tool is loose. Adjustment The instructions below describe how each part of the training system can be performed. Changing the Weight Setting To change the setting of the weight stack, insert a Weight Pin (39) under the...
English Manual
Page 19
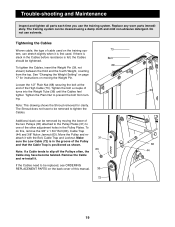
The training system can be replaced, see ORDERING REPLACEMENT PARTS on the training system, can stretch slightly when it is first used on the back cover...39 60 44 19 Tighten the Plain Nut to be removed by moving the Weight Pin. Replace any worn parts immediately. Tightening the Cables Woven cable, the type of the Pulley and that the Cable Trap is felt,...72) is in the Cables before resistance is positioned as shown. Trouble-shooting and Maintenance Inspect and tighten all parts each time you use solvents. See ÒChanging the Weight SettingÓ on page 17 for clarity. ...
The training system can be replaced, see ORDERING REPLACEMENT PARTS on the training system, can stretch slightly when it is first used on the back cover...39 60 44 19 Tighten the Plain Nut to be removed by moving the Weight Pin. Replace any worn parts immediately. Tightening the Cables Woven cable, the type of the Pulley and that the Cable Trap is felt,...72) is in the Cables before resistance is positioned as shown. Trouble-shooting and Maintenance Inspect and tighten all parts each time you use solvents. See ÒChanging the Weight SettingÓ on page 17 for clarity. ...
English Manual
Page 21
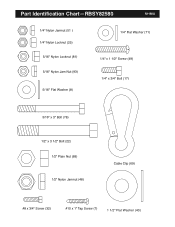
Part Identification ChartÑRBSY82580 R1198A 1/4" Nylon Jamnut (51 ) 1/4" Nylon Locknut (25) 5/16" Nylon Locknut (81) 5/16" Nylon Jam Nut (93) 5/16" Flat Washer (8) 1/4" Flat Washer (71) 1/4" x 1 1/2" Screw (49) 1/4" x 3/4" Bolt (17) 5/16" x 3" Bolt (78) 1/2" x 3 1/2" Bolt (22) 1/2" Plain Nut (68) 1/2" Nylon Jamnut (48) Cable Clip (69) #8 x 3/4" Screw (32) #10 x 1" Tap Screw (7) 1 1/2" Flat Washer (40)
Part Identification ChartÑRBSY82580 R1198A 1/4" Nylon Jamnut (51 ) 1/4" Nylon Locknut (25) 5/16" Nylon Locknut (81) 5/16" Nylon Jam Nut (93) 5/16" Flat Washer (8) 1/4" Flat Washer (71) 1/4" x 1 1/2" Screw (49) 1/4" x 3/4" Bolt (17) 5/16" x 3" Bolt (78) 1/2" x 3 1/2" Bolt (22) 1/2" Plain Nut (68) 1/2" Nylon Jamnut (48) Cable Clip (69) #8 x 3/4" Screw (32) #10 x 1" Tap Screw (7) 1 1/2" Flat Washer (40)

English Manual
Page 23
...; x 3Ó Bolt 5/16Ó Nylon Jamnut 5/16Ó Flat Washer 5/16Ó Nylon Locknut UserÕs Manual Exercise Guide Note: Ò#Ó indicates a non-illustrated part. Part ListÑModel No. Qty. 1 1 2 1 3 1 4 1 5 1 6 1 7 1 8 1 9 4 10 1 11 1 12 1 13 1 14 2 15 1 16 1 17 10 18 6 19 2 20 2 21 1 22 1 23 2 24 3 25 2 26 14 27...
...; x 3Ó Bolt 5/16Ó Nylon Jamnut 5/16Ó Flat Washer 5/16Ó Nylon Locknut UserÕs Manual Exercise Guide Note: Ò#Ó indicates a non-illustrated part. Part ListÑModel No. Qty. 1 1 2 1 3 1 4 1 5 1 6 1 7 1 8 1 9 4 10 1 11 1 12 1 13 1 14 2 15 1 16 1 17 10 18 6 19 2 20 2 21 1 22 1 23 2 24 3 25 2 26 14 27...
English Manual
Page 25
... of the product (Reebok¨ 825 Training System). 3. top weight. The NAME of the product (RBSY82580). 2. The SERIAL NUMBER of the product (see the PART LIST and EXPLODED DRAWING attached at 1-800-999-3756, Monday through Friday, 6 a.m. Ordering Replacement Parts To order replacement parts, simply call our ... in individual weight plates, as well as friction between the cables, pulleys, and weight guides. The KEY NUMBER and DESCRIPTION of the part(s) (see the front cover of this manual). The other numbers refer to give the following information: 1. To help us assist you...
... of the product (Reebok¨ 825 Training System). 3. top weight. The NAME of the product (RBSY82580). 2. The SERIAL NUMBER of the product (see the PART LIST and EXPLODED DRAWING attached at 1-800-999-3756, Monday through Friday, 6 a.m. Ordering Replacement Parts To order replacement parts, simply call our ... in individual weight plates, as well as friction between the cables, pulleys, and weight guides. The KEY NUMBER and DESCRIPTION of the part(s) (see the front cover of this manual). The other numbers refer to give the following information: 1. To help us assist you...


