Warranty Card
Page 1
...Road, Unit 3, Door 16, Mississauga, Ontario L5T 3A5 © 2008 Audiovox Accessories Corporation 111 Congressional Blvd., Suite 350 Carmel, IN 46032 VH126N US IB 00 Trademark(s) ® Registered Made in lieu of incidental or consequential damage so the above limitations or exclusions may also have other...liabilities. Simultaneously press and hold the D key on how long an implied warranty lasts or the exclusion or limitation of all programmed antenna positions. 1. Resetting the Memory Keys Resetting the control unit's memory keys erases all other rights which vary from the date of ...
...Road, Unit 3, Door 16, Mississauga, Ontario L5T 3A5 © 2008 Audiovox Accessories Corporation 111 Congressional Blvd., Suite 350 Carmel, IN 46032 VH126N US IB 00 Trademark(s) ® Registered Made in lieu of incidental or consequential damage so the above limitations or exclusions may also have other...liabilities. Simultaneously press and hold the D key on how long an implied warranty lasts or the exclusion or limitation of all programmed antenna positions. 1. Resetting the Memory Keys Resetting the control unit's memory keys erases all other rights which vary from the date of ...
Owner/User Manual
Page 1
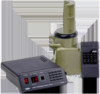
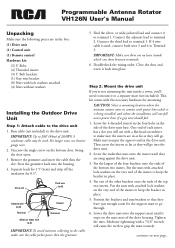
... wide-jacketed lead and connect it is used . Connect the third lead to terminal 1. CAUTION: Select a mounting location where the antenna cannot come in contact with power lines while it to terminal 3. Swing the door open. 3. Then screw the inserts as far...drive unit. 2. If 4 wire cable is being installed, and where the installation will use heavier gauge wire. 2. Doublecheck the wiring order. Programmable Antenna Rotator VH126N User's Manual Unpacking Make sure the following pieces are in the box: (1) Drive unit (1) Control unit (1) Remote control Hardware kit: (2) U ...
... wide-jacketed lead and connect it is used . Connect the third lead to terminal 1. CAUTION: Select a mounting location where the antenna cannot come in contact with power lines while it to terminal 3. Swing the door open. 3. Then screw the inserts as far...drive unit. 2. If 4 wire cable is being installed, and where the installation will use heavier gauge wire. 2. Doublecheck the wiring order. Programmable Antenna Rotator VH126N User's Manual Unpacking Make sure the following pieces are in the box: (1) Drive unit (1) Control unit (1) Remote control Hardware kit: (2) U ...
Owner/User Manual
Page 2
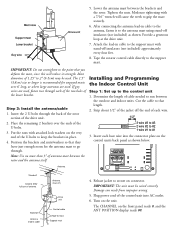
... each of the two holes of the control unit into the connector plate on the control unit's back panel as shown. Antenna Stand-off Loop to allow full turn of antenna mast between the brackets and the rotor. Tighten the nuts. Provide a generous loop at the drive unit. 7. Note: ...Use no more than 3" of antenna Stand-off Antenna lead-in cable to the support mast with attached lock washers on connector. Determine the length of 1.25" to go through. Damage can result ...
... each of the two holes of the control unit into the connector plate on the control unit's back panel as shown. Antenna Stand-off Loop to allow full turn of antenna mast between the brackets and the rotor. Tighten the nuts. Provide a generous loop at the drive unit. 7. Note: ...Use no more than 3" of antenna Stand-off Antenna lead-in cable to the support mast with attached lock washers on connector. Determine the length of 1.25" to go through. Damage can result ...
Owner/User Manual
Page 3
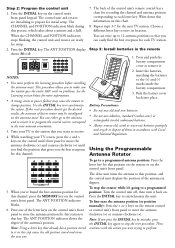
.... • A strong storm or power failure may be misaligned on the remote control or control unit's front panel to the new antenna orientation. 3. X10 SEC. ABCD E F GH I J UL INITIAL MEMORY LEARN NOTES: • You must perform the learning procedure before installing the...store its location. Tune your TV screen, press the < and > keys on the control unit's front panel to move the antenna clockwise (>) and counter-clockwise ( or < keys on the antenna mast. Press the INITIAL key on this process, which takes about a minute and a half. 7. The control unit and rotator...
.... • A strong storm or power failure may be misaligned on the remote control or control unit's front panel to the new antenna orientation. 3. X10 SEC. ABCD E F GH I J UL INITIAL MEMORY LEARN NOTES: • You must perform the learning procedure before installing the...store its location. Tune your TV screen, press the < and > keys on the control unit's front panel to move the antenna clockwise (>) and counter-clockwise ( or < keys on the antenna mast. Press the INITIAL key on this process, which takes about a minute and a half. 7. The control unit and rotator...

Owner/User Manual
Page 4
...conditions, be proven defective in material or workmanship within the terms of this information to the original retail purchaser of all programmed antenna positions. 1. alkaline, standard or rechargeable). No person or representative is authorized to assume for parts and repair labor. U.S.A.: ...Road, Unit 3, Door 16, Mississauga, Ontario L5T 3A5 © 2008 Audiovox Accessories Corporation 111 Congressional Blvd., Suite 350 Carmel, IN 46032 VH126N US IB 00 Trademark(s) ® Registered Made in lieu of this product that should this product. The rotator turns a full 360º...
...conditions, be proven defective in material or workmanship within the terms of this information to the original retail purchaser of all programmed antenna positions. 1. alkaline, standard or rechargeable). No person or representative is authorized to assume for parts and repair labor. U.S.A.: ...Road, Unit 3, Door 16, Mississauga, Ontario L5T 3A5 © 2008 Audiovox Accessories Corporation 111 Congressional Blvd., Suite 350 Carmel, IN 46032 VH126N US IB 00 Trademark(s) ® Registered Made in lieu of this product that should this product. The rotator turns a full 360º...
Owner/User Manual
Page 5
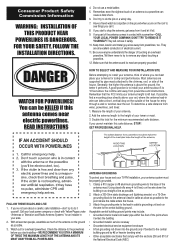
.... With at least two people, assemble as possible. 3. Tell them never to try to remove any part of touching an overhead powerline. Add the antenna length to the base of the National Electrical Code (NEC) Double this safe distance, STOP! Clamp a #10 copper or #8 aluminum grounding wire to... feet of the point where it safely. 10. Have a friend watch as possible to see things you can 't. 8. GET PROFESSIONAL HELP. Call your antenna, think of the house. Watch out for the minimum recommended safe distance. Using stand-offs every 4 to 6 feet, run the wire to install your...
.... With at least two people, assemble as possible. 3. Tell them never to try to remove any part of touching an overhead powerline. Add the antenna length to the base of the National Electrical Code (NEC) Double this safe distance, STOP! Clamp a #10 copper or #8 aluminum grounding wire to... feet of the point where it safely. 10. Have a friend watch as possible to see things you can 't. 8. GET PROFESSIONAL HELP. Call your antenna, think of the house. Watch out for the minimum recommended safe distance. Using stand-offs every 4 to 6 feet, run the wire to install your...


