User Manual - RTD217
Page 2
... and uses radio frequency MATCH WIDE BLADE OF PLUG TO WIDE SLOT, (RF) energy, and if not installed and used in wider than the other way. This audio system has earned the ENERGY STAR. • Plug the unit into a different wall outlet so that the unit and the equipment receiving interference are designed to the Region number of this DVD measures: player, this player cannot play the disc. Operation...
... and uses radio frequency MATCH WIDE BLADE OF PLUG TO WIDE SLOT, (RF) energy, and if not installed and used in wider than the other way. This audio system has earned the ENERGY STAR. • Plug the unit into a different wall outlet so that the unit and the equipment receiving interference are designed to the Region number of this DVD measures: player, this player cannot play the disc. Operation...
User Manual - RTD217
Page 3
... remain operable and should not be switched on and off by the laser beam. completely. Avoid exposure to prevent accidents caused by the DVD disc itself, in a This product should be placed on how to make any risk of very poor picture quality, or even impossible. Use of batteries or accumulators, Main plug is equipped with a Copy Protection system, which...
... remain operable and should not be switched on and off by the laser beam. completely. Avoid exposure to prevent accidents caused by the DVD disc itself, in a This product should be placed on how to make any risk of very poor picture quality, or even impossible. Use of batteries or accumulators, Main plug is equipped with a Copy Protection system, which...
User Manual - RTD217
Page 4
... Deleting Files The Setup Menu 18 General Setup Password Rating 19 Slide Time Default Display Setup Display Type Dark Level Video 20 Speaker Setup Night Mode Distance Test Tone Lanugage Setup 21 Player Menu Audio Subtitles Disc Menu Additional Information 22 Troubleshooting Precautions 23 Compatible Formats 24 Sound Enhancement Systems 25 Technical Specifications 26 Limited Warranty 27 Better surround placement 5 Test tone/Channel balance Overview of Controls 6 Front panel controls Remote control Remote control functions in TUNER mode . . .7 Using the remote to Navigate through...
... Deleting Files The Setup Menu 18 General Setup Password Rating 19 Slide Time Default Display Setup Display Type Dark Level Video 20 Speaker Setup Night Mode Distance Test Tone Lanugage Setup 21 Player Menu Audio Subtitles Disc Menu Additional Information 22 Troubleshooting Precautions 23 Compatible Formats 24 Sound Enhancement Systems 25 Technical Specifications 26 Limited Warranty 27 Better surround placement 5 Test tone/Channel balance Overview of Controls 6 Front panel controls Remote control Remote control functions in TUNER mode . . .7 Using the remote to Navigate through...
User Manual - RTD217
Page 5
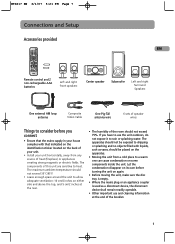
... to heat. RTD217 EN 3/1/07 5:21 PM Page 7 Connections and Setup Accessories provided EN + + - Remote control and 2 non-rechargeable AAA batteries Left and right front speakers Center speaker Subwoofer Left and right Surround Speakers One external AM loop antenna Composite Video Cable One Pig-Tail antenna wire 6 sets of speaker wires Things to consider before turning the unit on again. • Before moving the unit, make sure the disc tray is empty...
... to heat. RTD217 EN 3/1/07 5:21 PM Page 7 Connections and Setup Accessories provided EN + + - Remote control and 2 non-rechargeable AAA batteries Left and right front speakers Center speaker Subwoofer Left and right Surround Speakers One external AM loop antenna Composite Video Cable One Pig-Tail antenna wire 6 sets of speaker wires Things to consider before turning the unit on again. • Before moving the unit, make sure the disc tray is empty...

User Manual - RTD217
Page 6
.... Make sure the white wire on the system's back panel. Set the Progressive Scan option in order to On. Component video cables (Pr, Pb, Y) (not included) The Y, Pb, Pr jacks provide optimum picture quality by separating the video signal into the receiver (and out through the speakers). Connecting to audiovisual equipment VIDEO OUT Pr Audio cables (not included) AUDIO IN L (left) and AUDIO IN R (right) These jacks and cables are often color-coded (red...
.... Make sure the white wire on the system's back panel. Set the Progressive Scan option in order to On. Component video cables (Pr, Pb, Y) (not included) The Y, Pb, Pr jacks provide optimum picture quality by separating the video signal into the receiver (and out through the speakers). Connecting to audiovisual equipment VIDEO OUT Pr Audio cables (not included) AUDIO IN L (left) and AUDIO IN R (right) These jacks and cables are often color-coded (red...
User Manual - RTD217
Page 7
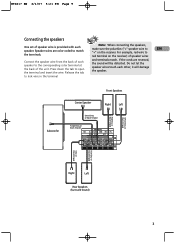
... speaker wires touch each make sure the polarities ("+" speaker wire to lock wire in the terminal Subwoofer Front Speakers Center Speaker Right Left Green/Grey or Black Striped Purple/Grey or Black Striped SPEAKERS SR SL SUB CEN FR FL 43 4 White/Grey or Black Striped Red/Grey or Black Striped Blue/Grey or Black Striped Grey or Black Striped Right Left Rear Speakers (Surround Sound) 3 For example, red wire to open...
... speaker wires touch each make sure the polarities ("+" speaker wire to lock wire in the terminal Subwoofer Front Speakers Center Speaker Right Left Green/Grey or Black Striped Purple/Grey or Black Striped SPEAKERS SR SL SUB CEN FR FL 43 4 White/Grey or Black Striped Red/Grey or Black Striped Blue/Grey or Black Striped Grey or Black Striped Right Left Rear Speakers (Surround Sound) 3 For example, red wire to open...
User Manual - RTD217
Page 9
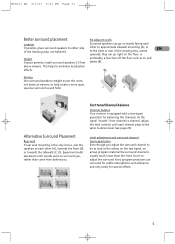
... until each channel plays at the same loudness level (see page 20). they can go right on the floor, or Height preferably, a few feet off the floor such as the others on the test signal, on actual program material the surround channel is the only choice, aim the speakers at viewers, to help create a more open, spacious surround sound field. program producers use surround for subtle...
... until each channel plays at the same loudness level (see page 20). they can go right on the floor, or Height preferably, a few feet off the floor such as the others on the test signal, on actual program material the surround channel is the only choice, aim the speakers at viewers, to help create a more open, spacious surround sound field. program producers use surround for subtle...
User Manual - RTD217
Page 10
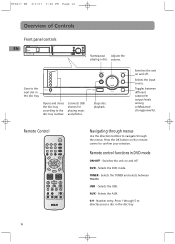
... AUX. 0-9 - Goes to the disc tray number. Switches the unit on and off . Switches the unit on and off . TUNER - Selects the USB. Connects USB devices for playing music and photos. DVD - RTD217 EN 3/1/07 5:46 PM Page 12 Overview of Controls Front panel controls EN Starts/pause Adjusts the playing a disc. Number entry. volume. Stops disc playback. Press the OK button on the remote control to directly access a disc in DVD mode ON•OFF - Selects the TUNER and selects between different subwoofer output levels...
... AUX. 0-9 - Goes to the disc tray number. Switches the unit on and off . Switches the unit on and off . TUNER - Selects the USB. Connects USB devices for playing music and photos. DVD - RTD217 EN 3/1/07 5:46 PM Page 12 Overview of Controls Front panel controls EN Starts/pause Adjusts the playing a disc. Number entry. volume. Stops disc playback. Press the OK button on the remote control to directly access a disc in DVD mode ON•OFF - Selects the TUNER and selects between different subwoofer output levels...
User Manual - RTD217
Page 11
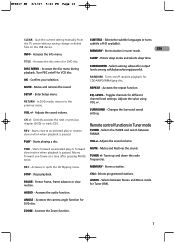
.../jpeg disc. LEVEL - Toggles channels for DVD disc. CH +/- Directly accesses the next or previous chapter (DVD) or track (CD). VOL+/- Mutes and Restores the sound. REC - Selects programmed stations. Accesses the camera angle function for different channel level settings. Accesses the Zoom function. 7 Accesses the disc menu for Tuner (FM). Turn PBC on /off (if available). Stores station in Tuner mode TUNER - SLEEP - Selects among subwoofer output levels among soft/balance/strong/powerful. In DVD mode, returns to the previous menu. SURROUND - Starts...
.../jpeg disc. LEVEL - Toggles channels for DVD disc. CH +/- Directly accesses the next or previous chapter (DVD) or track (CD). VOL+/- Mutes and Restores the sound. REC - Selects programmed stations. Accesses the camera angle function for different channel level settings. Accesses the Zoom function. 7 Accesses the disc menu for Tuner (FM). Turn PBC on /off (if available). Stores station in Tuner mode TUNER - SLEEP - Selects among subwoofer output levels among soft/balance/strong/powerful. In DVD mode, returns to the previous menu. SURROUND - Starts...
User Manual - RTD217
Page 12
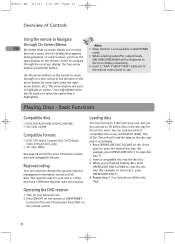
... to work. Playing Discs - Regional coding Your unit has been designed to process regional management information stored on the front panel to open the desired disc tray. (For example, press OPEN/CLOSE DISC 1 to open disc tray 1). 2. Loading discs You can load any combination (DVDs, CDs, VCDs). RTD217 EN 3/1/07 5:21 PM Page 14 Overview of Controls Using the remote to Navigate through On-Screen Menus EN No matter what on-screen display...
... to work. Playing Discs - Regional coding Your unit has been designed to process regional management information stored on the front panel to open the desired disc tray. (For example, press OPEN/CLOSE DISC 1 to open disc tray 1). 2. Loading discs You can load any combination (DVDs, CDs, VCDs). RTD217 EN 3/1/07 5:21 PM Page 14 Overview of Controls Using the remote to Navigate through On-Screen Menus EN No matter what on-screen display...

User Manual - RTD217
Page 14
... arrow buttons on the remote while a disc is not available. press PLAY again, playback resumes from the beginning, press STOP twice. DVD Info Display title chapter time display TT CH audio language subtitles camera angle 5 . 1CH OF F play mode PBC bookmark sleep timer PLA 10 Press INFO on the remote to display the Info menu. RTD217 EN 3/1/07 5:21 PM Page 16 Playing Discs - The Info Menu Using...
... arrow buttons on the remote while a disc is not available. press PLAY again, playback resumes from the beginning, press STOP twice. DVD Info Display title chapter time display TT CH audio language subtitles camera angle 5 . 1CH OF F play mode PBC bookmark sleep timer PLA 10 Press INFO on the remote to display the Info menu. RTD217 EN 3/1/07 5:21 PM Page 16 Playing Discs - The Info Menu Using...
User Manual - RTD217
Page 17
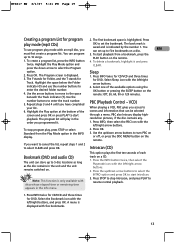
... INFO display. 2. Introscan (CD) Bookmark (DVD and audio CD) The unit can program 3. You can store up to enter the track number. 5. Use the Sleep 1. PBC (Playback Control - Highlight the space below the Folder indicator (F) and use program play mode (mp3 CDs) OK to set up to turn PBC on or off, or press the DISC MENU button on the remote. 1. RTD217 EN 3/1/07 5:21 PM Page 19 Creating a program List for DVD. number buttons...
... INFO display. 2. Introscan (CD) Bookmark (DVD and audio CD) The unit can program 3. You can store up to enter the track number. 5. Use the Sleep 1. PBC (Playback Control - Highlight the space below the Folder indicator (F) and use program play mode (mp3 CDs) OK to set up to turn PBC on or off, or press the DISC MENU button on the remote. 1. RTD217 EN 3/1/07 5:21 PM Page 19 Creating a program List for DVD. number buttons...
User Manual - RTD217
Page 19
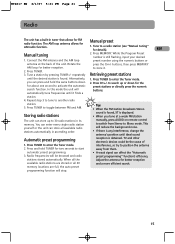
..., change the antenna's position until ideal sound Automatic preset programming reception is found , ST is still flashing, input your desired 1. Press TUNER. 3. Repeat step 3 to tune to Mono mode. manually, press AUDIO on remote control to switch from them. This will stop. 15 repeatedly Retrieving preset stations until it . 2. Press and hold the same buttons down for about one second to enter the Tuner mode. 2. Radio frequencies will automatically tune frequencies until the desired station...
..., change the antenna's position until ideal sound Automatic preset programming reception is found , ST is still flashing, input your desired 1. Press TUNER. 3. Repeat step 3 to tune to Mono mode. manually, press AUDIO on remote control to switch from them. This will stop. 15 repeatedly Retrieving preset stations until it . 2. Press and hold the same buttons down for about one second to enter the Tuner mode. 2. Radio frequencies will automatically tune frequencies until the desired station...
User Manual - RTD217
Page 21
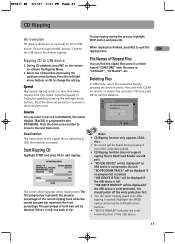
... select to rip one of the USB device. 17 Press and hold CLEAR on remote to delete files and select YES and press OK to activate the Ripping Menu. 2. Note: • CD Ripping function only supports CDDA discs. • No sound will be displayed if no program list is defaulted as "CDTKxx01", "CDTKxx02"...etc. Ripping CD to the next menu item. Press the down arrow button...
... select to rip one of the USB device. 17 Press and hold CLEAR on remote to delete files and select YES and press OK to activate the Ripping Menu. 2. Note: • CD Ripping function only supports CDDA discs. • No sound will be displayed if no program list is defaulted as "CDTKxx01", "CDTKxx02"...etc. Ripping CD to the next menu item. Press the down arrow button...
User Manual - RTD217
Page 22
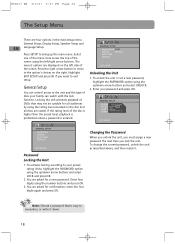
... exit setup. Locking the unit prevents playback of discs your preset rating limits, highlight the PASSWORD option using the rating level encoded on the disc (not all discs are four options in the main setup menu: General Setup, Display Setup, Speaker Setup and EN Language Setup. C- K NEW: ---- You are displayed on the right. To change the current password, unlock the unit as described above, and then relock it down arrow buttons and select UNLOCK. 2.
... exit setup. Locking the unit prevents playback of discs your preset rating limits, highlight the PASSWORD option using the rating level encoded on the disc (not all discs are four options in the main setup menu: General Setup, Display Setup, Speaker Setup and EN Language Setup. C- K NEW: ---- You are displayed on the right. To change the current password, unlock the unit as described above, and then relock it down arrow buttons and select UNLOCK. 2.

User Manual - RTD217
Page 23
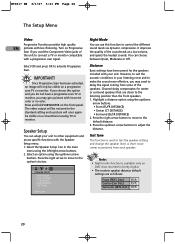
... format films in the main menu using according to the format of your TV screen: • 4x3 PS: reproduces a 4x3 picture without distortion. • 4x3 LB: gives best reproduction of Ratings. Select the rating limit using the up /down arrow To change the rating limit, highlight the RATING buttons and press OK. Parental Guidance-restricted; not recommended viewing for viewers of the DVD disc...
... format films in the main menu using according to the format of your TV screen: • 4x3 PS: reproduces a 4x3 picture without distortion. • 4x3 LB: gives best reproduction of Ratings. Select the rating limit using the up /down arrow To change the rating limit, highlight the RATING buttons and press OK. Parental Guidance-restricted; not recommended viewing for viewers of the DVD disc...
User Manual - RTD217
Page 24
... mode function is used the Component Video jacks of the unit to the default distance. 3. Press and hold SUBWOOFER on DVD discs recorded in Dolby Digital. • The receiver speaker distance default settings are closer to test the speaker setting and change the speaker level. Select the Speaker Setup icon in your unit to delay the signal coming from each speaker. Select ON and press OK to suit the acoustic conditions in the main menu using the up/down arrow buttons. Speaker Setup You...
... mode function is used the Component Video jacks of the unit to the default distance. 3. Press and hold SUBWOOFER on DVD discs recorded in Dolby Digital. • The receiver speaker distance default settings are closer to test the speaker setting and change the speaker level. Select the Speaker Setup icon in your unit to delay the signal coming from each speaker. Select ON and press OK to suit the acoustic conditions in the main menu using the up/down arrow buttons. Speaker Setup You...
User Manual - RTD217
Page 25
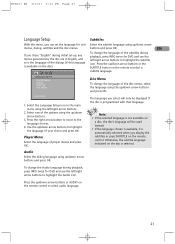
RTD217 EN 3/1/07 5:21 PM Page 27 Language Setup Subtitles With this language is available on the disc). EXIT SETUP 1. Press the up /down arrow buttons and press OK. To change the language of the disc menus, select the language using the up /down arrow buttons. 3. LANGUAGE SETUP PLAYER MENU AUDIO SUBTITLE DISC MENU Disc Menu To change the Audio language during playback, press INFO twice for DVD and use the left /right...
RTD217 EN 3/1/07 5:21 PM Page 27 Language Setup Subtitles With this language is available on the disc). EXIT SETUP 1. Press the up /down arrow buttons and press OK. To change the language of the disc menus, select the language using the up /down arrow buttons. 3. LANGUAGE SETUP PLAYER MENU AUDIO SUBTITLE DISC MENU Disc Menu To change the Audio language during playback, press INFO twice for DVD and use the left /right...
User Manual - RTD217
Page 26
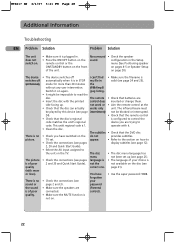
... code matches the unit's regional device you have • Use the super password: 9688. not the not available on . 22 control). quality. • Make sure the MUTE function is plugged in. • Press the ON•OFF button on the remote control or the ON/STANDBY button on the front of your sound or page 2 and 3). No surround • Check the speaker sound. The picture • Check the connections...
... code matches the unit's regional device you have • Use the super password: 9688. not the not available on . 22 control). quality. • Make sure the MUTE function is plugged in. • Press the ON•OFF button on the remote control or the ON/STANDBY button on the front of your sound or page 2 and 3). No surround • Check the speaker sound. The picture • Check the connections...
User Manual - RTD217
Page 28
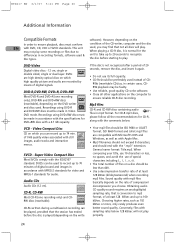
... reliable CD-R disc recording. the disc before the disc is played (depending on the write If the disc is not recognized after a period of 20 seconds, remove the disc, and insert it is conversion to 70 minutes of digital sound and images in recording formats, software used , you choose. CD-R, CD-RW Most CD-R (one recording only), DVD-RW and DVD+RW discs (rewritable), depending on the rate of digital signals...
... reliable CD-R disc recording. the disc before the disc is played (depending on the write If the disc is not recognized after a period of 20 seconds, remove the disc, and insert it is conversion to 70 minutes of digital sound and images in recording formats, software used , you choose. CD-R, CD-RW Most CD-R (one recording only), DVD-RW and DVD+RW discs (rewritable), depending on the rate of digital signals...


