User Manual
Page 1
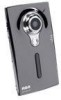
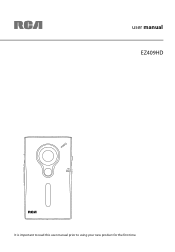
user manual EZ409HD It is important to read this user manual prior to using your new product for the first time.
user manual EZ409HD It is important to read this user manual prior to using your new product for the first time.
User Manual
Page 2
... for help. No technical or product support is available via this phone number is encouraged to try to correct the interference by manufacturer could void the user's authority to operate this equipment does cause harmful interference to Part 15 of the following two conditions: (1) This device may cause undesired operation. This equipment generates, uses and can be determined by turning...
... for help. No technical or product support is available via this phone number is encouraged to try to correct the interference by manufacturer could void the user's authority to operate this equipment does cause harmful interference to Part 15 of the following two conditions: (1) This device may cause undesired operation. This equipment generates, uses and can be determined by turning...
User Manual
Page 3
... THE TRIANGLE IS A WARNING SIGN ALERTING YOU OF IMPORTANT INSTRUCTIONS ACCOMPANYING THE PRODUCT. Use only the specific chargers which is designed to a warm place; RISK OF ELECTRIC SHOCK DO NOT OPEN CAUTION: TO REDUCE THE RISK OF ELECTRIC SHOCK, DO NOT REMOVE COVER (OR BACK). NO USER-SERVICEABLE PARTS INSIDE. REFER SERVICING TO QUALIFIED SERVICE PERSONNEL. Leaving this product in a closed automobile...
... THE TRIANGLE IS A WARNING SIGN ALERTING YOU OF IMPORTANT INSTRUCTIONS ACCOMPANYING THE PRODUCT. Use only the specific chargers which is designed to a warm place; RISK OF ELECTRIC SHOCK DO NOT OPEN CAUTION: TO REDUCE THE RISK OF ELECTRIC SHOCK, DO NOT REMOVE COVER (OR BACK). NO USER-SERVICEABLE PARTS INSIDE. REFER SERVICING TO QUALIFIED SERVICE PERSONNEL. Leaving this product in a closed automobile...
User Manual
Page 4
... memory card 7 4. Charging the battery 7 3. Turning on the camcorder 7 General controls Panel controls 8 Operation modes 9 Video mode Recording videos 10 Recording quality 10 Quality settings 10 Photo mode Taking photos 11 Photo Quality 11 Connecting to external devices Viewing videos on TV 14 Recording videos to VHS tape or DVD 14 Managing videos on your computer Computer system requirements 15 Connecting to a PC 15 About RCA Memory Manager 15 Viewing videos on PC 15 Additional information Tips and troubleshooting 16 Product registration 16 For your records 16 Service...
... memory card 7 4. Charging the battery 7 3. Turning on the camcorder 7 General controls Panel controls 8 Operation modes 9 Video mode Recording videos 10 Recording quality 10 Quality settings 10 Photo mode Taking photos 11 Photo Quality 11 Connecting to external devices Viewing videos on TV 14 Recording videos to VHS tape or DVD 14 Managing videos on your computer Computer system requirements 15 Connecting to a PC 15 About RCA Memory Manager 15 Viewing videos on PC 15 Additional information Tips and troubleshooting 16 Product registration 16 For your records 16 Service...
User Manual
Page 5
... license, without any software upgrades or updates provided by AUDIOVOX that this restriction is accompanied by destroying or permanently erasing the Program and all copies thereof. (c) If you are granted a non-exclusive, non-sublicenseable, non-assignable and nontransferable (except as set forth below) license (i) to accept the terms and conditions of the RCA branded Portable Digital Audio/Video Device ("A/V Device"), and only...
... license, without any software upgrades or updates provided by AUDIOVOX that this restriction is accompanied by destroying or permanently erasing the Program and all copies thereof. (c) If you are granted a non-exclusive, non-sublicenseable, non-assignable and nontransferable (except as set forth below) license (i) to accept the terms and conditions of the RCA branded Portable Digital Audio/Video Device ("A/V Device"), and only...

User Manual
Page 6
...USE OF THIRD PARTY SOFTWARE. 8. without regard to its Licensors. 6. End user license agreement 4. SHOULD THE PROGRAM PROVE DEFECTIVE, YOU (AND NOT AUDIOVOX, ITS SUPPLIERS, OR ITS DEALERS) ASSUME THE ENTIRE COST FOR ALL NECESSARY REPAIR OR CORRECTION. As a result, the above exclusion may not apply to direct or cause the direction...illegal, or unenforceable, the validity, legality, and enforceability of the remainder of the respective content owner and may not be accessed through use such content. "AUDIOVOX SUBSIDIARY" shall mean any other rights depending on the law that is ...
...USE OF THIRD PARTY SOFTWARE. 8. without regard to its Licensors. 6. End user license agreement 4. SHOULD THE PROGRAM PROVE DEFECTIVE, YOU (AND NOT AUDIOVOX, ITS SUPPLIERS, OR ITS DEALERS) ASSUME THE ENTIRE COST FOR ALL NECESSARY REPAIR OR CORRECTION. As a result, the above exclusion may not apply to direct or cause the direction...illegal, or unenforceable, the validity, legality, and enforceability of the remainder of the respective content owner and may not be accessed through use such content. "AUDIOVOX SUBSIDIARY" shall mean any other rights depending on the law that is ...
User Manual
Page 7
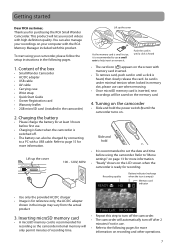
...) Memory card indicator • Use only the provided AC/DC charger • Image is heard, then slowly release the card. This product will automatically turn off after 2 minutes if not in until the camcorder turns on. Refer to set the date and time before first use care when removing. • Once microSD memory card is ready for purchasing the RCA Small Wonder Camcorder. You can also be saved on recording and other operations...
...) Memory card indicator • Use only the provided AC/DC charger • Image is heard, then slowly release the card. This product will automatically turn off after 2 minutes if not in until the camcorder turns on. Refer to set the date and time before first use care when removing. • Once microSD memory card is ready for purchasing the RCA Small Wonder Camcorder. You can also be saved on recording and other operations...
User Manual
Page 8
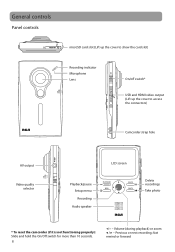
fast rewind or forward Previous or next recording; Volume (during playback) or zoom / - General controls Panel controls microSD card slot (Lift up the cover to show the card slot) Recording indicator Microphone Lens On/off switch* USB and HDMI video output (Lift up the cover to access the connectors) Camcorder strap hole AV output Video quality selector Playback/pause Setup menu Recording Audio speaker LCD screen Delete recordings Take photo * To reset the camcorder (if it is not functioning properly): Slide and hold the On/Off switch for more than 10 seconds. 8 +/- -
fast rewind or forward Previous or next recording; Volume (during playback) or zoom / - General controls Panel controls microSD card slot (Lift up the cover to show the card slot) Recording indicator Microphone Lens On/off switch* USB and HDMI video output (Lift up the cover to access the connectors) Camcorder strap hole AV output Video quality selector Playback/pause Setup menu Recording Audio speaker LCD screen Delete recordings Take photo * To reset the camcorder (if it is not functioning properly): Slide and hold the On/Off switch for more than 10 seconds. 8 +/- -
User Manual
Page 9
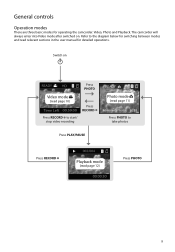
The camcorder will always enter into Video mode after switched on Press PHOTO Video mode (read page 10) Press RECORD Press RECORD to start/ stop video recording Press PLAY/PAUSE Photo mode (read page 11) Press PHOTO to the diagram below for operating the camcorder: Video, Photo and Playback. Refer to take photos Press RECORD Playback mode (read relevant sections in the user manual for detailed operations. Switch on . General controls Operation modes There are three basic modes for switching between modes and read page 12) Press PHOTO 9
The camcorder will always enter into Video mode after switched on Press PHOTO Video mode (read page 10) Press RECORD Press RECORD to start/ stop video recording Press PLAY/PAUSE Photo mode (read page 11) Press PHOTO to the diagram below for operating the camcorder: Video, Photo and Playback. Refer to take photos Press RECORD Playback mode (read relevant sections in the user manual for detailed operations. Switch on . General controls Operation modes There are three basic modes for switching between modes and read page 12) Press PHOTO 9
User Manual
Page 10
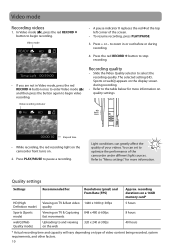
Video mode Recording videos 1. Video recording indicator Elapsed time • While recording, the red recording light on the camcorder front turns on type of the screen. • To resume recording, press PLAY/PAUSE. 3. Video mode • A pause indicator II replaces the red at the top left corner of video content being recorded, system requirements, and other factors. 10 The selected setting (HD, Sports or webQ) appears on the display screen during recording. 4. Quality settings Settings Recommended for more information on TV & Capturing 848...
Video mode Recording videos 1. Video recording indicator Elapsed time • While recording, the red recording light on the camcorder front turns on type of the screen. • To resume recording, press PLAY/PAUSE. 3. Video mode • A pause indicator II replaces the red at the top left corner of video content being recorded, system requirements, and other factors. 10 The selected setting (HD, Sports or webQ) appears on the display screen during recording. 4. Quality settings Settings Recommended for more information on TV & Capturing 848...

User Manual
Page 11
... 8 mega pixel*. You can select among 3, 5, 8 and 12 mega pixel by going to Video mode ( ). In Photo mode ( ), press PHOTO to take photos. Photo mode You must return to Video mode ( ) before recording videos. • If you are not in Photo mode, press PHOTO once to enter Photo mode ( ) and then press the button again to take photos. 2. After taking photos, press the red RECORD button to exit Photo mode ( ) and return to the camcorder menu. Photo mode Taking photos 1.
... 8 mega pixel*. You can select among 3, 5, 8 and 12 mega pixel by going to Video mode ( ). In Photo mode ( ), press PHOTO to take photos. Photo mode You must return to Video mode ( ) before recording videos. • If you are not in Photo mode, press PHOTO once to enter Photo mode ( ) and then press the button again to take photos. 2. After taking photos, press the red RECORD button to exit Photo mode ( ) and return to the camcorder menu. Photo mode Taking photos 1.

User Manual
Page 12
...enter Playback mode and start playback of files 2. Press PLAY/PAUSE to adjust volume (video only). 3. Type of file (Video/Photo) Current file number/Total number of the most recent recording (video/photo). Pause indicator Elapsed playback time Press and hold PLAY/PAUSE for three seconds to cue the previous or next video. Playback mode Playing back recordings 1. Press PLAY/PAUSE to pause playback. • Press PLAY/PAUSE again to Photo mode ( ) after playback. 12 Press the red RECORD button to return to Video mode ( ) or if no video is selected after playback has finished, Video mode...
...enter Playback mode and start playback of files 2. Press PLAY/PAUSE to adjust volume (video only). 3. Type of file (Video/Photo) Current file number/Total number of the most recent recording (video/photo). Pause indicator Elapsed playback time Press and hold PLAY/PAUSE for three seconds to cue the previous or next video. Playback mode Playing back recordings 1. Press PLAY/PAUSE to pause playback. • Press PLAY/PAUSE again to Photo mode ( ) after playback. 12 Press the red RECORD button to return to Video mode ( ) or if no video is selected after playback has finished, Video mode...
User Manual
Page 13
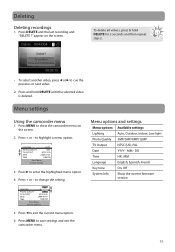
... firmware version 13 Deleting Deleting recordings 1. To delete all videos, press & hold DELETE until the selected video is deleted. Press DELETE and the last recording and "DELETE ?" Press + or - Press to Save and Exit 5. Press MENU to enter the highlighted menu option. 4. Press to show the camcorder menu on the screen. Menu options and settings Menu options Available settings Lighting Auto, Outdoor, Indoor, Low light Photo Quality 3MP/5MP/8MP/12MP TV Output NTSC (US), PAL Date YYYY - Menu settings Using the camcorder menu...
... firmware version 13 Deleting Deleting recordings 1. To delete all videos, press & hold DELETE until the selected video is deleted. Press DELETE and the last recording and "DELETE ?" Press + or - Press to Save and Exit 5. Press MENU to enter the highlighted menu option. 4. Press to show the camcorder menu on the screen. Menu options and settings Menu options Available settings Lighting Auto, Outdoor, Indoor, Low light Photo Quality 3MP/5MP/8MP/12MP TV Output NTSC (US), PAL Date YYYY - Menu settings Using the camcorder menu...
User Manual
Page 14
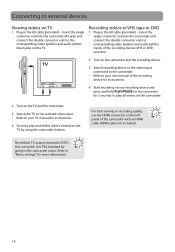
... video (yellow) and audio (white) input jacks on the camcorder and the recording device. 3. Plug in the AV cable (provided) - Refer to your user manual of your TV manual for more information. 14 Switch the TV to the selected video input. • Refer to VHS tape or DVD 1. Start recording of the recording device for 3 seconds to external devices Viewing videos on TV 1. Recording videos to your recording device and press and hold PLAY/PAUSE on the camcorder for instructions. 4. Connecting to play and delete videos viewed...
... video (yellow) and audio (white) input jacks on the camcorder and the recording device. 3. Plug in the AV cable (provided) - Refer to your user manual of your TV manual for more information. 14 Switch the TV to the selected video input. • Refer to VHS tape or DVD 1. Start recording of the recording device for 3 seconds to external devices Viewing videos on TV 1. Recording videos to your recording device and press and hold PLAY/PAUSE on the camcorder for instructions. 4. Connecting to play and delete videos viewed...
User Manual
Page 15
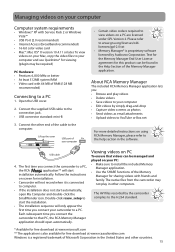
... Service Pack 2 or Windows Vista™ • USB Port (2.0 recommended) • Internet Access (broadband recommended) • 16-bit color video card • Mac®: Mac OS® X version 10.4.11 or later. USB cable 4. Follow the instructions on using RCA Memory Manager, please refer to the connection jack. • USB connector standard: mini-B 3. The AVI files recorded by simply drag-and-drop • Capture video screens as photos • Send videos as email attachments • Upload videos...
... Service Pack 2 or Windows Vista™ • USB Port (2.0 recommended) • Internet Access (broadband recommended) • 16-bit color video card • Mac®: Mac OS® X version 10.4.11 or later. USB cable 4. Follow the instructions on using RCA Memory Manager, please refer to the connection jack. • USB connector standard: mini-B 3. The AVI files recorded by simply drag-and-drop • Capture video screens as photos • Send videos as email attachments • Upload videos...
User Manual
Page 16
... the video recording quality before use only. The native files from the card slot again when the camcorder is powered off ? • Yes. Slide the power button to turn on how to obtain service, refer to the warranty included in this Guide. Available time for proof of third parties and may not play in the setting menu. The recording time and date are played back via connected TV set the date and time in...
... the video recording quality before use only. The native files from the card slot again when the camcorder is powered off ? • Yes. Slide the power button to turn on how to obtain service, refer to the warranty included in this Guide. Available time for proof of third parties and may not play in the setting menu. The recording time and date are played back via connected TV set the date and time in...

User Manual
Page 17
Visiting RCA website Please visit www.rcaaudiovideo.com for lost data. Additional information Back up your data As with any portable player, you must back up the drive regularly. The manufacturer is not responsible for : • Latest software and firmware • RCA Memory Manager Software • User manual • Frequently asked questions (FAQ) • Customer service and technical support information 17
Visiting RCA website Please visit www.rcaaudiovideo.com for lost data. Additional information Back up your data As with any portable player, you must back up the drive regularly. The manufacturer is not responsible for : • Latest software and firmware • RCA Memory Manager Software • User manual • Frequently asked questions (FAQ) • Customer service and technical support information 17
User Manual
Page 18
... SECURITY OF ANY PERSONAL CONTENT OR DATA ON THE RETURNED DEVICE. We recommend using the original carton and packing materials. • Include evidence of purchase date such as an mp3 player, digital voice recorder, etc), it is to be delivered with proof of media, files, data or content, or to damage to tapes, discs, removable memory devices or cards, speakers, accessories, computers, computer peripherals, other...
... SECURITY OF ANY PERSONAL CONTENT OR DATA ON THE RETURNED DEVICE. We recommend using the original carton and packing materials. • Include evidence of purchase date such as an mp3 player, digital voice recorder, etc), it is to be delivered with proof of media, files, data or content, or to damage to tapes, discs, removable memory devices or cards, speakers, accessories, computers, computer peripherals, other...

User Manual
Page 19
... 1-877-833-3491 • Insure your shipment for the remainder of damage or loss en route to Audiovox. • Pay any charges billed to you by the Exchange Center for service not covered by the warranty. • A new or refurbished unit will do: Provide you freight prepaid. Audiovox accepts no liability in...
... 1-877-833-3491 • Insure your shipment for the remainder of damage or loss en route to Audiovox. • Pay any charges billed to you by the Exchange Center for service not covered by the warranty. • A new or refurbished unit will do: Provide you freight prepaid. Audiovox accepts no liability in...

User Manual
Page 20
Trademark(s) ® Registered Marca(s) ® Registrada(s) Marque(s) ® Deposée(s) www.rcaaudiovideo.com V1.0 20 The descriptions and characteristics given in this publication are given as a general indication and not as a guarantee. In order to provide the highest quality product possible, we reserve the right to change. Illustrations contained within this document are for representation only and subject to make any improvement or modification without prior notice. Audiovox Electronics Corp. 150 Marcus Blvd., Hauppauge, NY 11788 © 2009 Audiovox Electronics Corp.
Trademark(s) ® Registered Marca(s) ® Registrada(s) Marque(s) ® Deposée(s) www.rcaaudiovideo.com V1.0 20 The descriptions and characteristics given in this publication are given as a general indication and not as a guarantee. In order to provide the highest quality product possible, we reserve the right to change. Illustrations contained within this document are for representation only and subject to make any improvement or modification without prior notice. Audiovox Electronics Corp. 150 Marcus Blvd., Hauppauge, NY 11788 © 2009 Audiovox Electronics Corp.


