User Guide & Warranty
Page 5
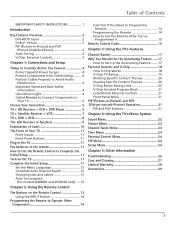
Table of Contents IMPORTANT SAFETY INSTRUCTIONS 1 Introduction Key Features Overview 2 DVI-HDTV Input 2 Dolby* Virtual 2 PIP (Picture-In-Picture) and POP (Picture-Outside-Picture 2 Auto Tuning 2 V-Chip: Parental Controls 2 Chapter 1: Connections and Setup Things to Consider Before... to Use the Remote Control to Complete the Initial Setup 11 Turn on the TV 11 Complete the Initial Setup 11 Set the Menu Language 12 Complete Auto Channel Search 12 Changing Lists and Labels 12 Auto Convergence (for models D40W20 and D52W20 only) ..... 12 Chapter 2: Using the Remote Control The Buttons ...
Table of Contents IMPORTANT SAFETY INSTRUCTIONS 1 Introduction Key Features Overview 2 DVI-HDTV Input 2 Dolby* Virtual 2 PIP (Picture-In-Picture) and POP (Picture-Outside-Picture 2 Auto Tuning 2 V-Chip: Parental Controls 2 Chapter 1: Connections and Setup Things to Consider Before... to Use the Remote Control to Complete the Initial Setup 11 Turn on the TV 11 Complete the Initial Setup 11 Set the Menu Language 12 Complete Auto Channel Search 12 Changing Lists and Labels 12 Auto Convergence (for models D40W20 and D52W20 only) ..... 12 Chapter 2: Using the Remote Control The Buttons ...
User Guide & Warranty
Page 6
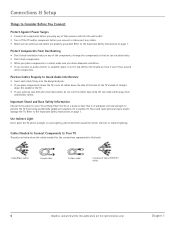
...8226; Don't stack components. • When you place components in this publication are properly grounded. Use Indirect Light Don't place the TV where sunlight or room lighting will be directed toward the screen. Use soft or indirect lighting. Refer to the Important Safety Instructions on ... back of the TV instead of straight down the middle of the TV. • If your TV carefully. Cables Needed to Connect Components to Avoid Audio Interference • Insert each cable firmly into the wall outlet. • Turn off . Position Cables Properly to Your TV The pictures below ...
...8226; Don't stack components. • When you place components in this publication are properly grounded. Use Indirect Light Don't place the TV where sunlight or room lighting will be directed toward the screen. Use soft or indirect lighting. Refer to the Important Safety Instructions on ... back of the TV instead of straight down the middle of the TV. • If your TV carefully. Cables Needed to Connect Components to Avoid Audio Interference • Insert each cable firmly into the wall outlet. • Turn off . Position Cables Properly to Your TV The pictures below ...
User Guide & Warranty
Page 11
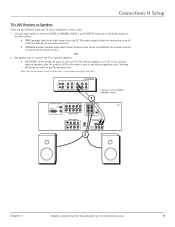
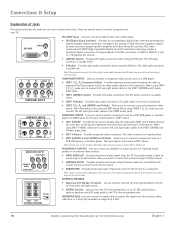
...let you connect external speakers, slide the switch to EXT so the audio is sent to the external speakers only. If you turn the TV's internal speakers on or off. This audio output is 8 ohms with 15 watts power handling capabilities. Volume levels can be ... its own volume control. • VARIABLE provides variable-level audio output. Connect audio cables to either FIXED or VARIABLE Output CMP1 CMP2 Y PB PR L/MONO R TV DVI-HDTV L/MONO R Y PB PR L/MONO R + + EXT/INT COMPONENT INPUTS RIGHT LEFT EXTERNAL SPEAKERS S-VIDEO S-VIDEO COMPOSITE INPUTS V L/MONO R V L/MONO R ...
...let you connect external speakers, slide the switch to EXT so the audio is sent to the external speakers only. If you turn the TV's internal speakers on or off. This audio output is 8 ohms with 15 watts power handling capabilities. Volume levels can be ... its own volume control. • VARIABLE provides variable-level audio output. Connect audio cables to either FIXED or VARIABLE Output CMP1 CMP2 Y PB PR L/MONO R TV DVI-HDTV L/MONO R Y PB PR L/MONO R + + EXT/INT COMPONENT INPUTS RIGHT LEFT EXTERNAL SPEAKERS S-VIDEO S-VIDEO COMPOSITE INPUTS V L/MONO R V L/MONO R ...
User Guide & Warranty
Page 12
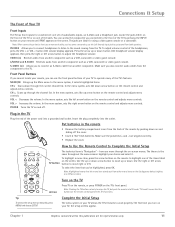
... R AUDIO/VIDEO OUTPUT FIXED AUDIO V L R VARIABLE AUDIO SUBWOOFER L R + + EXT/INT RIGHT LEFT EXTERNAL SPEAKERS VID2 VID1 CMP1 CMP2 DVI-HDTV Input Lets you connect an HD receiver with HDCP (High bandwidth Digital Content Protection) technology, creates a protected digital connection. The left audio connector is ...receive left and right sound. • EXT/INT (switch) Lets you turn the TV's internal speakers on pages 6-8, a VCR. The signal speed of the DVI connection is separated from the TV. Its AUDIO jacks are several ways to connect components to connect a component...
... R AUDIO/VIDEO OUTPUT FIXED AUDIO V L R VARIABLE AUDIO SUBWOOFER L R + + EXT/INT RIGHT LEFT EXTERNAL SPEAKERS VID2 VID1 CMP1 CMP2 DVI-HDTV Input Lets you connect an HD receiver with HDCP (High bandwidth Digital Content Protection) technology, creates a protected digital connection. The left audio connector is ...receive left and right sound. • EXT/INT (switch) Lets you turn the TV's internal speakers on pages 6-8, a VCR. The signal speed of the DVI connection is separated from the TV. Its AUDIO jacks are several ways to connect components to connect a component...
User Guide & Warranty
Page 13
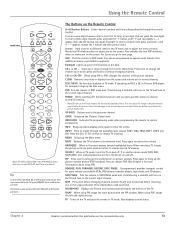
...to move up or down through the on the remote control and adjusts menu controls. Use the right or left arrow TV button button to the TV. Arrows Turn on the TV Press TV on the remote, or press POWER on the screen. Complete the Initial Setup The menu system in your choice and ...panel buttons of your remote, you connected to get sound from another component such as a VCR, camcorder or video game console. Note: Pressing the TV button not only turns on the list (appears darker, brighter, or a different color). Tip To access the setup menus manually, press MENU and choose SETUP. The ...
...to move up or down through the on the remote control and adjusts menu controls. Use the right or left arrow TV button button to the TV. Arrows Turn on the TV Press TV on the remote, or press POWER on the screen. Complete the Initial Setup The menu system in your choice and ...panel buttons of your remote, you connected to get sound from another component such as a VCR, camcorder or video game console. Note: Pressing the TV button not only turns on the list (appears darker, brighter, or a different color). Tip To access the setup menus manually, press MENU and choose SETUP. The ...
User Guide & Warranty
Page 15
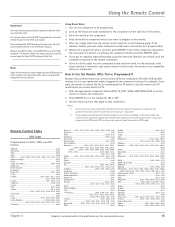
...When in the picture window. If operating an RCA, a GE or Proscan DVD player, for representation only. 13 The Buttons on the TV and puts the remote in another device mode (VCR, DVD, SAT•CABLE, etc.) and programmed, will turn off all the RCA, GE, and Proscan components that are on... the TV and tune to continue changing channels. SOUND•ANT Displays the Picture and Sound preset settings at any menu or display...
...When in the picture window. If operating an RCA, a GE or Proscan DVD player, for representation only. 13 The Buttons on the TV and puts the remote in another device mode (VCR, DVD, SAT•CABLE, etc.) and programmed, will turn off all the RCA, GE, and Proscan components that are on... the TV and tune to continue changing channels. SOUND•ANT Displays the Picture and Sound preset settings at any menu or display...
User Guide & Warranty
Page 16
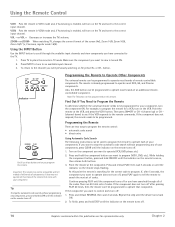
.... Point the remote at the component. If you want to operate most RCA, GE, and Proscan components. If the component does not turn off . 1. To finish, press and hold CLEAR until the indicator on the remote turns off after 5 seconds, the component you were previously watching on the VCR.... Programming the Remote There are 20 total sets of the screen (4x3, Zoom 14/9, Zoom 16/9, Zoom 16/9 ^/v, Cinerama, regular mode 16/9). Turn on the TV and tune to be used to program the remote to operate (VCR, DVD player, etc.) 2. Press and release REVERSE, then wait 2 seconds. ...
.... Point the remote at the component. If you want to operate most RCA, GE, and Proscan components. If the component does not turn off . 1. To finish, press and hold CLEAR until the indicator on the remote turns off after 5 seconds, the component you were previously watching on the VCR.... Programming the Remote There are 20 total sets of the screen (4x3, Zoom 14/9, Zoom 16/9, Zoom 16/9 ^/v, Cinerama, regular mode 16/9). Turn on the TV and tune to be used to program the remote to operate (VCR, DVD player, etc.) 2. Press and release REVERSE, then wait 2 seconds. ...
User Guide & Warranty
Page 17
... the universal remote to operate the VCR, you would press the TV button to put the remote into TV mode before you could control the TV. 1. Release the VCR1 button. Turn on the following pages. Press the appropriate component button (DVD, TV, VCR1, VCR2, SAT•CABLE, AUX) to set the ...remote to turn the component ON or OFF. 3. Notes: • The remote may...
... the universal remote to operate the VCR, you would press the TV button to put the remote into TV mode before you could control the TV. 1. Release the VCR1 button. Turn on the following pages. Press the appropriate component button (DVD, TV, VCR1, VCR2, SAT•CABLE, AUX) to set the ...remote to turn the component ON or OFF. 3. Notes: • The remote may...
User Guide & Warranty
Page 20
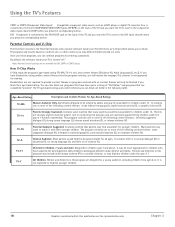
...Based Rating Description and Content Themes for children under 14. Specifically designed to be viewed by entering a password. TV-PG Parental Guidance Suggested. TV-G General Audience. TV-Y7 Directed to the DVI-HDCP jack on the back of the following content themes: crude indecent language (L), ...-believe children should not view. Themes and elements in the Parental Controls menu involve software inside your TV (referred to as a DVD player or digital TV converter box, is turned "off." It is connected to Children 7 years and older. Once you block programs, you press...
...Based Rating Description and Content Themes for children under 14. Specifically designed to be viewed by entering a password. TV-PG Parental Guidance Suggested. TV-G General Audience. TV-Y7 Directed to the DVI-HDCP jack on the back of the following content themes: crude indecent language (L), ...-believe children should not view. Themes and elements in the Parental Controls menu involve software inside your TV (referred to as a DVD player or digital TV converter box, is turned "off." It is connected to Children 7 years and older. Once you block programs, you press...
User Guide & Warranty
Page 26
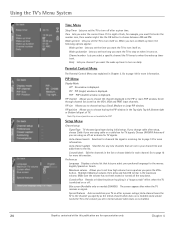
... is receiving. Highlight Maximum volume, then press and hold OK to hear is displayed. If it is eight o'clock, for example, you set the TV to turn itself on . Wake up timer Lets you must first enter the number zero, then number eight. Parental Control Menu The Parental Control Menu was explained... Antenna if you to choose the channel displayed in your channel list and adds them to the list. Time Lets you select your TV on . Channel number Lets you set the TV to turn on Wake up timer, the following options appear: Wake up time Lets you set the time you want the...
... is receiving. Highlight Maximum volume, then press and hold OK to hear is displayed. If it is eight o'clock, for example, you set the TV to turn itself on . Wake up timer Lets you must first enter the number zero, then number eight. Parental Control Menu The Parental Control Menu was explained... Antenna if you to choose the channel displayed in your channel list and adds them to the list. Time Lets you select your TV on . Channel number Lets you set the TV to turn on Wake up timer, the following options appear: Wake up time Lets you set the time you want the...
User Guide & Warranty
Page 28
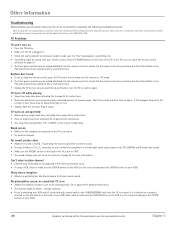
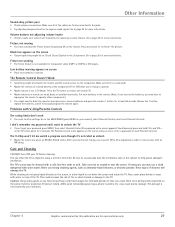
... the Front Panel Block in something else. • Something might have been activated because of a power surge. TV turns off while playing • Sleep timer may have been activated. Wait five minutes. TV turns on unexpectedly • Wake up button to restore sound. • If using S-Video or Y, PB, PR... your home for a fee to page 24 for instructions. • You might be wrong with your VCR). Plug in its operation. Turn the TV on page 27. • The front panel controls may be corrected by selecting the Front Panel Block in your VCR). 26 Graphics contained...
... the Front Panel Block in something else. • Something might have been activated because of a power surge. TV turns off while playing • Sleep timer may have been activated. Wait five minutes. TV turns on unexpectedly • Wake up button to restore sound. • If using S-Video or Y, PB, PR... your home for a fee to page 24 for instructions. • You might be wrong with your VCR). Plug in its operation. Turn the TV on page 27. • The front panel controls may be corrected by selecting the Front Panel Block in your VCR). 26 Graphics contained...
User Guide & Warranty
Page 29
...and the remote sensor on the screen, or allow liquid to be on the picture tube (or projection TV picture tubes). Check Closed Caption in TV Mode. Care and Cleaning CAUTION: Turn OFF your warranty. Caution: Using video games or any button to scratch or mar the screen. Volume... buttons not adjusting volume louder • Check to the TV. Press the TV button so remote will damage the TV. Simultaneously press and ...
...and the remote sensor on the screen, or allow liquid to be on the picture tube (or projection TV picture tubes). Check Closed Caption in TV Mode. Care and Cleaning CAUTION: Turn OFF your warranty. Caution: Using video games or any button to scratch or mar the screen. Volume... buttons not adjusting volume louder • Check to the TV. Press the TV button so remote will damage the TV. Simultaneously press and ...
Spec Sheet
Page 2
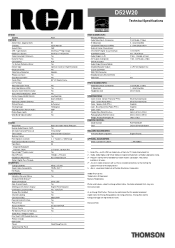
...™ 1 DVI-HDTV Yes - Variable & Fixed 1 Set - May not be available in Guide PSIP Guide Timers Lighted Control Panel D52W20 Technical Specifications RCA 52 HDTV Monitor 16x9 InfiniFocus™...subject to POP Yes Yes 2-Tuner with POP Yes Yes Clock/Sleep/Turn-On REAR CONNECTORS RF Input (Antenna) Audio/Video Inputs (Composite)...Digital Pass-Through RECEPTION Tuning Capability Digital Cable Compatibility HD Ready CONVENIENCE Interactive Set-up w/ Menus Integrated Web Browser²&#..., and Virtual Dolby are registered trademarks of Gemstar-TV Guide International Inc. 2 -
...™ 1 DVI-HDTV Yes - Variable & Fixed 1 Set - May not be available in Guide PSIP Guide Timers Lighted Control Panel D52W20 Technical Specifications RCA 52 HDTV Monitor 16x9 InfiniFocus™...subject to POP Yes Yes 2-Tuner with POP Yes Yes Clock/Sleep/Turn-On REAR CONNECTORS RF Input (Antenna) Audio/Video Inputs (Composite)...Digital Pass-Through RECEPTION Tuning Capability Digital Cable Compatibility HD Ready CONVENIENCE Interactive Set-up w/ Menus Integrated Web Browser²&#..., and Virtual Dolby are registered trademarks of Gemstar-TV Guide International Inc. 2 -


