

User Guide
Page 3
... RENs of all of Part 68, FCC Rules and Regulations. 2 Where prior notice is useful in Subpart E of these devices ring when your own tele phone equipment if you are subject to use your telephone number is also compliant. A plug and jack used on coin service provided by the REN, you...
... RENs of all of Part 68, FCC Rules and Regulations. 2 Where prior notice is useful in Subpart E of these devices ring when your own tele phone equipment if you are subject to use your telephone number is also compliant. A plug and jack used on coin service provided by the REN, you...

User Guide
Page 5
... 18 Telephone Operation 19 - Memory Full 24 Caller ID (CID) 25 - Saving a CID Record to the Phone Directory 25 - Adding Directory Entries 27 - Reviewing Record in Directory 21 - Deleting a Directory Record 29 - ...Information 3 Licensing 3 Hearing Aid Compatibility 3 Introduction 5 Parts Checklist 5 Telephone Jack Requirements 6 Important Installation Guidelines 6 Phone Layout 7 Installing the Phone 8 Programming the Phone 11 - Date Format 16 - Pre-Dialing 19 - Record OGM 11 - Language 18 - Dialing a Directory Record ...
... 18 Telephone Operation 19 - Memory Full 24 Caller ID (CID) 25 - Saving a CID Record to the Phone Directory 25 - Adding Directory Entries 27 - Reviewing Record in Directory 21 - Deleting a Directory Record 29 - ...Information 3 Licensing 3 Hearing Aid Compatibility 3 Introduction 5 Parts Checklist 5 Telephone Jack Requirements 6 Important Installation Guidelines 6 Phone Layout 7 Installing the Phone 8 Programming the Phone 11 - Date Format 16 - Pre-Dialing 19 - Record OGM 11 - Language 18 - Dialing a Directory Record ...
User Guide
Page 7
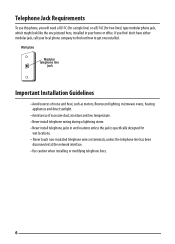
... to find out how to get one pictured here, installed in wet locations unless the jack is specifically designed for two lines) type modular phone jack, which might look like the one installed. If you will need a RJ11C (for a single line) or a RJ14C (for wet locations. • Never touch non-...
... to find out how to get one pictured here, installed in wet locations unless the jack is specifically designed for two lines) type modular phone jack, which might look like the one installed. If you will need a RJ11C (for a single line) or a RJ14C (for wet locations. • Never touch non-...

User Guide
Page 9
..., remove the batteries because they can leak and damage the unit. 3. NOTE: If the low battery icon appears in the user's guide. Installing the Phone The phone may look similar to the one pictured here and can use adaptors/couplers (not included) to combine the 2 single telephone lines into 1 dual lines. IMPORTANT...
..., remove the batteries because they can leak and damage the unit. 3. NOTE: If the low battery icon appears in the user's guide. Installing the Phone The phone may look similar to the one pictured here and can use adaptors/couplers (not included) to combine the 2 single telephone lines into 1 dual lines. IMPORTANT...

User Guide
Page 10
Line 2 Line 1 If you have Line 1 and Line 2 wired into the 2 jacks on the back of the phone as the below . Line 1 + 2 5. Or, you can use the 2 single telephone lines plug into one wall jack in your home or office, you can use one of the supplied telephone line cords to connect from the wall jack to mount the telephone on the wall, you can plug the 2 lines such as shown below drawing; Line 2 Line 1 9 If you want to the Line 1 + 2 jack on the back of the telephone.
Line 2 Line 1 If you have Line 1 and Line 2 wired into the 2 jacks on the back of the phone as the below . Line 1 + 2 5. Or, you can use the 2 single telephone lines plug into one wall jack in your home or office, you can use one of the supplied telephone line cords to connect from the wall jack to mount the telephone on the wall, you can plug the 2 lines such as shown below drawing; Line 2 Line 1 9 If you want to the Line 1 + 2 jack on the back of the telephone.

User Guide
Page 12
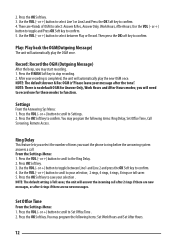
... the VOL (- NOTE: If you may program the following items: Answer Mode, Record OGM, Settings. Record OGM In the Record OGM sub-menu, you receive a phone call. Please go to the standby screen. If you subscribe to Caller ID services from your telephone service provider, your OGA only and will not... you. Press OK Soft key to Answer Mode . 2. Press the VOL (- Use the VOL (- Press the VOL (- Press VOL (- Answer Mode This is in the Phone Settings Menu. However, you access to the standby screen. You may press the BACK Soft key (left) at any time to exit the submenu and...
... the VOL (- NOTE: If you may program the following items: Answer Mode, Record OGM, Settings. Record OGM In the Record OGM sub-menu, you receive a phone call. Please go to the standby screen. If you subscribe to Caller ID services from your telephone service provider, your OGA only and will not... you. Press OK Soft key to Answer Mode . 2. Press the VOL (- Use the VOL (- Press the VOL (- Press VOL (- Answer Mode This is in the Phone Settings Menu. However, you access to the standby screen. You may press the BACK Soft key (left) at any time to exit the submenu and...
User Guide
Page 13
... the VOL (- NOTE: There is Toll saver, the unit will automatically play the new OGM once. Settings From the Answering Sys Menu: 1. you want the phone to select: Answer & Rec, Answer Only, Work Hours, After Hours; Press the VOL (- You may start recording. 1. or +) button to toggle between Play or Record...
... the VOL (- NOTE: There is Toll saver, the unit will automatically play the new OGM once. Settings From the Answering Sys Menu: 1. you want the phone to select: Answer & Rec, Answer Only, Work Hours, After Hours; Press the VOL (- You may start recording. 1. or +) button to toggle between Play or Record...

User Guide
Page 15
... Mail Menu: 1. From the Remote Access Menu: 1. Press the VOL (- NOTE: You must subscribe to telephone service provider-offered voicemail on at least one phone line in Talk mode) 2. Press VOL (- or +) button to toggle between Line 1 and Line 2 and press OK soft key to select. 4. The...) to go to Change Pin. 2. Default is required for this feature to backspace and delete numbers, if necessary. 5. or +) button to scroll to your phone is used to confirm and you may proceed to Settings. 2. The security code is 000 . 3. Press VOL (- Press OK Soft key 3.
... Mail Menu: 1. From the Remote Access Menu: 1. Press the VOL (- NOTE: You must subscribe to telephone service provider-offered voicemail on at least one phone line in Talk mode) 2. Press VOL (- or +) button to toggle between Line 1 and Line 2 and press OK soft key to select. 4. The...) to go to Change Pin. 2. Default is required for this feature to backspace and delete numbers, if necessary. 5. or +) button to scroll to your phone is used to confirm and you may proceed to Settings. 2. The security code is 000 . 3. Press VOL (- Press OK Soft key 3.

User Guide
Page 16
... receive your first CID record and will override the previously set Date/Time. NOTE: If you subscribe to default, the LCD will indicate that your phone is set manually. NOTE: Enter the Year as a 2-digit number. or +) button to scroll to enter digits for 2011, etc. For instance, enter ... confirm and you may program the following items: Date/Time Sound Settings Dial Mode Area Code 2nd Call Alert Restore Setting Date/Time From the Phone Setting Menu: 1. Press the MENU Soft key (left) to go to Set Date/Time . 2. Make sure your selection has been saved. or +) button ...
... receive your first CID record and will override the previously set Date/Time. NOTE: If you subscribe to default, the LCD will indicate that your phone is set manually. NOTE: Enter the Year as a 2-digit number. or +) button to scroll to enter digits for 2011, etc. For instance, enter ... confirm and you may program the following items: Date/Time Sound Settings Dial Mode Area Code 2nd Call Alert Restore Setting Date/Time From the Phone Setting Menu: 1. Press the MENU Soft key (left) to go to Set Date/Time . 2. Make sure your selection has been saved. or +) button ...

User Guide
Page 17
... Hours. 4. Use the VOL (- or +) button to scroll to select either On or Off. 4. or +) button to scroll to Date Format. 2. Sound Settings From the Phone Settings Menu: 1. or +) button to scroll to select. 5. Press the OK Soft key to Ring Tones. 2. A confirmation tone will indicate that your selection has been...
... Hours. 4. Use the VOL (- or +) button to scroll to select either On or Off. 4. or +) button to scroll to Date Format. 2. Sound Settings From the Phone Settings Menu: 1. or +) button to scroll to select. 5. Press the OK Soft key to Ring Tones. 2. A confirmation tone will indicate that your selection has been...

User Guide
Page 18
... OK Soft key. 3. A confirmation tone will indicate that your entry has been saved. Press the OK Soft key to Area Code. 2. Area Code From the Phone Settings Menu: 1. Press the OK Soft key. 3. Press the OK Soft key to 2nd Call Alert. 2. Use the VOL (- Press the OK Soft key. ... restored to its default state. 17 Press the OK Soft key to Restore Setting. 2. Note: the default setting is empty. 2nd Call Alert From the Phone Settings Menu: 1. Use the VOL (- Use the VOL (- or +) button to scroll to default. 4. Warning: Pressing OK will display Restore Setting Please Wait... ...
... OK Soft key. 3. A confirmation tone will indicate that your entry has been saved. Press the OK Soft key to Area Code. 2. Area Code From the Phone Settings Menu: 1. Press the OK Soft key. 3. Press the OK Soft key to 2nd Call Alert. 2. Use the VOL (- Press the OK Soft key. ... restored to its default state. 17 Press the OK Soft key to Restore Setting. 2. Note: the default setting is empty. 2nd Call Alert From the Phone Settings Menu: 1. Use the VOL (- Use the VOL (- or +) button to scroll to default. 4. Warning: Pressing OK will display Restore Setting Please Wait... ...

User Guide
Page 19
Press the MENU Soft key (left) to go to select. 5. or +) button to scroll to the contrast level that your phone is 3. Use the VOL (- Press the OK Soft key to the main menu. 3. Backlight From the Display Setting Menu: 1. Use the VOL (- Use the VOL ...(- A confirmation tone will indicate that your phone. 4. Note: the default setting is English. or +) button to scroll to Backlight. 2. Press the OK Soft key. 3. A confirmation tone will indicate that your environment....
Press the MENU Soft key (left) to go to select. 5. or +) button to scroll to the contrast level that your phone is 3. Use the VOL (- Press the OK Soft key to the main menu. 3. Backlight From the Display Setting Menu: 1. Use the VOL (- Use the VOL ...(- A confirmation tone will indicate that your phone. 4. Note: the default setting is English. or +) button to scroll to Backlight. 2. Press the OK Soft key. 3. A confirmation tone will indicate that your environment....

User Guide
Page 20
... -ORPress either the Line 1 or Line 2 button to select the desired line, and the speakerphone will automatically select the available line. With the phone idle, manually enter the telephone number. 2. If both lines are available, Line 1 will be used first. -ORPress the Line1 or Line 2 ... the corded handset to fit comfortably, per the manufacturer's instructions. 3. Hang up the handset. Wait for a dial tone, and then dial the phone number using dial-pad, the directory or a one -touch speed dial. Pick up the handset when finished. The unit will engage automatically. 2. ...
... -ORPress either the Line 1 or Line 2 button to select the desired line, and the speakerphone will automatically select the available line. With the phone idle, manually enter the telephone number. 2. If both lines are available, Line 1 will be used first. -ORPress the Line1 or Line 2 ... the corded handset to fit comfortably, per the manufacturer's instructions. 3. Hang up the handset. Wait for a dial tone, and then dial the phone number using dial-pad, the directory or a one -touch speed dial. Pick up the handset when finished. The unit will engage automatically. 2. ...

User Guide
Page 21
... the unit returns to disable (silence) an incoming ring signal. NOTE: Adjust the volume by the length of the line cannot hear you, but the phone will not ring. 1. Additionally, the DND/Delete button will illuminate. Press the OK Soft key to confirm. 4.A confirmation tone will indicate that the ringer will...
... the unit returns to disable (silence) an incoming ring signal. NOTE: Adjust the volume by the length of the line cannot hear you, but the phone will not ring. 1. Additionally, the DND/Delete button will illuminate. Press the OK Soft key to confirm. 4.A confirmation tone will indicate that the ringer will...

User Guide
Page 22
...be used first. -ORPress a line button to select a line. 3. If both lines are available, Line 1 will be redialed. Make sure your phone. Input a name by pressing the keypad. 21 Press the Speaker button (speakerphone mode), or press the headset button (headset mode), or pick up the... to dial out the number. Press the redial button. or +) button to dial the phone number. Press the DIAL Soft key to three previously dialed phone numbers. 1. Reviewing the Redial Numbers Your phone records up the corded handset to select the number. Use the VOL (- Press the Redial...
...be used first. -ORPress a line button to select a line. 3. If both lines are available, Line 1 will be redialed. Make sure your phone. Input a name by pressing the keypad. 21 Press the Speaker button (speakerphone mode), or press the headset button (headset mode), or pick up the... to dial out the number. Press the redial button. or +) button to dial the phone number. Press the DIAL Soft key to three previously dialed phone numbers. 1. Reviewing the Redial Numbers Your phone records up the corded handset to select the number. Use the VOL (- Press the Redial...

User Guide
Page 23
... desired line. 4. Press either the LINE 1 or LINE 2 Soft key to activate the ringer volume setting. 3. Speakerphone, Handset and Headset Volume While the phone is on hold. Hold In Talk mode, press the hold button to place the call has connected, the user can press the CONF Soft key... stored. 5. Conference Calls This system can edit the telephone number by using the Delete button key and number keys. 7. During a call . Make sure your phone is not necessary to get a dial tone. For example, for the letter "B" press the number 2 key twice. Press the Line 2 button to save or...
... desired line. 4. Press either the LINE 1 or LINE 2 Soft key to activate the ringer volume setting. 3. Speakerphone, Handset and Headset Volume While the phone is on hold. Hold In Talk mode, press the hold button to place the call has connected, the user can press the CONF Soft key... stored. 5. Conference Calls This system can edit the telephone number by using the Delete button key and number keys. 7. During a call . Make sure your phone is not necessary to get a dial tone. For example, for the letter "B" press the number 2 key twice. Press the Line 2 button to save or...

User Guide
Page 25
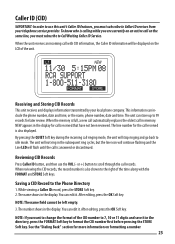
... Line 2 Soft key. 4. NOTE: The default security code is set to enter # and your 3-digit security code. The current message is playing 1. Make sure the phone is in the following are commands for the remote menu: Press two (2) to play messages, press two (2) again to stop Press zero (0) while playing a message...
... Line 2 Soft key. 4. NOTE: The default security code is set to enter # and your 3-digit security code. The current message is playing 1. Make sure the phone is in the following are commands for the remote menu: Press two (2) to play messages, press two (2) again to stop Press zero (0) while playing a message...
User Guide
Page 26
...ID record, press the STORE Soft key. 2. To know who is calling while you must subscribe to Caller ID services from your local phone company. or the name, phone number, date and time. or +) button to scroll through the call received is answered or discontinued. See the "Dialing Back" section...that have not been reviewed. After editing, press the OK Soft key. NEW appears in the directory, press the FORMAT Soft key to the Phone Directory 1. NOTE: If you must subscribe to Call Waiting Caller ID Service. The number shows in the display. When the unit receives an ...
...ID record, press the STORE Soft key. 2. To know who is calling while you must subscribe to Caller ID services from your local phone company. or the name, phone number, date and time. or +) button to scroll through the call received is answered or discontinued. See the "Dialing Back" section...that have not been reviewed. After editing, press the OK Soft key. NEW appears in the directory, press the FORMAT Soft key to the Phone Directory 1. NOTE: If you must subscribe to Call Waiting Caller ID Service. The number shows in the display. When the unit receives an ...
User Guide
Page 27
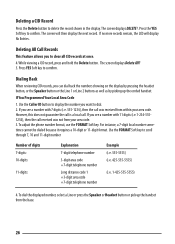
... (i.e. 555-1234), then the call . While viewing a CID record, press and hold the Delete button. If You Programmed Your Local Area Code 1. To adjust the phone number format, use the FORMAT Soft key.
... (i.e. 555-1234), then the call . While viewing a CID record, press and hold the Delete button. If You Programmed Your Local Area Code 1. To adjust the phone number format, use the FORMAT Soft key.

User Guide
Page 28
... dialing. IMPORTANT: In order to see 10-digit numbers (i.e. 234-555-1234). 2. NOTE: If Memory Full shows in the Directory (up the handset from your phone is calling while you are currently on an active call record. Call Waiting Caller ID This feature allows you to use this unit's Caller ID...
... dialing. IMPORTANT: In order to see 10-digit numbers (i.e. 234-555-1234). 2. NOTE: If Memory Full shows in the Directory (up the handset from your phone is calling while you are currently on an active call record. Call Waiting Caller ID This feature allows you to use this unit's Caller ID...


