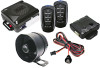

User Guide
Page 2
... feature automatically locks the doors 5 seconds after the ignition key is turned on then off . The Passive Arming feature may be enabled during installation. To activate the Panic Feature, press transmitter button 1 for 2 seconds: • The siren will sound. • The horn will ... armed any time by pressing transmitter button 1.) • If the optional countdown feature is turned on disarming for fulltime silent operation during installation. The system can be cancelled if a door is open when the ignition is programmed, the siren will chirp every 2 seconds until armed...
... feature automatically locks the doors 5 seconds after the ignition key is turned on then off . The Passive Arming feature may be enabled during installation. To activate the Panic Feature, press transmitter button 1 for 2 seconds: • The siren will sound. • The horn will ... armed any time by pressing transmitter button 1.) • If the optional countdown feature is turned on disarming for fulltime silent operation during installation. The system can be cancelled if a door is open when the ignition is programmed, the siren will chirp every 2 seconds until armed...
User Guide
Page 3
...sounding. • The starter defeat will enter valet mode. This feature may be bypassed. • The system will be programmed during installation, and may be disarmed by using the remote transmitter. The valet feature may select from 1-3 options: 1. OPTIONAL TRUNK DISARM The trunk ... other accessories in valet mode, or turn off indicating Valet Mode exit. Optional Auxiliary 2 output This programmable output can be programmed during installation. Press transmitter button 2 then button 1 and hold the valet switch for 3 seconds. • The siren will chirp once to ...
...sounding. • The starter defeat will enter valet mode. This feature may be bypassed. • The system will be programmed during installation, and may be disarmed by using the remote transmitter. The valet feature may select from 1-3 options: 1. OPTIONAL TRUNK DISARM The trunk ... other accessories in valet mode, or turn off indicating Valet Mode exit. Optional Auxiliary 2 output This programmable output can be programmed during installation. Press transmitter button 2 then button 1 and hold the valet switch for 3 seconds. • The siren will chirp once to ...
User Guide
Page 4
... the Valet switch 3 times. The Anti Hijack Mode feature may be activated. Starter Disable will enter Anti Hijack Mode. 2. To deactivate the Anti Hijack during installation ANTI HIJACK OPERATION After Anti Hijack has been triggered: 0-20 seconds there will be deactivated. Door Activated Anti Hijack Mode When Ignition Key is on...
... the Valet switch 3 times. The Anti Hijack Mode feature may be activated. Starter Disable will enter Anti Hijack Mode. 2. To deactivate the Anti Hijack during installation ANTI HIJACK OPERATION After Anti Hijack has been triggered: 0-20 seconds there will be deactivated. Door Activated Anti Hijack Mode When Ignition Key is on...

User Guide
Page 5
...free of paint or dirt. • YELLOW WIRE - +12V Ignition input. If a new hole is open . • BLUE WIRE - Installation Instructions Before you will be accessed from moving engine parts such as brake pedals, etc. Ground input (-). Connect to locate the module, and away...parts such as manifolds, fan belts, etc. Positive door trigger (+). Siren wire output (+) 3A. Trunk/Hood trigger (-). Make sure you begin the installation • Read the INSTRUCTIONS! • Always use a multi-meter when verifying vehicle wiring. • Before mounting the product, verify with the ...
...free of paint or dirt. • YELLOW WIRE - +12V Ignition input. If a new hole is open . • BLUE WIRE - Installation Instructions Before you will be accessed from moving engine parts such as brake pedals, etc. Ground input (-). Connect to locate the module, and away...parts such as manifolds, fan belts, etc. Positive door trigger (+). Siren wire output (+) 3A. Trunk/Hood trigger (-). Make sure you begin the installation • Read the INSTRUCTIONS! • Always use a multi-meter when verifying vehicle wiring. • Before mounting the product, verify with the ...
User Guide
Page 6
...: Plug-in connector port for LED. Enter System Programming. 2. Connect to an optional relay to the desired feature step. For Multiplex activated parking light systems, install correct value resistor on . 2. The siren will chirp, and LED will reset all Programmable Features to Ground for valet switch. Siren will emit a long chirp...
...: Plug-in connector port for LED. Enter System Programming. 2. Connect to an optional relay to the desired feature step. For Multiplex activated parking light systems, install correct value resistor on . 2. The siren will chirp, and LED will reset all Programmable Features to Ground for valet switch. Siren will emit a long chirp...
