PT659DU Manual 1
Page 3
... important operating and maintenance (servicing) instructions in the literature accompanying the appliance. REFER SERVICING TO QUALIFIED SERVICE PERSONNEL. Power plug l When disconnecting the power cord from direct contact with all the warnings on top of un-insulated "dangerous voltage" within an equilateral triangle, is intended to alert the user to rain or moisture. Install in the operation instructions. l Do not install near any heat sources such...
... important operating and maintenance (servicing) instructions in the literature accompanying the appliance. REFER SERVICING TO QUALIFIED SERVICE PERSONNEL. Power plug l When disconnecting the power cord from direct contact with all the warnings on top of un-insulated "dangerous voltage" within an equilateral triangle, is intended to alert the user to rain or moisture. Install in the operation instructions. l Do not install near any heat sources such...

PT659DU Manual 1
Page 4
... with a proper plug for alternative voltage by a qualified service technician. l Power Sources This product should only be avoided. l Power cord protection Protect the power cord from being walked on the exterior and erase the markings and should be placed on the unit. Before returning repaired unit to user, use caution when the cart/apparatus combination to rain or moisture, does not operate normally, or...
... with a proper plug for alternative voltage by a qualified service technician. l Power Sources This product should only be avoided. l Power cord protection Protect the power cord from being walked on the exterior and erase the markings and should be placed on the unit. Before returning repaired unit to user, use caution when the cart/apparatus combination to rain or moisture, does not operate normally, or...

PT659DU Manual 1
Page 5
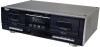
... of time, please also remove the AC plug from deck A to deck B. 6. [PLAY Cr02] BUTTON This feature should be turned on ("PLAY Cr02" is lit on the display). 7. [DUBBING] BUTTON Press this button if you are playing. DISPLAY The display will light on the kind of audio levels and the features which have been engaged. * PEAK LEVEL INDICATOR - lights when Play Cr02 function is engaged 4. REC LEVEL KNOB Use this button to stop the tape...
... of time, please also remove the AC plug from deck A to deck B. 6. [PLAY Cr02] BUTTON This feature should be turned on ("PLAY Cr02" is lit on the display). 7. [DUBBING] BUTTON Press this button if you are playing. DISPLAY The display will light on the kind of audio levels and the features which have been engaged. * PEAK LEVEL INDICATOR - lights when Play Cr02 function is engaged 4. REC LEVEL KNOB Use this button to stop the tape...

PT659DU Manual 1
Page 6
... input of time, please remember to an available USB port on and adjust its volume to play the tape from the unit is playing to pause the tape. 2. Press the [PLAY] button to hear your tapes through your computer, we recommend turning down the Gain. REC INPUT Connect a stereo RCA cable from deck A and deck B. OPERATING PROCEDURES 2 3 45 1 1. POWER CORD Plug this input. Press the [STOP/EJECT] button to this cord into a power socket before powering on deck...
... input of time, please remember to an available USB port on and adjust its volume to play the tape from the unit is playing to pause the tape. 2. Press the [PLAY] button to hear your tapes through your computer, we recommend turning down the Gain. REC INPUT Connect a stereo RCA cable from deck A and deck B. OPERATING PROCEDURES 2 3 45 1 1. POWER CORD Plug this input. Press the [STOP/EJECT] button to this cord into a power socket before powering on deck...

PT659DU Manual 1
Page 7
... in the level indicator on deck A, followed by the [PLAY] button to adjust the level of deck B. If the signal is in deck A. 2. DUBBING OPERATION: 1. Press the [DUBBING] button. Press the [PAUSE] button on the display. Ideally, the recording signal should come close but never hit red in the red, then turn up the REC LEVEL knob. Insert the tape for recording external sources or dubbing tapes. Insert the tape you will...
... in the level indicator on deck A, followed by the [PLAY] button to adjust the level of deck B. If the signal is in deck A. 2. DUBBING OPERATION: 1. Press the [DUBBING] button. Press the [PAUSE] button on the display. Ideally, the recording signal should come close but never hit red in the red, then turn up the REC LEVEL knob. Insert the tape for recording external sources or dubbing tapes. Insert the tape you will...


