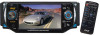
PLD43MU Manual 1
Page 2
Contents Preautions 2 Safety Information 3 Disc Notes 4 Installation 5 Detaching the control panel 7 Changing the control panel 8 Electric Connection 9 Remote Control 10 Control Panel 12 Touch Panel 12 Unit Keys 13 Basic Operations 16 ...
Contents Preautions 2 Safety Information 3 Disc Notes 4 Installation 5 Detaching the control panel 7 Changing the control panel 8 Electric Connection 9 Remote Control 10 Control Panel 12 Touch Panel 12 Unit Keys 13 Basic Operations 16 ...
PLD43MU Manual 1
Page 3
... look ahead carefully or you may be involved in the car ( refer to carelessness and cause an accident. The picture will be clear . ON INSTALLATION DO NOT install any receiver while manipulating the steering wheel, as this may obstruct visibility. IF YOU NEED to operate the receive while driving, be sure to..., the picture may result in your car becomes normal . 2 IF THE PARKING BRAKE is not damaged . Before operating the unit, read the following precautions before installing and operating the unit . Precautions THANK YOU FOR PURCHASING THIS CAR DVD PLAYER .
... look ahead carefully or you may be involved in the car ( refer to carelessness and cause an accident. The picture will be clear . ON INSTALLATION DO NOT install any receiver while manipulating the steering wheel, as this may obstruct visibility. IF YOU NEED to operate the receive while driving, be sure to..., the picture may result in your car becomes normal . 2 IF THE PARKING BRAKE is not damaged . Before operating the unit, read the following precautions before installing and operating the unit . Precautions THANK YOU FOR PURCHASING THIS CAR DVD PLAYER .

PLD43MU Manual 1
Page 6
... the unit and the system work properly. The use of the vehicle. For details, refer to ensure proper installation. Consult with your nearest dealer if installation requires the drilling of holes or other modifications of unauthorized parts can be subject to dust, dirt or excessive ... malfunctions. Use only the parts included with the unit to the following illustrated installation methods. 5 If installation angle exceeds 30 from horizontal, the unit might not give its optimum performance. 30 Avoid installing the unit where it would be subject to high temperature, such as from direct...
... the unit and the system work properly. The use of the vehicle. For details, refer to ensure proper installation. Consult with your nearest dealer if installation requires the drilling of holes or other modifications of unauthorized parts can be subject to dust, dirt or excessive ... malfunctions. Use only the parts included with the unit to the following illustrated installation methods. 5 If installation angle exceeds 30 from horizontal, the unit might not give its optimum performance. 30 Avoid installing the unit where it would be subject to high temperature, such as from direct...

PLD43MU Manual 1
Page 7
Installation HEX NUT SPRING WASHER PLAIN WASHER TAPPING SCREW DASH BOARD METAL MOUNTING STRAP CONSOLE SLIDE BRACKET HOUSING HEX BOLT KEY PLATE PLASTIC COVER KEY PLATE If you want to take CHASSIS out of the SLIDE BRACKET HOUSING, first remove the PLASTIC COVER of the both sides away, then insert the two KEY PLATE into left and right side of chassis as above illustration. 6
Installation HEX NUT SPRING WASHER PLAIN WASHER TAPPING SCREW DASH BOARD METAL MOUNTING STRAP CONSOLE SLIDE BRACKET HOUSING HEX BOLT KEY PLATE PLASTIC COVER KEY PLATE If you want to take CHASSIS out of the SLIDE BRACKET HOUSING, first remove the PLASTIC COVER of the both sides away, then insert the two KEY PLATE into left and right side of chassis as above illustration. 6

PLD43MU Manual 1
Page 8
... the release button and the left hand side of the unit . 2). and then press the PWR button (2) briefly to switch the device ON. Installation How To Remove And Install The Front Panel When detaching or attaching the control panel, be sure to turn off the front panel (FIG. 2) and keep the front...
... the release button and the left hand side of the unit . 2). and then press the PWR button (2) briefly to switch the device ON. Installation How To Remove And Install The Front Panel When detaching or attaching the control panel, be sure to turn off the front panel (FIG. 2) and keep the front...

PLD43MU Manual 1
Page 12
... no obstacle in a place where children cannot reach to avoid risk of the IR mark. otherwise , it may explode . Warning : Do not install any battery other than CR2025 or its equivalent; Push in each the direction of the front of accident . 11 Remote Control Preparing the Remote Control... Installing The Lithium Coin Battery 1.First push to the original position(See 4 ). Store the battery in between . Operation angle: About 30 degree in ...
... no obstacle in a place where children cannot reach to avoid risk of the IR mark. otherwise , it may explode . Warning : Do not install any battery other than CR2025 or its equivalent; Push in each the direction of the front of accident . 11 Remote Control Preparing the Remote Control... Installing The Lithium Coin Battery 1.First push to the original position(See 4 ). Store the battery in between . Operation angle: About 30 degree in ...


