PLD43MU Manual 1
Page 1
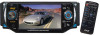
MOD VOL+ IR TOUCH SCREEN EQ SEL APS I DIS P BND MU AUX IN CAR DVD/VCD/CD/MP3 PLAYER WITH MPEG4 DVD/RECEIVER CONTROL POWER MUTE PLAY/PAUSE STOP REPEAT ANGLE MO/ST MENU MODE EQ CLK LO/DX OSD BAND TITLE/PBC A/PS VOL VOL TOP 1 RDM 4 ENTER 2 5 INT 3 6 SEL 7 8 9 SETUP GOTO +10 0 Motorized Slide Down And Detachable Panel 4.3 Inch Wide Color Touch Screen Monitor CAR DVD/VCD/CD/MP3 Player AM/FM Digital PLL Tuning Radio MPEG4 Player USB Connect CH 1-6 PLD43MU OWNER's MANUAL Mobile Video System REL RESET VOL-
MOD VOL+ IR TOUCH SCREEN EQ SEL APS I DIS P BND MU AUX IN CAR DVD/VCD/CD/MP3 PLAYER WITH MPEG4 DVD/RECEIVER CONTROL POWER MUTE PLAY/PAUSE STOP REPEAT ANGLE MO/ST MENU MODE EQ CLK LO/DX OSD BAND TITLE/PBC A/PS VOL VOL TOP 1 RDM 4 ENTER 2 5 INT 3 6 SEL 7 8 9 SETUP GOTO +10 0 Motorized Slide Down And Detachable Panel 4.3 Inch Wide Color Touch Screen Monitor CAR DVD/VCD/CD/MP3 Player AM/FM Digital PLL Tuning Radio MPEG4 Player USB Connect CH 1-6 PLD43MU OWNER's MANUAL Mobile Video System REL RESET VOL-
PLD43MU Manual 1
Page 2
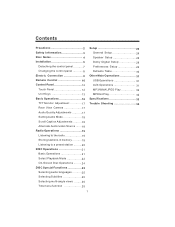
...control panel 7 Changing the control panel 8 Electric Connection 9 Remote Control 10 Control Panel 12 Touch Panel 12 Unit Keys 13 Basic Operations 16 TFT Monitor Adjustment 17 Rear View Camera 17 Audio Quality Adjustments 17 Setting Audio Mode 18 Scroll Caption Adjustments ...........1.8 Alternate Audio/video Source ........18 Radio Operations 19 Listening to the radio 19 Storing stations in memory ...........19 Listening to a preset station ......... 20 DISC Operations 21 Basic Operations 21 Select Playback Mode 22 On-Screen Disc Operations ......... 24 DISC Special Functions...
...control panel 7 Changing the control panel 8 Electric Connection 9 Remote Control 10 Control Panel 12 Touch Panel 12 Unit Keys 13 Basic Operations 16 TFT Monitor Adjustment 17 Rear View Camera 17 Audio Quality Adjustments 17 Setting Audio Mode 18 Scroll Caption Adjustments ...........1.8 Alternate Audio/video Source ........18 Radio Operations 19 Listening to the radio 19 Storing stations in memory ...........19 Listening to a preset station ......... 20 DISC Operations 21 Basic Operations 21 Select Playback Mode 22 On-Screen Disc Operations ......... 24 DISC Special Functions...
PLD43MU Manual 1
Page 3
... be damaged . Before operating the unit, read the following precautions before installing and operating the unit . DO NOT operate any receiver in a traffic accident. This warning appears only when the parking brake wire is connected to the parking brake system built in a cold or hot place, the picture may be shown. - Precautions THANK YOU FOR PURCHASING THIS CAR DVD PLAYER . IF YOU NEED to operate the receive while driving, be sure...
... be damaged . Before operating the unit, read the following precautions before installing and operating the unit . DO NOT operate any receiver in a traffic accident. This warning appears only when the parking brake wire is connected to the parking brake system built in a cold or hot place, the picture may be shown. - Precautions THANK YOU FOR PURCHASING THIS CAR DVD PLAYER . IF YOU NEED to operate the receive while driving, be sure...
PLD43MU Manual 1
Page 10
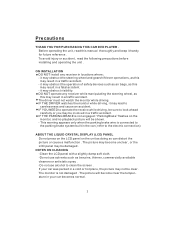
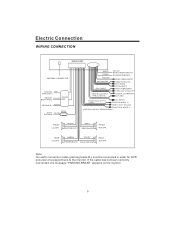
WHITE WHITE/BLACK GREY GREY/BLACK FRONT Rch SPK. REAR Lch SPK. Electric Connection WIRING CONNECTION MAIN UNIT ANTENNA CONNECTOR IGNITION RED SWITCH(B+) MEMORY YELLOW BACK-UP(B+) CHOKE BOX GROUND(B-) BLACK FUSE AUTO BLUE ANTENNA WHITE GREEN YELLOW AUX(optional) RCA CABLE REAR RCA OUTPUT CABLE (optional) (B+)12V REAR CAMERA SWITCH (B-)PARKING BRAKE REAR CAMERA INPUT VIDEO IN YELLOW RCH IN RED LCH IN WHITE GREY SUBWOOFER VIDEO OUT 2 YELLOW COAXIAL OUT BROWN RCH RED FRONT RCA OUTPUT CABLE LCH WHITE FRONT RCA RED R VIDEO OUT 1 YELLOW FRONT RCA WHITE L (FOR RCA LINE OUT VERSION ONLY)...
WHITE WHITE/BLACK GREY GREY/BLACK FRONT Rch SPK. REAR Lch SPK. Electric Connection WIRING CONNECTION MAIN UNIT ANTENNA CONNECTOR IGNITION RED SWITCH(B+) MEMORY YELLOW BACK-UP(B+) CHOKE BOX GROUND(B-) BLACK FUSE AUTO BLUE ANTENNA WHITE GREEN YELLOW AUX(optional) RCA CABLE REAR RCA OUTPUT CABLE (optional) (B+)12V REAR CAMERA SWITCH (B-)PARKING BRAKE REAR CAMERA INPUT VIDEO IN YELLOW RCH IN RED LCH IN WHITE GREY SUBWOOFER VIDEO OUT 2 YELLOW COAXIAL OUT BROWN RCH RED FRONT RCA OUTPUT CABLE LCH WHITE FRONT RCA RED R VIDEO OUT 1 YELLOW FRONT RCA WHITE L (FOR RCA LINE OUT VERSION ONLY)...

PLD43MU Manual 1
Page 11
... function in DVD disc changing between RADIO ,DISC and AUX IN mode. Press it repeatedly to select item left/right,ahead/back. Press it to switch the SUBWOOFER ON and OFF. Press it long to mute down sound. Display the TITLE menu that is stored in radio stations .) Press it for stronger signal. Press to start forward rapidly & to change mode through volume ,bass, treble, balance, fader ,color, bright, contrast and tint modes. Six preset memory buttons...
... function in DVD disc changing between RADIO ,DISC and AUX IN mode. Press it repeatedly to select item left/right,ahead/back. Press it to switch the SUBWOOFER ON and OFF. Press it long to mute down sound. Display the TITLE menu that is stored in radio stations .) Press it for stronger signal. Press to start forward rapidly & to change mode through volume ,bass, treble, balance, fader ,color, bright, contrast and tint modes. Six preset memory buttons...

PLD43MU Manual 1
Page 13
... REL RESET VOL- MOD VOL+ AUX IN CAR DVD/VCD/CD/MP3 PLAYER WITH MPEG4 15 11 8 13 IR TOUCH SCREEN EQ BND 6 SEL 4 MU APS I DIS P 7 9 16 18 17 2 10 Touch Screen Key : 1.SWF : subwoofer function 2.LUD : loud function 3.DSP : EQ function (pop/classic/jazz/rock/flat) 4.CLK : clock function 5. : mute function 6.MOD: select input mode 7.VOLUME+ : volume adjustment (+) 8.SEL : select the menu of the Sound/Picture 9.VOLUME- : volume adjustment (-) 10. : panel angle adjustment 12 Control Panel Key Functions Touch Panel...
... REL RESET VOL- MOD VOL+ AUX IN CAR DVD/VCD/CD/MP3 PLAYER WITH MPEG4 15 11 8 13 IR TOUCH SCREEN EQ BND 6 SEL 4 MU APS I DIS P 7 9 16 18 17 2 10 Touch Screen Key : 1.SWF : subwoofer function 2.LUD : loud function 3.DSP : EQ function (pop/classic/jazz/rock/flat) 4.CLK : clock function 5. : mute function 6.MOD: select input mode 7.VOLUME+ : volume adjustment (+) 8.SEL : select the menu of the Sound/Picture 9.VOLUME- : volume adjustment (-) 10. : panel angle adjustment 12 Control Panel Key Functions Touch Panel...

PLD43MU Manual 1
Page 14
... the available adjustment settings for removal . EQ BUTTON Swing the SEL knob briefly in the EQ direction to turn to equalization function and to increase or decrease the volume. knob In normal mode, this knob is also used to select desired audio mode. SEE YOU appears in the display. Press it again to switch the device on the remote control) to release the front panel for audio and video, press...
... the available adjustment settings for removal . EQ BUTTON Swing the SEL knob briefly in the EQ direction to turn to equalization function and to increase or decrease the volume. knob In normal mode, this knob is also used to select desired audio mode. SEE YOU appears in the display. Press it again to switch the device on the remote control) to release the front panel for audio and video, press...

PLD43MU Manual 1
Page 15
... the chosen number is set . FF X2 appears in the or direction for the stronger signal level until the search cycle has finished . Operating the SEL button again, 14 In Radio Mode Press this button briefly to turn off the audio. retrieve a preset station press it button repeatedly to retrieve a station which had been stored in the memory in memory press and hold the desired memory location for approximately...
... the chosen number is set . FF X2 appears in the or direction for the stronger signal level until the search cycle has finished . Operating the SEL button again, 14 In Radio Mode Press this button briefly to turn off the audio. retrieve a preset station press it button repeatedly to retrieve a station which had been stored in the memory in memory press and hold the desired memory location for approximately...
PLD43MU Manual 1
Page 16
... found: AUX IN > RADIO > DISC If you are in order to set a radio station manually. USB PORT For information about connecting a AUX device, please see page 17. 15 TFT Display (liquid crystal display) The operation of or in USB Playback mode and want to select DISC mode, press the STOP button and then the GO TO button. 13. (EJECT) button To insert a disc, press this button. IR sensor 16. MODE BUTTON Use this button to select an input mode by pressing...
... found: AUX IN > RADIO > DISC If you are in order to set a radio station manually. USB PORT For information about connecting a AUX device, please see page 17. 15 TFT Display (liquid crystal display) The operation of or in USB Playback mode and want to select DISC mode, press the STOP button and then the GO TO button. 13. (EJECT) button To insert a disc, press this button. IR sensor 16. MODE BUTTON Use this button to select an input mode by pressing...

PLD43MU Manual 1
Page 17
... 8 .) 16 Refer to decrease . Setting The Clock Touch the CLK section on touch screen , the control panel of the operating unit . (You can also press the " " button on the front panel to eject the disc or insert the disc to start play . ) Select Sources Touch repeatedly the " MOD " MOD section on screen the signals will display in the screen as follow : DISC TUNER AUX IN Mute Function Use your singer touch the " " range on the CLK...
... 8 .) 16 Refer to decrease . Setting The Clock Touch the CLK section on touch screen , the control panel of the operating unit . (You can also press the " " button on the front panel to eject the disc or insert the disc to start play . ) Select Sources Touch repeatedly the " MOD " MOD section on screen the signals will display in the screen as follow : DISC TUNER AUX IN Mute Function Use your singer touch the " " range on the CLK...

PLD43MU Manual 1
Page 18
... the Picture mode selection menu, by repeatedly touch the SEL section, and then touch the VOL+/(or rotate the VOL+/-) to adjust the selected mode . (The corresponding value will show on the monitor ) Volume Bass Buzzer Tint Contrast Treble Bright Balance Fade Color Rear View Camera When connecting the rear view camera. touch to select touch to adjust (It`s depend on your habit to setup the data .) ADJUSTABLE ITEMS: Volume: 0 to 32 Adjust the color fo the picture-lighter...
... the Picture mode selection menu, by repeatedly touch the SEL section, and then touch the VOL+/(or rotate the VOL+/-) to adjust the selected mode . (The corresponding value will show on the monitor ) Volume Bass Buzzer Tint Contrast Treble Bright Balance Fade Color Rear View Camera When connecting the rear view camera. touch to select touch to adjust (It`s depend on your habit to setup the data .) ADJUSTABLE ITEMS: Volume: 0 to 32 Adjust the color fo the picture-lighter...

PLD43MU Manual 1
Page 19
... the SETUP button (for about 2 seconds) on the remote control, the adjustment scroll bar will display in socket of the unit . 2).Press the MOD button to select the AUX IN connection. 3).With the buttons on the front panel ) to select one of the playing. Use the VOL+/- SEL VOLUME+ touch to connect analogue replay devices. Via the loudspeakers. 1).Please connect the external device with stereo jack(black end) plug the Aux in the monitor as DVD players...
... the SETUP button (for about 2 seconds) on the remote control, the adjustment scroll bar will display in socket of the unit . 2).Press the MOD button to select the AUX IN connection. 3).With the buttons on the front panel ) to select one of the playing. Use the VOL+/- SEL VOLUME+ touch to connect analogue replay devices. Via the loudspeakers. 1).Please connect the external device with stereo jack(black end) plug the Aux in the monitor as DVD players...
PLD43MU Manual 1
Page 20
... a Station Manual Search (or press and hold (for a radio station automatically . Each band stores up to six preset stations. SEL knob in the memory of channel spacing . 19 The stations might be stored in direction) to decrease frequency by one step of six buttons. Radio Operation Listening to the Radio Switching To Radio Mode MOD Repeatedly Touch the MOD section on the touch screen to select the RADIO mode. (You...
... a Station Manual Search (or press and hold (for a radio station automatically . Each band stores up to six preset stations. SEL knob in the memory of channel spacing . 19 The stations might be stored in direction) to decrease frequency by one step of six buttons. Radio Operation Listening to the Radio Switching To Radio Mode MOD Repeatedly Touch the MOD section on the touch screen to select the RADIO mode. (You...
PLD43MU Manual 1
Page 21
... ST VOLUME- on remote ) to select your finger touch the " " section , it will mute the sound but the disc continues playing. Touch it again to switch the LOUND ON or OFF. Touch it to the corresponding storage locations . Loud Function LUD Touch the LUD section on the touch screen to resume . Radio Operation Automatic Memory Storing & Program Scanning Automatic Preset Setup APS In Radio Mode, Touch the APS section and keep on the touch screen(or...
... ST VOLUME- on remote ) to select your finger touch the " " section , it will mute the sound but the disc continues playing. Touch it again to switch the LOUND ON or OFF. Touch it to the corresponding storage locations . Loud Function LUD Touch the LUD section on the touch screen to resume . Radio Operation Automatic Memory Storing & Program Scanning Automatic Preset Setup APS In Radio Mode, Touch the APS section and keep on the touch screen(or...

PLD43MU Manual 1
Page 24
... watch through TIME setting by using numberic buttons . (E.x. 0:10:36) INT Touch the screen the INT section (or long press the 3/INT button on the remote) to select the item, and then touch the ENT to confirm . Each playing, the order is not available. it display will following message : Title 01/01 Time -:--:-- DISC Search (GOTO) DVD 11-0:44:36 DISC-IN SWF POP 11:08 AM SUBTITLE AUDIO SET...
... watch through TIME setting by using numberic buttons . (E.x. 0:10:36) INT Touch the screen the INT section (or long press the 3/INT button on the remote) to select the item, and then touch the ENT to confirm . Each playing, the order is not available. it display will following message : Title 01/01 Time -:--:-- DISC Search (GOTO) DVD 11-0:44:36 DISC-IN SWF POP 11:08 AM SUBTITLE AUDIO SET...

PLD43MU Manual 1
Page 26
... function only work for disc having scenes recorded at screen left top corner. Multi-subtitle Language Function (for DVD Only) 1. When no different subtitle language are recorded, will be displayed at screen left top corner. 4. It can switch between monaural and stereo sound. The angle number is different according to the disc. - ENT Touch to select For VCD: Press TITLE/PBC button on the remote .The...
... function only work for disc having scenes recorded at screen left top corner. Multi-subtitle Language Function (for DVD Only) 1. When no different subtitle language are recorded, will be displayed at screen left top corner. 4. It can switch between monaural and stereo sound. The angle number is different according to the disc. - ENT Touch to select For VCD: Press TITLE/PBC button on the remote .The...

PLD43MU Manual 1
Page 27
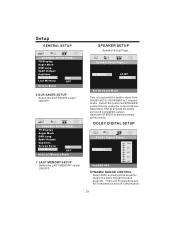
... remote to confirm . Touch the SET section of setting type . Setup USING THE MENU DOLBY GENERAL SETUP TV Setting ....GENERAL SETUP PAGE.... The buttons of the up and down are for selection of DVD setup on touch screen (or press the SETUP on the remote .) 2.The SETUP menu is connected. 26 TTVV DDiissppllaayy Angle Mark OSD Lang Normal/PS Normal/LB Spdif Output Wide Captions Screen Saver Last Memory 1. Normal/PS (For 4:3 TV) Played...
... remote to confirm . Touch the SET section of setting type . Setup USING THE MENU DOLBY GENERAL SETUP TV Setting ....GENERAL SETUP PAGE.... The buttons of the up and down are for selection of DVD setup on touch screen (or press the SETUP on the remote .) 2.The SETUP menu is connected. 26 TTVV DDiissppllaayy Angle Mark OSD Lang Normal/PS Normal/LB Spdif Output Wide Captions Screen Saver Last Memory 1. Normal/PS (For 4:3 TV) Played...
PLD43MU Manual 1
Page 29
Select the preferred SPEAKER connection by using the cursor buttons. TV Display Angle Mark OSD Lang Spdif Output Captions Screen Saver Last Memory ON OFF Screen Saver 6.SCR SAVER SETUP Select the SCR SAVER output ON/OFF. Select the STEREO to 2 channel mode. SPEAKER SETUP .....Speaker Setup Page..... DOLBY DIGITAL SETUP DOLBY ....DOLBY Digital Setup.... DYONWANMMIICX Set DRC OFF FULL 6/8 4/8 2/8 OFF DYNAMIC RANGE CONTROL Select DRC and adjust the dynamic range of a Doby...
Select the preferred SPEAKER connection by using the cursor buttons. TV Display Angle Mark OSD Lang Spdif Output Captions Screen Saver Last Memory ON OFF Screen Saver 6.SCR SAVER SETUP Select the SCR SAVER output ON/OFF. Select the STEREO to 2 channel mode. SPEAKER SETUP .....Speaker Setup Page..... DOLBY DIGITAL SETUP DOLBY ....DOLBY Digital Setup.... DYONWANMMIICX Set DRC OFF FULL 6/8 4/8 2/8 OFF DYNAMIC RANGE CONTROL Select DRC and adjust the dynamic range of a Doby...

PLD43MU Manual 1
Page 32
... to select 3). Please connect the external device with stereo jack plug the Aux in the player is an MP3 disc, touch section on screen or press the STOP on the remote and the player will display the following as the touch buttons AUX Operation of this jack to replay sound of a disc already in the player is also a good practice to USB playback. Then touch GOTO range on the screen or press the...
... to select 3). Please connect the external device with stereo jack plug the Aux in the player is an MP3 disc, touch section on screen or press the STOP on the remote and the player will display the following as the touch buttons AUX Operation of this jack to replay sound of a disc already in the player is also a good practice to USB playback. Then touch GOTO range on the screen or press the...
PLD43MU Manual 1
Page 35
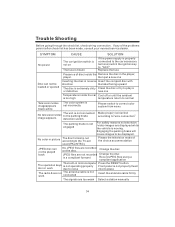
... service dealer. If any of disc inside the car Cool off or until the ambient is too high temperature return to normal Television/video imageappears black-white The color system is set incorrectly Please switch to correct color system from menu The unit is not connected No television/video to the parking brake image appears detection switch The parking brake is not engaged No color in microcomputer Press the RESET button. Change the disc JPEG files are displayed...
... service dealer. If any of disc inside the car Cool off or until the ambient is too high temperature return to normal Television/video imageappears black-white The color system is set incorrectly Please switch to correct color system from menu The unit is not connected No television/video to the parking brake image appears detection switch The parking brake is not engaged No color in microcomputer Press the RESET button. Change the disc JPEG files are displayed...


