User Manual
Page 1
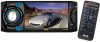
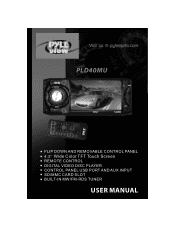
PLD40MU FLIP DOWN AND REMOVABLE CONTROL PANEL 4.3" Wide Color TFT Touch Screen REMOTE CONTROL DIGITAL VIDEO DISC PLAYER CONTROL PANEL USB PORT AND AUX INPUT SD/MMC CARD SLOT BUILT-IN MW/FM-RDS TUNER USER MANUAL
PLD40MU FLIP DOWN AND REMOVABLE CONTROL PANEL 4.3" Wide Color TFT Touch Screen REMOTE CONTROL DIGITAL VIDEO DISC PLAYER CONTROL PANEL USB PORT AND AUX INPUT SD/MMC CARD SLOT BUILT-IN MW/FM-RDS TUNER USER MANUAL

User Manual
Page 4
... 1.2 Unloading a disc, USB or card 17 2. Popping up Function Icons-board 17 2.1 Function Icons-board of Digital Video/VCD/MPEG4/Image /MP3/WMA 17 2.2 CD interface 18 3. Content Precaution 1 Content 2 Installation steps 3 General knowledge about remote control 7 Locations and Names of controls on main unit 8 Locations and Names of controls on the touch screen/main unit/remote control 19 * Region Code 28 * Parental Control 29 AUX IN operation 30 External iPod operation 31 Rear View Camera 32 Troubleshooting 33 Specification 34 -2-
... 1.2 Unloading a disc, USB or card 17 2. Popping up Function Icons-board 17 2.1 Function Icons-board of Digital Video/VCD/MPEG4/Image /MP3/WMA 17 2.2 CD interface 18 3. Content Precaution 1 Content 2 Installation steps 3 General knowledge about remote control 7 Locations and Names of controls on main unit 8 Locations and Names of controls on the touch screen/main unit/remote control 19 * Region Code 28 * Parental Control 29 AUX IN operation 30 External iPod operation 31 Rear View Camera 32 Troubleshooting 33 Specification 34 -2-

User Manual
Page 5
... in the position of car multi-media system and bend some tabs of Sliding Bracket Housing to take CHASSIS out of the SLIDE BRACKET HOUSING , first remove the PLASTIC FRAME of ...fix it.(see Installation Diagram) 3. Mounting Slide Bracket Housing; 1) Remove the PLASTIC FRAME from chassis as follows: A. Connecting all wires: 1) Remove control panel from the chassis ; 2) Insert the 2 KEY PLATES into left and right sides of the chassis till they click; INSTALLATION STEPS 1. then pulling the two KEY PLATES to flip down control panel . OPEN button -3- Press the OPEN button to remove...
... in the position of car multi-media system and bend some tabs of Sliding Bracket Housing to take CHASSIS out of the SLIDE BRACKET HOUSING , first remove the PLASTIC FRAME of ...fix it.(see Installation Diagram) 3. Mounting Slide Bracket Housing; 1) Remove the PLASTIC FRAME from chassis as follows: A. Connecting all wires: 1) Remove control panel from the chassis ; 2) Insert the 2 KEY PLATES into left and right sides of the chassis till they click; INSTALLATION STEPS 1. then pulling the two KEY PLATES to flip down control panel . OPEN button -3- Press the OPEN button to remove...

User Manual
Page 6
...onto chassis. -4- REAR Lch SPK. After connecting parking Line, video on screen of the control panel to slide rightwards a little and pull it towards you to remove it . 2 1 2) Connecting all wires according ot the wiring diagram as follows: RADIO ANTENNA JACK AUDIO L OUT (white) AUDIO R OUT (red) ISO CONNECTOR VIDEO OUTPUT (brown) SUB WOOFER (B+) 12V REAR CAMERA SWITCH (B-) PARKING BRAKE REAR CAMERA INPUT GREY PINK BROWN YELLOW BLUE YELLOW BLACK RED FUSE AUTO ANTENNA CONSTANT 12 VOLTS GROUND(B-) IGNITION SWITCH FRONT Lch SPK. Must use 4 ohms impedance of speakers. 2. B.
...onto chassis. -4- REAR Lch SPK. After connecting parking Line, video on screen of the control panel to slide rightwards a little and pull it towards you to remove it . 2 1 2) Connecting all wires according ot the wiring diagram as follows: RADIO ANTENNA JACK AUDIO L OUT (white) AUDIO R OUT (red) ISO CONNECTOR VIDEO OUTPUT (brown) SUB WOOFER (B+) 12V REAR CAMERA SWITCH (B-) PARKING BRAKE REAR CAMERA INPUT GREY PINK BROWN YELLOW BLUE YELLOW BLACK RED FUSE AUTO ANTENNA CONSTANT 12 VOLTS GROUND(B-) IGNITION SWITCH FRONT Lch SPK. Must use 4 ohms impedance of speakers. 2. B.

User Manual
Page 7
... cloth . 4) Testing it for making sure that it can work properly . 4. Installing main unit according to installation diagram: 1) Insert the chassis of sliding metal housing. -5- 3) Attach control panel onto chassis. Connector * How to make the left and right side of main unit and draw main unit out of the car multi-media system into the sliding metal housing. 2) Use the metal strap to...
... cloth . 4) Testing it for making sure that it can work properly . 4. Installing main unit according to installation diagram: 1) Insert the chassis of sliding metal housing. -5- 3) Attach control panel onto chassis. Connector * How to make the left and right side of main unit and draw main unit out of the car multi-media system into the sliding metal housing. 2) Use the metal strap to...

User Manual
Page 8
Installation diagram HEX NUT SPRING WASHER PLAIN WASHER TAPPING SCREW DASH BOARD METAL MOUNTING STRAP CONSOLE SLIDE BRACKET HOUSING FIXING TAB HEX BOLT -6-
Installation diagram HEX NUT SPRING WASHER PLAIN WASHER TAPPING SCREW DASH BOARD METAL MOUNTING STRAP CONSOLE SLIDE BRACKET HOUSING FIXING TAB HEX BOLT -6-
User Manual
Page 12
... switching on remote control to AUX Operation). Same functions in any work source between BASS,TREBLE,BALANCE, FADE,COLOR,BRIGHTNESS,CONTRAST, TINT and VOLUME, briefly and repeatedly press SEL button. POWER button or OFF icon In power off SUBWOOFER mode, long press SW button on main unit. buttons to Radio Operation and Disc/USB/Card Operation). -10- In radio or CD mode, touch Radio or CD icon to enter the source menu (refer to set it . SW button To switch on or off mode, pressing POWER button on remote control...
... switching on remote control to AUX Operation). Same functions in any work source between BASS,TREBLE,BALANCE, FADE,COLOR,BRIGHTNESS,CONTRAST, TINT and VOLUME, briefly and repeatedly press SEL button. POWER button or OFF icon In power off SUBWOOFER mode, long press SW button on main unit. buttons to Radio Operation and Disc/USB/Card Operation). -10- In radio or CD mode, touch Radio or CD icon to enter the source menu (refer to set it . SW button To switch on or off mode, pressing POWER button on remote control...

User Manual
Page 13
The source menu displays as follows: TREBLE BASS BALANCE +03 Sound page of BRIGHTNESS, CONTRAST, COLOR, TINT, ANIMATION and WALLPAPER. After highlighting a desired setting item, touch the or icon to set it. 2) SETTING SOUND In SET menu, touch SOUND icon to highlight one work source of RADIO, DISC, AUX, SD CARD and USB. 10.SET icon 1) SETTING SYSTEM In source menu, touch SET icon to display SYSTEM page of SET menu as follows: BRIGHTNESS CONTRAST COLOR 15 System page of SET menu In the SYSTEM page...
The source menu displays as follows: TREBLE BASS BALANCE +03 Sound page of BRIGHTNESS, CONTRAST, COLOR, TINT, ANIMATION and WALLPAPER. After highlighting a desired setting item, touch the or icon to set it. 2) SETTING SOUND In SET menu, touch SOUND icon to highlight one work source of RADIO, DISC, AUX, SD CARD and USB. 10.SET icon 1) SETTING SYSTEM In source menu, touch SET icon to display SYSTEM page of SET menu as follows: BRIGHTNESS CONTRAST COLOR 15 System page of SET menu In the SYSTEM page...
User Manual
Page 14
... available or sound is distorted, press OPEN button to flip down the control panel, then remove it . After highlighting a desired setting item, touch the or icon to set it as above, then use the sharp end of a pointed object to press RESET button to reset the program to highlight one setting item of TREBLE, BASS, BALANCE, FADE, SUBWOOFER, LOUDNESS, RADIO LOC/DX(entering Source Menu in radio mode), RADIO STEREO(entering Source Menu in radio mode) and...
... available or sound is distorted, press OPEN button to flip down the control panel, then remove it . After highlighting a desired setting item, touch the or icon to set it as above, then use the sharp end of a pointed object to press RESET button to reset the program to highlight one setting item of TREBLE, BASS, BALANCE, FADE, SUBWOOFER, LOUDNESS, RADIO LOC/DX(entering Source Menu in radio mode), RADIO STEREO(entering Source Menu in radio mode) and...

User Manual
Page 15
... pressing A/PS button on remote control or long pressing APS button on screen. 3. To enter RADIO mode(MODE button or RADIO icon) When you use MODE button or source menu (tapping RADIO icon) to enter RADIO mode, it will be implemented in selected FM or MW band. (It can be displayed on control panel, the radio searches from the current frequency. 4. and VOL+ buttons = VOL knob SWF icon : To switch SUBWOOFER mode on or off . Radio Operation 1.
... pressing A/PS button on remote control or long pressing APS button on screen. 3. To enter RADIO mode(MODE button or RADIO icon) When you use MODE button or source menu (tapping RADIO icon) to enter RADIO mode, it will be implemented in selected FM or MW band. (It can be displayed on control panel, the radio searches from the current frequency. 4. and VOL+ buttons = VOL knob SWF icon : To switch SUBWOOFER mode on or off . Radio Operation 1.
User Manual
Page 16
... the memory station in the current band preset in the number memory bank. * CH1-6 button: 1)To preset a station in the RADIO interface or SEL and VOL buttons to set AF mode on or long press AF button on control panel or AF button on remote control to switch on AF mode, then AF icon flashes on remote control to the previous normal station. 9. To search for FM band. If the station that is activated...
... the memory station in the current band preset in the number memory bank. * CH1-6 button: 1)To preset a station in the RADIO interface or SEL and VOL buttons to set AF mode on or long press AF button on control panel or AF button on remote control to switch on AF mode, then AF icon flashes on remote control to the previous normal station. 9. To search for FM band. If the station that is activated...

User Manual
Page 17
... PI MUTE mode, when switching on screen. When an RDS radio station transmits traffic announcement and is over, it will be receive from a same AF. PI mode use the RDS page of the SETUP MENU or the SEL and VOL buttons to previous work source to those AF stations which have a different regional program content. 11. To automatically search for traffic announcements (TA) In any mode, use the...
... PI MUTE mode, when switching on screen. When an RDS radio station transmits traffic announcement and is over, it will be receive from a same AF. PI mode use the RDS page of the SETUP MENU or the SEL and VOL buttons to previous work source to those AF stations which have a different regional program content. 11. To automatically search for traffic announcements (TA) In any mode, use the...

User Manual
Page 19
..." Remove the memory card * During MP3/WMA playback, the information of file, folder, title, artist and album will be scrolling on LCD display; To unload the card in card slot, use STOP button to stop playback, then press OPEN button to flip down the control panel, then press EJECT button to pop up Function Icons-board 2.1 Function Icons-board of Digital Video/VCD/MPEG4/Image/MP3...
..." Remove the memory card * During MP3/WMA playback, the information of file, folder, title, artist and album will be scrolling on LCD display; To unload the card in card slot, use STOP button to stop playback, then press OPEN button to flip down the control panel, then press EJECT button to pop up Function Icons-board 2.1 Function Icons-board of Digital Video/VCD/MPEG4/Image/MP3...

User Manual
Page 25
.../WMA/MPEG4/image playback, use icon or press REPEAT button to switch between audio tracks (depending on the current playing media). icon or INT button During VCD/CD playback, tapping intro mode on or off . icon or button During Digital Video playback, use icon or button to switch repeat mode between MONO L, MONO R, MIX MONO and STEREO. During VCD/CD playback, use icon or button to switch audio channels...
.../WMA/MPEG4/image playback, use icon or press REPEAT button to switch between audio tracks (depending on the current playing media). icon or INT button During VCD/CD playback, tapping intro mode on or off . icon or button During Digital Video playback, use icon or button to switch repeat mode between MONO L, MONO R, MIX MONO and STEREO. During VCD/CD playback, use icon or button to switch audio channels...

User Manual
Page 27
... or lock parental control. * Remove the section of the PASSWORD of parental control. (1) First highlight PASSWORD item to lock parental control again. The default mode is for setting a new rating level of the User Manual to keep this item when connecting a monitor with 4:3 screen. (1) 4:3 PS: Choose this item when connecting a monitor with 16:9 wide screen. When playing video with 16:9 size, the left and right part of video will be turned into a black square...
... or lock parental control. * Remove the section of the PASSWORD of parental control. (1) First highlight PASSWORD item to lock parental control again. The default mode is for setting a new rating level of the User Manual to keep this item when connecting a monitor with 4:3 screen. (1) 4:3 PS: Choose this item when connecting a monitor with 16:9 wide screen. When playing video with 16:9 size, the left and right part of video will be turned into a black square...
User Manual
Page 31
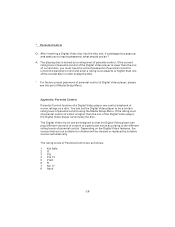
... to input a password, what should you must input the correct password of parental control to unlock the parental control and enter a rating level equal to or higher than the one of the current disc in order to play the disc. * For factory preset password of parental control of Digital Video player, please see the part of parental control using the Media Setup Menu. Appendix: Parental Control Parental Control function of a Digital Video player can play the disc. If...
... to input a password, what should you must input the correct password of parental control to unlock the parental control and enter a rating level equal to or higher than the one of the current disc in order to play the disc. * For factory preset password of parental control of Digital Video player, please see the part of parental control using the Media Setup Menu. Appendix: Parental Control Parental Control function of a Digital Video player can play the disc. If...

User Manual
Page 32
... anti-clock wise. Play the external AV system, then use MODE button or Source Menu to make the car AV system and the external AV system connected through the monitor of the external AV system. SWF: Same as long pressing SW button. : Same as follows: AUX : Popping up Source Menu. AUX IN operation An external AV system can use SEL, +, -, VOL, MUTE, EQ , SW and LOUD buttons or icons to adjust audio and video. -30- Use an AV cable...
... anti-clock wise. Play the external AV system, then use MODE button or Source Menu to make the car AV system and the external AV system connected through the monitor of the external AV system. SWF: Same as long pressing SW button. : Same as follows: AUX : Popping up Source Menu. AUX IN operation An external AV system can use SEL, +, -, VOL, MUTE, EQ , SW and LOUD buttons or icons to adjust audio and video. -30- Use an AV cable...

User Manual
Page 33
... headphone port of the external iPod. In AUX IN mode, you can use the car AV system as a monitor and amplifier. 1. EQ : Same as EQ button. : Same as VOL+ button or rotating VOL knob with anti-clock wise. 3. External iPod operation An external iPod can use SEL, +, -, VOL, MUTE, EQ , SW and LOUD buttons or icons to adjust audio and video. -31- By now, the program played by the external iPod can be output through the AUX IN...
... headphone port of the external iPod. In AUX IN mode, you can use the car AV system as a monitor and amplifier. 1. EQ : Same as EQ button. : Same as VOL+ button or rotating VOL knob with anti-clock wise. 3. External iPod operation An external iPod can use SEL, +, -, VOL, MUTE, EQ , SW and LOUD buttons or icons to adjust audio and video. -31- By now, the program played by the external iPod can be output through the AUX IN...
User Manual
Page 34
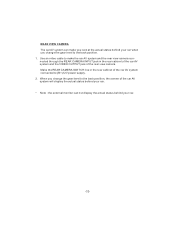
... car AV system and the VIDEO OUTPUT jack of the car AV system connected to (B+)12V power supply. 2. When you change the gear level to the back position, the screen of the car AV system will display the actual status behind your car. * Note : the external monitor can make the car AV system and the rear view camera connected through the REAR CAMERA INPUT jack in the rear cabinet of the rear view camera. Use an video cable to make...
... car AV system and the VIDEO OUTPUT jack of the car AV system connected to (B+)12V power supply. 2. When you change the gear level to the back position, the screen of the car AV system will display the actual status behind your car. * Note : the external monitor can make the car AV system and the rear view camera connected through the REAR CAMERA INPUT jack in the rear cabinet of the rear view camera. Use an video cable to make...
User Manual
Page 35
... the player's audio output is properly connected to the speaker's audio input. * Check whether the audio connector is not blown. RADIO DOES NOT WORK * Check whether antenna cable is condensation inside the car is compatible to the troubleshooting guide. NO SOUND BUT HAVE PICTURE * Ensure that disc format is not too high. If so, power on . * Ensure that the power switch is on the player and do not work for a station. -33- NO PICTURE, SOUND * Ensure that the power cord is...
... the player's audio output is properly connected to the speaker's audio input. * Check whether the audio connector is not blown. RADIO DOES NOT WORK * Check whether antenna cable is condensation inside the car is compatible to the troubleshooting guide. NO SOUND BUT HAVE PICTURE * Ensure that disc format is not too high. If so, power on . * Ensure that the power switch is on the player and do not work for a station. -33- NO PICTURE, SOUND * Ensure that the power cord is...


