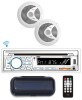
User Manual
Page 2
...3 Take out screw before installation ......... 3 DIN Front-Mount 3 Installing the unit 3 Removing the unit 4 Wiring Connection 5 Operation 6 Location of keys 6 Switching on/off the unit 7 Sound adjustment 7 EQ function 7 Display information 7 Liquid crystal display 7 Reset function 7 Radio operation 7 Switching to radio mode 7 Selecting the frequency band 7 Selecting station 7 Automatic memory storing& program scanning 8 Manually Store Station & Recall Preset Station 8 CD/MP3/WMA operation 8 Switching to CD mode 8 Selecting tracks 8 Pausing playing 8 Previewing all tracks...
...3 Take out screw before installation ......... 3 DIN Front-Mount 3 Installing the unit 3 Removing the unit 4 Wiring Connection 5 Operation 6 Location of keys 6 Switching on/off the unit 7 Sound adjustment 7 EQ function 7 Display information 7 Liquid crystal display 7 Reset function 7 Radio operation 7 Switching to radio mode 7 Selecting the frequency band 7 Selecting station 7 Automatic memory storing& program scanning 8 Manually Store Station & Recall Preset Station 8 CD/MP3/WMA operation 8 Switching to CD mode 8 Selecting tracks 8 Pausing playing 8 Previewing all tracks...
User Manual
Page 3
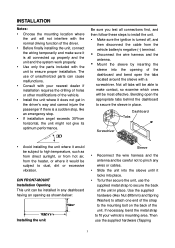
... wire harness and the antenna. Mount the sleeve by inserting the sleeve into place. To further secure the unit, use the supplied hardware (Tapping 3 DIN FRONT-MOUNT Installation Opening This unit can cause malfunctions. Consult with your vehicle's mounting area. INSTALLATION Notes: Choose the mounting location where the unit will not interfere with the normal driving function of the driver. Before finally installing...
... wire harness and the antenna. Mount the sleeve by inserting the sleeve into place. To further secure the unit, use the supplied hardware (Tapping 3 DIN FRONT-MOUNT Installation Opening This unit can cause malfunctions. Consult with your vehicle's mounting area. INSTALLATION Notes: Choose the mounting location where the unit will not interfere with the normal driving function of the driver. Before finally installing...
User Manual
Page 4
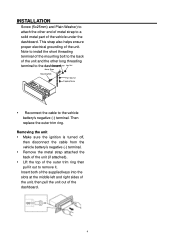
INSTALLATION Screw (5x25mm) and Plain Washer) to attach the other long threading terminal to the dashbSopriangrWda.sher Hex Nut Metal Strap Mounting Bolt Plain Washer Tapping Screw Reconnect the cable to remove it out to the vehicle battery's negative (-) terminal. Then replace the outer trim ring. Removing the unit Make sure the ignition is turned...right sides of the unit, then pull the unit out of the unit. Note to install the short threading terminal of the mounting bolt to the back of the unit and the other end of metal strap to a solid metal part of the outer trim...
INSTALLATION Screw (5x25mm) and Plain Washer) to attach the other long threading terminal to the dashbSopriangrWda.sher Hex Nut Metal Strap Mounting Bolt Plain Washer Tapping Screw Reconnect the cable to remove it out to the vehicle battery's negative (-) terminal. Then replace the outer trim ring. Removing the unit Make sure the ignition is turned...right sides of the unit, then pull the unit out of the unit. Note to install the short threading terminal of the mounting bolt to the back of the unit and the other end of metal strap to a solid metal part of the outer trim...
User Manual
Page 5
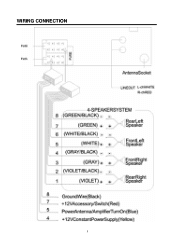
WIRING CONNECTION 5
WIRING CONNECTION 5

User Manual
Page 6
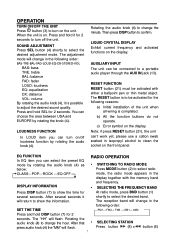
"Vol /SEL" button 5. " " Seek up button. 9. Microphone 6 OPERATION LOCATION OF KEYS 1. IR Sensor 10. LCD display 11. AUX jack 14. "3 RPT" button. 19 "2 INT" button. 20. "DISP" button. 8. SD slot 15. " " Seek down button 7. " " button. 21. "AMS" button 6. Eject button 12. USB port 13. "4 RDM" button. 18. "5 DIR-" button. 17. "MODE"/ button. 3. "BAND" / button. 2. "6 DIR+" button. 16. " " button 4.
"Vol /SEL" button 5. " " Seek up button. 9. Microphone 6 OPERATION LOCATION OF KEYS 1. IR Sensor 10. LCD display 11. AUX jack 14. "3 RPT" button. 19 "2 INT" button. 20. "DISP" button. 8. SD slot 15. " " Seek down button 7. " " button. 21. "AMS" button 6. Eject button 12. USB port 13. "4 RDM" button. 18. "5 DIR-" button. 17. "MODE"/ button. 3. "BAND" / button. 2. "6 DIR+" button. 16. " " button 4.
User Manual
Page 7
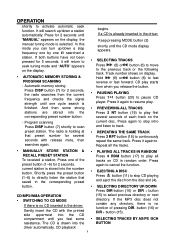
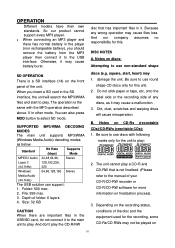
... RADIO OPERATION SWITCHING TO RADIO MODE below: Press MODE button (2) to show the time for At radio mode, press BND button (1) several seconds it for 2 seconds. Rotating the audio knob (4) to select the desired adjustment mode. DISPLAY INFORMATION SELECTING THE FREQUENCY BAND Press DISP button (7) to show the information. After that press audio knob (4) the "MM" will flash. SOUND ADJUSTMENT Press SEL button (4) shortly to change in the following reasons: a) Initial installation of the unit...
... RADIO OPERATION SWITCHING TO RADIO MODE below: Press MODE button (2) to show the time for At radio mode, press BND button (1) several seconds it for 2 seconds. Rotating the audio knob (4) to select the desired adjustment mode. DISPLAY INFORMATION SELECTING THE FREQUENCY BAND Press DISP button (7) to show the information. After that press audio knob (4) the "MM" will flash. SOUND ADJUSTMENT Press SEL button (4) shortly to change in the following reasons: a) Initial installation of the unit...
User Manual
Page 8
... preset button (1~6) for several seconds of pressing DIR- OPERATION shortly to continuously repeat the same track. Program scanning Press DISP button (7) shortly to cancel the function. current station is finished. It will return to Repeat all tracks on the display, the manual tuning mode is drawn into the corresponding preset number button. - In this mode you feel some strong stations are stored into the driver automatically. PLAYING...
... preset button (1~6) for several seconds of pressing DIR- OPERATION shortly to continuously repeat the same track. Program scanning Press DISP button (7) shortly to cancel the function. current station is finished. It will return to Repeat all tracks on the display, the manual tuning mode is drawn into the corresponding preset number button. - In this mode you feel some strong stations are stored into the driver automatically. PLAYING...
User Manual
Page 9
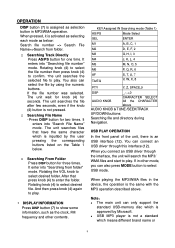
... MODE button to select USB mode. The unit wait for knob (4) for two times. You can only support the standard USB-memory disc which is approved by Microsoft. USB MP3 player is not a standard which is activated as selecting each mode as below . Searching From Folder Press DISP button for one time. If in MP3/WMA operation. When you can select the file by the user pressing the corresponding buttons...
... MODE button to select USB mode. The unit wait for knob (4) for two times. You can only support the standard USB-memory disc which is approved by Microsoft. USB MP3 player is not a standard which is activated as selecting each mode as below . Searching From Folder Press DISP button for one time. If in MP3/WMA operation. When you can select the file by the user pressing the corresponding buttons...
User Manual
Page 10
...,96,128,192 Stereo Media Audio (44.1kHz) The USB solution can also press MOD button to use non-standard shape SD OPERATION There is a SD interface (14) on finalization process). 3. Depth of the unit. And don't play . B. So our product cannot support every MP3 player. When connecting an MP3 player and there has normal battery in the player (non rechargeable battery), you insert...
...,96,128,192 Stereo Media Audio (44.1kHz) The USB solution can also press MOD button to use non-standard shape SD OPERATION There is a SD interface (14) on finalization process). 3. Depth of the unit. And don't play . B. So our product cannot support every MP3 player. When connecting an MP3 player and there has normal battery in the player (non rechargeable battery), you insert...
User Manual
Page 11
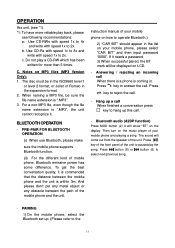
... see *1) *1: To have more than 5 times. Press key to 2x. Bluetooth audio (A2DP function) Press MOD button (2) it needs a password. 3) When successful paired, the BT mark will be displayed on your mobile phone, please select "CAR BIT" and then input password "0000". b. c. BLUETOOTH OPERATION - instruction manual of mobile phone, Bluetooth emissive power has some difference. Press key of the front panel of the mobile phone and the unit. The disc must be sure the file...
... see *1) *1: To have more than 5 times. Press key to 2x. Bluetooth audio (A2DP function) Press MOD button (2) it needs a password. 3) When successful paired, the BT mark will be displayed on your mobile phone, please select "CAR BIT" and then input password "0000". b. c. BLUETOOTH OPERATION - instruction manual of mobile phone, Bluetooth emissive power has some difference. Press key of the front panel of the mobile phone and the unit. The disc must be sure the file...

User Manual
Page 12
...16. REMOTE CONTROL HANDSET (OPTIONAL) FUNCTION KEY & CONTROL 1. TUNE/SKIP 17. MUTE Power ON/OFF Button Mode Button(S,T,U,7,For MP3/WMA Operation) Band Select Button Volume Up Button (Character Select (A, B~8, 9, 0) For MP3/WMA Operation) Tune/SKIP Down Button(W,X,Y,8 For MP3/WMA) Sound Mode Select Button (Character Shift Right for MP3/WMA Operation) EQ Select Button Volume Down Button (Character Select (A, B~8, 9, 0) For MP3/WMA Operation) Pause Button (A,B,C,1 For MP3/WMA Operation) Intro Button (D,E,F,2 For MP3/WMA Operation) Random Button (J,K,L,4 For MP3/WMA Operation) Direct Previous...
...16. REMOTE CONTROL HANDSET (OPTIONAL) FUNCTION KEY & CONTROL 1. TUNE/SKIP 17. MUTE Power ON/OFF Button Mode Button(S,T,U,7,For MP3/WMA Operation) Band Select Button Volume Up Button (Character Select (A, B~8, 9, 0) For MP3/WMA Operation) Tune/SKIP Down Button(W,X,Y,8 For MP3/WMA) Sound Mode Select Button (Character Shift Right for MP3/WMA Operation) EQ Select Button Volume Down Button (Character Select (A, B~8, 9, 0) For MP3/WMA Operation) Pause Button (A,B,C,1 For MP3/WMA Operation) Intro Button (D,E,F,2 For MP3/WMA Operation) Random Button (J,K,L,4 For MP3/WMA Operation) Direct Previous...
User Manual
Page 13
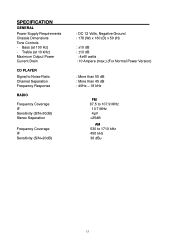
SPECIFICATION GENERAL Power Supply Requirements Chassis Dimensions Tone Controls - Bass (at 10 kHz) Maximum Output Power Current Drain CD PLAYER Signal to Noise Ratio Channel Separation Frequency Response RADIO Frequency Coverage IF Sensitivity (S/N=30dB) Stereo Separation Frequency Coverage IF Sensitivity (S/N=20dB) : DC 12 Volts, Negative Ground : 178 (W) x 160 (D) x 50 (H) : ±10 dB : ±10 dB : 4x40 watts : 10 Ampere (max.) (For Normal Power Version) : More...
SPECIFICATION GENERAL Power Supply Requirements Chassis Dimensions Tone Controls - Bass (at 10 kHz) Maximum Output Power Current Drain CD PLAYER Signal to Noise Ratio Channel Separation Frequency Response RADIO Frequency Coverage IF Sensitivity (S/N=30dB) Stereo Separation Frequency Coverage IF Sensitivity (S/N=20dB) : DC 12 Volts, Negative Ground : 178 (W) x 160 (D) x 50 (H) : ±10 dB : ±10 dB : 4x40 watts : 10 Ampere (max.) (For Normal Power Version) : More...
User Manual
Page 14
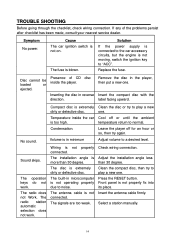
... . Select a station manually. 14 TROUBLE SHOOTING Before going through the checklist, check wiring connection. Symptom No power. Insert the compact disc with the label facing upward. The signals are too weak. The operation keys do not work . Replace the fuse. temperature return to play a new dirty or detective disc. Adjust the installation angle less than 30 degree. Clean the compact disc, then try again. Cause The car ignition switch is blown. Remove the disc...
... . Select a station manually. 14 TROUBLE SHOOTING Before going through the checklist, check wiring connection. Symptom No power. Insert the compact disc with the label facing upward. The signals are too weak. The operation keys do not work . Replace the fuse. temperature return to play a new dirty or detective disc. Adjust the installation angle less than 30 degree. Clean the compact disc, then try again. Cause The car ignition switch is blown. Remove the disc...


