
English Manual
Page 4
...attempt to raise, lower, or move the treadmill. 22. DANGER: 25. SAVE THESE INSTRUCTIONS 4 Always remove the key, unplug the power cord, and press the power switch into any opening on page 5 for in the storage position. 23. Never remove the motor hood un- Over exercising may result in ...use only. If you feel faint or if you experience pain while exercising, stop immediately and cool down. Never insert any object into the off position when the treadmill is not in serious injury or death...
...attempt to raise, lower, or move the treadmill. 22. DANGER: 25. SAVE THESE INSTRUCTIONS 4 Always remove the key, unplug the power cord, and press the power switch into any opening on page 5 for in the storage position. 23. Never remove the motor hood un- Over exercising may result in ...use only. If you feel faint or if you experience pain while exercising, stop immediately and cool down. Never insert any object into the off position when the treadmill is not in serious injury or death...
English Manual
Page 23
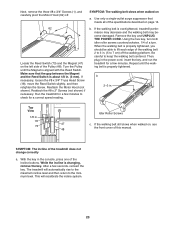
... (18), move the Reed Switch slightly, and then retighten the Screw. SYMPTOM: The walking belt slows when walked on the left side of the treadmill does not change correctly a. If the walking belt is changing, remove the key. Using the hex key, turn . With the key in the... maximum incline level and then return to check for a few seconds, reinsert the key. Next, remove the three #8 x 3/4" Screws (1), and carefully pivot the Motor Hood (62) off the walking platform. Turn the Pulley until the walking belt is aligned with the Reed Switch. Reattach the #8 x 2" Screws (not shown)...
... (18), move the Reed Switch slightly, and then retighten the Screw. SYMPTOM: The walking belt slows when walked on the left side of the treadmill does not change correctly a. If the walking belt is changing, remove the key. Using the hex key, turn . With the key in the... maximum incline level and then return to check for a few seconds, reinsert the key. Next, remove the three #8 x 3/4" Screws (1), and carefully pivot the Motor Hood (62) off the walking platform. Turn the Pulley until the walking belt is aligned with the Reed Switch. Reattach the #8 x 2" Screws (not shown)...
English Manual
Page 26
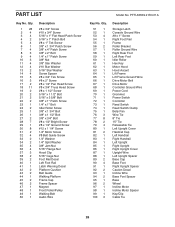
...Upright Cover Upright Wire Left Upright Spacer Base Cap Base Foot Right Upright Spacer Caution Decal Incline Wire Base Foot Spacer Base Wheel Incline Motor Incline Motor Spacer Key/Clip Cable Tie 26 PFTL60509.2 R0411A Key No. Qty. 1 28 2 4 3 4 4 2 5 4 6 1...Patch Screw 1/4" x 1" Bolt Idler Roller Screw 3/8" x 1 3/4" Bolt 3/8" x 1 1/2" Bolt 3/8" x 3/4" Bolt #8 x 1/2" Bright Screw #8 x 1/2" Ground Screw #12 x 1 1/4" Screw 1/4" Motor Screw #8 Belt Guide Screw 1/4" Washer 1/4" Split Washer 3/8" Jam Nut 5/16" Flange Nut Hood Clip 5/16" Cage Nut Foot Rail Decal Left Foot Rail Latch Warning...
...Upright Cover Upright Wire Left Upright Spacer Base Cap Base Foot Right Upright Spacer Caution Decal Incline Wire Base Foot Spacer Base Wheel Incline Motor Incline Motor Spacer Key/Clip Cable Tie 26 PFTL60509.2 R0411A Key No. Qty. 1 28 2 4 3 4 4 2 5 4 6 1...Patch Screw 1/4" x 1" Bolt Idler Roller Screw 3/8" x 1 3/4" Bolt 3/8" x 1 1/2" Bolt 3/8" x 3/4" Bolt #8 x 1/2" Bright Screw #8 x 1/2" Ground Screw #12 x 1 1/4" Screw 1/4" Motor Screw #8 Belt Guide Screw 1/4" Washer 1/4" Split Washer 3/8" Jam Nut 5/16" Flange Nut Hood Clip 5/16" Cage Nut Foot Rail Decal Left Foot Rail Latch Warning...
English Manual
Page 32
... or replacing, at ICONʼs option, the product through one of its authorized service centers. the customer may not apply to the product. The drive motor is warranted for a particular purpose are not followed, if the product is abused or improperly or abnormally used for service needed under warranty. Parts and...
... or replacing, at ICONʼs option, the product through one of its authorized service centers. the customer may not apply to the product. The drive motor is warranted for a particular purpose are not followed, if the product is abused or improperly or abnormally used for service needed under warranty. Parts and...


