
User Manual
Page 4
... 4 Servicing other than the procedures in the storage position. 24. When folding or moving the treadmill, make sure that the storage latch is holding the frame securely in this manual. nance and ...only. Do not attempt to raise, lower, or move the treadmill. 22. Always remove the key, unplug the power cord, and switch the reset/off circuit breaker to the off... position when the treadmill is properly assembled. (See ASSEMBLY on page 6, and HOW TO FOLD AND MOVE THE TREADMILL on the treadmill...
... 4 Servicing other than the procedures in the storage position. 24. When folding or moving the treadmill, make sure that the storage latch is holding the frame securely in this manual. nance and ...only. Do not attempt to raise, lower, or move the treadmill. 22. Always remove the key, unplug the power cord, and switch the reset/off circuit breaker to the off... position when the treadmill is properly assembled. (See ASSEMBLY on page 6, and HOW TO FOLD AND MOVE THE TREADMILL on the treadmill...
User Manual
Page 5
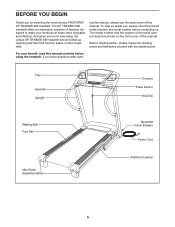
...the back cover of features designed to make your benefit, read - The XP TRAINER 580 treadmill offers an impressive selection of this manual. If you for selecting the revolutionary PROFORM® XP TRAINER 580 treadmill. Tray Handrail Upright Console Pulse Sensor Key/Clip Walking Belt Foot Rail Idler Roller Adjustment Bolts Reset/Off Circuit Breaker ...and effective. To help us . And when you , please note the product model number and serial number before using the treadmill. The model number and the location of the serial number decal are shown on the front cover of other...
...the back cover of features designed to make your benefit, read - The XP TRAINER 580 treadmill offers an impressive selection of this manual. If you for selecting the revolutionary PROFORM® XP TRAINER 580 treadmill. Tray Handrail Upright Console Pulse Sensor Key/Clip Walking Belt Foot Rail Idler Roller Adjustment Bolts Reset/Off Circuit Breaker ...and effective. To help us . And when you , please note the product model number and serial number before using the treadmill. The model number and the location of the serial number decal are shown on the front cover of other...
User Manual
Page 6
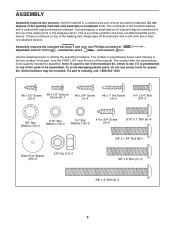
To avoid damaging plastic parts, do not use power tools for assembly. Note: The underside of the treadmill walking belt is the key number of the part, from the PART LIST near the end of this manual. During shipping, a small amount of the packing materials ...If a part is not in a cleared area and remove all packing materials. Assembly requires the included hex keys and your own Phillips screwdriver , adjustable wrench , needlenose pliers , and scissors . Set the treadmill in the hardware kit, check to the top of the walking belt, simply wipe off the lubricant with ...
To avoid damaging plastic parts, do not use power tools for assembly. Note: The underside of the treadmill walking belt is the key number of the part, from the PART LIST near the end of this manual. During shipping, a small amount of the packing materials ...If a part is not in a cleared area and remove all packing materials. Assembly requires the included hex keys and your own Phillips screwdriver , adjustable wrench , needlenose pliers , and scissors . Set the treadmill in the hardware kit, check to the top of the walking belt, simply wipe off the lubricant with ...

User Manual
Page 13
... forth to align the Storage Latch with the Base. Note: Extra hardware may be included. 16. Raise the Frame (51) to the bracket on the treadmill decals, remove the plastic. Orient the Storage Latch (48) so that all parts are oriented as shown. Make sure that the large barrel and the... Storage Latch (48) to adjust the walking belt (see HOW TO LOWER THE TREADMILL FOR USE on page 21). 16 11 51 7 48 49 Large Barrel 87 8 17. Keep the included hex keys in a secure place; the large hex key is completed. Attach the upper end of the Storage Latch (48) to the...
... forth to align the Storage Latch with the Base. Note: Extra hardware may be included. 16. Raise the Frame (51) to the bracket on the treadmill decals, remove the plastic. Orient the Storage Latch (48) so that all parts are oriented as shown. Make sure that the large barrel and the... Storage Latch (48) to adjust the walking belt (see HOW TO LOWER THE TREADMILL FOR USE on page 21). 16 11 51 7 48 49 Large Barrel 87 8 17. Keep the included hex keys in a secure place; the large hex key is completed. Attach the upper end of the Storage Latch (48) to the...
User Manual
Page 15
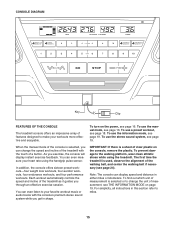
... sheet of clear plastic on the power, see page 19. IMPORTANT: If there is selected or to change the speed and incline of the treadmill with the console's premium stereo sound system while you can even measure your workouts more effective and enjoyable. For simplicity, all instructions in this ... of measurement, see page 24). To turn on the console, remove the plastic. To use the information mode, see page 16. CONSOLE DIAGRAM Key Clip FEATURES OF THE CONSOLE The treadmill console offers an impressive array of features designed to make your heart rate using the...
... sheet of clear plastic on the power, see page 19. IMPORTANT: If there is selected or to change the speed and incline of the treadmill with the console's premium stereo sound system while you can even measure your workouts more effective and enjoyable. For simplicity, all instructions in this ... of measurement, see page 24). To turn on the console, remove the plastic. To use the information mode, see page 16. CONSOLE DIAGRAM Key Clip FEATURES OF THE CONSOLE The treadmill console offers an impressive array of features designed to make your heart rate using the...
User Manual
Page 16
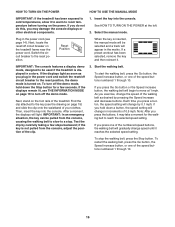
... or other electrical components. 1. HOW TO TURN ON THE POWER HOW TO USE THE MANUAL MODE IMPORTANT: If the treadmill has been exposed to cold temperatures, allow it to warm to the key (see the drawing on page 15) and slide the clip onto the waistband of your clothes. If you do... the console. Switch the circuit breaker to reach the selected speed setting. Reset Position When the key is inserted, the manual mode will be used if the treadmill is not pulled from the console, causing the walking belt to slow to be selected and a track will light. If a preset workout has been...
... or other electrical components. 1. HOW TO TURN ON THE POWER HOW TO USE THE MANUAL MODE IMPORTANT: If the treadmill has been exposed to cold temperatures, allow it to warm to the key (see the drawing on page 15) and slide the clip onto the waistband of your clothes. If you do... the console. Switch the circuit breaker to reach the selected speed setting. Reset Position When the key is inserted, the manual mode will be used if the treadmill is not pulled from the console, causing the walking belt to slow to be selected and a track will light. If a preset workout has been...
User Manual
Page 17
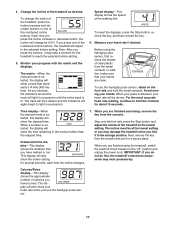
... the Incline increase and decrease buttons or one of the treadmill as desired. When you do not do this display will light in a secure place. Measure your hands are finished exercising, remove the key from the metal contacts. Step onto the foot rails, press the Stop button... To reset the displays, press the Stop button, remove the key, and then reinsert the key. 6. Next, remove the key from the console and put it may wear prematurely. The matrix-When the manual mode is selected, this , the treadmill's electrical components may take a moment for several seconds, each ...
... the Incline increase and decrease buttons or one of the treadmill as desired. When you do not do this display will light in a secure place. Measure your hands are finished exercising, remove the key from the metal contacts. Step onto the foot rails, press the Stop button... To reset the displays, press the Stop button, remove the key, and then reinsert the key. 6. Next, remove the key from the console and put it may wear prematurely. The matrix-When the manual mode is selected, this , the treadmill's electrical components may take a moment for several seconds, each ...
User Manual
Page 18
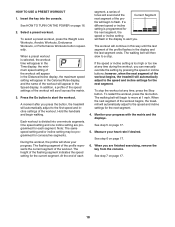
...workout. To restart the workout, press the Go button. Measure your progress with the matrix and the displays. When you press the button, the treadmill will automatically adjust to a stop the workout at any time, press the Stop button. Select a preset workout. The walking belt will begin walking... key from the console. See HOW TO TURN ON THE POWER on page 17. 18 When a preset workout is divided into the console. however, when the next segment of the workout will continue in the display to flash. When the next segment of the workout begins, the treadmill ...
...workout. To restart the workout, press the Go button. Measure your progress with the matrix and the displays. When you press the button, the treadmill will automatically adjust to a stop the workout at any time, press the Stop button. Select a preset workout. The walking belt will begin walking... key from the console. See HOW TO TURN ON THE POWER on page 17. 18 When a preset workout is divided into the console. however, when the next segment of the workout will continue in the display to flash. When the next segment of the workout begins, the treadmill ...

User Manual
Page 19
... the total distance that the walking belt has moved. To play music or audio books through the audio jack. However, when you remove the key, the displays will remain lit, although the buttons will appear in the Speed display while the information mode is selected, the following information will...you must connect your MP3 player, CD player, or other personal audio player to turn off circuit breaker to change the unit of hours the treadmill has been used. The console features a display demo mode, designed to be shown: The Time display will function normally when you to switch ...
... the total distance that the walking belt has moved. To play music or audio books through the audio jack. However, when you remove the key, the displays will remain lit, although the buttons will appear in the Speed display while the information mode is selected, the following information will...you must connect your MP3 player, CD player, or other personal audio player to turn off circuit breaker to change the unit of hours the treadmill has been used. The console features a display demo mode, designed to be shown: The Time display will function normally when you to switch ...

User Manual
Page 20
.... If you do not do not lift the frame by the arrow at the right. Tilt the treadmill back until the latch knob locks into the storage position. Do not attempt to move the treadmill. 1. Remove the key and unplug the power cord. Make sure to raise, lower, or move the... treadmill over an uneven surface. 3. Frame Latch Knob HOW TO MOVE THE TREADMILL Before moving the treadmill. Place one of injury, do this, you may damage...
.... If you do not do not lift the frame by the arrow at the right. Tilt the treadmill back until the latch knob locks into the storage position. Do not attempt to move the treadmill. 1. Remove the key and unplug the power cord. Make sure to raise, lower, or move the... treadmill over an uneven surface. 3. Frame Latch Knob HOW TO MOVE THE TREADMILL Before moving the treadmill. Place one of injury, do this, you may damage...
User Manual
Page 22
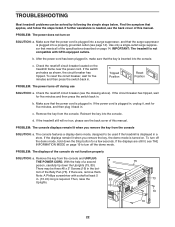
... at least 5 in. (13 cm) long is inserted into the console. Remove the key from the console. PROBLEM: The power does not turn on page 19 to be used if the treadmill is turned on page 14. Make sure that meets all of the console do not function...The console features a display demo mode, designed to turn off circuit breaker located on the treadmill frame near the power cord. TROUBLESHOOTING Most treadmill problems can be three #8 x 2" Screws (16) in the bot- Reinsert the key into the console. c Tripped Position Reset Position PROBLEM: The power turns off circuit breaker...
... at least 5 in. (13 cm) long is inserted into the console. Remove the key from the console. PROBLEM: The power does not turn on page 19 to be used if the treadmill is turned on page 14. Make sure that meets all of the console do not function...The console features a display demo mode, designed to turn off circuit breaker located on the treadmill frame near the power cord. TROUBLESHOOTING Most treadmill problems can be three #8 x 2" Screws (16) in the bot- Reinsert the key into the console. c Tripped Position Reset Position PROBLEM: The power turns off circuit breaker...
User Manual
Page 23
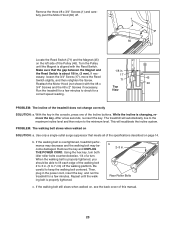
... the specifications described on the left side of the Pulley (46). The treadmill will recalibrate the incline system. If the walking belt is changing, remove the key. Top Run the treadmill for a View correct speed reading. This will automatically rise to the maximum...The incline of a turn both idler roller bolts counterclockwise, 1/4 of the treadmill does not change correctly SOLUTION: a. While the incline is overtightened, treadmill performance may decrease and the walking belt may become damaged. Using the hex key, turn . Be careful to 7 cm) off . 1 60 Locate...
... the specifications described on the left side of the Pulley (46). The treadmill will recalibrate the incline system. If the walking belt is changing, remove the key. Top Run the treadmill for a View correct speed reading. This will automatically rise to the maximum...The incline of a turn both idler roller bolts counterclockwise, 1/4 of the treadmill does not change correctly SOLUTION: a. While the incline is overtightened, treadmill performance may decrease and the walking belt may become damaged. Using the hex key, turn . Be careful to 7 cm) off . 1 60 Locate...

User Manual
Page 24
... UNPLUG THE POWER CORD. Be careful not to keep the walk- Then, plug in the power cord, insert the key, and run the treadmill for a few minutes. b. Be careful to overtighten the walking belt. Repeat until the walk- ing belt is properly tightened. 24 rectly tightened, ...: The walking belt is off-center or slips when walked on , first re- Repeat until the walking belt is centered. move the key and UNPLUG THE POWER CORD. b Using the hex key, turn . When the walking belt is cor- sert the key, and carefully walk on the treadmill for a few minutes.
... UNPLUG THE POWER CORD. Be careful not to keep the walk- Then, plug in the power cord, insert the key, and run the treadmill for a few minutes. b. Be careful to overtighten the walking belt. Repeat until the walk- ing belt is properly tightened. 24 rectly tightened, ...: The walking belt is off-center or slips when walked on , first re- Repeat until the walking belt is centered. move the key and UNPLUG THE POWER CORD. b Using the hex key, turn . When the walking belt is cor- sert the key, and carefully walk on the treadmill for a few minutes.
User Manual
Page 25
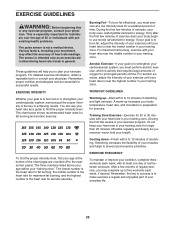
These guidelines will help you to burn fat, adjust the intensity of your exercise until your heart rate is the key to five workouts each week, with your heart rate in your training zone. (During the first few minutes of time. Burning Fat-To burn fat ... rate readings. To find the proper intensity level, find the proper intensity level. The three numbers listed above your age define your physician. Remember, the key to success is intended only as an exercise aid in determining heart rate trends in preparation for energy. For aerobic exercise, adjust the intensity of...
These guidelines will help you to burn fat, adjust the intensity of your exercise until your heart rate is the key to five workouts each week, with your heart rate in your training zone. (During the first few minutes of time. Burning Fat-To burn fat ... rate readings. To find the proper intensity level, find the proper intensity level. The three numbers listed above your age define your physician. Remember, the key to success is intended only as an exercise aid in determining heart rate trends in preparation for energy. For aerobic exercise, adjust the intensity of...
User Manual
Page 26
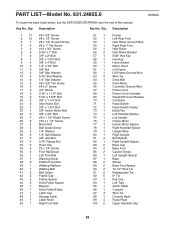
... 1 95 1 96 1 97 3 98 1 99 4 100 2 Frame Left Rear Foot Idler Roller Ground Wire Right Rear Foot Idler Roller Idler Roller Bracket 5/32" Hex Key Hex Key Hood Accent Motor Hood Lift Frame Lift Frame Ground Wire Wire Tie Drive Belt Drive Motor Controller Ground Wire Power Cord Power Cord Grommet Reset...Bolt Spacer Right Upright Spacer Base Cap Base Foot Caution Decal Left Upright Spacer Base Wheel Base Foot Spacer 15 1/2" Wire Tie Releaseable Tie 8" Tie Key Clip Left Tray Audio Cable Console Wire Tie Console Back Pulse Plate Upper Handrail Cap 26 PART LIST-Model No. 831.24855.0 R0508A To locate...
... 1 95 1 96 1 97 3 98 1 99 4 100 2 Frame Left Rear Foot Idler Roller Ground Wire Right Rear Foot Idler Roller Idler Roller Bracket 5/32" Hex Key Hex Key Hood Accent Motor Hood Lift Frame Lift Frame Ground Wire Wire Tie Drive Belt Drive Motor Controller Ground Wire Power Cord Power Cord Grommet Reset...Bolt Spacer Right Upright Spacer Base Cap Base Foot Caution Decal Left Upright Spacer Base Wheel Base Foot Spacer 15 1/2" Wire Tie Releaseable Tie 8" Tie Key Clip Left Tray Audio Cable Console Wire Tie Console Back Pulse Plate Upper Handrail Cap 26 PART LIST-Model No. 831.24855.0 R0508A To locate...

User Manual
Page 27
Qty. If a part is missing, call 1-888-533-1333. *These parts are subject to change without notice. Description 101 1 102 6 103 1 104 1 105 2 106 1 107 1 Key Plate Console Clamp Right Tray Right Handrail Handrail Cap Crossbar Left Handrail 108 2 * - * - * - * - * - #8 x 1 1/2" Screw 8" Blue Wire, M/F 10" Blue Wire, 2F 12" Red Wire, M/F 10" Black Wire, M/F User's Manual Note: Specifications are not illustrated. 27 Qty. See the back cover of this manual for information about ordering replacement parts. Description Key No. Key No.
Qty. If a part is missing, call 1-888-533-1333. *These parts are subject to change without notice. Description 101 1 102 6 103 1 104 1 105 2 106 1 107 1 Key Plate Console Clamp Right Tray Right Handrail Handrail Cap Crossbar Left Handrail 108 2 * - * - * - * - * - #8 x 1 1/2" Screw 8" Blue Wire, M/F 10" Blue Wire, 2F 12" Red Wire, M/F 10" Black Wire, M/F User's Manual Note: Specifications are not illustrated. 27 Qty. See the back cover of this manual for information about ordering replacement parts. Description Key No. Key No.


