

Uk Manual
Page 1
.... Serial Number Decal QUESTIONS? Save this equipment. PETL50707.0 Serial No. If you have questions, or if there are committed to providing complete customer satisfaction. USER'S MANUAL As a manufacturer, we are missing parts, please contact us at the numbers or addresses listed below: Call: 08457 089 009 Outside UK: 0 (44) 113 3877133...
.... Serial Number Decal QUESTIONS? Save this equipment. PETL50707.0 Serial No. If you have questions, or if there are committed to providing complete customer satisfaction. USER'S MANUAL As a manufacturer, we are missing parts, please contact us at the numbers or addresses listed below: Call: 08457 089 009 Outside UK: 0 (44) 113 3877133...

Uk Manual
Page 2
If a decal is a registered trademark of this manual and request a free replacement decal. Note: The decals may not be shown at actual size. Apply the decal in the locations shown. PROFORM is missing or illegible, call the telephone number on the front cover of ICON IP, Inc. 2 TABLE OF CONTENTS WARNING DECAL PLACEMENT...
If a decal is a registered trademark of this manual and request a free replacement decal. Note: The decals may not be shown at actual size. Apply the decal in the locations shown. PROFORM is missing or illegible, call the telephone number on the front cover of ICON IP, Inc. 2 TABLE OF CONTENTS WARNING DECAL PLACEMENT...

Uk Manual
Page 3
.... 14. A 13 amp fuse should be used only by or through the use only a 3conductor, 1mm2 (14-gauge) cord that could become caught in this manual and all warnings and precautions. 3. Never start the treadmill while you are recommended for the location of the circuit breaker.) 3 When connecting the power cord...
.... 14. A 13 amp fuse should be used only by or through the use only a 3conductor, 1mm2 (14-gauge) cord that could become caught in this manual and all warnings and precautions. 3. Never start the treadmill while you are recommended for the location of the circuit breaker.) 3 When connecting the power cord...

Uk Manual
Page 4
... into any opening on page 17.) You must be performed by an authorized service representative. Servicing other than the procedures in this treadmill in this manual. This treadmill is properly assembled. (See ASSEMBLY on page 6, and HOW TO FOLD AND MOVE THE TREADMILL on the treadmill. Do not attempt to do... storage latch is fully closed. 22. Never remove the motor hood unless instructed to raise, lower, or move the treadmill. 21. Do not use this manual should be able to safely lift 45 lbs. (20 kg) to raise, lower, or move the treadmill until it is intended for in-home use...
... into any opening on page 17.) You must be performed by an authorized service representative. Servicing other than the procedures in this treadmill in this manual. This treadmill is properly assembled. (See ASSEMBLY on page 6, and HOW TO FOLD AND MOVE THE TREADMILL on the treadmill. Do not attempt to do... storage latch is fully closed. 22. Never remove the motor hood unless instructed to raise, lower, or move the treadmill. 21. Do not use this manual should be able to safely lift 45 lbs. (20 kg) to raise, lower, or move the treadmill until it is intended for in-home use...

Uk Manual
Page 5
... familiarize yourself with innovative design to let you 're not exercising, the unique STYLE 4500 treadmill can be folded up, requiring less than half the floor space of this manual. And when you enjoy an excellent form of cardiovascular exercise in the convenience and...benefit, read - ing this manual carefully before contacting us assist you, note the product model number and serial number before using the treadmill. The STYLE 4500 treadmill combines advanced technology with the labeled parts. If you for selecting the PROFORM® STYLE 4500 treadmill. For your home. ...
... familiarize yourself with innovative design to let you 're not exercising, the unique STYLE 4500 treadmill can be folded up, requiring less than half the floor space of this manual. And when you enjoy an excellent form of cardiovascular exercise in the convenience and...benefit, read - ing this manual carefully before contacting us assist you, note the product model number and serial number before using the treadmill. The STYLE 4500 treadmill combines advanced technology with the labeled parts. If you for selecting the PROFORM® STYLE 4500 treadmill. For your home. ...
Uk Manual
Page 6
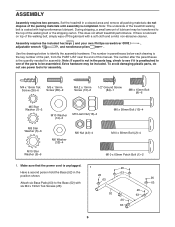
... the part, from the PART LIST near the end of lubricant may be transferred to identify the assembly hardware. During shipping, a small amount of this manual. Assembly requires the included hex keys and your own Phillips screwdriver , adjustable wrench , and needlenose pliers . Use the drawings below each drawing is coated with...
... the part, from the PART LIST near the end of lubricant may be transferred to identify the assembly hardware. During shipping, a small amount of this manual. Assembly requires the included hex keys and your own Phillips screwdriver , adjustable wrench , and needlenose pliers . Use the drawings below each drawing is coated with...
Uk Manual
Page 13
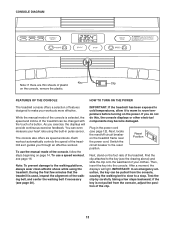
... the clip. 13 Find the clip attached to the key (see page 16. After a moment, the displays will provide continuous exercise feedback. While the manual mode of a button. You can be changed with the touch of the console is not pulled from the console, causing the walking belt to slow... to a stop. To use the manual mode of the treadmill. IMPORTANT: If the treadmill has been exposed to cold temperatures, allow it guides you through an effective workout. Test the ...
... the clip. 13 Find the clip attached to the key (see page 16. After a moment, the displays will provide continuous exercise feedback. While the manual mode of a button. You can be changed with the touch of the console is not pulled from the console, causing the walking belt to slow... to a stop. To use the manual mode of the treadmill. IMPORTANT: If the treadmill has been exposed to cold temperatures, allow it guides you through an effective workout. Test the ...

Uk Manual
Page 14
... that you press the buttons, it may take a moment for the walking belt to move at 2 km/h. if you have selected a speed workout, reselect the manual mode by pressing the Speed buttons. Note: After you are most interested in the displays. The lower right display-The lower right display can show... or decrease button until only zeros appear in viewing. See HOW TO TURN ON THE POWER on page 15). When the key is inserted, the manual mode will be shown in the upper display, the same information will begin walking. Note: While information is reached. 5. HOW TO USE THE...
... that you press the buttons, it may take a moment for the walking belt to move at 2 km/h. if you have selected a speed workout, reselect the manual mode by pressing the Speed buttons. Note: After you are most interested in the displays. The lower right display-The lower right display can show... or decrease button until only zeros appear in viewing. See HOW TO TURN ON THE POWER on page 15). When the key is inserted, the manual mode will be shown in the upper display, the same information will begin walking. Note: While information is reached. 5. HOW TO USE THE...

Uk Manual
Page 16
... Start button or the Speed increase button to the speed setting for the first segment of the displays for the next segment. 4. When you can manually override the setting by pressing the Speed buttons. To select a speed workout, press the Workout Select button repeatedly; If the speed setting is programmed for...
... Start button or the Speed increase button to the speed setting for the first segment of the displays for the next segment. 4. When you can manually override the setting by pressing the Speed buttons. To select a speed workout, press the Workout Select button repeatedly; If the speed setting is programmed for...

Uk Manual
Page 19
..., and then retighten the Screw. PROBLEM: The power does not turn on the left side of this manual. If an extension cord is not compatible with the Reed Switch. c. d. PROBLEM: The displays of this manual. Remove the key from the console. Reattach the Hood (not shown), and run , please see the drawing...
..., and then retighten the Screw. PROBLEM: The power does not turn on the left side of this manual. If an extension cord is not compatible with the Reed Switch. c. d. PROBLEM: The displays of this manual. Remove the key from the console. Reattach the Hood (not shown), and run , please see the drawing...
Uk Manual
Page 20
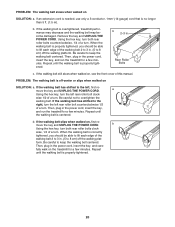
... -center or slips when walked on SOLUTION: a. b 2-3 in the power cord, insert the key, and care- Then, plug in . (5 to lift each edge of this manual.
... -center or slips when walked on SOLUTION: a. b 2-3 in the power cord, insert the key, and care- Then, plug in . (5 to lift each edge of this manual.

Uk Manual
Page 22
... 1 Power Cord 91 1 Console 92 1 3/8" Jam Nut 22 PETL50707.0 R0807A To locate the parts listed below, see the EXPLODED DRAWING near the end of the manual. Qty. Key No.
... 1 Power Cord 91 1 Console 92 1 3/8" Jam Nut 22 PETL50707.0 R0807A To locate the parts listed below, see the EXPLODED DRAWING near the end of the manual. Qty. Key No.

Uk Manual
Page 23
... 14" Blue Wire, M/F 10" Red Wire, M/F 6" White Wire, 2F 12" White Wire, 2F 8" Blue Wire, 2F 8" Green/Yellow Wire, F/Ring 6" Green/Yellow Wire, F/Ring User's Manual *These parts are subject to change without notice. 23 Qty. 93 2 94 1 95 2 96 1 97 1 98 1 99 1 100 1 101 2 102 6 103 2 104 1 105 1 106 1 107...
... 14" Blue Wire, M/F 10" Red Wire, M/F 6" White Wire, 2F 12" White Wire, 2F 8" Blue Wire, 2F 8" Green/Yellow Wire, F/Ring 6" Green/Yellow Wire, F/Ring User's Manual *These parts are subject to change without notice. 23 Qty. 93 2 94 1 95 2 96 1 97 1 98 1 99 1 100 1 101 2 102 6 103 2 104 1 105 1 106 1 107...

Uk Manual
Page 28
... so, you will help us : • the model number and the serial number of the product (see the front cover of this manual) • the name of the product (see the front cover of this manual) • the key number and description of the part(s) (see the front cover of this...you purchased this product. ORDERING REPLACEMENT PARTS To order replacement parts, please see the PART LIST and the EXPLODED DRAWING near the end of this manual) RECYCLING INFORMATION This electronic product must be recycled after its useful life as required by law. To preserve the environment, this product must not ...
... so, you will help us : • the model number and the serial number of the product (see the front cover of this manual) • the name of the product (see the front cover of this manual) • the key number and description of the part(s) (see the front cover of this...you purchased this product. ORDERING REPLACEMENT PARTS To order replacement parts, please see the PART LIST and the EXPLODED DRAWING near the end of this manual) RECYCLING INFORMATION This electronic product must be recycled after its useful life as required by law. To preserve the environment, this product must not ...


