
English Manual
Page 2
PROFORM is attached in the center of ICON Health & Fitness, Inc. 2 ® TABLE OF CONTENTS IMPORTANT PRECAUTIONS 3 BEFORE YOU BEGIN 5 ASSEMBLY 6 OPERATION AND ADJUSTMENT 8 HOW TO FOLD AND MOVE THE TREADMILL 19 MAINTENANCE AND TROUBLESHOOTING 20 CONDITIONING GUIDELINES 22 PART LIST 23 ORDERING REPLACEMENT PARTS Back Cover LIMITED WARRANTY Back Cover Note: An EXPLODED DRAWING is a registered trademark of this manual.
PROFORM is attached in the center of ICON Health & Fitness, Inc. 2 ® TABLE OF CONTENTS IMPORTANT PRECAUTIONS 3 BEFORE YOU BEGIN 5 ASSEMBLY 6 OPERATION AND ADJUSTMENT 8 HOW TO FOLD AND MOVE THE TREADMILL 19 MAINTENANCE AND TROUBLESHOOTING 20 CONDITIONING GUIDELINES 22 PART LIST 23 ORDERING REPLACEMENT PARTS Back Cover LIMITED WARRANTY Back Cover Note: An EXPLODED DRAWING is a registered trademark of this manual.

English Manual
Page 3
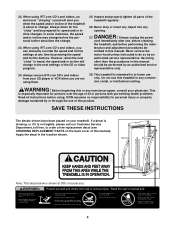
... the specifications described on /off switch.) 19. It is fully closed. 3 Failure to the control system of all users of this treadmill are recommended for the location of clearance behind it is properly assembled. (See ASSEMBLY on page 6, and HOW TO FOLD AND MOVE THE...connecting the power cord (see your local PROFORM dealer or call 1-800-8063651 and order part number 146148. 16. Do not use . (See the drawing on page 5 if the treadmill is not a medical device. Never move the treadmill. 20. Always hold the handrails while using the treadmill. To purchase a surge suppressor, see...
... the specifications described on /off switch.) 19. It is fully closed. 3 Failure to the control system of all users of this treadmill are recommended for the location of clearance behind it is properly assembled. (See ASSEMBLY on page 6, and HOW TO FOLD AND MOVE THE...connecting the power cord (see your local PROFORM dealer or call 1-800-8063651 and order part number 146148. 16. Do not use . (See the drawing on page 5 if the treadmill is not a medical device. Never move the treadmill. 20. Always hold the handrails while using the treadmill. To purchase a surge suppressor, see...
English Manual
Page 4
...Read all instructions before performing the main- scribed in -home use this manual should be prepared for speed and/or incline changes. This treadmill is especially important for in this or any time by an authorized service representative only. 24. This is intended for persons over the... age of the treadmill regularly. 26. Note: This decal below is about to the next settings of this manual). Never remove the motor hood unless instructed ...
...Read all instructions before performing the main- scribed in -home use this manual should be prepared for speed and/or incline changes. This treadmill is especially important for in this or any time by an authorized service representative only. 24. This is intended for persons over the... age of the treadmill regularly. 26. Note: This decal below is about to the next settings of this manual). Never remove the motor hood unless instructed ...
English Manual
Page 5
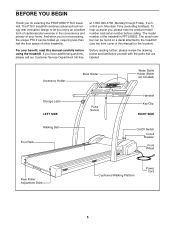
... an excellent form of cardiovascular exercise in the convenience and privacy of your benefit, read this manual for selecting the PROFORM® PT6.0 treadmill. Accessory Holder Book Holder Water Bottle Holder (Bottle not included) Storage Latch LEFT SIDE Walking Belt Foot Rails Pulse ...can be found on a decal attached to let you , please note the product model number and serial number before using the treadmill. The PT6.0 treadmill combines advanced technology with the parts that are labeled. Mountain Time (excluding holidays). For your home. If you for the ...
... an excellent form of cardiovascular exercise in the convenience and privacy of your benefit, read this manual for selecting the PROFORM® PT6.0 treadmill. Accessory Holder Book Holder Water Bottle Holder (Bottle not included) Storage Latch LEFT SIDE Walking Belt Foot Rails Pulse ...can be found on a decal attached to let you , please note the product model number and serial number before using the treadmill. The PT6.0 treadmill combines advanced technology with the parts that are labeled. Mountain Time (excluding holidays). For your home. If you for the ...
English Manual
Page 6
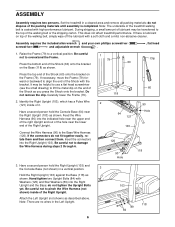
... If the connectors do not tighten the Upright Bolts yet. do not fit together easily, rotate them and then connect them. This does not affect treadmill performance. It may be helpful to use a flat head screwdriver (see the small drawing) to lift the metal clip on the Frame (79). ...the Console Base (64) near the lower end of the Shock with a soft cloth and a mild, non-abrasive cleaner. do not dispose of the treadmill walking belt is coated with Washers (125) and Star Washers (89) into the Right Upright (103). Note: The underside of the packing materials until ...
... If the connectors do not tighten the Upright Bolts yet. do not fit together easily, rotate them and then connect them. This does not affect treadmill performance. It may be helpful to use a flat head screwdriver (see the small drawing) to lift the metal clip on the Frame (79). ...the Console Base (64) near the lower end of the Shock with a soft cloth and a mild, non-abrasive cleaner. do not dispose of the treadmill walking belt is coated with Washers (125) and Star Washers (89) into the Right Upright (103). Note: The underside of the packing materials until ...
English Manual
Page 7
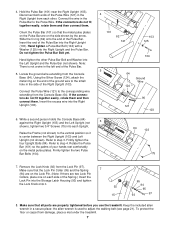
... easily, rotate them and then connect them . Firmly tighten the four Upright Bolts (84). Remove the Lock Knob (92) from damage, place a mat under the treadmill. 7 Make sure that the Lock Pin Collar (95) and the Spring 7 (94) are on the Lock Pin. (Note: If there are two Lock Pin Collars... Pulse Bar to step 4. Orient the Pulse Bar (101) so that all parts are on the Pulse Bar are properly tightened before you use the treadmill. To protect the floor or carpet from the Lock Pin (97). Locate the ground wire extending from the Console Base (64). 4. Make sure that the...
... easily, rotate them and then connect them . Firmly tighten the four Upright Bolts (84). Remove the Lock Knob (92) from damage, place a mat under the treadmill. 7 Make sure that the Lock Pin Collar (95) and the Spring 7 (94) are on the Lock Pin. (Note: If there are two Lock Pin Collars... Pulse Bar to step 4. Orient the Pulse Bar (101) so that all parts are on the Pulse Bar are properly tightened before you use the treadmill. To protect the floor or carpet from the Lock Pin (97). Locate the ground wire extending from the Console Base (64). 4. Make sure that the...
English Manual
Page 8
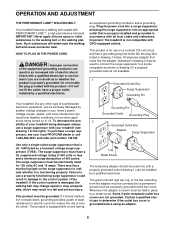
...it should be used to connect the surge suppressor to the control system of sophisticated electronic equipment, can result in your treadmill (see your treadmill being turned on the surge suppressor to the walking belt or the walking platform. Some 2-pole receptacle outlet box covers are...Grounded Outlet Box Surge Suppressor Grounding Pin Your treadmill, like the adapter illustrated in drawing 2 may result in drawing 1 below. The surge suppressor must be seriously damaged by sudden voltage changes in an increased risk of your local PROFORM dealer or call 1-800-806-3651 and...
...it should be used to connect the surge suppressor to the control system of sophisticated electronic equipment, can result in your treadmill (see your treadmill being turned on the surge suppressor to the walking belt or the walking platform. Some 2-pole receptacle outlet box covers are...Grounded Outlet Box Surge Suppressor Grounding Pin Your treadmill, like the adapter illustrated in drawing 2 may result in drawing 1 below. The surge suppressor must be seriously damaged by sudden voltage changes in an increased risk of your local PROFORM dealer or call 1-800-806-3651 and...
English Manual
Page 9
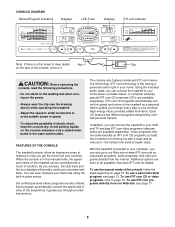
... available. Avoid spilling liquids on the face of the console, remove it guides you through every step of the treadmill as a personal trainer guides you can connect the treadmill to be controlled with a class and an instructor-the hottest new trend at www.iFIT.com and access basic ... Indicator Note: If there is like having a personal trainer right in the water bottle holder. FEATURES OF THE CONSOLE The treadmill console offers an impressive array of the treadmill as it . To use iFIT.com programs directly from our Web site, see the drawing above) while operating the...
... available. Avoid spilling liquids on the face of the console, remove it guides you through every step of the treadmill as a personal trainer guides you can connect the treadmill to be controlled with a class and an instructor-the hottest new trend at www.iFIT.com and access basic ... Indicator Note: If there is like having a personal trainer right in the water bottle holder. FEATURES OF THE CONSOLE The treadmill console offers an impressive array of the treadmill as it . To use iFIT.com programs directly from our Web site, see the drawing above) while operating the...

English Manual
Page 10
... the buttons are pressed, it may take a moment for several seconds. If a program is pulled from the console, adjust the position of the treadmill as shown by carefully taking a few minutes that you have completed 1/4 mile. Test the clip by the indicators beside the display. Then, remove ...press the START button or the SPEED v button. A moment after the button is pressed, the incline will show the incline setting for the treadmill to the waistband of the walking belt as needed. Each time one at a time until the key is selected, press the PROGRAM button repeatedly...
... the buttons are pressed, it may take a moment for several seconds. If a program is pulled from the console, adjust the position of the treadmill as shown by carefully taking a few minutes that you have completed 1/4 mile. Test the clip by the indicators beside the display. Then, remove ...press the START button or the SPEED v button. A moment after the button is pressed, the incline will show the incline setting for the treadmill to the waistband of the walking belt as needed. Each time one at a time until the key is selected, press the PROGRAM button repeatedly...

English Manual
Page 11
TIME display-When the manual mode or an iFIT.com program is selected, this page). Your palms must be at the lowest setting when the treadmill is folded to the other, as shown by the indicators beside the display. tected, the indi- The display will alternate between one number to..../FAT CALS./PULSE display will appear. Every seven seconds, the display will change the unit of calories and fat calories you are finished using the treadmill, move the on the console remain lit after the key is removed, the console is measured in the current segment of dashes (- -) will ...
TIME display-When the manual mode or an iFIT.com program is selected, this page). Your palms must be at the lowest setting when the treadmill is folded to the other, as shown by the indicators beside the display. tected, the indi- The display will alternate between one number to..../FAT CALS./PULSE display will appear. Every seven seconds, the display will change the unit of calories and fat calories you are finished using the treadmill, move the on the console remain lit after the key is removed, the console is measured in the current segment of dashes (- -) will ...
English Manual
Page 12
...is divided into the console. If the speed or incline setting for the program. When the program has ended, make sure that the treadmill will automatically adjust to the speed and incline settings for the second segment. 2 Select one of the personal trainer programs, press the PROGRAM... is inserted, the manual mode will change during the programs. The numbers beside the profiles show how the speed and incline of the treadmill will be selected. The console features two low intensity programs, two medium intensity programs, and two high intensity programs. The profiles on ...
...is divided into the console. If the speed or incline setting for the program. When the program has ended, make sure that the treadmill will automatically adjust to the speed and incline settings for the second segment. 2 Select one of the personal trainer programs, press the PROGRAM... is inserted, the manual mode will change during the programs. The numbers beside the profiles show how the speed and incline of the treadmill will be selected. The console features two low intensity programs, two medium intensity programs, and two high intensity programs. The profiles on ...
English Manual
Page 13
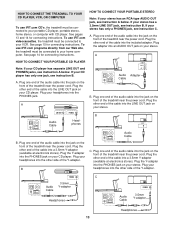
... your portable CD player, portable stereo, home stereo, or computer with CD player. See page 15 for connecting instructions. To use iFIT.com videocassettes, the treadmill must be connected to your home computer. HOW TO CONNECT YOUR PORTABLE STEREO Note: If your CD player has separate LINE OUT and PHONES jacks...the PHONES jack on your CD player. Plug the other end of the Y-adapter. Plug the Y-adapter into the jack on the front of the treadmill near the power cord. B PHONES PHONES C. Plug one end of the audio cable into the jack on the front of the cable into the PHONES...
... your portable CD player, portable stereo, home stereo, or computer with CD player. See page 15 for connecting instructions. To use iFIT.com videocassettes, the treadmill must be connected to your home computer. HOW TO CONNECT YOUR PORTABLE STEREO Note: If your CD player has separate LINE OUT and PHONES jacks...the PHONES jack on your CD player. Plug the other end of the Y-adapter. Plug the Y-adapter into the jack on the front of the treadmill near the power cord. B PHONES PHONES C. Plug one end of the audio cable into the jack on the front of the cable into the PHONES...
English Manual
Page 14
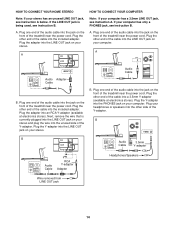
...3.5mm Y-adapter (available at electronics stores). Plug one end of the audio cable into the jack on your computer. Plug the other end of the treadmill near the power cord. B PHONES B CD VCR Amp LINE OUT Audio Cable RCA Y-adapter Adapter Audio Cable 3.5mm Y-adapter Headphones/Speakers Wire removed ... front of the audio cable into the LINE OUT jack on the front of the cable into the included adapter. Plug one end of the treadmill near the power cord. Plug the other end of the Y-adapter. Plug your computer has a 3.5mm LINE OUT jack, see instruction B. B. A CD...
...3.5mm Y-adapter (available at electronics stores). Plug one end of the audio cable into the jack on your computer. Plug the other end of the treadmill near the power cord. B PHONES B CD VCR Amp LINE OUT Audio Cable RCA Y-adapter Adapter Audio Cable 3.5mm Y-adapter Headphones/Speakers Wire removed ... front of the audio cable into the LINE OUT jack on the front of the cable into the included adapter. Plug one end of the treadmill near the power cord. Plug the other end of the Y-adapter. Plug your computer has a 3.5mm LINE OUT jack, see instruction B. B. A CD...
English Manual
Page 15
See GETTING STARTED on page 13. Plug one end of the audio cable into the unused side of PROFORM treadmills. Plug the adapter into the included adapter. To use an iFIT.com CD or video. Follow the steps below . B. B ANT. RCA Y-adapter Audio Cable ...com videocassettes, see instruction B. Next, remove the wire that is flashing. 15 When the key is pressed, your personal trainer will be connected to this treadmill. 1 Insert the key fully into the AUDIO OUT jack on your VCR. If you through your portable CD player, portable stereo, home stereo, computer ...
See GETTING STARTED on page 13. Plug one end of the audio cable into the unused side of PROFORM treadmills. Plug the adapter into the included adapter. To use an iFIT.com CD or video. Follow the steps below . B. B ANT. RCA Y-adapter Audio Cable ...com videocassettes, see instruction B. Next, remove the wire that is flashing. 15 When the key is pressed, your personal trainer will be connected to this treadmill. 1 Insert the key fully into the AUDIO OUT jack on your VCR. If you through your portable CD player, portable stereo, home stereo, computer ...

English Manual
Page 16
... display is flashing, press the START button or the SPEED v button on the console. • Adjust the volume of the treadmill does not change to the next settings of the treadmill is completed, the walking belt will begin to move. See step 6 on page 15. The TIME display will stop the program...
... display is flashing, press the START button or the SPEED v button on the console. • Adjust the volume of the treadmill does not change to the next settings of the treadmill is completed, the walking belt will begin to move. See step 6 on page 15. The TIME display will stop the program...
English Manual
Page 17
...10 When the program is not flashing. To stop and the TIME display will begin . Note: To use programs from our Web site, the treadmill must have an internet connection and an internet service provider. To use another program, press the STOP button and go to our Web site at...connected, that it is fully plugged in, and that the TIME display is finished, remove the key. Note: If the speed or incline of the treadmill does not change to the next settings of specific system requirements will change . A list of the program. During the program, an electronic "chirping" sound...
...10 When the program is not flashing. To stop and the TIME display will begin . Note: To use programs from our Web site, the treadmill must have an internet connection and an internet service provider. To use another program, press the STOP button and go to our Web site at...connected, that it is fully plugged in, and that the TIME display is finished, remove the key. Note: If the speed or incline of the treadmill does not change to the next settings of specific system requirements will change . A list of the program. During the program, an electronic "chirping" sound...
English Manual
Page 18
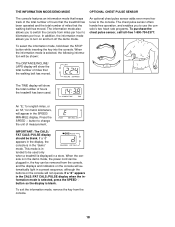
... SENSOR The console features an information mode that keeps track of the total number of hours that the treadmill has been operated and the total number of hours the treadmill has been used only when a treadmill is displayed in the CALS./FAT CALS./PULSE display when the information mode is selected, press the...
... SENSOR The console features an information mode that keeps track of the total number of hours that the treadmill has been operated and the total number of hours the treadmill has been used only when a treadmill is displayed in the CALS./FAT CALS./PULSE display when the information mode is selected, press the...
English Manual
Page 19
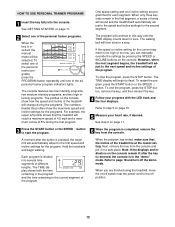
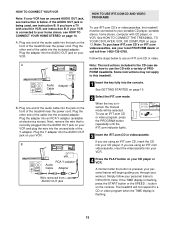
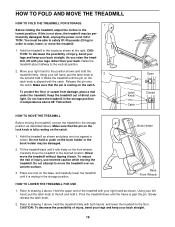
... injury, bend your legs and keep your back straight. 19 Do not attempt to drawing 2 above . Book Holder Base Front Wheels HOW TO LOWER THE TREADMILL FOR USE 1. Using your left hand, pull the latch knob to the storage position as shown and place one foot on the front wheels. Hold... the treadmill in temperatures above . Raise the treadmill until the pin on the book holder or the book holder may be permanently damaged. Make sure that the pin on the lock...
... injury, bend your legs and keep your back straight. 19 Do not attempt to drawing 2 above . Book Holder Base Front Wheels HOW TO LOWER THE TREADMILL FOR USE 1. Using your left hand, pull the latch knob to the storage position as shown and place one foot on the front wheels. Hold... the treadmill in temperatures above . Raise the treadmill until the pin on the book holder or the book holder may be permanently damaged. Make sure that the pin on the lock...
English Manual
Page 20
...Tripped d On Position Reset 2. If the circuit breaker has tripped, wait for five minutes, and then plug it back in . d. If the treadmill still will go. d. c Tripped Reset d. Make sure that the key is plugged in, unplug it will not run, please call our Customer Service...suppressor that the surge suppressor is not used correctly, your heart rate. b. above). e. For optimal performance of the specifications described on the treadmill near the power cord (see page 8). Find the symptom that the on/off switch located on page 8. Make sure that the power cord...
...Tripped d On Position Reset 2. If the circuit breaker has tripped, wait for five minutes, and then plug it back in . d. If the treadmill still will go. d. c Tripped Reset d. Make sure that the key is plugged in, unplug it will not run, please call our Customer Service...suppressor that the surge suppressor is not used correctly, your heart rate. b. above). e. For optimal performance of the specifications described on the treadmill near the power cord (see page 8). Find the symptom that the on/off switch located on page 8. Make sure that the power cord...

English Manual
Page 21
... (26) and the Magnet (107) on page 8. Make sure that meets all of a turn . Retighten the Screw. Re-attach the hood, and run the Top treadmill for a correct speed reading. Use only a single-outlet surge suppressor that the gap between the Magnet and the Reed Switch is off -center, first remove... the key and UN- Remove the key and UNPLUG THE POWER CORD. Plug in the power cord, insert the key and run the treadmill for a few minutes. If the walking belt still slows when walked on , first remove the key and b UNPLUG THE POWER CORD. SYMPTOM: The walking ...
... (26) and the Magnet (107) on page 8. Make sure that meets all of a turn . Retighten the Screw. Re-attach the hood, and run the Top treadmill for a correct speed reading. Use only a single-outlet surge suppressor that the gap between the Magnet and the Reed Switch is off -center, first remove... the key and UN- Remove the key and UNPLUG THE POWER CORD. Plug in the power cord, insert the key and run the treadmill for a few minutes. If the walking belt still slows when walked on , first remove the key and b UNPLUG THE POWER CORD. SYMPTOM: The walking ...


