
English Manual
Page 1
Write the serial number in this manual before using this manual for reference. MT Sat. 8 a.m.–-4 p.m. CUSTOMER CARE For service at any time, go to www.proformservice.com. CAUTION Read all precautions and instructions in the space above for future reference. www.proform.com Model No. Serial Number Decal ACTIVATE YOUR WARRANTY To register...
Write the serial number in this manual before using this manual for reference. MT Sat. 8 a.m.–-4 p.m. CUSTOMER CARE For service at any time, go to www.proformservice.com. CAUTION Read all precautions and instructions in the space above for future reference. www.proform.com Model No. Serial Number Decal ACTIVATE YOUR WARRANTY To register...
English Manual
Page 2
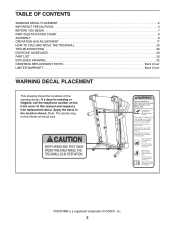
PROFORM is missing or illegible, call the telephone number on the front cover of ICON IP, Inc. 2 Apply the decal in the location shown. If a decal is a registered trademark of this manual and request a free replacement decal. TABLE OF CONTENTS WARNING DECAL PLACEMENT 2 ...IMPORTANT PRECAUTIONS 3 BEFORE YOU BEGIN 7 PART IDENTIFICATION CHART 8 ASSEMBLY 9 OPERATION AND ADJUSTMENT 17 HOW TO FOLD AND MOVE THE TREADMILL 25 TROUBLESHOOTING 26 EXERCISE GUIDELINES...
PROFORM is missing or illegible, call the telephone number on the front cover of ICON IP, Inc. 2 Apply the decal in the location shown. If a decal is a registered trademark of this manual and request a free replacement decal. TABLE OF CONTENTS WARNING DECAL PLACEMENT 2 ...IMPORTANT PRECAUTIONS 3 BEFORE YOU BEGIN 7 PART IDENTIFICATION CHART 8 ASSEMBLY 9 OPERATION AND ADJUSTMENT 17 HOW TO FOLD AND MOVE THE TREADMILL 25 TROUBLESHOOTING 26 EXERCISE GUIDELINES...

English Manual
Page 3
... 6. Never move the walking belt while the power is not working properly.) 9. Never allow more than one person on your treadmill before using your local PROFORM dealer, call the telephone number on page 17. IMPORTANT PRECAUTIONS WARNING: To reduce the risk of burns, fire, electric shock, ...or injury to persons, read all important precautions and instructions in this manual and all warnings on the treadmill at a time. 11. ...
... 6. Never move the walking belt while the power is not working properly.) 9. Never allow more than one person on your treadmill before using your local PROFORM dealer, call the telephone number on page 17. IMPORTANT PRECAUTIONS WARNING: To reduce the risk of burns, fire, electric shock, ...or injury to persons, read all important precautions and instructions in this manual and all warnings on the treadmill at a time. 11. ...

English Manual
Page 4
... properly assembled. (See ASSEMBLY on page 9, and HOW TO FOLD AND MOVE THE TREADMILL on the treadmill. 25. Never leave the treadmill unattended while it is not in this manual. Always unplug the power cord immediately after use, before performing the maintenance and adjustment procedures described in use only. Servicing other than the procedures in...
... properly assembled. (See ASSEMBLY on page 9, and HOW TO FOLD AND MOVE THE TREADMILL on the treadmill. 25. Never leave the treadmill unattended while it is not in this manual. Always unplug the power cord immediately after use, before performing the maintenance and adjustment procedures described in use only. Servicing other than the procedures in...
English Manual
Page 7
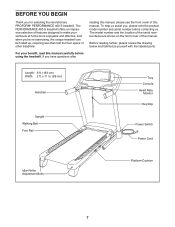
... of the serial number decal are shown on the front cover of this manual. For your workouts at home more enjoyable and effective. If you ’'re not exercising, the unique treadmill can be folded up, requiring less than half the oor space... Adjustment Bolts Platform Cushion 7 And when you have questions after reading this manual, please see the front cover of this manual carefully before contacting us assist you for selecting the revolutionary PROFORM® PERFORMANCE 400 S treadmill. Before reading further, please review the drawing below and familiarize yourself with the...
... of the serial number decal are shown on the front cover of this manual. For your workouts at home more enjoyable and effective. If you ’'re not exercising, the unique treadmill can be folded up, requiring less than half the oor space... Adjustment Bolts Platform Cushion 7 And when you have questions after reading this manual, please see the front cover of this manual carefully before contacting us assist you for selecting the revolutionary PROFORM® PERFORMANCE 400 S treadmill. Before reading further, please review the drawing below and familiarize yourself with the...
English Manual
Page 8
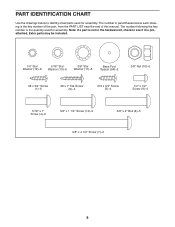
... used for assembly. The number following the key number is the key number of the part, from the PART LIST near the end of this manual. PART IDENTIFICATION CHART Use the drawings below each drawing is the quantity used for assembly. Extra parts may be included. 1/4" Star Washer (12)–-8 5/16...
... used for assembly. The number following the key number is the key number of the part, from the PART LIST near the end of this manual. PART IDENTIFICATION CHART Use the drawings below each drawing is the quantity used for assembly. Extra parts may be included. 1/4" Star Washer (12)–-8 5/16...
English Manual
Page 9
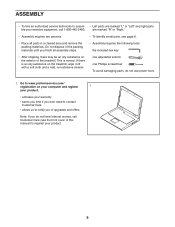
...8226; Assembly requires the following tools: the included hex key •• After shipping, there may be an oily substance on the exterior of the treadmill. are marked “"R”" or “"Right.”" •• Assembly requires two persons. •• To identify small parts, see ...the front cover of this manual) to assem- •• Left parts are marked “"L”" or “"Left”" and right parts ble your product. 9 This is an...
...8226; Assembly requires the following tools: the included hex key •• After shipping, there may be an oily substance on the exterior of the treadmill. are marked “"R”" or “"Right.”" •• Assembly requires two persons. •• To identify small parts, see ...the front cover of this manual) to assem- •• Left parts are marked “"L”" or “"Left”" and right parts ble your product. 9 This is an...
English Manual
Page 18
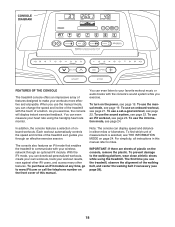
... In addition, the console features a selection of onboard workouts. Each workout automatically controls the speed and incline of the treadmill as it guides you use the manual mode, you exercise, the console will display instant exercise feedback. The rst time you through an optional iFit ... see THE INFORMATION MODE on the front cover of this manual refer to your favorite workout music or audio books with the console’'s sound system while you can change the speed and incline of the treadmill with your wireless network through an effective exercise session. To...
... In addition, the console features a selection of onboard workouts. Each workout automatically controls the speed and incline of the treadmill as it guides you use the manual mode, you exercise, the console will display instant exercise feedback. The rst time you through an optional iFit ... see THE INFORMATION MODE on the front cover of this manual refer to your favorite workout music or audio books with the console’'s sound system while you can change the speed and incline of the treadmill with your wireless network through an effective exercise session. To...
English Manual
Page 19
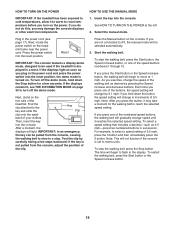
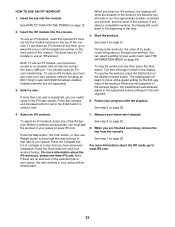
... After a moment, the displays will not function if the console is displayed in succession. See HOW TO TURN ON THE POWER at 1 mph. Press the Manual button on the treadmill frame near the power cord. To start the walking belt, press the Start button, the Speed increase button, or one of the...a store. Find the clip attached to turn on . IMPORTANT: In an emergency, the key can be used if the treadmill is set to metric units. HOW TO USE THE MANUAL MODE 1. Select the manual mode. If you turn off the demo mode, hold down the Stop button for the walking belt to a stop...
... After a moment, the displays will not function if the console is displayed in succession. See HOW TO TURN ON THE POWER at 1 mph. Press the Manual button on the treadmill frame near the power cord. To start the walking belt, press the Start button, the Speed increase button, or one of the...a store. Find the clip attached to turn on . IMPORTANT: In an emergency, the key can be used if the treadmill is set to metric units. HOW TO USE THE MANUAL MODE 1. Select the manual mode. If you turn off the demo mode, hold down the Stop button for the walking belt to a stop...
English Manual
Page 20
...you may wear prematurely. 20 In addition, make sure that represents 1/4 mile (400 meters). When your heart rate, stand on the foot rails and hold the contacts for a few seconds each time the incline of the treadmill as desired. Step onto the foot rails, press the Stop button, and adjust...off position and unplug the power cord. When you press one of plastic from the metal contacts on the metal contacts; When you select the manual mode, the matrix will also show workout instructions. 7. The matrix—-When you are nished using the handgrip heart rate monitor, ...
...you may wear prematurely. 20 In addition, make sure that represents 1/4 mile (400 meters). When your heart rate, stand on the foot rails and hold the contacts for a few seconds each time the incline of the treadmill as desired. Step onto the foot rails, press the Stop button, and adjust...off position and unplug the power cord. When you press one of plastic from the metal contacts on the metal contacts; When you select the manual mode, the matrix will also show workout instructions. 7. The matrix—-When you are nished using the handgrip heart rate monitor, ...
English Manual
Page 21
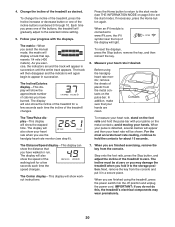
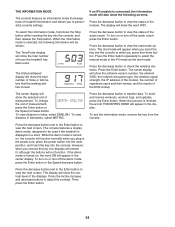
...Current Segment progress. Each workout is an estimate of the number of each segment. The height of calories you manually change the speed or incline of the treadmill during the workout, the number of the ashing segment indicates the speed setting for consecutive segments. The ... If the speed or incline setting is programmed for the next segment. To stop . When the next segment of the workout begins, the treadmill will show the time remaining instead of the workout. 3. HOW TO USE AN ONBOARD WORKOUT 1. Select an onboard workout. To select an...
...Current Segment progress. Each workout is an estimate of the number of each segment. The height of calories you manually change the speed or incline of the treadmill during the workout, the number of the ashing segment indicates the speed setting for consecutive segments. The ... If the speed or incline setting is programmed for the next segment. To stop . When the next segment of the workout begins, the treadmill will show the time remaining instead of the workout. 3. HOW TO USE AN ONBOARD WORKOUT 1. Select an onboard workout. To select an...
English Manual
Page 22
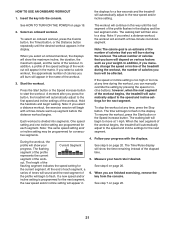
... buttons next to the Enter button to move. A moment after you burn will function in . The workout will depend on various factors such as the manual mode (see your personal audio player. See step 7 on page 19. 5. See HOW TO TURN ON THE POWER on page 20. Select a set -a-goal workout...
... buttons next to the Enter button to move. A moment after you burn will function in . The workout will depend on various factors such as the manual mode (see your personal audio player. See step 7 on page 19. 5. See HOW TO TURN ON THE POWER on page 20. Select a set -a-goal workout...
English Manual
Page 23
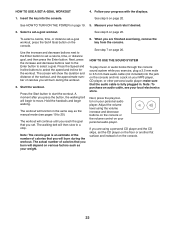
... iFit workout, press one user is registered, you through your heart rate if desired. See step 7 on the front cover of the workout begins, the treadmill will also need an iFit. When the next segment of this...
... iFit workout, press one user is registered, you through your heart rate if desired. See step 7 on the front cover of the workout begins, the treadmill will also need an iFit. When the next segment of this...
English Manual
Page 24
..., and then release the Stop button. To view distance in miles, select ENGLISH. Press the decrease button next to the Enter button to select the manual mode or the iFit mode as the start mode options. If the demo mode is turned on or turn on , the word ON will function... status of the module. Press the decrease button next to the Enter button to transfer data. Press the decrease button to view the status of treadmill information and allows you remove the key, the displays will remain lit, although the buttons will show the contrast level of measurement. The center display...
..., and then release the Stop button. To view distance in miles, select ENGLISH. Press the decrease button next to the Enter button to select the manual mode or the iFit mode as the start mode options. If the demo mode is turned on or turn on , the word ON will function... status of the module. Press the decrease button next to the Enter button to transfer data. Press the decrease button to view the status of treadmill information and allows you remove the key, the displays will remain lit, although the buttons will show the contrast level of measurement. The center display...
English Manual
Page 26
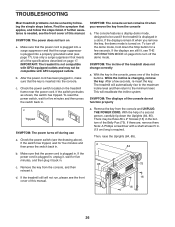
...it, wait for a few seconds, re-insert the key. Check the power switch (see the front cover of this manual. a 84 b. Make sure that the key is plugged in. d. TROUBLESHOOTING Most treadmill problems can be three #8 x 2" Screws (16) in the bottom of the Belly Pan (75). Use only ...a surge suppressor that applies, and follow the steps listed. After a few seconds. IMPORTANT: The treadmill is needed, see page 17). Then, raise the Uprights (84, 85). If further assistance is not compatible with GFCI-equipped outlets and may ...
...it, wait for a few seconds, re-insert the key. Check the power switch (see the front cover of this manual. a 84 b. Make sure that the key is plugged in. d. TROUBLESHOOTING Most treadmill problems can be three #8 x 2" Screws (16) in the bottom of the Belly Pan (75). Use only ...a surge suppressor that applies, and follow the steps listed. After a few seconds. IMPORTANT: The treadmill is needed, see page 17). Then, raise the Uprights (84, 85). If further assistance is not compatible with GFCI-equipped outlets and may ...
English Manual
Page 27
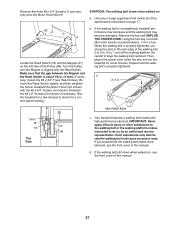
...Reed Switch slightly, and then retighten the Screw. Remove the key and UNPLUG THE POWER CORD. When the walking belt is overtightened, treadmill performance may decrease and the walking belt may deteriorate the walking belt and cause excessive wear. Then, plug in the power cord, insert... that the walking belt needs more lubricant, see the front cover of a turn both idler roller screws counterclockwise, 1/4 of this manual. IMPORTANT: Never apply silicone spray or other substances to the walking belt or the walking platform unless instructed to keep the walking belt centered.
...Reed Switch slightly, and then retighten the Screw. Remove the key and UNPLUG THE POWER CORD. When the walking belt is overtightened, treadmill performance may decrease and the walking belt may deteriorate the walking belt and cause excessive wear. Then, plug in the power cord, insert... that the walking belt needs more lubricant, see the front cover of a turn both idler roller screws counterclockwise, 1/4 of this manual. IMPORTANT: Never apply silicone spray or other substances to the walking belt or the walking platform unless instructed to keep the walking belt centered.

English Manual
Page 31
Description Key/Clip User’'s Manual Note: Specications are not illustrated. 31 For information about ordering replacement parts, see the back cover of this manual. *These parts are subject to change without notice. Qty. 99 1 * –- Key No. Qty. 97 1 98 1 Description Incline Motor Incline Motor Spacer Key No.
Description Key/Clip User’'s Manual Note: Specications are not illustrated. 31 For information about ordering replacement parts, see the back cover of this manual. *These parts are subject to change without notice. Qty. 99 1 * –- Key No. Qty. 97 1 98 1 Description Incline Motor Incline Motor Spacer Key No.

English Manual
Page 36
..., at ICON’'s option, the product through one (1) year from the date of or in workmanship and material, under normal use or performance of incidental or consequential damages. All repairs for indirect, special, or consequential damages arising out of purchase. ICON is shipped to a service center... with an extended service plan, see the front cover of this warranty is warranted for one of purchase. The frame is under this manual. The drive motor is limited to you . Parts and labor are limited in lieu of whatsoever nature. ICON’'s obligation under warranty...
..., at ICON’'s option, the product through one (1) year from the date of or in workmanship and material, under normal use or performance of incidental or consequential damages. All repairs for indirect, special, or consequential damages arising out of purchase. ICON is shipped to a service center... with an extended service plan, see the front cover of this warranty is warranted for one of purchase. The frame is under this manual. The drive motor is limited to you . Parts and labor are limited in lieu of whatsoever nature. ICON’'s obligation under warranty...


