
English Manual
Page 2
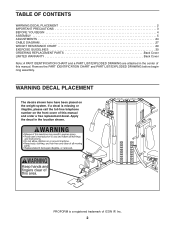
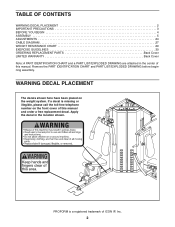
PROFORM is missing or illegible, please call the toll-free telephone number on the weight system. If a decal is a registered trademark of this manual. Apply the ... DRAWING before beginning assembly. TABLE OF CONTENTS WARNING DECAL PLACEMENT 2 IMPORTANT PRECAUTIONS 3 BEFORE YOU BEGIN 4 ASSEMBLY 5 ADJUSTMENTS 24 CABLE DIAGRAM 27 WEIGHT RESISTANCE CHART 29 EXERCISE GUIDELINES 30 ORDERING REPLACEMENT PARTS Back Cover LIMITED WARRANTY Back Cover Note: A PART IDENTIFICATION CHART and a PART LIST/EXPLODED DRAWING are attached in the location...
PROFORM is missing or illegible, please call the toll-free telephone number on the weight system. If a decal is a registered trademark of this manual. Apply the ... DRAWING before beginning assembly. TABLE OF CONTENTS WARNING DECAL PLACEMENT 2 IMPORTANT PRECAUTIONS 3 BEFORE YOU BEGIN 4 ASSEMBLY 5 ADJUSTMENTS 24 CABLE DIAGRAM 27 WEIGHT RESISTANCE CHART 29 EXERCISE GUIDELINES 30 ORDERING REPLACEMENT PARTS Back Cover LIMITED WARRANTY Back Cover Note: A PART IDENTIFICATION CHART and a PART LIST/EXPLODED DRAWING are attached in the location...
English Manual
Page 3
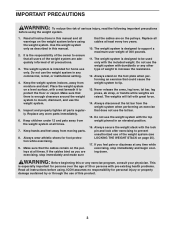
... for home use of weight to protect the floor or carpet. Make sure that the cables are raised. Replace all cables at any time while exercising, stop immediately and make sure that there is intended for persons over the age of this manual and all times. 7. Always stand on a...handle while weights are on the weight system before using the weight system. Keep hands and feet away from the weight system when performing an exercise that could cause the weight system to be used only with great force. 14. Inspect and properly tighten all times. ICON assumes no ...
... for home use of weight to protect the floor or carpet. Make sure that the cables are raised. Replace all cables at any time while exercising, stop immediately and make sure that there is intended for persons over the age of this manual and all times. 7. Always stand on a...handle while weights are on the weight system before using the weight system. Keep hands and feet away from the weight system when performing an exercise that could cause the weight system to be used only with great force. 14. Inspect and properly tighten all times. ICON assumes no ...
English Manual
Page 24
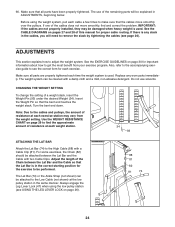
...be performed. Adjust the length of the remaining parts will need to get the most benefit from the weight setting. The use solvents. For some exercises, the Chain (82) should be attached between the Lat Bar and the Cable so that all parts are not properly installed, they may vary ...from your exercise program. Make sure that the Lat Bar is any worn parts immediately. If there is in ADJUSTMENTS, beginning below. Turn the bent end down....
...be performed. Adjust the length of the remaining parts will need to get the most benefit from the weight setting. The use solvents. For some exercises, the Chain (82) should be attached between the Lat Bar and the Cable so that all parts are not properly installed, they may vary ...from your exercise program. Make sure that the Lat Bar is any worn parts immediately. If there is in ADJUSTMENTS, beginning below. Turn the bent end down....

English Manual
Page 25
... from the Right Seat Frame (17). Make sure the Knob is fully tightened. Remove the Curl Pad (38) from the weight system when performing an exercise that does not require it at the desired height with an Adjustment Knob (69). Reengage the Knob into the Backrest Frame and retighten the Knob...
... from the Right Seat Frame (17). Make sure the Knob is fully tightened. Remove the Curl Pad (38) from the weight system when performing an exercise that does not require it at the desired height with an Adjustment Knob (69). Reengage the Knob into the Backrest Frame and retighten the Knob...

English Manual
Page 29
Weight resistance shown for the butterfly arm station is for each exercise station. The numbers refer to differences in individual weight plates as well as friction between the cables, pulleys, and weight guides. WEIGHT RESISTANCE CHART The ...
Weight resistance shown for the butterfly arm station is for each exercise station. The numbers refer to differences in individual weight plates as well as friction between the cables, pulleys, and weight guides. WEIGHT RESISTANCE CHART The ...
English Manual
Page 30
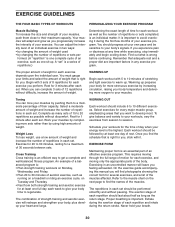
... To give your body time to regenerate. Each workout should progress at least one full day each repetition should include 6 to 10 different exercises. EXERCISE FORM Maintaining proper form is an individual matter. Refer to the muscle chart on Tuesday and Thursday. • Rest from session to session... part of the body. Once you find the names of the muscles. This requires moving only the appropriate parts of an effective exercise program. Exercising in each set should be followed by at your own pace and be sensitive to your body's signals. Warming up . Toning You...
... To give your body time to regenerate. Each workout should progress at least one full day each repetition should include 6 to 10 different exercises. EXERCISE FORM Maintaining proper form is an individual matter. Refer to the muscle chart on Tuesday and Thursday. • Rest from session to session... part of the body. Once you find the names of the muscles. This requires moving only the appropriate parts of an effective exercise program. Exercising in each set should be followed by at your own pace and be sensitive to your body's signals. Warming up . Toning You...
English Manual
Page 31
... set for a muscle building workout. • Rest for one minute after each set for a short period of stretching. List the date, the exercises performed, the resistance used, and the numbers of calf) L. Sternomastoid (neck) B. Rectus Abdominus (stomach) N. Triceps (back of calf) K. ...Anterior Deltoid (shoulder) M. Remember, the key to achieving the greatest results is an effective way to 10 minutes of time after each exercise. Brachioradials (forearm) F. Adductor (inner thigh) O. Gastrocnemius (back of thigh) J. Quadriceps (front of each workout. Ease into each ...
... set for a muscle building workout. • Rest for one minute after each set for a short period of stretching. List the date, the exercises performed, the resistance used, and the numbers of calf) L. Sternomastoid (neck) B. Rectus Abdominus (stomach) N. Triceps (back of calf) K. ...Anterior Deltoid (shoulder) M. Remember, the key to achieving the greatest results is an effective way to 10 minutes of time after each exercise. Brachioradials (forearm) F. Adductor (inner thigh) O. Gastrocnemius (back of thigh) J. Quadriceps (front of each workout. Ease into each ...

English Manual
Page 35
... notice. Key Qty. No. 116 2 117 2 118 1 119 1 120 1 #1 #1 #1 #2 Description M10 x 40mm Bolt Backrest Plate Large Seat Plate Small Seat Plate Curl Plate User's Manual Exercise Guide Allen Wrench Grease Pack Note: "#" indicates a non-illustrated part. No. 107 1 108 1 109 60 110 16 111 75 112 6 113 2 114 3 115 2 Description M10...
... notice. Key Qty. No. 116 2 117 2 118 1 119 1 120 1 #1 #1 #1 #2 Description M10 x 40mm Bolt Backrest Plate Large Seat Plate Small Seat Plate Curl Plate User's Manual Exercise Guide Allen Wrench Grease Pack Note: "#" indicates a non-illustrated part. No. 107 1 108 1 109 60 110 16 111 75 112 6 113 2 114 3 115 2 Description M10...
English Manual
Page 2
... WARNING DECAL PLACEMENT 2 IMPORTANT PRECAUTIONS 3 BEFORE YOU BEGIN 4 ASSEMBLY 5 ADJUSTMENTS 24 CABLE DIAGRAM 27 WEIGHT RESISTANCE CHART 29 EXERCISE GUIDELINES 30 ORDERING REPLACEMENT PARTS Back Cover LIMITED WARRANTY Back Cover Note: A PART IDENTIFICATION CHART and a PART LIST/EXPLODED DRAWING...decal is a registered trademark of this manual. Apply the decal in the center of this manual and order a free replacement decal. PROFORM is missing or illegible, please call the toll-free telephone number on the weight system. WARNING DECAL PLACEMENT The decals shown here have ...
... WARNING DECAL PLACEMENT 2 IMPORTANT PRECAUTIONS 3 BEFORE YOU BEGIN 4 ASSEMBLY 5 ADJUSTMENTS 24 CABLE DIAGRAM 27 WEIGHT RESISTANCE CHART 29 EXERCISE GUIDELINES 30 ORDERING REPLACEMENT PARTS Back Cover LIMITED WARRANTY Back Cover Note: A PART IDENTIFICATION CHART and a PART LIST/EXPLODED DRAWING...decal is a registered trademark of this manual. Apply the decal in the center of this manual and order a free replacement decal. PROFORM is missing or illegible, please call the toll-free telephone number on the weight system. WARNING DECAL PLACEMENT The decals shown here have ...
English Manual
Page 3
...Use the weight system only as you feel pain or dizziness at all times. Place the weight system on the pulleys at any time while exercising, stop immediately and make sure that all users of the weight system are adequately informed of all times. 7. The weight system is the ...weight system at least every two years. 10. Always wear athletic shoes for home use the weight system with the lock pin and lock after exercising to increase the resistance. 12. ICON assumes no responsibility for persons over the age of 35 or persons with great force. 14. IMPORTANT ...
...Use the weight system only as you feel pain or dizziness at all times. Place the weight system on the pulleys at any time while exercising, stop immediately and make sure that all users of the weight system are adequately informed of all times. 7. The weight system is the ...weight system at least every two years. 10. Always wear athletic shoes for home use the weight system with the lock pin and lock after exercising to increase the resistance. 12. ICON assumes no responsibility for persons over the age of 35 or persons with great force. 14. IMPORTANT ...

English Manual
Page 24
.... ADJUSTMENTS This section explains how to make sure that the Lat Bar is used . Replace any slack in ADJUSTMENTS, beginning below. For some exercises, the Chain (82) should be performed. Make sure that the bent end touches the weight stack. CHANGING THE WEIGHT SETTING To change the ...setting of resistance at the low pulley station in the correct starting position for each exercise station may be cleaned with a Cable Clip (81). Always engage the Leg Lever Lock (47) when using the weight system, pull each...
.... ADJUSTMENTS This section explains how to make sure that the Lat Bar is used . Replace any slack in ADJUSTMENTS, beginning below. For some exercises, the Chain (82) should be performed. Make sure that the bent end touches the weight stack. CHANGING THE WEIGHT SETTING To change the ...setting of resistance at the low pulley station in the correct starting position for each exercise station may be cleaned with a Cable Clip (81). Always engage the Leg Lever Lock (47) when using the weight system, pull each...

English Manual
Page 25
... BACKREST To adjust the position of the Large Seat (37), loosen the Adjustment Knob (69) and disengage it from the weight system when performing an exercise that does not require it. Move the Seat to the desired position. Make sure the Knob is fully tightened. LOCKING THE WEIGHT STACK Lock a weight...
... BACKREST To adjust the position of the Large Seat (37), loosen the Adjustment Knob (69) and disengage it from the weight system when performing an exercise that does not require it. Move the Seat to the desired position. Make sure the Knob is fully tightened. LOCKING THE WEIGHT STACK Lock a weight...

English Manual
Page 29
Note: The actual resistance at each exercise station. weight plates. The numbers refer to differences in individual weight plates as well as friction between the cables, pulleys, and weight guides. WEIGHT 1 2 3 4 5 6 7 8 9 10 ...
Note: The actual resistance at each exercise station. weight plates. The numbers refer to differences in individual weight plates as well as friction between the cables, pulleys, and weight guides. WEIGHT 1 2 3 4 5 6 7 8 9 10 ...

English Manual
Page 30
....) Determining the exact length of time for each week to give balance and variety to your workouts, vary the exercises from both strength training and aerobic exercise for the time of day when your energy level is important. Toning You can tone your muscles by pushing them...each workout with 5 to warm up . Weight Loss To lose weight, use a low amount of weight and increase the number of an effective exercise program. Exercise for a maximum of repetitions or sets per- An example of a balanced program is: • Plan strength training workouts on Monday, Wednesday, and...
....) Determining the exact length of time for each week to give balance and variety to your workouts, vary the exercises from both strength training and aerobic exercise for the time of day when your energy level is important. Toning You can tone your muscles by pushing them...each workout with 5 to warm up . Weight Loss To lose weight, use a low amount of weight and increase the number of an effective exercise program. Exercise for a maximum of repetitions or sets per- An example of a balanced program is: • Plan strength training workouts on Monday, Wednesday, and...

English Manual
Page 31
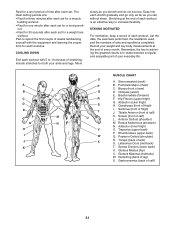
...thigh) O. Spinae Erectors (lower back) U. Gluteus Medius (hip) V. COOLING DOWN End each workout with the equipment and learning the proper form for each exercise. Move slowly as you stretch and do not bounce. Quadriceps (front of thigh) I J K L M N O P Q R S T U ...V W X MUSCLE CHART A. Trapezius (upper back) P. Stretching at the end of your arms and legs. List the date, the exercises performed, the resistance used, and the numbers of stretching. Brachioradials (forearm) F. Gluteus Maximus (buttocks) W. Hamstring (back of arm) S. The ideal resting periods ...
...thigh) O. Spinae Erectors (lower back) U. Gluteus Medius (hip) V. COOLING DOWN End each workout with the equipment and learning the proper form for each exercise. Move slowly as you stretch and do not bounce. Quadriceps (front of thigh) I J K L M N O P Q R S T U ...V W X MUSCLE CHART A. Trapezius (upper back) P. Stretching at the end of your arms and legs. List the date, the exercises performed, the resistance used, and the numbers of stretching. Brachioradials (forearm) F. Gluteus Maximus (buttocks) W. Hamstring (back of arm) S. The ideal resting periods ...

English Manual
Page 35
No. 107 1 108 1 109 60 110 16 111 75 112 6 113 2 Description M10 x 130mm Bolt M10 x 95mm Bolt M10 Washer M10 x 65mm Bolt M10 Nylon Locknut M10 x 80mm Carriage Bolt M10 x 35mm Screw Key Qty. No. 114 3 115 2 116 2 #1 #1 #1 #2 Description M6 Washer M10 x 55mm Button Bolt M10 x 40mm Bolt User's Manual Exercise Guide Allen Wrench Grease Pack Note: "#" indicates a non-illustrated part. Key Qty. See the back cover of the user's manual for information about ordering replacement parts. Specifications are subject to change without notice.
No. 107 1 108 1 109 60 110 16 111 75 112 6 113 2 Description M10 x 130mm Bolt M10 x 95mm Bolt M10 Washer M10 x 65mm Bolt M10 Nylon Locknut M10 x 80mm Carriage Bolt M10 x 35mm Screw Key Qty. No. 114 3 115 2 116 2 #1 #1 #1 #2 Description M6 Washer M10 x 55mm Button Bolt M10 x 40mm Bolt User's Manual Exercise Guide Allen Wrench Grease Pack Note: "#" indicates a non-illustrated part. Key Qty. See the back cover of the user's manual for information about ordering replacement parts. Specifications are subject to change without notice.


