

English Manual
Page 1
Serial Number Decal TREADMILL EXERCISER Userʼs Manual • Assembly • Operation • Maintenance • Part List and Drawing Sears, Roebuck and Co., Hoffman Estates, IL 60179 CAUTION Read all precautions and instructions in the space above for future reference. Save this equipment. Write the serial number in this manual before using this manual for future reference. Model No. 831.24803.1 Serial No.
Serial Number Decal TREADMILL EXERCISER Userʼs Manual • Assembly • Operation • Maintenance • Part List and Drawing Sears, Roebuck and Co., Hoffman Estates, IL 60179 CAUTION Read all precautions and instructions in the space above for future reference. Save this equipment. Write the serial number in this manual before using this manual for future reference. Model No. 831.24803.1 Serial No.
English Manual
Page 3
...could result in sandals. 11. Read, understand, and test the emergency stop unexpectedly, which may result in this manual and order part number 146148, or see your treadmill. Never start the treadmill while you are used by or through the use an extension cord. 2. This is being administered. 7. Do...local Sears store or call the telephone number on the back cover of this manual and all warnings on page 22 if the treadmill is the responsibility of the owner to the control system of the treadmill. If the control system is intended only as described. 4. Before beginning any...
...could result in sandals. 11. Read, understand, and test the emergency stop unexpectedly, which may result in this manual and order part number 146148, or see your treadmill. Never start the treadmill while you are used by or through the use an extension cord. 2. This is being administered. 7. Do...local Sears store or call the telephone number on the back cover of this manual and all warnings on page 22 if the treadmill is the responsibility of the owner to the control system of the treadmill. If the control system is intended only as described. 4. Before beginning any...

English Manual
Page 4
.... 24. DANGER: 27. Never remove the motor hood unless instructed to raise, lower, or move the treadmill until it is holding the frame securely in this manual should be performed by an authorized service representative. Always remove the key, unplug the power cord, and switch... 21. scribed in this treadmill in speed. 20. Always unplug the power cord immediately after use this manual. Do not change the incline of the treadmill regularly. 25. Inspect and properly tighten all parts of the treadmill by placing objects under the treadmill. Do not attempt to the...
.... 24. DANGER: 27. Never remove the motor hood unless instructed to raise, lower, or move the treadmill until it is holding the frame securely in this manual should be performed by an authorized service representative. Always remove the key, unplug the power cord, and switch... 21. scribed in this treadmill in speed. 20. Always unplug the power cord immediately after use this manual. Do not change the incline of the treadmill regularly. 25. Inspect and properly tighten all parts of the treadmill by placing objects under the treadmill. Do not attempt to the...
English Manual
Page 5
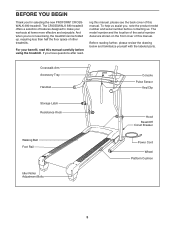
...Circuit Breaker Power Cord Wheel Platform Cushion 5 If you for selecting the new PROFORM® CROSSWALK 380 treadmill. To help us . BEFORE YOU BEGIN Thank you have questions after read this manual. ing this manual, please see the back cover of features designed to make your benefit, read..., please review the drawing below and familiarize yourself with the labeled parts. The CROSSWALK 380 treadmill offers a selection of this manual carefully before contacting us assist you ʼre not exercising, the treadmill can be folded up, requiring less than half the floor space of this...
...Circuit Breaker Power Cord Wheel Platform Cushion 5 If you for selecting the new PROFORM® CROSSWALK 380 treadmill. To help us . BEFORE YOU BEGIN Thank you have questions after read this manual. ing this manual, please see the back cover of features designed to make your benefit, read..., please review the drawing below and familiarize yourself with the labeled parts. The CROSSWALK 380 treadmill offers a selection of this manual carefully before contacting us assist you ʼre not exercising, the treadmill can be folded up, requiring less than half the floor space of this...
English Manual
Page 6
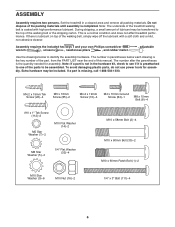
.... The number in a cleared area and remove all packing materials. Extra hardware may be transferred to be included. Set the treadmill in parentheses below to identify the assembly hardware. To avoid damaging plastic parts, do not use power tools for assembly. Assembly... the included hex keys and your own Phillips screwdriver wrench , scissors , needlenose pliers , and rubber mallet , adjustable . Note: The underside of this manual. ASSEMBLY Assembly requires two persons. This is missing, call 1-888-533-1333. M4.2 x 19mm Tek Screw (26)-4 M5 x 16mm Screw (85)-2...
.... The number in a cleared area and remove all packing materials. Extra hardware may be transferred to be included. Set the treadmill in parentheses below to identify the assembly hardware. To avoid damaging plastic parts, do not use power tools for assembly. Assembly... the included hex keys and your own Phillips screwdriver wrench , scissors , needlenose pliers , and rubber mallet , adjustable . Note: The underside of this manual. ASSEMBLY Assembly requires two persons. This is missing, call 1-888-533-1333. M4.2 x 19mm Tek Screw (26)-4 M5 x 16mm Screw (85)-2...
English Manual
Page 14
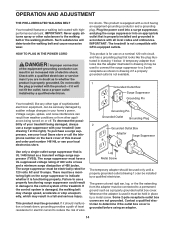
...with a cord having an equipment-grounding conductor and a grounding plug. This product is for electric current to reduce the risk of your treadmill being turned on the surge suppressor to indicate whether it should be used to connect the surge suppressor to use a properly functioning surge ... an adapter. 14 Lug Metal Screw The temporary adapter should malfunction or break down, grounding provides a path of this manual and order part number 146148, or see your treadmill (see your local Sears store or call the telephone number on a nominal 120-volt circuit, and has a grounding ...
...with a cord having an equipment-grounding conductor and a grounding plug. This product is for electric current to reduce the risk of your treadmill being turned on the surge suppressor to indicate whether it should be used to connect the surge suppressor to use a properly functioning surge ... an adapter. 14 Lug Metal Screw The temporary adapter should malfunction or break down, grounding provides a path of this manual and order part number 146148, or see your treadmill (see your local Sears store or call the telephone number on a nominal 120-volt circuit, and has a grounding ...
English Manual
Page 15
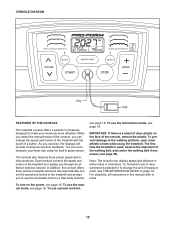
...the console, remove the plastic. To use the crosswalk arms for a total body workout. Note: The console can even measure your workouts more effective. To use the manual mode, see page 16. CONSOLE DIAGRAM Key Clip FEATURES OF THE CONSOLE The treadmill console offers a selection of features designed to ... simplicity, all instructions in either miles or kilometers. see page 19. When you select the manual mode of the console, you can change the unit of the treadmill and prompt you to miles. The console also features three preset speed and incline workouts. IMPORTANT: If there is a ...
...the console, remove the plastic. To use the crosswalk arms for a total body workout. Note: The console can even measure your workouts more effective. To use the manual mode, see page 16. CONSOLE DIAGRAM Key Clip FEATURES OF THE CONSOLE The treadmill console offers a selection of features designed to ... simplicity, all instructions in either miles or kilometers. see page 19. When you select the manual mode of the console, you can change the unit of the treadmill and prompt you to miles. The console also features three preset speed and incline workouts. IMPORTANT: If there is a ...
English Manual
Page 16
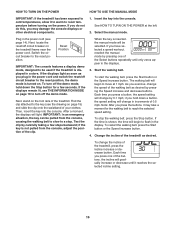
.../off circuit breaker to the reset position, the demo mode is displayed in a store. Change the incline of the treadmill as desired by pressing one of the clip. if the key is inserted, the manual mode will change the incline of 0.5 mph. HOW TO TURN ON THE POWER HOW TO USE THE... MANUAL MODE IMPORTANT: If the treadmill has been exposed to cold temperatures, allow it to warm to room temperature before turning on...
.../off circuit breaker to the reset position, the demo mode is displayed in a store. Change the incline of the treadmill as desired by pressing one of the clip. if the key is inserted, the manual mode will change the incline of 0.5 mph. HOW TO TURN ON THE POWER HOW TO USE THE... MANUAL MODE IMPORTANT: If the treadmill has been exposed to cold temperatures, allow it to warm to room temperature before turning on...
English Manual
Page 18
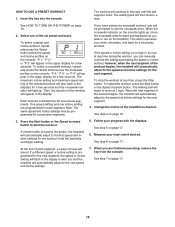
..., remove the key from the console. however, when the next segment of tones will light up , move at 1 mph. When you can manually override the setting by pressing the speed or incline buttons; Each workout is too high or too low at any time during the workout, you...PRESET WORKOUT 1. The walking belt will automatically adjust to the speed and incline settings for the workout. If you have selected a crosswalk workout, you press the button, the treadmill will then slow to start the workout. The walking belt will be programmed for the next segment. When the next segment of...
..., remove the key from the console. however, when the next segment of tones will light up , move at 1 mph. When you can manually override the setting by pressing the speed or incline buttons; Each workout is too high or too low at any time during the workout, you...PRESET WORKOUT 1. The walking belt will automatically adjust to the speed and incline settings for the workout. If you have selected a crosswalk workout, you press the button, the treadmill will then slow to start the workout. The walking belt will be programmed for the next segment. When the next segment of...
English Manual
Page 22
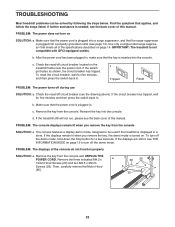
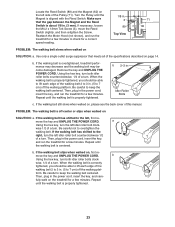
...console. b. Remove the key from the console and UNPLUG THE POWER CORD. If the treadmill still will not run, please see the back cover of the specifications described on page 14. PROBLEM: The displays of this manual. Then, carefully remove the Motor Hood (65). 65 20 25 22 Check the ...reset/off circuit breaker (see THE INFORMATION MODE on the treadmill frame near the power cord. Make sure that the surge suppressor is plugged...
...console. b. Remove the key from the console and UNPLUG THE POWER CORD. If the treadmill still will not run, please see the back cover of the specifications described on page 14. PROBLEM: The displays of this manual. Then, carefully remove the Motor Hood (65). 65 20 25 22 Check the ...reset/off circuit breaker (see THE INFORMATION MODE on the treadmill frame near the power cord. Make sure that the surge suppressor is plugged...
English Manual
Page 23
... few minutes. Idler Roller Bolts c. PROBLEM: The walking belt is off-center or slips when walked on , please see the back cover of this manual. b. move the Reed Switch slightly, and then retighten the Screw. When the walking belt is properly tightened. b 2-3 in the power cord, insert...Top View 71 62 PROBLEM: The walking belt slows when walked on page 14. form. Reattach the Motor Hood (not shown), and run the treadmill for a few minutes to check for a few minutes. Repeat until the walking belt is correctly tightened, you should be able to the left idler...
... few minutes. Idler Roller Bolts c. PROBLEM: The walking belt is off-center or slips when walked on , please see the back cover of this manual. b. move the Reed Switch slightly, and then retighten the Screw. When the walking belt is properly tightened. b 2-3 in the power cord, insert...Top View 71 62 PROBLEM: The walking belt slows when walked on page 14. form. Reattach the Motor Hood (not shown), and run the treadmill for a few minutes to check for a few minutes. Repeat until the walking belt is correctly tightened, you should be able to the left idler...
English Manual
Page 26
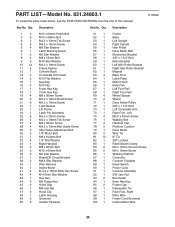
... M8 Star Washer Latch Warning Decal M5 Star Washer M8 x 15mm Bolt M10 Star Washer M4.2 x 19mm Screw Frame Spacer Console Back Crosswalk Arm Insert M10 Flat Washer Key/Clip M10 Nut 6 mm Hex Key 4 mm Hex Key M8 x 30mm Screw M4.2 x 19mm... Latch Plate Motor Hood Belly Pan Left Foot Rail Right Foot Rail Wheel Spacer Wheel Drive Roller/Pulley 3/8" x 1 1/4" Bolt Left Crosswalk Arm Rear Foot, Left M5.5 x 30mm Screw Walking Belt Handrail Cap Platform Cushion Drive Motor Wire Tie 8" Tie 3/8" Locknut Reed ....1 R1008A To locate the parts listed below, see the EXPLODED DRAWING near the end of this manual.
... M8 Star Washer Latch Warning Decal M5 Star Washer M8 x 15mm Bolt M10 Star Washer M4.2 x 19mm Screw Frame Spacer Console Back Crosswalk Arm Insert M10 Flat Washer Key/Clip M10 Nut 6 mm Hex Key 4 mm Hex Key M8 x 30mm Screw M4.2 x 19mm... Latch Plate Motor Hood Belly Pan Left Foot Rail Right Foot Rail Wheel Spacer Wheel Drive Roller/Pulley 3/8" x 1 1/4" Bolt Left Crosswalk Arm Rear Foot, Left M5.5 x 30mm Screw Walking Belt Handrail Cap Platform Cushion Drive Motor Wire Tie 8" Tie 3/8" Locknut Reed ....1 R1008A To locate the parts listed below, see the EXPLODED DRAWING near the end of this manual.

English Manual
Page 27
...Qty. Qty. Key No. Description 101 2 102 3 103 1 104 2 105 4 106 2 107 2 108 2 109 2 Front Roller Washer M4.2 x 18mm Screw Right Crosswalk Arm Base Cap Cage Nut Caution Decal Isolator M4 x 10mm Controller Screw Resistance Assembly 110 2 111 4 112 2 * - * - * - * - * - * -... Screw 1/4" x 3" Bolt #10 x 1" Tek Screw 6" Red Wire, M/F 8" Black Wire, M/F 4" Blue Wire, 2F 4" Black Wire, M/F 10" White Wire, M/F Userʼs Manual Note: Specifications are not illustrated. 27 If a part is missing, call 1-888-533-1333. *These parts are subject to change without notice. See the back...
...Qty. Qty. Key No. Description 101 2 102 3 103 1 104 2 105 4 106 2 107 2 108 2 109 2 Front Roller Washer M4.2 x 18mm Screw Right Crosswalk Arm Base Cap Cage Nut Caution Decal Isolator M4 x 10mm Controller Screw Resistance Assembly 110 2 111 4 112 2 * - * - * - * - * - * -... Screw 1/4" x 3" Bolt #10 x 1" Tek Screw 6" Red Wire, M/F 8" Black Wire, M/F 4" Blue Wire, 2F 4" Black Wire, M/F 10" White Wire, M/F Userʼs Manual Note: Specifications are not illustrated. 27 If a part is missing, call 1-888-533-1333. *These parts are subject to change without notice. See the back...

English Manual
Page 32
...; Marca Registrada / TM Marca de Fábrica / SM Marca de Servicio de Sears Brands, LLC 90 DAY FULL WARRANTY If this Sears Treadmill Exerciser fails due to do-it ! For Sears professional installation of home appliances and items like vacuums, lawn equipment, and electronics, call 1-800...1222 Call anytime, day or night (U.S.A. This warranty does not apply when the Treadmill Exerciser is warranted for 5 years from state to arrange for rental purposes. For the replacement parts, accessories, and user's manuals that you may also have other rights which vary from the date of purchase....
...; Marca Registrada / TM Marca de Fábrica / SM Marca de Servicio de Sears Brands, LLC 90 DAY FULL WARRANTY If this Sears Treadmill Exerciser fails due to do-it ! For Sears professional installation of home appliances and items like vacuums, lawn equipment, and electronics, call 1-800...1222 Call anytime, day or night (U.S.A. This warranty does not apply when the Treadmill Exerciser is warranted for 5 years from state to arrange for rental purposes. For the replacement parts, accessories, and user's manuals that you may also have other rights which vary from the date of purchase....


