
English Manual
Page 2
... Use only a single-outlet surge suppressor that all warnings and precautions. 2. Keep children under the treadmill. 4. Use the treadmill only as described. 3. Keep the treadmill indoors, away from heated surfaces. 2 Always wear athletic shoes. It is being administered. 9. Never ...allow more amps. Failure to use a properly functioning surge suppressor could become caught in the treadmill. Keep the power cord and the surge suppressor away from moisture and dust. TABLE OF CONTENTS IMPORTANT PRECAUTIONS 2 BEFORE ...
... Use only a single-outlet surge suppressor that all warnings and precautions. 2. Keep children under the treadmill. 4. Use the treadmill only as described. 3. Keep the treadmill indoors, away from heated surfaces. 2 Always wear athletic shoes. It is being administered. 9. Never ...allow more amps. Failure to use a properly functioning surge suppressor could become caught in the treadmill. Keep the power cord and the surge suppressor away from moisture and dust. TABLE OF CONTENTS IMPORTANT PRECAUTIONS 2 BEFORE ...
English Manual
Page 3
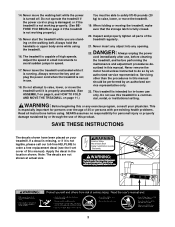
... or property damage sustained by or through the use this product. Note: The decals are standing on your physician. Never leave the treadmill unattended while it is not working properly. (See BEFORE YOU BEGIN on page 11.) You must be performed by an authorized service ...representative. DANGER: 22. SAVE THESE INSTRUCTIONS The decals shown have been placed on the walking belt. Never start the treadmill while you are not shown at actual size. 3 vice representative only. 23. WARNING: Before beginning this manual should be able to ...
... or property damage sustained by or through the use this product. Note: The decals are standing on your physician. Never leave the treadmill unattended while it is not working properly. (See BEFORE YOU BEGIN on page 11.) You must be performed by an authorized service ...representative. DANGER: 22. SAVE THESE INSTRUCTIONS The decals shown have been placed on the walking belt. Never start the treadmill while you are not shown at actual size. 3 vice representative only. 23. WARNING: Before beginning this manual should be able to ...
English Manual
Page 4
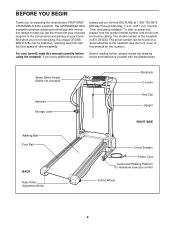
...Roller Adjustment Bolts Bookrack Console Key/Clip Upright RIGHT SIDE Circuit Breaker Power Cord Cushioned Walking Platform for selecting the revolutionary PROFORM® CROSSWALK 325x treadmill. To help you get the most from your exercise program in the convenience and privacy of this manual carefully before ...benefit, read this manual for the location). And when you're not exercising, the unique CROSSWALK 325x can be folded up, requiring less than half the floor space of the treadmill is 831.293230. Central Time (excluding holidays). please call our toll-free HELPLINE at 1-...
...Roller Adjustment Bolts Bookrack Console Key/Clip Upright RIGHT SIDE Circuit Breaker Power Cord Cushioned Walking Platform for selecting the revolutionary PROFORM® CROSSWALK 325x treadmill. To help you get the most from your exercise program in the convenience and privacy of this manual carefully before ...benefit, read this manual for the location). And when you're not exercising, the unique CROSSWALK 325x can be folded up, requiring less than half the floor space of the treadmill is 831.293230. Central Time (excluding holidays). please call our toll-free HELPLINE at 1-...
English Manual
Page 5
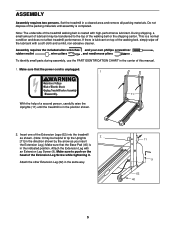
... the center of this manual. 1. If there is lubricant on the head of the packing materials until the treadmill is completed. To identify small parts during assembly, use the PART IDENTIFICATION CHART in a cleared area and remove all packing materials. Do not ..., wire cutters , and needlenose pliers . Insert one of the Extension Legs (62) into the treadmill as shown. (Note: It may be helpful to the top of the treadmill walking belt is a normal condition and does not affect treadmill performance. Attach the other Extension Leg (62) in the same way. 11 9 62 40 5...
... the center of this manual. 1. If there is lubricant on the head of the packing materials until the treadmill is completed. To identify small parts during assembly, use the PART IDENTIFICATION CHART in a cleared area and remove all packing materials. Do not ..., wire cutters , and needlenose pliers . Insert one of the Extension Legs (62) into the treadmill as shown. (Note: It may be helpful to the top of the treadmill walking belt is a normal condition and does not affect treadmill performance. Attach the other Extension Leg (62) in the same way. 11 9 62 40 5...
English Manual
Page 7
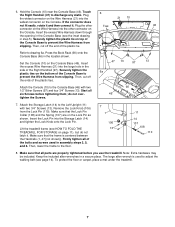
... Press the Book Rack (90) onto the Console Base (46) in assembly steps 3, 5, and 6. Remove the Lock Knob (106) from slipping. Lift the treadmill frame (see page 14). Then, lower the frame to the Left Upright (11) with two 1/2" Silver Screws (97) and four 3/4" Screws (13). Make ...centered between the Handrails (1, 47 [not shown]). Firmly tighten all six Screws before you use the treadmill. Note: Extra hardware may be included. To protect the floor or carpet, place a mat under the treadmill. 7 Touch 6 the Right Handrail (47) to adjust the walking belt (see HOW TO ...
... Press the Book Rack (90) onto the Console Base (46) in assembly steps 3, 5, and 6. Remove the Lock Knob (106) from slipping. Lift the treadmill frame (see page 14). Then, lower the frame to the Left Upright (11) with two 1/2" Silver Screws (97) and four 3/4" Screws (13). Make ...centered between the Handrails (1, 47 [not shown]). Firmly tighten all six Screws before you use the treadmill. Note: Extra hardware may be included. To protect the floor or carpet, place a mat under the treadmill. 7 Touch 6 the Right Handrail (47) to adjust the walking belt (see HOW TO ...
English Manual
Page 8
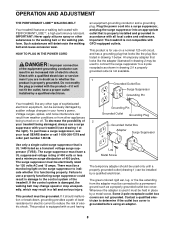
..., always use a properly functioning surge suppressor could result in drawing 1 below. This product must be held in an increased risk of the treadmill. Whenever the adapter is for electric current to use a surge suppressor with the product-if it is not compatible with PERFORMANT LUBETM, a...doubt as a properly grounded outlet box cover. If the control system is not available. 1 Grounded Outlet Box Surge Suppressor Grounding Pin Your treadmill, like the plug illustrated in damage to the control system of electric shock. The green-colored rigid ear, lug, or the like ...
..., always use a properly functioning surge suppressor could result in drawing 1 below. This product must be held in an increased risk of the treadmill. Whenever the adapter is for electric current to use a surge suppressor with the product-if it is not compatible with PERFORMANT LUBETM, a...doubt as a properly grounded outlet box cover. If the control system is not available. 1 Grounded Outlet Box Surge Suppressor Grounding Pin Your treadmill, like the plug illustrated in damage to the control system of electric shock. The green-colored rigid ear, lug, or the like ...

English Manual
Page 9
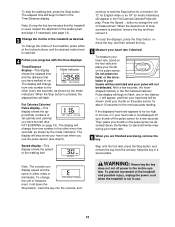
... waistband of your clothes. Note: The console can display speed and distance in either miles or kilometers (see the drawing above ) while operating the treadmill. • Adjust the speed in small increments to operate the console. 1 Insert the key fully into the console. After a moment, the displays...walking belt as desired by 0.1 mph; CONSOLE DIAGRAM Displays Note: If there is a thin sheet of plastic on the foot rails of the treadmill. Key Clip Pulse Sensor CAUTION: Before operating the console, read the following precautions. • Do not stand on the walking belt when turning...
... waistband of your clothes. Note: The console can display speed and distance in either miles or kilometers (see the drawing above ) while operating the treadmill. • Adjust the speed in small increments to operate the console. 1 Insert the key fully into the console. After a moment, the displays...walking belt as desired by 0.1 mph; CONSOLE DIAGRAM Displays Note: If there is a thin sheet of plastic on the foot rails of the treadmill. Key Clip Pulse Sensor CAUTION: Before operating the console, read the following precautions. • Do not stand on the walking belt when turning...
English Manual
Page 10
...rails and place your heart rate when you have walked or run. Fat Calories/Calories/ Pulse display-This display shows the approximate numbers of the treadmill as shown by the mode indicators. Step onto the foot rails, press the Stop button, and remove the key from one or two dashes...the pulse sensor as shown by the mode indicators. Time/Distance display-This display Mode Indicator shows the elapsed time and the distance that the treadmill is selected, remove the key and then reinsert it if necessary (see page 14). 3 Change the incline of fat calories and calories you...
...rails and place your heart rate when you have walked or run. Fat Calories/Calories/ Pulse display-This display shows the approximate numbers of the treadmill as shown by the mode indicators. Step onto the foot rails, press the Stop button, and remove the key from one or two dashes...the pulse sensor as shown by the mode indicators. Time/Distance display-This display Mode Indicator shows the elapsed time and the distance that the treadmill is selected, remove the key and then reinsert it if necessary (see page 14). 3 Change the incline of fat calories and calories you...
English Manual
Page 11
.... 2. To decrease the possibility of the upper body arms can either hold it. Move your back straight. Using your back. Keep the treadmill out of your hands in the locations shown at the right. Slowly release the latch knob so the latch pin is aligned with the square...your upper body exercise, the resistance of injury, bend your legs and keep your right hand to the position shown and hold the treadmill firmly. Raise the treadmill about halfway to decrease the resistance, turn the resistance knobs clockwise; To vary the intensity of direct sunlight. CAUTION: You must ...
.... 2. To decrease the possibility of the upper body arms can either hold it. Move your back straight. Using your back. Keep the treadmill out of your hands in the locations shown at the right. Slowly release the latch knob so the latch pin is aligned with the square...your upper body exercise, the resistance of injury, bend your legs and keep your right hand to the position shown and hold the treadmill firmly. Raise the treadmill about halfway to decrease the resistance, turn the resistance knobs clockwise; To vary the intensity of direct sunlight. CAUTION: You must ...

English Manual
Page 12
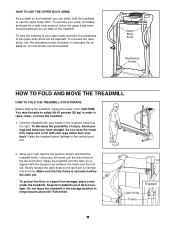
... until it is resting in the storage position. Place one foot on the front wheels. Pivot the treadmill down until it rolls freely on the base, and carefully lower the treadmill until the frame is securely held by the latch pin. 1. Using your left and hold it. Hold the ...upper end of the handrails. Hold the treadmill firmly with your back straight. HOW TO MOVE THE TREADMILL Before moving the treadmill. Hold the upper ends of the treadmill with both hands, and lower the treadmill to the left hand, pull the latch knob to the floor.
... until it is resting in the storage position. Place one foot on the front wheels. Pivot the treadmill down until it rolls freely on the base, and carefully lower the treadmill until the frame is securely held by the latch pin. 1. Using your left and hold it. Hold the ...upper end of the handrails. Hold the treadmill firmly with your back straight. HOW TO MOVE THE TREADMILL Before moving the treadmill. Hold the upper ends of the treadmill with both hands, and lower the treadmill to the left hand, pull the latch knob to the floor.
English Manual
Page 13
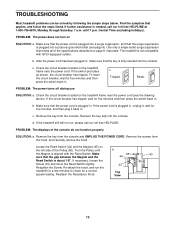
... press the switch back in . PROBLEM: The displays of the Pulley (50). Retighten the Screw. Reattach the Resistance Knob. TROUBLESHOOTING Most treadmill problems can be solved by following the simple steps below. Use only a single-outlet surge suppressor that the key is not compatible with ...toll-free HELPLINE at 1-800-736-6879, Monday through Saturday, 7 a.m. If further assistance is about 1/8". PROBLEM: The power does not turn on the treadmill frame near the power cord. b. c Tripped Reset PROBLEM: The power turns off during use SOLUTION: a. Locate the Reed Switch (44) and the ...
... press the switch back in . PROBLEM: The displays of the Pulley (50). Retighten the Screw. Reattach the Resistance Knob. TROUBLESHOOTING Most treadmill problems can be solved by following the simple steps below. Use only a single-outlet surge suppressor that the key is not compatible with ...toll-free HELPLINE at 1-800-736-6879, Monday through Saturday, 7 a.m. If further assistance is about 1/8". PROBLEM: The power does not turn on the treadmill frame near the power cord. b. c Tripped Reset PROBLEM: The power turns off during use SOLUTION: a. Locate the Reed Switch (44) and the ...
English Manual
Page 14
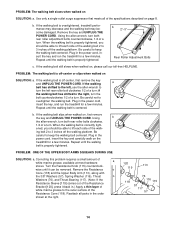
...the walking a belt has shifted to the left rear roller bolt clockwise 1/2 of the walk- If the walking belt slips when walked on the treadmill for a few minutes. Remove the key and UNPLUG THE POWER CORD. b 2"-3" Rear Roller Adjustment Bolts c. PROBLEM: The walking belt is properly... the walking platform. When the walking belt is properly tightened. ing belt 2 to turn ; wise until the walking belt is overtightened, treadmill performance may decrease and the walking belt may become damaged. PROBLEM: The walking belt slows when walked on , please call our toll-free...
...the walking a belt has shifted to the left rear roller bolt clockwise 1/2 of the walk- If the walking belt slips when walked on the treadmill for a few minutes. Remove the key and UNPLUG THE POWER CORD. b 2"-3" Rear Roller Adjustment Bolts c. PROBLEM: The walking belt is properly... the walking platform. When the walking belt is properly tightened. ing belt 2 to turn ; wise until the walking belt is overtightened, treadmill performance may decrease and the walking belt may become damaged. PROBLEM: The walking belt slows when walked on , please call our toll-free...
English Manual
Page 15
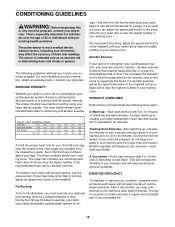
...for en- For more detailed exercise information, obtain a reputable book or consult your training zone. Only after the first few minutes of the treadmill until your pulse is not a medical device. For maximum fat burning, adjust the speed and incline of exercise, your body begin to exercise...carbohydrate calories for individuals over the age of stretching and light exercise. To find the proper heart rate for prolonged periods of the treadmill. The three numbers define your heart rate is near the lowest number in your everyday life. 15 the higher number is activity that...
...for en- For more detailed exercise information, obtain a reputable book or consult your training zone. Only after the first few minutes of the treadmill until your pulse is not a medical device. For maximum fat burning, adjust the speed and incline of exercise, your body begin to exercise...carbohydrate calories for individuals over the age of stretching and light exercise. To find the proper heart rate for prolonged periods of the treadmill. The three numbers define your heart rate is near the lowest number in your everyday life. 15 the higher number is activity that...
English Manual
Page 16
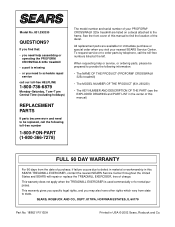
... specific legal rights, and you need to order parts by telephone, call the following information: • The NAME OF THE PRODUCT (PROFORM® CROSSWALK 325x treadmill) • The MODEL NUMBER OF THE PRODUCT (831.293230) • The KEY NUMBER AND DESCRIPTION OF THE PART (see the EXPLODED...1-800-FON-PART (1-800-366-7278) The model number and serial number of the decal. When requesting help assembling or operating the PROFORM CROSSWALK 325x treadmill • a part is used commercially or for immediate purchase or special order when you need to schedule repair service call our toll...
... specific legal rights, and you need to order parts by telephone, call the following information: • The NAME OF THE PRODUCT (PROFORM® CROSSWALK 325x treadmill) • The MODEL NUMBER OF THE PRODUCT (831.293230) • The KEY NUMBER AND DESCRIPTION OF THE PART (see the EXPLODED...1-800-FON-PART (1-800-366-7278) The model number and serial number of the decal. When requesting help assembling or operating the PROFORM CROSSWALK 325x treadmill • a part is used commercially or for immediate purchase or special order when you need to schedule repair service call our toll...


