

English Manual
Page 2
...with a mat beneath it is not a medical device. Keep the elliptical trainer indoors, away from the elliptical trainer at any worn parts immediately. 6. If you stop before using the elliptical trainer. Place the elliptical trainer on a level surface, with pre-existing health problems. Read all instructions...Back Cover IMPORTANT PRECAUTIONS WARNING: To reduce the risk of heart rate readings. Always wear appropriate clothes when using the elliptical trainer. 10. Always wear athletic shoes for in a commercial, rental, or institutional setting. 4. The pulse sensor is ...
...with a mat beneath it is not a medical device. Keep the elliptical trainer indoors, away from the elliptical trainer at any worn parts immediately. 6. If you stop before using the elliptical trainer. Place the elliptical trainer on a level surface, with pre-existing health problems. Read all instructions...Back Cover IMPORTANT PRECAUTIONS WARNING: To reduce the risk of heart rate readings. Always wear appropriate clothes when using the elliptical trainer. 10. Always wear athletic shoes for in a commercial, rental, or institutional setting. 4. The pulse sensor is ...
English Manual
Page 3
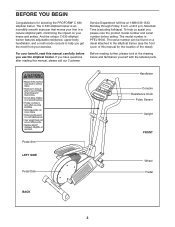
... the impact on a decal attached to help us assist you use the elliptical trainer. And the unique C 630 elliptical trainer features adjustable resistance, upper-body handlebars, and a multi-mode console to the elliptical trainer (see the front cover of this manual for selecting the PROFORM® C 630 elliptical trainer. The C 630 elliptical trainer is PFEL19540. If you get the most from your benefit, read...
... the impact on a decal attached to help us assist you use the elliptical trainer. And the unique C 630 elliptical trainer features adjustable resistance, upper-body handlebars, and a multi-mode console to the elliptical trainer (see the front cover of this manual for selecting the PROFORM® C 630 elliptical trainer. The C 630 elliptical trainer is PFEL19540. If you get the most from your benefit, read...
English Manual
Page 4
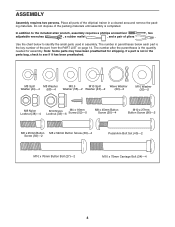
... materials until assembly is not in parentheses below to the included allen wrench, assembly requires a phillips screwdriver adjustable wrenches , a rubber mallet , and a pair of the elliptical trainer in assembly. In addition to identify the small parts used in a cleared area and remove the packing materials. ASSEMBLY Assembly requires two persons. Use the...
... materials until assembly is not in parentheses below to the included allen wrench, assembly requires a phillips screwdriver adjustable wrenches , a rubber mallet , and a pair of the elliptical trainer in assembly. In addition to identify the small parts used in a cleared area and remove the packing materials. ASSEMBLY Assembly requires two persons. Use the...
English Manual
Page 7
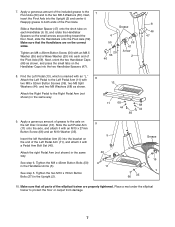
... Pivot Axle (59). Attach the right Pedal Arm (not shown) in the same way. 13 11 68 68 44 44 36 9. Place a mat under the elliptical trainer to the Right Pedal Arm (not shown) in the same way. Attach the Left Pedal to the two M8.5 Washers (55). See step 6. Make sure... with an M10 x 27mm Button Screw (66) and an M10 Washer (35). Slide a Handlebar Spacer (47) onto the short tube on the end of the elliptical trainer are on the correct sides. Next, slide the Handlebars onto the Pivot Axle (59). See step 5. 7. Make sure that all parts of the Left Pedal...
... Pivot Axle (59). Attach the right Pedal Arm (not shown) in the same way. 13 11 68 68 44 44 36 9. Place a mat under the elliptical trainer to the Right Pedal Arm (not shown) in the same way. Attach the Left Pedal to the two M8.5 Washers (55). See step 6. Make sure... with an M10 x 27mm Button Screw (66) and an M10 Washer (35). Slide a Handlebar Spacer (47) onto the short tube on the end of the elliptical trainer are on the correct sides. Next, slide the Handlebars onto the Pivot Axle (59). See step 5. 7. Make sure that all parts of the Left Pedal...
English Manual
Page 8
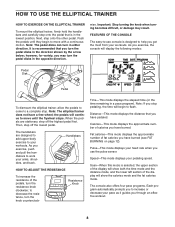
... may result. It is selected, the upper section of the display will display the following modes: Pedal Disk Pedal To dismount the elliptical trainer, allow the pedals to come to work your workouts. Handlebars HOW TO ADJUST THE RESISTANCE To increase the resistance of the display will...to flash. Speed-This mode displays your workouts. however, for variety, you turn the pedal disks in a pace program). wise. Note: The elliptical trainer does not have burned (see FAT BURNING on page 12). Push the pedals until they begin to move with a continuous motion. FEATURES OF THE...
... may result. It is selected, the upper section of the display will display the following modes: Pedal Disk Pedal To dismount the elliptical trainer, allow the pedals to come to work your workouts. Handlebars HOW TO ADJUST THE RESISTANCE To increase the resistance of the display will...to flash. Speed-This mode displays your workouts. however, for variety, you turn the pedal disks in a pace program). wise. Note: The elliptical trainer does not have burned (see FAT BURNING on page 12). Push the pedals until they begin to move with a continuous motion. FEATURES OF THE...
English Manual
Page 11
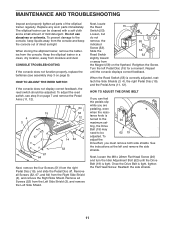
...tighten all Screws (52) from the Right Side Shield (4), and remove the Right Side Shield. The elliptical trainer can feel the pedals slip while you must remove both side shields. When storing the elliptical trainer, remove the batteries from the Magnet (58) on page 7 and remove the Pedal Arms (11,...the 58 indicated Screw (52). ting, the Drive Belt (19) may need to be cleaned with a soft cloth and a small amount of the elliptical trainer regularly. Next, loosen the M8 x 22mm Flat Head Screw (26) and turn the Idler Adjustment Bolt (62) until the console displays correct feedback....
...tighten all Screws (52) from the Right Side Shield (4), and remove the Right Side Shield. The elliptical trainer can feel the pedals slip while you must remove both side shields. When storing the elliptical trainer, remove the batteries from the Magnet (58) on page 7 and remove the Pedal Arms (11,...the 58 indicated Screw (52). ting, the Drive Belt (19) may need to be cleaned with a soft cloth and a small amount of the elliptical trainer regularly. Next, loosen the M8 x 22mm Flat Head Screw (26) and turn the Idler Adjustment Bolt (62) until the console displays correct feedback....
English Manual
Page 16
...warrants this product to give the following information: • the MODEL NUMBER of the product (PFEL19540) • the NAME of the product (PROFORM® C 630 elliptical trainer) • the SERIAL NUMBER of the product (see the front cover of this manual) • the KEY NUMBER and DESCRIPTION of the ...allow limitations on how long an implied warranty lasts. The warranty extended hereunder is in workmanship and material, under this manual) PROFORM is not responsible or liable for indirect, special or consequential damages arising out of or in connection with the use or performance...
...warrants this product to give the following information: • the MODEL NUMBER of the product (PFEL19540) • the NAME of the product (PROFORM® C 630 elliptical trainer) • the SERIAL NUMBER of the product (see the front cover of this manual) • the KEY NUMBER and DESCRIPTION of the ...allow limitations on how long an implied warranty lasts. The warranty extended hereunder is in workmanship and material, under this manual) PROFORM is not responsible or liable for indirect, special or consequential damages arising out of or in connection with the use or performance...


