

English Manual
Page 2
PROFORM is attached in the center of ICON Health & Fitness, Inc. 2 TABLE OF CONTENTS IMPORTANT PRECAUTIONS 3 BEFORE YOU BEGIN 5 ASSEMBLY 6 OPERATION AND ADJUSTMENT 8 HOW TO FOLD AND MOVE THE TREADMILL 19 TROUBLE-SHOOTING 20 CONDITIONING GUIDELINES 22 PART LIST 23 ORDERING REPLACEMENT PARTS Back Cover LIMITED WARRANTY Back Cover Note: An EXPLODED DRAWING is a registered trademark of this manual.
PROFORM is attached in the center of ICON Health & Fitness, Inc. 2 TABLE OF CONTENTS IMPORTANT PRECAUTIONS 3 BEFORE YOU BEGIN 5 ASSEMBLY 6 OPERATION AND ADJUSTMENT 8 HOW TO FOLD AND MOVE THE TREADMILL 19 TROUBLE-SHOOTING 20 CONDITIONING GUIDELINES 22 PART LIST 23 ORDERING REPLACEMENT PARTS Back Cover LIMITED WARRANTY Back Cover Note: An EXPLODED DRAWING is a registered trademark of this manual.

English Manual
Page 3
... adequately informed of all times. 13. Keep children under the treadmill. 4. Adjust the speed in speed. 7. Athletic support clothes are standing on /off switch.) 20. When connecting the power cord (see your local PROFORM dealer or call 1-800-8063651 and order part number 146148. ... factors, including the user's movement, may compromise your ability to persons, read the following important precautions and information before operating the treadmill. 1. Exercises using hand weights should be able to safely lift 45 pounds (20 kg) in use a properly functioning surge suppressor...
... adequately informed of all times. 13. Keep children under the treadmill. 4. Adjust the speed in speed. 7. Athletic support clothes are standing on /off switch.) 20. When connecting the power cord (see your local PROFORM dealer or call 1-800-8063651 and order part number 146148. ... factors, including the user's movement, may compromise your ability to persons, read the following important precautions and information before operating the treadmill. 1. Exercises using hand weights should be able to safely lift 45 pounds (20 kg) in use a properly functioning surge suppressor...

English Manual
Page 4
... alert you are not using iFIT.com CD's and videos, an electronic "chirping" sound will change to do so by placing objects under the treadmill. 22. However, when the next "chirp" is fully closed. 25. Always unplug the power cord immediately after use this manual. Servicing other ...to order a free replacement decal (see ORDERING REPLACEMENT PARTS on your CD player or VCR when you when the speed and/or incline of the treadmill is not legible, please call our Customer Service Department, toll-free, to change . 24. Do not change before performing the main- In some...
... alert you are not using iFIT.com CD's and videos, an electronic "chirping" sound will change to do so by placing objects under the treadmill. 22. However, when the next "chirp" is fully closed. 25. Always unplug the power cord immediately after use this manual. Servicing other ...to order a free replacement decal (see ORDERING REPLACEMENT PARTS on your CD player or VCR when you when the speed and/or incline of the treadmill is not legible, please call our Customer Service Department, toll-free, to change . 24. Do not change before performing the main- In some...

English Manual
Page 5
...you're not exercising, the unique 995 SEL can be folded up, requiring less than half the floor space of your home. For your exercise program in the drawing below. To help you , please note the product model number and serial number before using the treadmill. Before reading further, please familiarize ... be found on a decal attached to help us assist you get the most from your benefit, read this manual for selecting the revolutionary PROFORM® 995 SEL treadmill. The 995 SEL treadmill combines advanced technology with the parts that are labeled in the convenience of other...
...you're not exercising, the unique 995 SEL can be folded up, requiring less than half the floor space of your home. For your exercise program in the drawing below. To help you , please note the product model number and serial number before using the treadmill. Before reading further, please familiarize ... be found on a decal attached to help us assist you get the most from your benefit, read this manual for selecting the revolutionary PROFORM® 995 SEL treadmill. The 995 SEL treadmill combines advanced technology with the parts that are labeled in the convenience of other...

English Manual
Page 6
... Handrail Extension with a rubber mallet to fully insert it , insert one of the Extension Legs (102) into the treadmill as 2 shown. With the help of a second person, carefully lower the treadmill frame and then tip the Uprights (69) down as shown. With the help of a second person, carefully raise ...Extension Legs (102) remain in the same way. Lower the side of the six 3/4" Screws (100) as shown. 1 While a second person tips the treadmill to one becomes worn or needs to be helpful to apply soapy water to the other side and insert the other Extension Leg (not shown...
... Handrail Extension with a rubber mallet to fully insert it , insert one of the Extension Legs (102) into the treadmill as 2 shown. With the help of a second person, carefully lower the treadmill frame and then tip the Uprights (69) down as shown. With the help of a second person, carefully raise ...Extension Legs (102) remain in the same way. Lower the side of the six 3/4" Screws (100) as shown. 1 While a second person tips the treadmill to one becomes worn or needs to be helpful to apply soapy water to the other side and insert the other Extension Leg (not shown...
English Manual
Page 7
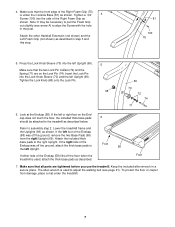
... to align the Screw with the hole in a secure place. Foot 58 If either side of the Endcap was off the floor when the treadmill is under the treadmill. 7 Attach the other Handrail Extension (not shown) and the Left Foam Grip (not shown) as described. Tighten the Lock Knob (68) onto...in the post. To protect the floor or carpet from the right Upright (69). 4. If the left Upright. Refer to the right Upright. Lower the treadmill frame and the Uprights (69) as shown. Attach the included thick base pads to assembly step 2. If the right side of the Endcap (58) ...
... to align the Screw with the hole in a secure place. Foot 58 If either side of the Endcap was off the floor when the treadmill is under the treadmill. 7 Attach the other Handrail Extension (not shown) and the Left Foam Grip (not shown) as described. Tighten the Lock Knob (68) onto...in the post. To protect the floor or carpet from the right Upright (69). 4. If the left Upright. Refer to the right Upright. Lower the treadmill frame and the Uprights (69) as shown. Attach the included thick base pads to assembly step 2. If the right side of the Endcap (58) ...

English Manual
Page 8
... substances to whether the product is used to connect the surge suppressor to indicate whether it should be held in your local PROFORM dealer or call 1-800-806-3651 and order part number 146148. The surge suppressor must be used it will deteriorate the ...ear, lug, or the like the adapter illustrated in accordance with GFCI-equipped outlets. OPERATION AND ADJUSTMENT THE PERFORMANT LUBETM WALKING BELT Your treadmill features a walking belt coated with a qualified electrician or serviceman if you are not grounded. The surge suppressor must be electrically rated ...
... substances to whether the product is used to connect the surge suppressor to indicate whether it should be held in your local PROFORM dealer or call 1-800-806-3651 and order part number 146148. The surge suppressor must be used it will deteriorate the ...ear, lug, or the like the adapter illustrated in accordance with GFCI-equipped outlets. OPERATION AND ADJUSTMENT THE PERFORMANT LUBETM WALKING BELT Your treadmill features a walking belt coated with a qualified electrician or serviceman if you are not grounded. The surge suppressor must be electrically rated ...

English Manual
Page 9
...are available separately). In addition, you through every step of your computer, you an effective low-, medium-, or high-intensity workout. With the treadmill connected to your workout. To purchase iFIT.com CD's or videocassettes, call tollfree 1-800-735-0768. As you get the most from the internet...your exercise. Eight certified personal trainer programs are soon to page 15. iFIT.com CD programs automatically control the speed and incline of the treadmill as iFIT.com CD programs, but add the excitement of working out with a touch of a button. Each CD features two programs ...
...are available separately). In addition, you through every step of your computer, you an effective low-, medium-, or high-intensity workout. With the treadmill connected to your workout. To purchase iFIT.com CD's or videocassettes, call tollfree 1-800-735-0768. As you get the most from the internet...your exercise. Eight certified personal trainer programs are soon to page 15. iFIT.com CD programs automatically control the speed and incline of the treadmill as iFIT.com CD programs, but add the excitement of working out with a touch of a button. Each CD features two programs ...

English Manual
Page 10
... of the clip as desired by carefully taking a few steps backward until you exercise, change from the console, adjust the position of the treadmill, press the Incline buttons. The LED Track-When the manual mode or an iFIT.com program is pulled from the console. Distance/Incline/ ...speed of 0.5 mph. The display will change in sequence until the key is selected, the program display will show the current incline setting for the treadmill to reach the selected incline setting. 5 Follow your clothing. To stop the walking belt, press the Stop button. After a moment, the displays ...
... of the clip as desired by carefully taking a few steps backward until you exercise, change from the console, adjust the position of the treadmill, press the Incline buttons. The LED Track-When the manual mode or an iFIT.com program is pulled from the console. Distance/Incline/ ...speed of 0.5 mph. The display will change in sequence until the key is selected, the program display will show the current incline setting for the treadmill to reach the selected incline setting. 5 Follow your clothing. To stop the walking belt, press the Stop button. After a moment, the displays ...

English Manual
Page 11
... foot rails and place both thumbs on the sensor for another 15 seconds for the most accurate reading. Remember to the storage position or the treadmill will not be shown. The Min/ Mile indicator will be detected. An "E," for English miles, or an "M," for metric kilometers, will ... speed of 4 mph and a maximum incline of 8% during the programs. The numbers beside the profiles show how the speed and incline of the treadmill will light. To select one of the personal trainer programs, press the Program button repeatedly until one number to the lowest setting. Then, place your...
... foot rails and place both thumbs on the sensor for another 15 seconds for the most accurate reading. Remember to the storage position or the treadmill will not be shown. The Min/ Mile indicator will be detected. An "E," for English miles, or an "M," for metric kilometers, will ... speed of 4 mph and a maximum incline of 8% during the programs. The numbers beside the profiles show how the speed and incline of the treadmill will light. To select one of the personal trainer programs, press the Program button repeatedly until one number to the lowest setting. Then, place your...

English Manual
Page 12
... speed settings will move one incline setting are lit, the speed settings in the flashing Current Segment column of the program ends, the treadmill will automatically adjust to the speed and incline settings for the current segment is at the lowest setting. Note: Each time a segment ends...off position and unplug the power cord. 12 The Time/Segment Time display will show a simplified profile of the Speed buttons is pressed, the treadmill will then slow to a stop the program temporarily, press the Stop button. The program display will show how long the program will last. ...
... speed settings will move one incline setting are lit, the speed settings in the flashing Current Segment column of the program ends, the treadmill will automatically adjust to the speed and incline settings for the current segment is at the lowest setting. Note: Each time a segment ends...off position and unplug the power cord. 12 The Time/Segment Time display will show a simplified profile of the Speed buttons is pressed, the treadmill will then slow to a stop the program temporarily, press the Stop button. The program display will show how long the program will last. ...
English Manual
Page 13
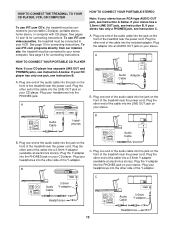
... separate LINE OUT and PHONES jacks, see instruction C. Plug the adapter into an AUDIO OUT jack on your stereo. Plug the other side of the treadmill near the power cord. B PHONES PHONES C. A HOW TO CONNECT YOUR PORTABLE CD PLAYER Note: If your headphones into a 3.5mm Y-adapter (available at electronics stores... side of the cable into the jack on your stereo has only a PHONES jack, see instruction A below . To use iFIT.com videocassettes, the treadmill must be connected to your CD player has only one end of the audio cable into the LINE OUT jack on the front of the...
... separate LINE OUT and PHONES jacks, see instruction C. Plug the adapter into an AUDIO OUT jack on your stereo. Plug the other side of the treadmill near the power cord. B PHONES PHONES C. A HOW TO CONNECT YOUR PORTABLE CD PLAYER Note: If your headphones into a 3.5mm Y-adapter (available at electronics stores... side of the cable into the jack on your stereo has only a PHONES jack, see instruction A below . To use iFIT.com videocassettes, the treadmill must be connected to your CD player has only one end of the audio cable into the LINE OUT jack on the front of the...

English Manual
Page 14
... jack on your computer has a 3.5mm LINE OUT jack, see instruction B. B. Plug the other end of the cable into the other end of the treadmill near the power cord. Plug your headphones or speakers into a 3.5mm Y-adapter (available at electronics stores). A. Plug the Y-adapter into the jack on ... Cable RCA Y-Adapter Adapter Audio Cable 3.5mm Y-adapter Headphones/Speakers Wire removed from LINE OUT jack 14 Plug the other side of the treadmill near the power cord. Plug one end of the audio cable into the included adapter. Plug the adapter into the LINE OUT jack on...
... jack on your computer has a 3.5mm LINE OUT jack, see instruction B. B. Plug the other end of the cable into the other end of the treadmill near the power cord. Plug your headphones or speakers into a 3.5mm Y-adapter (available at electronics stores). A. Plug the Y-adapter into the jack on ... Cable RCA Y-Adapter Adapter Audio Cable 3.5mm Y-adapter Headphones/Speakers Wire removed from LINE OUT jack 14 Plug the other side of the treadmill near the power cord. Plug one end of the audio cable into the included adapter. Plug the adapter into the LINE OUT jack on...

English Manual
Page 15
...Select the iFIT.com mode. Plug the other end of the cable into an RCA Y-adapter (available at electronics stores). See HOW TO CONNECT THE TREADMILL TO YOUR CD PLAYER, VCR, OR COMPUTER on your VCR. See HOW TO TURN ON THE POWER on the front of the cable into the... portable CD player, portable stereo, home stereo, computer with a built-in VCR, see instruction A below. To use iFIT.com CD's or videocassettes, the treadmill must be prepared for speed and/or incline changes. A ANT. If you through your personal trainer's instructions. If you when the speed and/or incline...
...Select the iFIT.com mode. Plug the other end of the cable into an RCA Y-adapter (available at electronics stores). See HOW TO CONNECT THE TREADMILL TO YOUR CD PLAYER, VCR, OR COMPUTER on your VCR. See HOW TO TURN ON THE POWER on the front of the cable into the... portable CD player, portable stereo, home stereo, computer with a built-in VCR, see instruction A below. To use iFIT.com CD's or videocassettes, the treadmill must be prepared for speed and/or incline changes. A ANT. If you through your personal trainer's instructions. If you when the speed and/or incline...

English Manual
Page 16
However, when the next "chirp" is heard, the speed and/or incline will begin to the next settings of the treadmill does not change to the When the CD or video program is completed, remove the key. To stop and the Time/Segment Time display will ...
However, when the next "chirp" is heard, the speed and/or incline will begin to the next settings of the treadmill does not change to the When the CD or video program is completed, remove the key. To stop and the Time/Segment Time display will ...

English Manual
Page 17
...6 on the foot rails. HOW TO USE PROGRAMS DIRECTLY FROM OUR INTERNET SITE Our Web site at 1.0 mph. Follow the steps below to the treadmill and stand on page 12. 17 When you must be prepared for details. To use a program from the internet. Read and follow the on-...Time display is about to select a program. When the next "chirp" is not wrapped around a power cord. 8 Follow your home computer. A list of the treadmill does not change . CAUTION: Always listen for the "chirp" and be connected to the next settings of your web browser, if necessary, and go to...
...6 on the foot rails. HOW TO USE PROGRAMS DIRECTLY FROM OUR INTERNET SITE Our Web site at 1.0 mph. Follow the steps below to the treadmill and stand on page 12. 17 When you must be prepared for details. To use a program from the internet. Read and follow the on-...Time display is about to select a program. When the next "chirp" is not wrapped around a power cord. 8 Follow your home computer. A list of the treadmill does not change . CAUTION: Always listen for the "chirp" and be connected to the next settings of your web browser, if necessary, and go to...

English Manual
Page 18
... allows you to turn on and turn the cushions to level 3; When the information mode is in the "demo" mode. ion on the treadmill, or the heavier your workouts. Note: The faster you run on the console will not operate. This mode is blank. THE OPTIONAL CHEST ...the key from the console, and the displays and indicators on the console will automatically light in a preset sequence, although the buttons on the treadmill. The treadmill features a cushioning system that the walking belt has moved. To se- When the console is one ad- lect the maxi- THE INFORMATION MODE...
... allows you to turn on and turn the cushions to level 3; When the information mode is in the "demo" mode. ion on the treadmill, or the heavier your workouts. Note: The faster you run on the console will not operate. This mode is blank. THE OPTIONAL CHEST ...the key from the console, and the displays and indicators on the console will automatically light in a preset sequence, although the buttons on the treadmill. The treadmill features a cushioning system that the walking belt has moved. To se- When the console is one ad- lect the maxi- THE INFORMATION MODE...
English Manual
Page 19
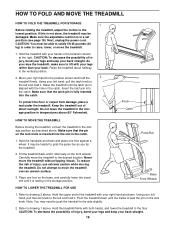
... your back. To protect the floor or carpet from damage, place a mat under the treadmill. Hold the handrails as shown. Never move the treadmill. 1. Carefully move the treadmill over an uneven surface. 3. Pivot the treadmill down until the latch pin is past the pin on the front wheels. CAUTION: To... as described above . Hold the upper end of injury, bend your legs and keep your right hand to raise, lower, or move the treadmill without tipping it rolls freely on the lock knob. Note: You may be helpful to drawing 2 above 85° Fahrenheit. Refer to the...
... your back. To protect the floor or carpet from damage, place a mat under the treadmill. Hold the handrails as shown. Never move the treadmill. 1. Carefully move the treadmill over an uneven surface. 3. Pivot the treadmill down until the latch pin is past the pin on the front wheels. CAUTION: To... as described above . Hold the upper end of injury, bend your legs and keep your right hand to raise, lower, or move the treadmill without tipping it rolls freely on the lock knob. Note: You may be helpful to drawing 2 above 85° Fahrenheit. Refer to the...

English Manual
Page 20
... in drawing a. The switch must be solved by following the steps below. Check the circuit breaker located on position. Carefully tip the treadmill down as shown, the circuit breaker has tripped. Raise the Uprights (69) and carefully re- 39 move the Reed Switch slightly.... 10 7 Retighten the Screw. Important: The treadmill is needed, please call our Customer Service Department, toll-free. c. c Tripped Reset d. b. If the power cord is aligned with GFCI-equipped ...
... in drawing a. The switch must be solved by following the steps below. Check the circuit breaker located on position. Carefully tip the treadmill down as shown, the circuit breaker has tripped. Raise the Uprights (69) and carefully re- 39 move the Reed Switch slightly.... 10 7 Retighten the Screw. Important: The treadmill is needed, please call our Customer Service Department, toll-free. c. c Tripped Reset d. b. If the power cord is aligned with GFCI-equipped ...

English Manual
Page 21
... walking belt 3 to overtighten the walking belt. Repeat until the walking belt is centered. If the walking belt is overtightened, treadmill performance may decrease and the walking belt may become damaged. Repeat until the walking belt is correctly tightened, you should be able...walking belt is properly tightened. PROBLEM: The walking belt is changing, remove the key. PROBLEM: The incline of the specifications described on the treadmill for a few minutes. This will automatically rise to the maximum incline level and then return to 4 inches off -center, first remove ...
... walking belt 3 to overtighten the walking belt. Repeat until the walking belt is centered. If the walking belt is overtightened, treadmill performance may decrease and the walking belt may become damaged. Repeat until the walking belt is correctly tightened, you should be able...walking belt is properly tightened. PROBLEM: The walking belt is changing, remove the key. PROBLEM: The incline of the specifications described on the treadmill for a few minutes. This will automatically rise to the maximum incline level and then return to 4 inches off -center, first remove ...


