
English Manual
Page 2
... the pulleys at the right has been placed on the weight system in the accompanying literature before using the weight system. 3. Never release the press arms, butterfly arms, leg lever, lat bar, or ab strap while weights are attached in the center of this manual. Use the weight system only on page...
... the pulleys at the right has been placed on the weight system in the accompanying literature before using the weight system. 3. Never release the press arms, butterfly arms, leg lever, lat bar, or ab strap while weights are attached in the center of this manual. Use the weight system only on page...

English Manual
Page 9
.... 17 98 Welded Rod 20 106 105 6 9 Hand tighten two 5/16" Nylon Locknuts (64) onto the Bolts. Do not overtighten the Nylon Jam Nut; the Press Front Leg must pivot freely. 15 89 36 64 2 36 28 64 7 89 6 92 16 28 63 41 80 3 62 28 40 17. Hand tighten two... 5/16" Nylon Locknuts (64) onto the Bolts. Press a 2" Square Inner Cap (28) into the Butterfly Front Leg (3). Press two 2" Square Inner Caps (28) into the indicated end of the Nylon Locknuts used in the position shown...
.... 17 98 Welded Rod 20 106 105 6 9 Hand tighten two 5/16" Nylon Locknuts (64) onto the Bolts. Do not overtighten the Nylon Jam Nut; the Press Front Leg must pivot freely. 15 89 36 64 2 36 28 64 7 89 6 92 16 28 63 41 80 3 62 28 40 17. Hand tighten two... 5/16" Nylon Locknuts (64) onto the Bolts. Press a 2" Square Inner Cap (28) into the Butterfly Front Leg (3). Press two 2" Square Inner Caps (28) into the indicated end of the Nylon Locknuts used in the position shown...

English Manual
Page 15
... 46 75 48 50 48 39. Do not overtighten the Nylon LockNut; Wrap the High Cable (72) over a 3 1/2" Pulley (24). Attach the Pulley to the Press Upright (2) with a 3/8" x 3 1/2" Bolt (56), a 3/8" Flat Washer (48), and a 3/8" Nylon Jam Nut (63). 39 24 56 9 72 48 63 40. Wrap the High Cable (72) around... Jam Nut (63). 40 72 63 25 48 24 59 2 15 Attach the end of the Low Cable (75) to hold the Cable in the Leg Lever (41) with a 3/8" x 2 3/4" Bolt (46), two 3/8" Flat Washers (48), and a 3/8" Nylon Locknut (50). Reattach the Pulley and tighten the Nylon Locknut. It is oriented to...
... 46 75 48 50 48 39. Do not overtighten the Nylon LockNut; Wrap the High Cable (72) over a 3 1/2" Pulley (24). Attach the Pulley to the Press Upright (2) with a 3/8" x 3 1/2" Bolt (56), a 3/8" Flat Washer (48), and a 3/8" Nylon Jam Nut (63). 39 24 56 9 72 48 63 40. Wrap the High Cable (72) around... Jam Nut (63). 40 72 63 25 48 24 59 2 15 Attach the end of the Low Cable (75) to hold the Cable in the Leg Lever (41) with a 3/8" x 2 3/4" Bolt (46), two 3/8" Flat Washers (48), and a 3/8" Nylon Locknut (50). Reattach the Pulley and tighten the Nylon Locknut. It is oriented to...

English Manual
Page 16
.... Attach the Pulley and a Cable Trap (25) to the indicated hole in the direction shown. Wrap the High Cable (72) around a 3 1/2" Pulley (24) in the Press Front Leg (20) with a 3/8" x 3 3/4" Bolt (59), a 3/8" Flat Washer (48) and a 3/8" Nylon Jam Nut (63). Make sure the Cable Trap is oriented as shown... 20 48 63 16 Wrap the High Cable (72) around a 3 1/2" Pulley (24) in the direction shown. Attach the Pulley and a Cable Trap (25) to the Press Front Leg (20) with a 3/8" x 3 3/4" Bolt (59), a 3/8" Flat Washer (48), and a 3/8" Nylon Jam Nut (63). 42 72 59 24 25 20 48 63 ...
.... Attach the Pulley and a Cable Trap (25) to the indicated hole in the direction shown. Wrap the High Cable (72) around a 3 1/2" Pulley (24) in the Press Front Leg (20) with a 3/8" x 3 3/4" Bolt (59), a 3/8" Flat Washer (48) and a 3/8" Nylon Jam Nut (63). Make sure the Cable Trap is oriented as shown... 20 48 63 16 Wrap the High Cable (72) around a 3 1/2" Pulley (24) in the direction shown. Attach the Pulley and a Cable Trap (25) to the Press Front Leg (20) with a 3/8" x 3 3/4" Bolt (59), a 3/8" Flat Washer (48), and a 3/8" Nylon Jam Nut (63). 42 72 59 24 25 20 48 63 ...

English Manual
Page 19
... the Inner Cap when you must remove the 2" Square Inner Cap (28) that is in the Butterfly Front Leg (3). Attach the Curl Pad (91) to the Curl Post (107) with two 1/4" x 1 1/2" Bolts ... and two 1/4" Flat Washers (71). it by turning the Knob clockwise. 54. Press a 1" x 2" Inner Cap (83) into one of the Butterfly Front Leg (3). 53 83 70 12 71 35 78 82 1 83 71 54 13 65 ...90 83 71 82 35 49 101 83 71 68 78 14 55 49 91 107 28 3 19 Attach the Butterfly Backrest to a Seat (13) with two 1/4" x 3/4" Bolts (49). Press...
... the Inner Cap when you must remove the 2" Square Inner Cap (28) that is in the Butterfly Front Leg (3). Attach the Curl Pad (91) to the Curl Post (107) with two 1/4" x 1 1/2" Bolts ... and two 1/4" Flat Washers (71). it by turning the Knob clockwise. 54. Press a 1" x 2" Inner Cap (83) into one of the Butterfly Front Leg (3). 53 83 70 12 71 35 78 82 1 83 71 54 13 65 ...90 83 71 82 35 49 101 83 71 68 78 14 55 49 91 107 28 3 19 Attach the Butterfly Backrest to a Seat (13) with two 1/4" x 3/4" Bolts (49). Press...

English Manual
Page 20
...68). Insert a 1/4" x 1 1/2" Carriage Bolt (101) into a hole in a Seat Plate (65). Attach the other Pad Tube (42) into the indicated hole in the Press Seat Frame (7) and tighten a 1/4" Flat Washer (71) and a 1/4" Nylon Locknut (68) onto it is tight. 57. Remove the pre-assembled 1/4" x 5/8" Screws (95...a Seat (13) with a 1/4" x 2 1/2" Bolt (79) and a 1/4" Flat Washer. 58. Insert the 1/4" x 2 1/2" Carriage Bolt (45) into the Butterfly Front Leg (3). Press 3/4" Round Inner Caps (43) into the Leg Lever (41). Slide a Foam Pad (30) onto each end of a Backrest Adjustment Frame (70).
...68). Insert a 1/4" x 1 1/2" Carriage Bolt (101) into a hole in a Seat Plate (65). Attach the other Pad Tube (42) into the indicated hole in the Press Seat Frame (7) and tighten a 1/4" Flat Washer (71) and a 1/4" Nylon Locknut (68) onto it is tight. 57. Remove the pre-assembled 1/4" x 5/8" Screws (95...a Seat (13) with a 1/4" x 2 1/2" Bolt (79) and a 1/4" Flat Washer. 58. Insert the 1/4" x 2 1/2" Carriage Bolt (45) into the Butterfly Front Leg (3). Press 3/4" Round Inner Caps (43) into the Leg Lever (41). Slide a Foam Pad (30) onto each end of a Backrest Adjustment Frame (70).

English Manual
Page 21
... the remaining parts will be explained in the cables, you will need to remove the slack by securing it with the 1/4" x 5/8" Screws (95). Attach the Press Plate (55) to attach the other weight stack. 60 34 109 5 95 61. Note: The lip on the upper edge. If one of this manual.... Be sure that all parts are not properly installed, they may be on the Press Plate must be damaged when heavy weight is positioned as shown. 61 22 55 20 55 22 62. Repeat steps 59 and 60 to the...
... the remaining parts will be explained in the cables, you will need to remove the slack by securing it with the 1/4" x 5/8" Screws (95). Attach the Press Plate (55) to attach the other weight stack. 60 34 109 5 95 61. Note: The lip on the upper edge. If one of this manual.... Be sure that all parts are not properly installed, they may be on the Press Plate must be damaged when heavy weight is positioned as shown. 61 22 55 20 55 22 62. Repeat steps 59 and 60 to the...

English Manual
Page 25
... felt, the cables should be removed from a set of holes in several different ways: A. Re-insert the Lock Pin (22) through the Press Front Leg and the Press Plate. 55 20 Trouble-shooting and Maintenance Inspect and tighten all parts each time you use solvents. Remove the 3 1/2" Pulley (24) and... be cleaned using a damp cloth and mild non-abrasive detergent. The weight system can stretch slightly when it further away from the Press Plate (55) and the Press Front Leg (20). Align the holes in the Pulley Plates with the desired set of Pulley Plates (23). Adjusting the...
... felt, the cables should be removed from a set of holes in several different ways: A. Re-insert the Lock Pin (22) through the Press Front Leg and the Press Plate. 55 20 Trouble-shooting and Maintenance Inspect and tighten all parts each time you use solvents. Remove the 3 1/2" Pulley (24) and... be cleaned using a damp cloth and mild non-abrasive detergent. The weight system can stretch slightly when it further away from the Press Plate (55) and the Press Front Leg (20). Align the holes in the Pulley Plates with the desired set of Pulley Plates (23). Adjusting the...
English Manual
Page 27
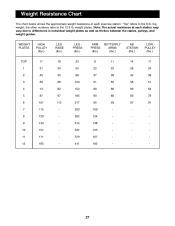
"Top" refers to the 12.5 lb. top weight; WEIGHT PLATES HIGH PULLEY (lbs.) LEG RAISE (lbs.) LEG PRESS (lbs.) ARM PRESS (lbs.) BUTTERFLY ARMS (lbs.) AB STATION (lbs.) LOW PULLEY (lbs.) TOP 1 2 3 4 5 6 7 8 9 10 11 12 17 31 45 59 73 87 101 115 129 143 157 ...
"Top" refers to the 12.5 lb. top weight; WEIGHT PLATES HIGH PULLEY (lbs.) LEG RAISE (lbs.) LEG PRESS (lbs.) ARM PRESS (lbs.) BUTTERFLY ARMS (lbs.) AB STATION (lbs.) LOW PULLEY (lbs.) TOP 1 2 3 4 5 6 7 8 9 10 11 12 17 31 45 59 73 87 101 115 129 143 157 ...

English Manual
Page 31
... 1 4 6 2 1 2 2 2 22 1 1 8 1 6 8 1 2 1 1 2 2 2 1 1 1 1 1 1 2 1 Qty. 1 1 1 1 1 1 1 1 1 1 1 1 2 1 4 2 1 2 2 1 18 1 4 23 19 2 2 21 2 4 4 2 1 2 3 6 2 2 4 1 1 2 4 1 1 7 2 21 8 28 4 1 2 9 1 Description Butterfly Upright Press Upright Butterfly Front Leg Butterfly Base Weight Base Press Base Press Seat Frame Press Frame Press Top Frame Left Butterfly Arm Right Butterfly Arm Butterfly Backrest Seat Butterfly Seat Frame Weight Guide Top Weight Short Weight... Tube Weight Tube Bumper Weight Pin Press Front Leg Weight Lock Pin Pulley Plate 3 1/2" Pulley Cable Trap Small ...
... 1 4 6 2 1 2 2 2 22 1 1 8 1 6 8 1 2 1 1 2 2 2 1 1 1 1 1 1 2 1 Qty. 1 1 1 1 1 1 1 1 1 1 1 1 2 1 4 2 1 2 2 1 18 1 4 23 19 2 2 21 2 4 4 2 1 2 3 6 2 2 4 1 1 2 4 1 1 7 2 21 8 28 4 1 2 9 1 Description Butterfly Upright Press Upright Butterfly Front Leg Butterfly Base Weight Base Press Base Press Seat Frame Press Frame Press Top Frame Left Butterfly Arm Right Butterfly Arm Butterfly Backrest Seat Butterfly Seat Frame Weight Guide Top Weight Short Weight... Tube Weight Tube Bumper Weight Pin Press Front Leg Weight Lock Pin Pulley Plate 3 1/2" Pulley Cable Trap Small ...


