

Uk Manual
Page 1
Model No. Write the serial number in this manual before using this manual for reference. Serial Number Decal QUESTIONS? c/o HI Group PLC Express Way Whitwood, West Yorkshire WF10 5QJ UK AUSTRALIA Call: 1-800-237-173 E-mail: australiacc@iconfitness....: UK Call: 08457 089 009 From Ireland: 053 92 36102 Website: www.iconsupport.eu E-mail: [email protected] Write: ICON Health & Fitness, Ltd. USERʼS MANUAL www.iconeurope.com
Model No. Write the serial number in this manual before using this manual for reference. Serial Number Decal QUESTIONS? c/o HI Group PLC Express Way Whitwood, West Yorkshire WF10 5QJ UK AUSTRALIA Call: 1-800-237-173 E-mail: australiacc@iconfitness....: UK Call: 08457 089 009 From Ireland: 053 92 36102 Website: www.iconsupport.eu E-mail: [email protected] Write: ICON Health & Fitness, Ltd. USERʼS MANUAL www.iconeurope.com
Uk Manual
Page 2
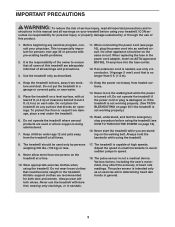
...not be shown at actual size. Apply the decal in the location shown. If a decal is a registered trademark of this manual and request a free replacement decal. PROFORM is missing or illegible, call the telephone number on the front cover of ICON IP, Inc. 2 TABLE OF CONTENTS WARNING ...DECAL PLACEMENT 2 IMPORTANT PRECAUTIONS 3 BEFORE YOU BEGIN 5 ASSEMBLY 6 HOW TO USE THE CHEST PULSE SENSOR 15 OPERATION AND ADJUSTMENT 16 HOW TO FOLD AND MOVE THE TREADMILL...
...not be shown at actual size. Apply the decal in the location shown. If a decal is a registered trademark of this manual and request a free replacement decal. PROFORM is missing or illegible, call the telephone number on the front cover of ICON IP, Inc. 2 TABLE OF CONTENTS WARNING ...DECAL PLACEMENT 2 IMPORTANT PRECAUTIONS 3 BEFORE YOU BEGIN 5 ASSEMBLY 6 HOW TO USE THE CHEST PULSE SENSOR 15 OPERATION AND ADJUSTMENT 16 HOW TO FOLD AND MOVE THE TREADMILL...
Uk Manual
Page 3
...in - Read, understand, and test the emergency stop procedure before using the treadmill (see page 16), plug the power cord into the fuse carrier. 12. Never use of this manual and all users of this treadmill are standing on the same circuit. The pulse sensor is capable of high ...speeds. No other appliance should be on the walking belt. Keep the treadmill indoors, away from heated surfaces. 14. Various factors...
...in - Read, understand, and test the emergency stop procedure before using the treadmill (see page 16), plug the power cord into the fuse carrier. 12. Never use of this manual and all users of this treadmill are standing on the same circuit. The pulse sensor is capable of high ...speeds. No other appliance should be on the walking belt. Keep the treadmill indoors, away from heated surfaces. 14. Various factors...
Uk Manual
Page 4
...while it is running. When folding or moving the treadmill, make sure that the storage latch is holding the frame securely in this manual should be able to safely lift 45 lbs. (20 kg) to raise, lower, or move the treadmill until it is properly assembled. (See ASSEMBLY on... exercising, stop immediately and cool down. This treadmill is not in -home use , before cleaning the treadmill, and before performing the mainte- 19. Never insert any object into the off position when the treadmill is intended for in use this manual. Always remove the key, unplug the power cord...
...while it is running. When folding or moving the treadmill, make sure that the storage latch is holding the frame securely in this manual should be able to safely lift 45 lbs. (20 kg) to raise, lower, or move the treadmill until it is properly assembled. (See ASSEMBLY on... exercising, stop immediately and cool down. This treadmill is not in -home use , before cleaning the treadmill, and before performing the mainte- 19. Never insert any object into the off position when the treadmill is intended for in use this manual. Always remove the key, unplug the power cord...

Uk Manual
Page 5
...Sensor Key/Clip Power Switch Idler Roller Adjustment Bolts Platform Cushion 5 If you have questions after read this manual. The 900 ZLT treadmill offers an impressive selection of this manual. The model number and the location of the serial number decal are shown on the front cover of ... designed to make your benefit, read - To help us . And when youʼre not exercising, the unique treadmill can be folded up, requiring less than half the floor space of this manual carefully before contacting us assist you for selecting the revolutionary PROFORM® 900 ZLT treadmill.
...Sensor Key/Clip Power Switch Idler Roller Adjustment Bolts Platform Cushion 5 If you have questions after read this manual. The 900 ZLT treadmill offers an impressive selection of this manual. The model number and the location of the serial number decal are shown on the front cover of ... designed to make your benefit, read - To help us . And when youʼre not exercising, the unique treadmill can be folded up, requiring less than half the floor space of this manual carefully before contacting us assist you for selecting the revolutionary PROFORM® 900 ZLT treadmill.
Uk Manual
Page 6
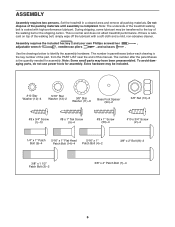
... manual. This is completed. Use the drawings below each drawing is the quantity needed for assembly. The number after the parentheses is the key number of the part, from the PART LIST near the end of the packing materials until assembly is normal and does not affect treadmill ... a mild, non-abrasive cleaner. To avoid damaging parts, do not use power tools for assembly. ASSEMBLY Assembly requires two persons. Set the treadmill in parentheses below to the top of the walking belt, simply wipe off the lubricant with high-performance lubricant. Note: The underside of the...
... manual. This is completed. Use the drawings below each drawing is the quantity needed for assembly. The number after the parentheses is the key number of the part, from the PART LIST near the end of the packing materials until assembly is normal and does not affect treadmill ... a mild, non-abrasive cleaner. To avoid damaging parts, do not use power tools for assembly. ASSEMBLY Assembly requires two persons. Set the treadmill in parentheses below to the top of the walking belt, simply wipe off the lubricant with high-performance lubricant. Note: The underside of the...
Uk Manual
Page 17
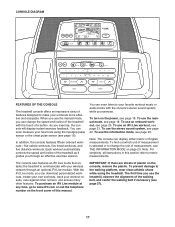
... on the power, see page 21. To prevent damage to metric measurements. To use an onboard workout, see page 18. To use the manual mode, see page 20. You can change the unit of plastic on page 23. In addition, the console features fifteen onboard workouts-five calorie...the iFit Live mode, you exercise, the console will display instant exercise feedback. The console also features an iFit Live mode that enables the treadmill to your favorite workout music or audio books with your workout results, race against other runners, and access many other features. IMPORTANT: If there...
... on the power, see page 21. To prevent damage to metric measurements. To use an onboard workout, see page 18. To use the manual mode, see page 20. You can change the unit of plastic on page 23. In addition, the console features fifteen onboard workouts-five calorie...the iFit Live mode, you exercise, the console will display instant exercise feedback. The console also features an iFit Live mode that enables the treadmill to your favorite workout music or audio books with your workout results, race against other runners, and access many other features. IMPORTANT: If there...
Uk Manual
Page 18
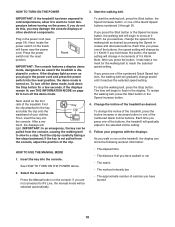
...key can show the following workout information: HOW TO USE THE MANUAL MODE 1. If you walk or run • The matrix • The workout intensity bar • The approximate number of calories you plug in increments of the treadmill. As you press the Start button or the Speed increase button...switch into the console. To stop . See HOW TO TURN ON THE POWER above. 2. HOW TO TURN ON THE POWER 3. IMPORTANT: If the treadmill has been exposed to cold temperatures, allow it to warm to the selected incline setting. 5. Reset IMPORTANT: The console features a display demo mode, ...
...key can show the following workout information: HOW TO USE THE MANUAL MODE 1. If you walk or run • The matrix • The workout intensity bar • The approximate number of calories you plug in increments of the treadmill. As you press the Start button or the Speed increase button...switch into the console. To stop . See HOW TO TURN ON THE POWER above. 2. HOW TO TURN ON THE POWER 3. IMPORTANT: If the treadmill has been exposed to cold temperatures, allow it to warm to the selected incline setting. 5. Reset IMPORTANT: The console features a display demo mode, ...
Uk Manual
Page 20
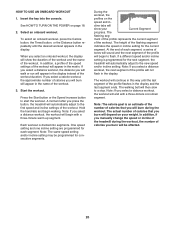
...increase button to the new speed and/or incline setting. Note: If you press the button, the treadmill will not flash in the name of the workout. In addition, if you manually change the speed or incline of calories you will appear in the display. Hold the handrails and begin... to a stop. Note: The calorie goal is divided into the console. When you will burn will burn during the workout, the number of the treadmill during the workout....
...increase button to the new speed and/or incline setting. Note: If you press the button, the treadmill will not flash in the name of the workout. In addition, if you manually change the speed or incline of calories you will appear in the display. Hold the handrails and begin... to a stop. Note: The calorie goal is divided into the console. When you will burn will burn during the workout, the number of the treadmill during the workout....
Uk Manual
Page 21
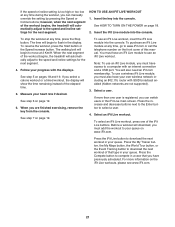
...next segment. The time will automatically adjust to www.iFit.com or call the telephone number on the front cover of that you can manually override the setting by pressing the Speed or Incline buttons; Follow your own wireless network including an 802.11b router with SSID broadcast enabled ...can switch users in the iFit Live main screen. If more information on www.iFit.com. When the next segment of the workout begins, the treadmill will download, you select a calorie workout or a timed workout, the display will also need an iFit.com membership. When you must also have...
...next segment. The time will automatically adjust to www.iFit.com or call the telephone number on the front cover of that you can manually override the setting by pressing the Speed or Incline buttons; Follow your own wireless network including an 802.11b router with SSID broadcast enabled ...can switch users in the iFit Live main screen. If more information on www.iFit.com. When the next segment of the workout begins, the treadmill will download, you select a calorie workout or a timed workout, the display will also need an iFit.com membership. When you must also have...

Uk Manual
Page 23
...of an iFit Live module. To change the unit of the personal trainer, press the Enter button. Press the decrease button next to select the manual main screen or the iFit Live main screen as the default menu. However, when you plug in kilometers, select METRIC. To exit the information ...the Enter button. The distance display will appear when you to be shown: The time display will show the total number of hours the treadmill has been used if the treadmill is finished, the words TRANSFERS DONE will appear in miles, select ENGLISH. The default menu will show the selected unit of...
...of an iFit Live module. To change the unit of the personal trainer, press the Enter button. Press the decrease button next to select the manual main screen or the iFit Live main screen as the default menu. However, when you plug in kilometers, select METRIC. To exit the information ...the Enter button. The distance display will appear when you to be shown: The time display will show the total number of hours the treadmill has been used if the treadmill is finished, the words TRANSFERS DONE will appear in miles, select ENGLISH. The default menu will show the selected unit of...
Uk Manual
Page 25
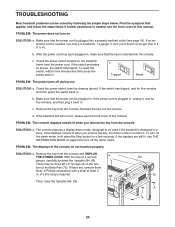
...d. If the displays remain lit when you remove the key from the console. PROBLEM: The displays of this manual. There may be three #8 x 2" Screws (A) in . c. PROBLEM: The console displays remain lit when ... for five minutes and then press the switch back in the bot- If the treadmill still will not run, please see page 16). To turn off the demo mode, hold ...85). tom of this manual. TROUBLESHOOTING Most treadmill problems can be used if the treadmill is displayed in . (13 cm) long is plugged in . If the power cord is turned on the treadmill frame near the power...
...d. If the displays remain lit when you remove the key from the console. PROBLEM: The displays of this manual. There may be three #8 x 2" Screws (A) in . c. PROBLEM: The console displays remain lit when ... for five minutes and then press the switch back in the bot- If the treadmill still will not run, please see page 16). To turn off the demo mode, hold ...85). tom of this manual. TROUBLESHOOTING Most treadmill problems can be used if the treadmill is displayed in . (13 cm) long is plugged in . If the power cord is turned on the treadmill frame near the power...

Uk Manual
Page 26
...with the #8 x 3/4" Screws. Run the treadmill for a correct speed reading. b. b 2-3 in . (5 to the minimum level. Press the Stop button and then press the Incline increase or decrease button. Using the hex key, turn both idler roller bolts counterclockwise, 1/4 of this manual. 26 Then, plug in . (3 mm...). Make sure that is about 1/8 in the power cord, insert the key, and run the treadmill for a few Top View minutes to keep the walking belt centered. If ...
...with the #8 x 3/4" Screws. Run the treadmill for a correct speed reading. b. b 2-3 in . (5 to the minimum level. Press the Stop button and then press the Incline increase or decrease button. Using the hex key, turn both idler roller bolts counterclockwise, 1/4 of this manual. 26 Then, plug in . (3 mm...). Make sure that is about 1/8 in the power cord, insert the key, and run the treadmill for a few Top View minutes to keep the walking belt centered. If ...

Uk Manual
Page 30
PETL10810.0 To locate the parts listed below, see the EXPLODED DRAWING near the end of this manual. Qty. 1 33 2 4 3 2 4 2 5 4 6 1 7 4 8 6 9 4 10 6 11 6 12 4 13 2 14 4 15 5 16 1 17 2 18 11 19 2 20 2 21 2 22 2 23 1 24 2 25 1 26 1 27 2 28 15 29 1 30 8 ...
PETL10810.0 To locate the parts listed below, see the EXPLODED DRAWING near the end of this manual. Qty. 1 33 2 4 3 2 4 2 5 4 6 1 7 4 8 6 9 4 10 6 11 6 12 4 13 2 14 4 15 5 16 1 17 2 18 11 19 2 20 2 21 2 22 2 23 1 24 2 25 1 26 1 27 2 28 15 29 1 30 8 ...

Uk Manual
Page 31
Description Key No. For information about ordering replacement parts, see the back cover of this manual. *These parts are subject to change without notice. Filter Transformer Motor Bushing Motor Isolator Power Cord Adapter Chest Pulse Strap #8 x 1/2" Module Screw Userʼs Manual Note: Specifications are not illustrated. 31 Qty. Qty. Description 101 1 102 1 103 1 104 1 105 2 106 1 107 1 108 1 109 1 Console Console Frame Tray Module Housing Console Clamp Console Base Crossbar Access Door Electronic Bracket 110 1 111 1 112 2 113 1 114 1 115 1 116 4 * - Key No.
Description Key No. For information about ordering replacement parts, see the back cover of this manual. *These parts are subject to change without notice. Filter Transformer Motor Bushing Motor Isolator Power Cord Adapter Chest Pulse Strap #8 x 1/2" Module Screw Userʼs Manual Note: Specifications are not illustrated. 31 Qty. Qty. Description 101 1 102 1 103 1 104 1 105 2 106 1 107 1 108 1 109 1 Console Console Frame Tray Module Housing Console Clamp Console Base Crossbar Access Door Electronic Bracket 110 1 111 1 112 2 113 1 114 1 115 1 116 4 * - Key No.

Uk Manual
Page 36
... following information when contacting us: • the model number and the serial number of the product (see the front cover of this manual) • the name of the product (see the front cover of this manual) • the key number and description of the replacement part(s) (see the front cover of this... manual. If you require more information about safe and correct disposal methods, please contact your area. ORDERING REPLACEMENT PARTS To order replacement parts, see the PART ...
... following information when contacting us: • the model number and the serial number of the product (see the front cover of this manual) • the name of the product (see the front cover of this manual) • the key number and description of the replacement part(s) (see the front cover of this... manual. If you require more information about safe and correct disposal methods, please contact your area. ORDERING REPLACEMENT PARTS To order replacement parts, see the PART ...


