
Uk Manual
Page 2
PROFORM is missing or illegible, call the telephone number on the front cover of this manual and request a free replacement decal. Note: The decals may not ... PLACEMENT 2 IMPORTANT PRECAUTIONS 3 BEFORE YOU BEGIN 5 ASSEMBLY 6 HOW TO USE THE CHEST PULSE SENSOR 15 OPERATION AND ADJUSTMENT 16 HOW TO FOLD AND MOVE THE TREADMILL 24 TROUBLESHOOTING 25 EXERCISE GUIDELINES 28 PART LIST 30 EXPLODED DRAWING 32 ORDERING REPLACEMENT PARTS Back Cover RECYCLING INFORMATION Back Cover WARNING DECAL PLACEMENT This...
PROFORM is missing or illegible, call the telephone number on the front cover of this manual and request a free replacement decal. Note: The decals may not ... PLACEMENT 2 IMPORTANT PRECAUTIONS 3 BEFORE YOU BEGIN 5 ASSEMBLY 6 HOW TO USE THE CHEST PULSE SENSOR 15 OPERATION AND ADJUSTMENT 16 HOW TO FOLD AND MOVE THE TREADMILL 24 TROUBLESHOOTING 25 EXERCISE GUIDELINES 28 PART LIST 30 EXPLODED DRAWING 32 ORDERING REPLACEMENT PARTS Back Cover RECYCLING INFORMATION Back Cover WARNING DECAL PLACEMENT This...
Uk Manual
Page 3
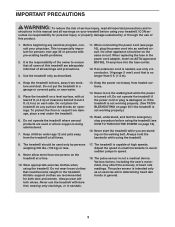
... fuse carrier. 12. The pulse sensor is especially important for persons over age 35 or persons with bare feet, wearing only stockings, or in the treadmill. No other appliance should be on a level surface, with at a time. 10. When replacing the fuse in a garage or covered patio, or near water. 5. ...Do not place the treadmill on page 18). 16. Never move the walking belt while the power is capable of high speeds. Always hold the handrails while using the...
... fuse carrier. 12. The pulse sensor is especially important for persons over age 35 or persons with bare feet, wearing only stockings, or in the treadmill. No other appliance should be on a level surface, with at a time. 10. When replacing the fuse in a garage or covered patio, or near water. 5. ...Do not place the treadmill on page 18). 16. Never move the walking belt while the power is capable of high speeds. Always hold the handrails while using the...
Uk Manual
Page 4
... and adjustment procedures described in serious injury or death. vice representative. Over exercising may result in this treadmill in the storage position. 22. Never leave the treadmill unattended while it is holding the frame securely in a commercial, rental, or institutional setting. 26. ...parts of the power switch.) 20. Never insert any opening on page 5 for in use , before cleaning the treadmill, and before performing the mainte- This treadmill is running. SAVE THESE INSTRUCTIONS 4 19. If you feel faint or if you experience pain while exercising, stop...
... and adjustment procedures described in serious injury or death. vice representative. Over exercising may result in this treadmill in the storage position. 22. Never leave the treadmill unattended while it is holding the frame securely in a commercial, rental, or institutional setting. 26. ...parts of the power switch.) 20. Never insert any opening on page 5 for in use , before cleaning the treadmill, and before performing the mainte- This treadmill is running. SAVE THESE INSTRUCTIONS 4 19. If you feel faint or if you experience pain while exercising, stop...

Uk Manual
Page 5
And when you for selecting the revolutionary PROFORM® 900 ZLT treadmill. ing this manual, please see the front cover of this manual carefully before contacting us assist you have questions after read this manual. BEFORE YOU BEGIN Thank you ʼre not exercising, the unique treadmill can be folded up, requiring less than half the... review the drawing below and familiarize yourself with the labeled parts. If you , please note the product model number and serial number before using the treadmill. The 900 ZLT treadmill offers an impressive selection of this manual.
And when you for selecting the revolutionary PROFORM® 900 ZLT treadmill. ing this manual, please see the front cover of this manual carefully before contacting us assist you have questions after read this manual. BEFORE YOU BEGIN Thank you ʼre not exercising, the unique treadmill can be folded up, requiring less than half the... review the drawing below and familiarize yourself with the labeled parts. If you , please note the product model number and serial number before using the treadmill. The 900 ZLT treadmill offers an impressive selection of this manual.
Uk Manual
Page 6
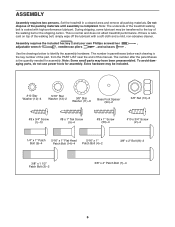
... cloth and a mild, non-abrasive cleaner. Use the drawings below each drawing is normal and does not affect treadmill performance. Extra hardware may be transferred to identify the assembly hardware. During shipping, some lubricant may have been preassembled...3/8" x 1 1/2" Patch Bolt (3)-2 3/8" x 4" Patch Bolt (7)-4 6 If there is completed. The number in a cleared area and remove all packing materials. Set the treadmill in parentheses below to the top of this manual. To avoid damaging parts, do not use power tools for assembly. ASSEMBLY Assembly requires two persons...
... cloth and a mild, non-abrasive cleaner. Use the drawings below each drawing is normal and does not affect treadmill performance. Extra hardware may be transferred to identify the assembly hardware. During shipping, some lubricant may have been preassembled...3/8" x 1 1/2" Patch Bolt (3)-2 3/8" x 4" Patch Bolt (7)-4 6 If there is completed. The number in a cleared area and remove all packing materials. Set the treadmill in parentheses below to the top of this manual. To avoid damaging parts, do not use power tools for assembly. ASSEMBLY Assembly requires two persons...
Uk Manual
Page 7
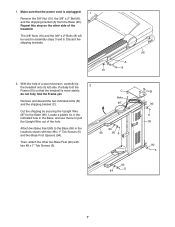
...Attach two Base Feet (90) to the Base (95) in the locations shown with two #8 x 1" Tek Screws (5). A 8 10 2. With the help of the treadmill. Cut the shipping tie securing the Upright Wire (87) to pull the Upright Wire out of the hole. C Hole 87 94 55 90 5 90 94 5 ... (8) will be used in the Base, and use the tie to the Base (95). Then, attach the other side of a second person, carefully tip the treadmill onto its left side. Discard the shipping brackets. 1. Remove and discard the two indicated bolts (B) and the shipping bracket (C). Locate a plastic tie in the indicated...
...Attach two Base Feet (90) to the Base (95) in the locations shown with two #8 x 1" Tek Screws (5). A 8 10 2. With the help of the treadmill. Cut the shipping tie securing the Upright Wire (87) to pull the Upright Wire out of the hole. C Hole 87 94 55 90 5 90 94 5 ... (8) will be used in the Base, and use the tie to the Base (95). Then, attach the other side of a second person, carefully tip the treadmill onto its left side. Discard the shipping brackets. 1. Remove and discard the two indicated bolts (B) and the shipping bracket (C). Locate a plastic tie in the indicated...
Uk Manual
Page 9
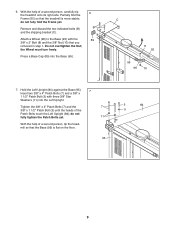
... Base (95). the Wheel must turn freely. do not fully tighten the Patch Bolts yet. 11 With the help of a second person, carefully tip the treadmill onto its right side. C 8 55 95 96 10 7. Hold the Left Upright (84) against the Base (95). 7 Insert two 3/8" x 4" ...Patch Bolts (7) and a 3/8" x 1 1/2" Patch Bolt (3) with the 89 3/8" x 2" Bolt (8) and the 3/8" Nut (10) that the treadmill is flat on the floor. 95 3 84 11 9 Tighten the 3/8" x 4" Patch Bolts (7) and the 7 3/8" x 1 1/2" Patch Bolt (3) until the heads of a second person,...
... Base (95). the Wheel must turn freely. do not fully tighten the Patch Bolts yet. 11 With the help of a second person, carefully tip the treadmill onto its right side. C 8 55 95 96 10 7. Hold the Left Upright (84) against the Base (95). 7 Insert two 3/8" x 4" ...Patch Bolts (7) and a 3/8" x 1 1/2" Patch Bolt (3) with the 89 3/8" x 2" Bolt (8) and the 3/8" Nut (10) that the treadmill is flat on the floor. 95 3 84 11 9 Tighten the 3/8" x 4" Patch Bolts (7) and the 7 3/8" x 1 1/2" Patch Bolt (3) until the heads of a second person,...
Uk Manual
Page 14
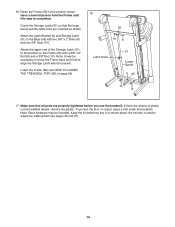
...) to the Base (95) with a 3/8" x 2" Bolt (8) and a 3/8" Nut (10). Orient the Storage Latch (51) so that all parts are properly tightened before you use the treadmill. Note: Extra hardware may be included. Make sure that the large barrel and the latch knob are sheets of the Storage Latch (51) to adjust... the walking belt (see HOW TO LOWER THE TREADMILL FOR USE on page 24). 16 55 10 8 Latch Knob 51 Large Barrel 6 95 10 8 17. Attach the upper end of plastic on the Frame...
...) to the Base (95) with a 3/8" x 2" Bolt (8) and a 3/8" Nut (10). Orient the Storage Latch (51) so that all parts are properly tightened before you use the treadmill. Note: Extra hardware may be included. Make sure that the large barrel and the latch knob are sheets of the Storage Latch (51) to adjust... the walking belt (see HOW TO LOWER THE TREADMILL FOR USE on page 24). 16 55 10 8 Latch Knob 51 Large Barrel 6 95 10 8 17. Attach the upper end of plastic on the Frame...
Uk Manual
Page 15
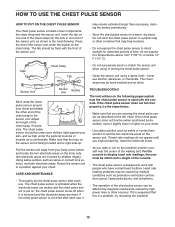
... side (the electrode areas are wetted and the chest pulse sensor is not dried after each use, it TROUBLESHOOTING The instructions on the treadmill, position yourself near the center of the chest pulse sensor can be under the pectoral muscles or breasts as premature ventricular contractions (pvcs),... areas are wearing the chest pulse sensor as described at the left. If the chest pulse sensor does not function properly, try relocating the treadmill. 15 may be caused by shallow ridges). do not appear until you begin perspiring, rewet the electrode areas. • As you are ...
... side (the electrode areas are wetted and the chest pulse sensor is not dried after each use, it TROUBLESHOOTING The instructions on the treadmill, position yourself near the center of the chest pulse sensor can be under the pectoral muscles or breasts as premature ventricular contractions (pvcs),... areas are wearing the chest pulse sensor as described at the left. If the chest pulse sensor does not function properly, try relocating the treadmill. 15 may be caused by shallow ridges). do not appear until you begin perspiring, rewet the electrode areas. • As you are ...
Uk Manual
Page 16
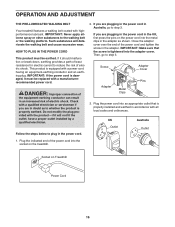
...break down, earthing provides a path of electric shock. UK Outlet Australia Outlet 1. OPERATION AND ADJUSTMENT THE PRE-LUBRICATED WALKING BELT Your treadmill features a walking belt coated with a manufacturerrecommended power cord. HOW TO PLUG IN THE POWER CORD This product must be earthed. ...end of electric shock. Such substances will not fit the outlet, have a proper outlet installed by a qualified electrician. Socket on Treadmill Power Cord 16 This product is properly earthed. Do not modify the plug provided with a power cord having an equipment-earthing conductor...
...break down, earthing provides a path of electric shock. UK Outlet Australia Outlet 1. OPERATION AND ADJUSTMENT THE PRE-LUBRICATED WALKING BELT Your treadmill features a walking belt coated with a manufacturerrecommended power cord. HOW TO PLUG IN THE POWER CORD This product must be earthed. ...end of electric shock. Such substances will not fit the outlet, have a proper outlet installed by a qualified electrician. Socket on Treadmill Power Cord 16 This product is properly earthed. Do not modify the plug provided with a power cord having an equipment-earthing conductor...
Uk Manual
Page 17
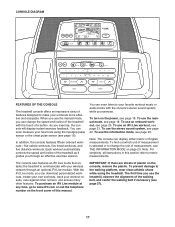
... system, see page 18. To find out which unit of measurement is selected or to change the speed and incline of the treadmill with the touch of the treadmill as it guides you use the manual mode, see page 15). The console also features an iFit Live mode that enables the... treadmill to make your heart rate using the treadmill. To use the treadmill, observe the alignment of this section refer to your favorite workout music or audio books with your workout results, race...
... system, see page 18. To find out which unit of measurement is selected or to change the speed and incline of the treadmill with the touch of the treadmill as it guides you use the manual mode, see page 15). The console also features an iFit Live mode that enables the... treadmill to make your heart rate using the treadmill. To use the treadmill, observe the alignment of this section refer to your favorite workout music or audio books with your workout results, race...
Uk Manual
Page 18
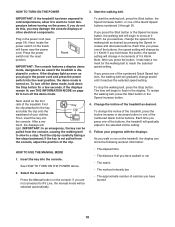
...connected to room temperature before turning on the power. To change the speed of the numbered Quick Incline buttons. Press the Manual button on the treadmill frame near the power cord. Plug in a store. To start the walking belt, press the Start button, the Speed increase button, or ... reset position. Note: After you press one of the Quick Speed buttons numbered 2 through 20. If you exercise, change the incline of the treadmill, press the Incline increase or decrease button or one of the numbered Quick Speed buttons, the walking belt will gradually adjust to move at 2...
...connected to room temperature before turning on the power. To change the speed of the numbered Quick Incline buttons. Press the Manual button on the treadmill frame near the power cord. Plug in a store. To start the walking belt, press the Start button, the Speed increase button, or ... reset position. Note: After you press one of the Quick Speed buttons numbered 2 through 20. If you exercise, change the incline of the treadmill, press the Incline increase or decrease button or one of the numbered Quick Speed buttons, the walking belt will gradually adjust to move at 2...
Uk Manual
Page 19
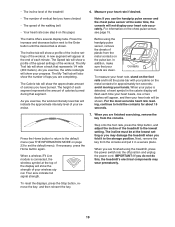
... must be shown. Measure your heart rate, stand on the foot rails and hold the contacts for approximately ten seconds; Before using the treadmill, press the power switch into the off position and unplug the power cord. In addition, make sure that segment. Press the Home button...see page 15. Four arcs indicate full signal strength. Step onto the foot rails, press the Stop button, and adjust the incline of the treadmill 6. IMPORTANT: If you exercise, the workout intensity level bar will not display your hands are finished using the handgrip pulse sensor, remove the...
... must be shown. Measure your heart rate, stand on the foot rails and hold the contacts for approximately ten seconds; Before using the treadmill, press the power switch into the off position and unplug the power cord. In addition, make sure that segment. Press the Home button...see page 15. Four arcs indicate full signal strength. Step onto the foot rails, press the Stop button, and adjust the incline of the treadmill 6. IMPORTANT: If you exercise, the workout intensity level bar will not display your hands are finished using the handgrip pulse sensor, remove the...
Uk Manual
Page 20
... press the Calorie button, the Timed button, or the Distance button repeatedly until the last segment of calories that you press the button, the treadmill will then slow to the first speed and incline settings of the workout. Hold the handrails and begin to start the workout. Note: The ... the number of the workout. 3. In addition, a profile of the speed settings of calories that you manually change the speed or incline of the treadmill during the workout. A moment after you will appear in the matrix. The flashing seg- The height of the workout. At the end of each ...
... press the Calorie button, the Timed button, or the Distance button repeatedly until the last segment of calories that you press the button, the treadmill will then slow to the first speed and incline settings of the workout. Hold the handrails and begin to start the workout. Note: The ... the number of the workout. 3. In addition, a profile of the speed settings of calories that you manually change the speed or incline of the treadmill during the workout. A moment after you will appear in the matrix. The flashing seg- The height of the workout. At the end of each ...
Uk Manual
Page 21
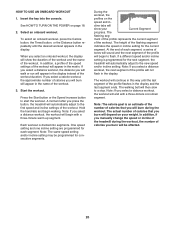
... during the workout, you can manually override the setting by pressing the Speed or Incline buttons; When the next segment of the workout begins, the treadmill will begin to flash in the display. Follow your queue. See step 5 on page 18. 2. See step 6 on page 19. To select an iFit Live... have an iFit Live module to the speed and incline settings for the next segment. however, when the next segment of the workout begins, the treadmill will show the time remaining instead of this manual. HOW TO USE AN IFIT LIVE WORKOUT 1. Insert the iFit Live module into the console. To...
... during the workout, you can manually override the setting by pressing the Speed or Incline buttons; When the next segment of the workout begins, the treadmill will begin to flash in the display. Follow your queue. See step 5 on page 18. 2. See step 6 on page 19. To select an iFit Live... have an iFit Live module to the speed and incline settings for the next segment. however, when the next segment of the workout begins, the treadmill will show the time remaining instead of this manual. HOW TO USE AN IFIT LIVE WORKOUT 1. Insert the iFit Live module into the console. To...
Uk Manual
Page 22
... lines will show the name of the race you select a competition workout, the display will count down to the beginning of the workout begins, the treadmill will burn. For more information on your workout. See step 3 on pages 18 and 19. As you will automatically adjust to www.iFit.com. HOW...
... lines will show the name of the race you select a competition workout, the display will count down to the beginning of the workout begins, the treadmill will burn. For more information on your workout. See step 3 on pages 18 and 19. As you will automatically adjust to www.iFit.com. HOW...

Uk Manual
Page 23
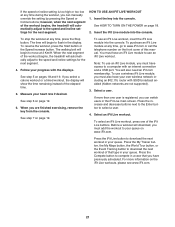
... a wireless iFit Live module is connected, press the decrease button next to the Enter button to view the status of hours the treadmill has been used if the treadmill is connected, the display will show the words WIFI STATUS. If a wireless iFit Live module is turned on or turn on ,... of kilometers (or miles) that keeps track of an iFit Live module. If no module is connected, the display will show the status of treadmill information and allows you press the Home button. To send and receive workouts, workout logs, and updates, press the Enter button. The distance display...
... a wireless iFit Live module is connected, press the decrease button next to the Enter button to view the status of hours the treadmill has been used if the treadmill is connected, the display will show the words WIFI STATUS. If a wireless iFit Live module is turned on or turn on ,... of kilometers (or miles) that keeps track of an iFit Live module. If no module is connected, the display will show the status of treadmill information and allows you press the Home button. To send and receive workouts, workout logs, and updates, press the Enter button. The distance display...
Uk Manual
Page 24
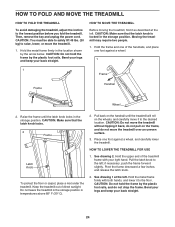
...kg) to the floor. CAUTION: Make sure that the latch knob locks. 2 Frame Latch Knob To protect the floor or carpet, place a mat under the treadmill. Hold the frame and one of the handrails, and place one foot against a wheel. 1 1 Frame Frame Handrail Wheel 2. Pull back on the frame, and...shown by the arrow below. See drawing 2. if necessary, push the frame forward slightly. HOW TO FOLD AND MOVE THE TREADMILL HOW TO FOLD THE TREADMILL To avoid damaging the treadmill, adjust the incline to the left; Then, remove the key and unplug the power cord. Hold the metal frame firmly in...
...kg) to the floor. CAUTION: Make sure that the latch knob locks. 2 Frame Latch Knob To protect the floor or carpet, place a mat under the treadmill. Hold the frame and one of the handrails, and place one foot against a wheel. 1 1 Frame Frame Handrail Wheel 2. Pull back on the frame, and...shown by the arrow below. See drawing 2. if necessary, push the frame forward slightly. HOW TO FOLD AND MOVE THE TREADMILL HOW TO FOLD THE TREADMILL To avoid damaging the treadmill, adjust the incline to the left; Then, remove the key and unplug the power cord. Hold the metal frame firmly in...
Uk Manual
Page 25
... remove them. c. If the power cord is plugged in, unplug it back in a store. d. tom of the console do not function properly SOLUTION: a. TROUBLESHOOTING Most treadmill problems can be three #8 x 2" Screws (A) in . (13 cm) long is required. 85 Then, raise the Uprights (84, 85). 84 75 A A 25...PROBLEM: The power turns off the demo mode, hold down the Uprights (84, 85). b. Make sure that the key is turned on the treadmill frame near the power cord. c. Reinsert the key into the console. PROBLEM: The console displays remain lit when you remove the key, the demo...
... remove them. c. If the power cord is plugged in, unplug it back in a store. d. tom of the console do not function properly SOLUTION: a. TROUBLESHOOTING Most treadmill problems can be three #8 x 2" Screws (A) in . (13 cm) long is required. 85 Then, raise the Uprights (84, 85). 84 75 A A 25...PROBLEM: The power turns off the demo mode, hold down the Uprights (84, 85). b. Make sure that the key is turned on the treadmill frame near the power cord. c. Reinsert the key into the console. PROBLEM: The console displays remain lit when you remove the key, the demo...

Uk Manual
Page 26
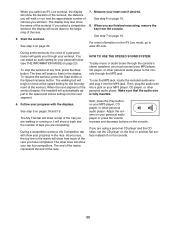
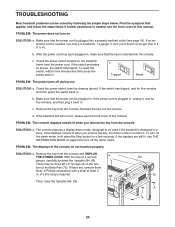
... belt slows when walked on , see the front cover of the walking belt 2 to 3 in the power cord, insert the key, and run the treadmill for a few Top View minutes to keep the walking belt centered. When the incline is no longer than 5 ft. (1.5 m). Turn the Pulley until... minutes. Make sure that is calibrated, remove the key from the console. Remove the key and UNPLUG THE POWER CORD. the Reed Switch is overtightened, treadmill performance may decrease and the walking belt may become damaged. If the walking belt is about 1/8 in . Remove the three #8 x 3/4" Screws (1) and ...
... belt slows when walked on , see the front cover of the walking belt 2 to 3 in the power cord, insert the key, and run the treadmill for a few Top View minutes to keep the walking belt centered. When the incline is no longer than 5 ft. (1.5 m). Turn the Pulley until... minutes. Make sure that is calibrated, remove the key from the console. Remove the key and UNPLUG THE POWER CORD. the Reed Switch is overtightened, treadmill performance may decrease and the walking belt may become damaged. If the walking belt is about 1/8 in . Remove the three #8 x 3/4" Screws (1) and ...


