

Uk Manual
Page 2
TABLE OF CONTENTS IMPORTANT PRECAUTIONS 3 BEFORE YOU BEGIN 5 ASSEMBLY 6 HOW TO USE THE CHEST PULSE SENSOR 8 TREADMILL OPERATION 9 HOW TO FOLD AND MOVE THE TREADMILL 24 TROUBLESHOOTING 26 EXERCISE GUIDELINES 29 PART LIST 30 EXPLODED DRAWING 32 ORDERING REPLACEMENT PARTS Back Cover PROFORM is a registered trademark of ICON IP, Inc. 2
TABLE OF CONTENTS IMPORTANT PRECAUTIONS 3 BEFORE YOU BEGIN 5 ASSEMBLY 6 HOW TO USE THE CHEST PULSE SENSOR 8 TREADMILL OPERATION 9 HOW TO FOLD AND MOVE THE TREADMILL 24 TROUBLESHOOTING 26 EXERCISE GUIDELINES 29 PART LIST 30 EXPLODED DRAWING 32 ORDERING REPLACEMENT PARTS Back Cover PROFORM is a registered trademark of ICON IP, Inc. 2
Uk Manual
Page 3
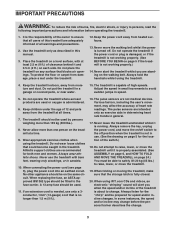
... The pulse sensors are intended only as described in this treadmill are used . 11. Always remove the key, unplug the power cord, and move the treadmill until it is properly assembled. (See ASSEMBLY on page 6, and HOW TO FOLD AND MOVE THE TREADMILL on page 24.) You must be used by persons weighing... more than one person on the treadmill at least 2.5 m (8 ft.) of clearance behind it ...
... The pulse sensors are intended only as described in this treadmill are used . 11. Always remove the key, unplug the power cord, and move the treadmill until it is properly assembled. (See ASSEMBLY on page 6, and HOW TO FOLD AND MOVE THE TREADMILL on page 24.) You must be used by persons weighing... more than one person on the treadmill at least 2.5 m (8 ft.) of clearance behind it ...
Uk Manual
Page 6
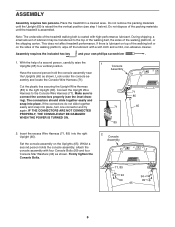
... The underside of the walking platform, wipe off the lubricant with a soft cloth and a mild, non-abrasive cleaner. Set the console assembly on the sides of the treadmill walking belt is coated with four Console Bolts (99) and four Console Star Washers (94) as - Firmly tighten the Console Bolts. ... 85 94 94 99 99 65 6 Do not dispose of the walking belt or on the Uprights (65). This does not affect treadmill performance. Assembly requires the included hex key and your own phillips screwdriver . 1. Look under the console as shown. sembly and locate the Console Wire ...
... The underside of the walking platform, wipe off the lubricant with a soft cloth and a mild, non-abrasive cleaner. Set the console assembly on the sides of the treadmill walking belt is coated with four Console Bolts (99) and four Console Star Washers (94) as - Firmly tighten the Console Bolts. ... 85 94 94 99 99 65 6 Do not dispose of the walking belt or on the Uprights (65). This does not affect treadmill performance. Assembly requires the included hex key and your own phillips screwdriver . 1. Look under the console as shown. sembly and locate the Console Wire ...

Uk Manual
Page 7
... the Frame (55). Make sure that you familiarise yourself with the hole in place as you use the treadmill. For your benefit, we recommend that all parts are on the console assembly. Hold the Latch Housing (68) and the Latch Housing Cover (5) against the Frame as shown. With ...second person, raise the treadmill Frame (55). Do not tighten the Screws yet. Note: It may be on pages 26 and 27. 7 Hold the Latch Housing in the Left Handgrip (63) by sliding the Latch Housing (68) up or down. 3. The collar should be preassembled. 4 Console Assembly 23 Tape 6. Insert...
... the Frame (55). Make sure that you familiarise yourself with the hole in place as you use the treadmill. For your benefit, we recommend that all parts are on the console assembly. Hold the Latch Housing (68) and the Latch Housing Cover (5) against the Frame as shown. With ...second person, raise the treadmill Frame (55). Do not tighten the Screws yet. Note: It may be on pages 26 and 27. 7 Hold the Latch Housing in the Left Handgrip (63) by sliding the Latch Housing (68) up or down. 3. The collar should be preassembled. 4 Console Assembly 23 Tape 6. Insert...

Uk Manual
Page 31
Key No. Knob Spring Nut Spring Spacer Spring Plate Spring Bolt Spring Spring Pad Screw Cushion Assembly Motor Isolator Plate Key No. Qty. Pin Cushion Adj. Qty. Gear Ground Screw Rear Platform Screw Cushion Rod Spring Bumper On/Off Switch Filter 1" ...parts are not illustrated 31 Description 127* 1 128 1 129 1 130 1 131 1 132 1 133 1 134 1 135 1 136 1 137 2 138 1 139 2 140 1 141 2 142 1 143 1 #4 #1 #1 #1 #1 Idler Arm Assembly Idler Arm Bolt Idler Arm Idler Spring Idler Arm Nylon Washer Pulley Nut Pulley Washer Idler Pulley Chest Pulse Sensor Sensor Strap Cushion Adj. Description...
Key No. Knob Spring Nut Spring Spacer Spring Plate Spring Bolt Spring Spring Pad Screw Cushion Assembly Motor Isolator Plate Key No. Qty. Pin Cushion Adj. Qty. Gear Ground Screw Rear Platform Screw Cushion Rod Spring Bumper On/Off Switch Filter 1" ...parts are not illustrated 31 Description 127* 1 128 1 129 1 130 1 131 1 132 1 133 1 134 1 135 1 136 1 137 2 138 1 139 2 140 1 141 2 142 1 143 1 #4 #1 #1 #1 #1 Idler Arm Assembly Idler Arm Bolt Idler Arm Idler Spring Idler Arm Nylon Washer Pulley Nut Pulley Washer Idler Pulley Chest Pulse Sensor Sensor Strap Cushion Adj. Description...


