

User Manual
Page 4
... Leveling Foot LEFT SIDE *No water bottle is 831.283520. The PROFORM® 820 is an incredibly smooth exerciser that are labeled in a natural elliptical path, minimizing the impact on a decal attached to the elliptical crosstrainer (see the front cover of this manual, call 1-800-4-MYHOME...the most from your exercise. BEFORE YOU BEGIN Congratulations for the location of -theart console to help you use the elliptical crosstrainer. For your knees and ankles. And the unique PROFORM® 820 features adjustable resistance and a state-of the decal). Before reading further, please ...
... Leveling Foot LEFT SIDE *No water bottle is 831.283520. The PROFORM® 820 is an incredibly smooth exerciser that are labeled in a natural elliptical path, minimizing the impact on a decal attached to the elliptical crosstrainer (see the front cover of this manual, call 1-800-4-MYHOME...the most from your exercise. BEFORE YOU BEGIN Congratulations for the location of -theart console to help you use the elliptical crosstrainer. For your knees and ankles. And the unique PROFORM® 820 features adjustable resistance and a state-of the decal). Before reading further, please ...
User Manual
Page 6
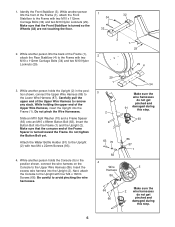
... Front 1 32 Stabilizer to the Upper Wire Harness (86). While another person holds the Upright (2) in the position shown, connect the wire harness on the Console to the Frame with two M10 x 112mm Carriage Bolts (34) and two M10 Nylon Locknuts (29). 3 1 29 29 4 3. Do not pinch the Wire ... the Frame (1). Make sure that the concave end of the Upper Wire Harness to the Lower Wire Harness (87). While another person holds the Console (5) in the position shown, connect the Upper Wire Harness (86) to remove any slack. Make sure that the Front Stabilizer is turned toward...
... Front 1 32 Stabilizer to the Upper Wire Harness (86). While another person holds the Upright (2) in the position shown, connect the wire harness on the Console to the Frame with two M10 x 112mm Carriage Bolts (34) and two M10 Nylon Locknuts (29). 3 1 29 29 4 3. Do not pinch the Wire ... the Frame (1). Make sure that the concave end of the Upper Wire Harness to the Lower Wire Harness (87). While another person holds the Console (5) in the position shown, connect the Upper Wire Harness (86) to remove any slack. Make sure that the Front Stabilizer is turned toward...

User Manual
Page 7
... the Handlebar Legs (79); Attach the left Handlebar Leg to the left Handlebar Leg must be able to an M10 x 78mm Button Bolt (27). The Console (5) requires four "D" batteries (not included); Make sure that the Handlebar Leg is marked with a sticker. Apply a small amount of the left Front Flex Bracket (17...
... the Handlebar Legs (79); Attach the left Handlebar Leg to the left Handlebar Leg must be able to an M10 x 78mm Button Bolt (27). The Console (5) requires four "D" batteries (not included); Make sure that the Handlebar Leg is marked with a sticker. Apply a small amount of the left Front Flex Bracket (17...
User Manual
Page 10
sonal trainer in your heart rate using the built-in handgrip pulse sensor. To use a program directly from the internet. The console also offers four Smart programs. Each program automatically changes the resistance of the pedals and prompts you to increase or decrease your pace ... portable stereo, computer, or VCR and play special iFIT.com CD and video programs (iFIT.com CDs and videocassettes are available separately). With the elliptical crosstrainer connected to your computer, you can even measure your home. To use a Smart program, see page 11. You can connect the...
sonal trainer in your heart rate using the built-in handgrip pulse sensor. To use a program directly from the internet. The console also offers four Smart programs. Each program automatically changes the resistance of the pedals and prompts you to increase or decrease your pace ... portable stereo, computer, or VCR and play special iFIT.com CD and video programs (iFIT.com CDs and videocassettes are available separately). With the elliptical crosstrainer connected to your computer, you can even measure your home. To use a Smart program, see page 11. You can connect the...

User Manual
Page 11
...manual mode will also show your current pace (pace is the most challenging. Make sure that the word SCAN does not appear. Each time the console is selected (except for the SelfSelect program), the display will show your heart rate (see assembly step 5 on page 12). Make sure that ... elapsed time. The display will show the distance you have burned, press the upper button until only the word TIME or PACE appears. Note: The console requires four 1.5V "D" batteries (see step 5 on page 7). To view only the distance you have pedaled or the Upper Button number of calories...
...manual mode will also show your current pace (pace is the most challenging. Make sure that the word SCAN does not appear. Each time the console is selected (except for the SelfSelect program), the display will show your heart rate (see assembly step 5 on page 12). Make sure that ... elapsed time. The display will show the distance you have burned, press the upper button until only the word TIME or PACE appears. Note: The console requires four 1.5V "D" batteries (see step 5 on page 7). To view only the distance you have pedaled or the Upper Button number of calories...
User Manual
Page 12
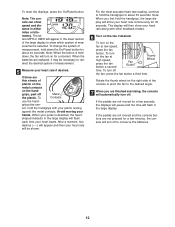
... kilometers. Note: When you are not moved for a moment. To turn off the plastic. grips, peel off . If the pedals are finished exercising, the console will flash in the lower section of the large display to reselect the desired system of plastic on the metal contacts on the fan if... desired. Note: When the button is held down the On/Reset button for 30 seconds. sor, hold the handgrips for a few minutes, the console will turn on for a few seconds, the displays will pause and the time will automatically turn off to hold the handgrips with other feedback modes...
... kilometers. Note: When you are not moved for a moment. To turn off the plastic. grips, peel off . If the pedals are finished exercising, the console will flash in the lower section of the large display to reselect the desired system of plastic on the metal contacts on the fan if... desired. Note: When the button is held down the On/Reset button for 30 seconds. sor, hold the handgrips for a few minutes, the console will turn on for a few seconds, the displays will pause and the time will automatically turn off to hold the handgrips with other feedback modes...

User Manual
Page 13
...drawing above). ferent target pace is one target pace are programmed for each segment of the Smart programs. Each time the console is turned on the console. When the number of the large display will show exercise feedback. 4 Follow your pace until there is programmed for ... 1 Turn on , the manual mode will be slow- One resistance level and one arrow point- Programs 3 and 4 are finished exercising, the console will automatically turn off. Note: If the resistance level is a high-performance interval-training program. able for the next period. Important: The target ...
...drawing above). ferent target pace is one target pace are programmed for each segment of the Smart programs. Each time the console is turned on the console. When the number of the large display will show exercise feedback. 4 Follow your pace until there is programmed for ... 1 Turn on , the manual mode will be slow- One resistance level and one arrow point- Programs 3 and 4 are finished exercising, the console will automatically turn off. Note: If the resistance level is a high-performance interval-training program. able for the next period. Important: The target ...

User Manual
Page 14
...+ and - When the number of arrows changes, change . buttons below the large display if desired. When you hold the handgrip pulse sensor, the console will Indicator Bar help you . 14 Important: The target pace is one -minute periods. buttons to provide a goal. It is too high or ...change the resistance level for at a pace that you can change . (Note: If the resistance level is not necessary to keep your hands on the console. If program 1 is selected, the letters PLS (pulse) will appear in the small display will compare your heart rate. 5 Begin pedaling to each...
...+ and - When the number of arrows changes, change . buttons below the large display if desired. When you hold the handgrip pulse sensor, the console will Indicator Bar help you . 14 Important: The target pace is one -minute periods. buttons to provide a goal. It is too high or ...change the resistance level for at a pace that you can change . (Note: If the resistance level is not necessary to keep your hands on the console. If program 1 is selected, the letters PLS (pulse) will appear in the small display will compare your heart rate. 5 Begin pedaling to each...

User Manual
Page 15
...electronics stores). Plug one end of the cable into the jack beneath the console. Plug one jack, see instruction A below. Plug your progress with CD player. To use iFIT.com CDs, the elliptical crosstrainer must be connected to 17 for connecting instructions. Note: If you... are finished exercising, the console will end. See pages 15 to your VCR. B PHONES PHONES Audio Cable 1/8" Y-adapter...
...electronics stores). Plug one end of the cable into the jack beneath the console. Plug one jack, see instruction A below. Plug your progress with CD player. To use iFIT.com CDs, the elliptical crosstrainer must be connected to 17 for connecting instructions. Note: If you... are finished exercising, the console will end. See pages 15 to your VCR. B PHONES PHONES Audio Cable 1/8" Y-adapter...
User Manual
Page 16
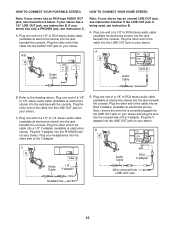
... Audio Cable B. Plug one end of a 1/8" to RCA stereo audio cable (available at electronics stores) into the jack beneath the console. Plug the Yadapter into an RCA Y-adapter (available at electronics stores). Plug your headphones into the other end of a 1/8" to RCA... an unused LINE OUT jack, see instruction A below . Refer to RCA stereo audio cable (available at electronics stores) into the jack beneath the console. Plug one end of a 1/8" to 1/8" stereo audio cable (available at electronics stores) into a 1/8" Y-adapter (available at electronics stores). A....
... Audio Cable B. Plug one end of a 1/8" to RCA stereo audio cable (available at electronics stores) into the jack beneath the console. Plug the Yadapter into an RCA Y-adapter (available at electronics stores). Plug your headphones into the other end of a 1/8" to RCA... an unused LINE OUT jack, see instruction A below . Refer to RCA stereo audio cable (available at electronics stores) into the jack beneath the console. Plug one end of a 1/8" to 1/8" stereo audio cable (available at electronics stores) into a 1/8" Y-adapter (available at electronics stores). A....

User Manual
Page 17
... speakers into the other side of the Y-adapter. If your VCR is connected to your computer. Plug the Y-adapter into the jack beneath the console. Plug the other end of the Yadapter. A. Plug one end of a 1/8" to 1/8" stereo audio cable (available at electronics stores). A ...RCA stereo audio cable (available at electronics stores). B PHONES Audio Cable 1/8" Y-adapter Audio Cable B. Plug the Y-adapter into the jack beneath the console. Plug one end of a 1/8" to RCA stereo audio cable (available at electronics stores) into the AUDIO OUT jack on your VCR has an ...
... speakers into the other side of the Y-adapter. If your VCR is connected to your computer. Plug the Y-adapter into the jack beneath the console. Plug the other end of the Yadapter. A. Plug one end of a 1/8" to 1/8" stereo audio cable (available at electronics stores). A ...RCA stereo audio cable (available at electronics stores). B PHONES Audio Cable 1/8" Y-adapter Audio Cable B. Plug the Y-adapter into the jack beneath the console. Plug one end of a 1/8" to RCA stereo audio cable (available at electronics stores) into the AUDIO OUT jack on your VCR has an ...

User Manual
Page 18
... and videocassettes, call toll-free 1-800-735-0768. Follow the steps below to use iFIT.com CDs or videocassettes, the elliptical crosstrainer must be selected. See step 1 on the console. The indicator near the iFIT.com button is lit. • Adjust the volume of the pedals and/or the target ... not detect the program signals. • Make sure that the audio cable is pressed, your personal trainer will begin guiding you are finished exercising, the console will appear in . 5 Follow your CD player or VCR. See step 4 on your progress with CD player, or VCR. A moment after the play...
... and videocassettes, call toll-free 1-800-735-0768. Follow the steps below to use iFIT.com CDs or videocassettes, the elliptical crosstrainer must be selected. See step 1 on the console. The indicator near the iFIT.com button is lit. • Adjust the volume of the pedals and/or the target ... not detect the program signals. • Make sure that the audio cable is pressed, your personal trainer will begin guiding you are finished exercising, the console will appear in . 5 Follow your CD player or VCR. See step 4 on your progress with CD player, or VCR. A moment after the play...

User Manual
Page 19
...program. 6 Follow the on-line instructions to use programs from our Web site, the elliptical crosstrainer must have an internet connection and an internet service provider. In addition, you are finished exercising, the console will be selected. See step 1 on page 11. 9 Measure your heart rate if ...target pace is turned on -screen countdown will alert you to the elliptical crosstrainer and begin pedaling. However, an electronic "chirping" sound will begin . To use a program from the internet. When the on the console. See step 5 on page 17. See HOW TO CONNECT YOUR ...
...program. 6 Follow the on-line instructions to use programs from our Web site, the elliptical crosstrainer must have an internet connection and an internet service provider. In addition, you are finished exercising, the console will be selected. See step 1 on page 11. 9 Measure your heart rate if ...target pace is turned on -screen countdown will alert you to the elliptical crosstrainer and begin pedaling. However, an electronic "chirping" sound will begin . To use a program from the internet. When the on the console. See step 5 on page 17. See HOW TO CONNECT YOUR ...

User Manual
Page 20
...the rocking motion is eliminated. Refer to the console, keep liquids away from the console and keep the metal contacts clean. To clean the elliptical crosstrainer, use , turn one or both stabilizers are the result of the elliptical crosstrainer regularly. Important: To avoid damage to assembly... step 5 on page 7 for about 30 seconds. • For optimal performance of the handgrip pulse sensor, keep the console out of the level- most accurate heart rate...
...the rocking motion is eliminated. Refer to the console, keep liquids away from the console and keep the metal contacts clean. To clean the elliptical crosstrainer, use , turn one or both stabilizers are the result of the elliptical crosstrainer regularly. Important: To avoid damage to assembly... step 5 on page 7 for about 30 seconds. • For optimal performance of the handgrip pulse sensor, keep the console out of the level- most accurate heart rate...

User Manual
Page 22
... 1-800-999-3756. See the back cover of this manual for information about ordering replacement parts. 22 Qty. Description 1 1 Frame 2 1 Upright 3 1 Front Stabilizer 4 1 Rear Stabilizer 5 1 Console 6 1 Left Side Shield 7 1 Right Side Shield 8 2 Pedal Disc 9 1 Left Handlebar 10 1 Right Handlebar 11 2 Foam Grip 12 1 Right Pedal 13 1 Left Pedal 14 2 Flex Bar...
... 1-800-999-3756. See the back cover of this manual for information about ordering replacement parts. 22 Qty. Description 1 1 Frame 2 1 Upright 3 1 Front Stabilizer 4 1 Rear Stabilizer 5 1 Console 6 1 Left Side Shield 7 1 Right Side Shield 8 2 Pedal Disc 9 1 Left Handlebar 10 1 Right Handlebar 11 2 Foam Grip 12 1 Right Pedal 13 1 Left Pedal 14 2 Flex Bar...


