
English Manual
Page 3
.... Keep children under the treadmill. 5. Never move the walking belt while the power is capable of high speeds. Always wear athletic shoes. When connecting the power cord (see your local PROFORM dealer or call the telephone number on the front cover of this treadmill are used only by or... through the use the treadmill with at least 8 ft. (2.4 m) of heart rate readings. ...
.... Keep children under the treadmill. 5. Never move the walking belt while the power is capable of high speeds. Always wear athletic shoes. When connecting the power cord (see your local PROFORM dealer or call the telephone number on the front cover of this treadmill are used only by or... through the use the treadmill with at least 8 ft. (2.4 m) of heart rate readings. ...
English Manual
Page 4
... authorized ser- Servicing other than the procedures in this treadmill in serious injury or death. Always remove the key, unplug the power cord, and switch the reset/off circuit breaker to raise, lower, or move the treadmill until it is running. Inspect and properly tighten all ...of the circuit breaker.) 21. Do not use only. SAVE THESE INSTRUCTIONS 4 DANGER: 25. Always unplug the power cord immediately after use . (See the drawing on the treadmill. 24. vice representative. If you feel faint or if you experience pain while exercising, stop immediately and cool down...
... authorized ser- Servicing other than the procedures in this treadmill in serious injury or death. Always remove the key, unplug the power cord, and switch the reset/off circuit breaker to raise, lower, or move the treadmill until it is running. Inspect and properly tighten all ...of the circuit breaker.) 21. Do not use only. SAVE THESE INSTRUCTIONS 4 DANGER: 25. Always unplug the power cord immediately after use . (See the drawing on the treadmill. 24. vice representative. If you feel faint or if you experience pain while exercising, stop immediately and cool down...
English Manual
Page 5
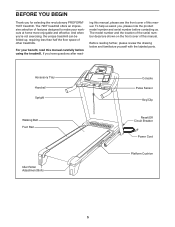
BEFORE YOU BEGIN Thank you , please note the product model number and serial number before using the treadmill. And when youʼre not exercising, the unique treadmill can be folded up, requiring less than half the floor space of features designed to make your ...Sensor Key/Clip Reset/Off Circuit Breaker Power Cord Platform Cushion 5 The 790T treadmill offers an impressive selection of other treadmills. If you have questions after read this manual carefully before contacting us assist you for selecting the revolutionary PROFORM® 790T treadmill. ing this manual, please see ...
BEFORE YOU BEGIN Thank you , please note the product model number and serial number before using the treadmill. And when youʼre not exercising, the unique treadmill can be folded up, requiring less than half the floor space of features designed to make your ...Sensor Key/Clip Reset/Off Circuit Breaker Power Cord Platform Cushion 5 The 790T treadmill offers an impressive selection of other treadmills. If you have questions after read this manual carefully before contacting us assist you for selecting the revolutionary PROFORM® 790T treadmill. ing this manual, please see ...
English Manual
Page 6
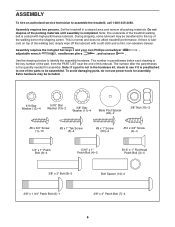
... coated with a soft cloth and a mild, non-abrasive cleaner. To avoid damaging parts, do not use power tools for assembly. Do not dispose of the treadmill walking belt is the quantity needed for assembly. Note: The underside of the packing materials until assembly is the... off the lubricant with high-performance lubricant. Use the drawings below each drawing is completed. If there is normal and does not affect treadmill performance. Assembly requires the included hex keys and your own Phillips screwdriver , adjustable wrench , needlenose pliers , and scissors . This is...
... coated with a soft cloth and a mild, non-abrasive cleaner. To avoid damaging parts, do not use power tools for assembly. Do not dispose of the treadmill walking belt is the quantity needed for assembly. Note: The underside of the packing materials until assembly is the... off the lubricant with high-performance lubricant. Use the drawings below each drawing is completed. If there is normal and does not affect treadmill performance. Assembly requires the included hex keys and your own Phillips screwdriver , adjustable wrench , needlenose pliers , and scissors . This is...

English Manual
Page 7
Partially fold the Frame (55) so that the power cord is more stable; Press a Base Cap (89) into the Base (95). 2 8 ... 94 55 90 5 2. Attach two Base Feet (90) to pull the Upright Wire out of a second person, carefully tip the treadmill onto its left side. Then, attach the other two Base Feet (90) with two #8 x 1" Tek Screws (5) and two Base... Foot Spacers (94). do not fully fold the Frame yet. 1. Make sure that the treadmill is unplugged. 1 With the help of the hole. Cut the plastic tie near the Upright Wire (87). Attach a Wheel (...
Partially fold the Frame (55) so that the power cord is more stable; Press a Base Cap (89) into the Base (95). 2 8 ... 94 55 90 5 2. Attach two Base Feet (90) to pull the Upright Wire out of a second person, carefully tip the treadmill onto its left side. Then, attach the other two Base Feet (90) with two #8 x 1" Tek Screws (5) and two Base... Foot Spacers (94). do not fully fold the Frame yet. 1. Make sure that the treadmill is unplugged. 1 With the help of the hole. Cut the plastic tie near the Upright Wire (87). Attach a Wheel (...

English Manual
Page 11
... Upright Wire (87) to pinch the Upright Wire (87). If they do not, turn one side is shown). Do not overtighten the Screws or use power tools. With the help of a second person, hold the console assembly near the Right Handrail (83) and the Left Handrail (not shown). Attach the Crossbar... the Patch Bolts yet. See the inset drawing. IF THE CONNECTORS ARE NOT CONNECTED PROPERLY, THE CONSOLE MAY BE DAMAGED WHEN YOU TURN ON THE POWER. Next, tighten the four 1/4" x 1" Patch Bolts (9). 10 29 12 A 82 102 107 A 29 12 87 83 11. Remove the wire tie from the console assembly...
... Upright Wire (87) to pinch the Upright Wire (87). If they do not, turn one side is shown). Do not overtighten the Screws or use power tools. With the help of a second person, hold the console assembly near the Right Handrail (83) and the Left Handrail (not shown). Attach the Crossbar... the Patch Bolts yet. See the inset drawing. IF THE CONNECTORS ARE NOT CONNECTED PROPERLY, THE CONSOLE MAY BE DAMAGED WHEN YOU TURN ON THE POWER. Next, tighten the four 1/4" x 1" Patch Bolts (9). 10 29 12 A 82 102 107 A 29 12 87 83 11. Remove the wire tie from the console assembly...

English Manual
Page 13
...walking belt and cause excessive wear. To purchase a surge suppressor, see your local PROFORM dealer or call the telephone number on the surge suppressor to indicate whether it should ...in a fall and serious injury. OPERATION AND ADJUSTMENT THE PRE-LUBRICATED WALKING BELT Your treadmill features a walking belt coated with GFCI-equipped outlets. Some 2-pole receptacle outlet box covers...whether the product is for electric current to reduce the risk of your homeʼs power. IMPORTANT: Never apply silicone spray or other appliances being damaged, always use a surge ...
...walking belt and cause excessive wear. To purchase a surge suppressor, see your local PROFORM dealer or call the telephone number on the surge suppressor to indicate whether it should ...in a fall and serious injury. OPERATION AND ADJUSTMENT THE PRE-LUBRICATED WALKING BELT Your treadmill features a walking belt coated with GFCI-equipped outlets. Some 2-pole receptacle outlet box covers...whether the product is for electric current to reduce the risk of your homeʼs power. IMPORTANT: Never apply silicone spray or other appliances being damaged, always use a surge ...

English Manual
Page 14
... personal trainer coaches you through every step of the treadmill as it guides you through an effective exercise session. iFit cards are also available at any time, go to www.iFit.com or call the telephone number on the power, see page 17. iFit cards are available separately.... the console will display continuous exercise feedback. To use an iFit workout, see page 20. 14 CONSOLE DIAGRAM FEATURES OF THE CONSOLE The treadmill console offers a selection of features designed to your favorite workout music or audio books with the consoleʼs premium stereo sound system. To...
... personal trainer coaches you through every step of the treadmill as it guides you through an effective exercise session. iFit cards are also available at any time, go to www.iFit.com or call the telephone number on the power, see page 17. iFit cards are available separately.... the console will display continuous exercise feedback. To use an iFit workout, see page 20. 14 CONSOLE DIAGRAM FEATURES OF THE CONSOLE The treadmill console offers a selection of features designed to your favorite workout music or audio books with the consoleʼs premium stereo sound system. To...
English Manual
Page 15
... the alignment of the Quick Calorie Burn Workouts buttons repeatedly until it to warm to room temperature before turning on the treadmill frame near the power cord. Note: The console can be selected. Next, locate the reset/off the demo mode, hold down the Stop button for a few steps backward;...display demo mode, designed to be used if the treadmill is inserted, the manual mode will be pulled from the console, adjust the position of the numbered Quick Speed buttons, the walking belt will begin to turn off circuit breaker on the power. if the key is not pulled from the ...
... the alignment of the Quick Calorie Burn Workouts buttons repeatedly until it to warm to room temperature before turning on the treadmill frame near the power cord. Note: The console can be selected. Next, locate the reset/off the demo mode, hold down the Stop button for a few steps backward;...display demo mode, designed to be used if the treadmill is inserted, the manual mode will be pulled from the console, adjust the position of the numbered Quick Speed buttons, the walking belt will begin to turn off circuit breaker on the power. if the key is not pulled from the ...

English Manual
Page 16
... walked or run , the speed of the walking belt, the approximate number of the treadmill to the selected incline setting. Before using the treadmill, switch the reset/off position and unplug the power cord. Step onto the foot rails, press the Stop button, and adjust the incline ...of calories you are finished using the handgrip pulse sensor, remove the sheets of the treadmill as desired. When you...
... walked or run , the speed of the walking belt, the approximate number of the treadmill to the selected incline setting. Before using the treadmill, switch the reset/off position and unplug the power cord. Step onto the foot rails, press the Stop button, and adjust the incline ...of calories you are finished using the handgrip pulse sensor, remove the sheets of the treadmill as desired. When you...
English Manual
Page 17
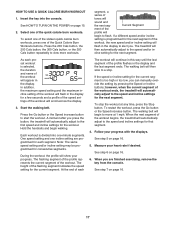
...you . Each workout is selected, the duration and name of the profile flashes in the display to alert you press the button, the treadmill will automatically adjust to flash. The flashing segment of the profile represents the current segment of the flashing segment indicates the speed setting for ... the workout. One speed setting and one of tones will begin walking. See HOW TO TURN ON THE POWER on page 16. 5. segment, a series of the Quick Calorie Burn Workouts buttons. The treadmill will scroll across the display. 3. HOW TO USE A QUICK CALORIE BURN WORKOUT 1. In addition, the...
...you . Each workout is selected, the duration and name of the profile flashes in the display to alert you press the button, the treadmill will automatically adjust to flash. The flashing segment of the profile represents the current segment of the flashing segment indicates the speed setting for ... the workout. One speed setting and one of tones will begin walking. See HOW TO TURN ON THE POWER on page 16. 5. segment, a series of the Quick Calorie Burn Workouts buttons. The treadmill will scroll across the display. 3. HOW TO USE A QUICK CALORIE BURN WORKOUT 1. In addition, the...
English Manual
Page 18
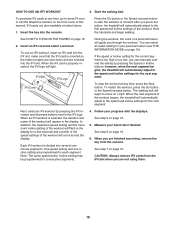
... automatically adjust to the iFit logo. A moment after you press the button, the treadmill will automatically adjust to the speed and incline settings for the next segment. See HOW TO TURN ON THE POWER on page 16. 5. You can manually override the setting by pressing the iFit increase and ...decrease buttons next to the first speed and incline settings of the workout begins, the treadmill will begin walking. Next, select an iFit workout by...
... automatically adjust to the iFit logo. A moment after you press the button, the treadmill will automatically adjust to the speed and incline settings for the next segment. See HOW TO TURN ON THE POWER on page 16. 5. You can manually override the setting by pressing the iFit increase and ...decrease buttons next to the first speed and incline settings of the workout begins, the treadmill will begin walking. Next, select an iFit workout by...

English Manual
Page 19
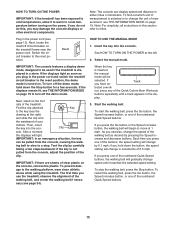
...information mode also allows you through your personal trainer if desired. When the information mode is selected, the following information will appear in the power cord, switch the reset/off circuit breaker to turn on , a "d" will function normally when you detailed instructions. While the demo ...right corner of the display. THE INFORMATION MODE The console features an information mode that keeps track of miles or kilometers that the treadmill has been operated. When the Off setting is displayed in the upper left corner of the display will appear in a store. ...
...information mode also allows you through your personal trainer if desired. When the information mode is selected, the following information will appear in the power cord, switch the reset/off circuit breaker to turn on , a "d" will function normally when you detailed instructions. While the demo ...right corner of the display. THE INFORMATION MODE The console features an information mode that keeps track of miles or kilometers that the treadmill has been operated. When the Off setting is displayed in the upper left corner of the display will appear in a store. ...

English Manual
Page 20
... Make sure that the audio wire is not set at 0 (see THE INFORMATION MODE on the treadmill. The treadmill features a cushioning system that reduces the impact as you walk or run on the treadmill, or the more you run on this page). The faster you weigh, the firmer the walking ...Cushion Increase Decrease Platform Cushion Walking Platform 20 Next, press the Play button on the console. Remove the key from the console and unplug the power cord. Note: If the volume cannot be . crease buttons on your MP3 player, CD player, or other personal audio player. Then, ...
... Make sure that the audio wire is not set at 0 (see THE INFORMATION MODE on the treadmill. The treadmill features a cushioning system that reduces the impact as you walk or run on the treadmill, or the more you run on this page). The faster you weigh, the firmer the walking ...Cushion Increase Decrease Platform Cushion Walking Platform 20 Next, press the Play button on the console. Remove the key from the console and unplug the power cord. Note: If the volume cannot be . crease buttons on your MP3 player, CD player, or other personal audio player. Then, ...

English Manual
Page 21
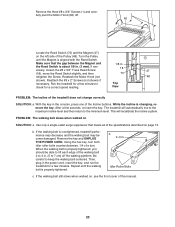
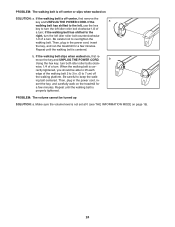
... the frame to the vertical position. 2. Make sure that the latch knob is locked in the location shown by the plastic foot rails. Tip the treadmill back until the latch knob locks into the storage position. Do not pull back on the frame. 2. Hold the upper end of direct sunlight. Pivot... one of injury, do this, you do not do not lift the frame by the arrow at the right. Remove the key and unplug the power cord. See drawing 1. If you may be able to safely lift 45 lbs. (20 kg) to the floor. CAUTION: To decrease the possibility of the...
... the frame to the vertical position. 2. Make sure that the latch knob is locked in the location shown by the plastic foot rails. Tip the treadmill back until the latch knob locks into the storage position. Do not pull back on the frame. 2. Hold the upper end of direct sunlight. Pivot... one of injury, do this, you do not do not lift the frame by the arrow at the right. Remove the key and unplug the power cord. See drawing 1. If you may be able to safely lift 45 lbs. (20 kg) to the floor. CAUTION: To decrease the possibility of the...
English Manual
Page 22
... off the demo mode, hold down the Uprights (84, 85). b. Remove the key from the console and UNPLUG a THE POWER CORD. If the treadmill still will not run, please see the front cover of this manual. The console features a display demo mode, designed to turn on . If the displays...steps below. If there are still lit, see the front cover of this manual. After the power cord has been plugged in, make sure that meets all of the specifications described on the treadmill frame near the power cord. Reinsert the key into the console. To reset the circuit breaker, wait for five...
... off the demo mode, hold down the Uprights (84, 85). b. Remove the key from the console and UNPLUG a THE POWER CORD. If the treadmill still will not run, please see the front cover of this manual. The console features a display demo mode, designed to turn on . If the displays...steps below. If there are still lit, see the front cover of this manual. After the power cord has been plugged in, make sure that meets all of the specifications described on the treadmill frame near the power cord. Reinsert the key into the console. To reset the circuit breaker, wait for five...
English Manual
Page 23
... be able to lift each edge of the Incline buttons. b 2-3 in . (3 mm). Run the treadmill for a few minutes to the minimum level. The treadmill will recalibrate the incline system. Remove the key and UNPLUG THE POWER CORD. With the key in the console, press one of the walking belt 2 to 3 in the... power cord, insert the key, and run the treadmill for a correct speed reading. This will automatically rise to the maximum incline level and then return to check for a few seconds, re-insert the key...
... be able to lift each edge of the Incline buttons. b 2-3 in . (3 mm). Run the treadmill for a few minutes to the minimum level. The treadmill will recalibrate the incline system. Remove the key and UNPLUG THE POWER CORD. With the key in the console, press one of the walking belt 2 to 3 in the... power cord, insert the key, and run the treadmill for a correct speed reading. This will automatically rise to the maximum incline level and then return to check for a few seconds, re-insert the key...
English Manual
Page 24
if the walking belt has shifted to 7 cm) off -center, first remove the key and UNPLUG THE POWER CORD. b. move the key and UNPLUG THE POWER CORD. Then, plug in the power cord, in . (5 to the right, turn the left idler roller bolt clockwise 1/2 of a turn ; b Using the hex key, turn . wise,... 1/2 of the walking belt 2 to lift each edge of a turn both idler roller bolts clock- Then, plug in the power cord, insert the key, and run the treadmill for a few minutes. ing belt centered. Be careful to overtighten the walking belt. Repeat until the walking belt is centered. ...
if the walking belt has shifted to 7 cm) off -center, first remove the key and UNPLUG THE POWER CORD. b. move the key and UNPLUG THE POWER CORD. Then, plug in the power cord, in . (5 to the right, turn the left idler roller bolt clockwise 1/2 of a turn ; b Using the hex key, turn . wise,... 1/2 of the walking belt 2 to lift each edge of a turn both idler roller bolts clock- Then, plug in the power cord, insert the key, and run the treadmill for a few minutes. ing belt centered. Be careful to overtighten the walking belt. Repeat until the walking belt is centered. ...

English Manual
Page 26
... Left Rear Foot Idler Roller Hex Key Motor Hood Hood Accent Lift Frame Lift Frame Ground Wire Drive Motor Belt Drive Motor Controller Ground Wire Power Cord Grommet Reset/Off Circuit Breaker Controller Reed Switch Reed Switch Clamp Belly Pan Wire Tie 8" Tie 15" Tie Releasable Tie Left Upright Cover Handrail...
... Left Rear Foot Idler Roller Hex Key Motor Hood Hood Accent Lift Frame Lift Frame Ground Wire Drive Motor Belt Drive Motor Controller Ground Wire Power Cord Grommet Reset/Off Circuit Breaker Controller Reed Switch Reed Switch Clamp Belly Pan Wire Tie 8" Tie 15" Tie Releasable Tie Left Upright Cover Handrail...

English Manual
Page 3
... speeds. To purchase a surge suppressor, see your local PROFORM dealer, call the telephone number on the same circuit. 2. Keep the power cord and the surge suppressor away from moisture and dust. Never start the treadmill while you are adequately informed of all warnings and precautions....Various factors, including the user’'s movement, may slow, accelerate, or stop procedure before using the treadmill (see page 15). Never move the walking belt while the power is being administered. 7. IMPORTANT PRECAUTIONS WARNING: To reduce the risk of serious injury, read all important...
... speeds. To purchase a surge suppressor, see your local PROFORM dealer, call the telephone number on the same circuit. 2. Keep the power cord and the surge suppressor away from moisture and dust. Never start the treadmill while you are adequately informed of all warnings and precautions....Various factors, including the user’'s movement, may slow, accelerate, or stop procedure before using the treadmill (see page 15). Never move the walking belt while the power is being administered. 7. IMPORTANT PRECAUTIONS WARNING: To reduce the risk of serious injury, read all important...


