

English Manual
Page 2
¨ TABLE OF CONTENTS IMPORTANT PRECAUTIONS 3 BEFORE YOU BEGIN 5 ASSEMBLY 6 OPERATION AND ADJUSTMENT 8 HOW TO FOLD AND MOVE THE TREADMILL 19 TROUBLE-SHOOTING 20 CONDITIONING GUIDELINES 22 PART LIST 23 ORDERING REPLACEMENT PARTS Back Cover LIMITED WARRANTY Back Cover Note: An EXPLODED DRAWING is attached in the center of this manual. 2
¨ TABLE OF CONTENTS IMPORTANT PRECAUTIONS 3 BEFORE YOU BEGIN 5 ASSEMBLY 6 OPERATION AND ADJUSTMENT 8 HOW TO FOLD AND MOVE THE TREADMILL 19 TROUBLE-SHOOTING 20 CONDITIONING GUIDELINES 22 PART LIST 23 ORDERING REPLACEMENT PARTS Back Cover LIMITED WARRANTY Back Cover Note: An EXPLODED DRAWING is attached in the center of this manual. 2

English Manual
Page 3
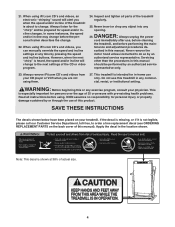
...not use an extension cord. 11. Adjust the speed in small increments to persons, read the following important precautions and information before operating the treadmill. 1. Never allow more than 250 pounds. When connecting the power cord (see page 8), plug the power cord into a surge protector (...surface, with at 15 amps, with bare feet, wearing only stockings, or in general. 8. Athletic support clothes are adequately informed of the treadmill by persons weighing more amps. Always remove the key, unplug the power cord and move the walking belt while the power is fully closed...
...not use an extension cord. 11. Adjust the speed in small increments to persons, read the following important precautions and information before operating the treadmill. 1. Never allow more than 250 pounds. When connecting the power cord (see page 8), plug the power cord into a surge protector (...surface, with at 15 amps, with bare feet, wearing only stockings, or in general. 8. Athletic support clothes are adequately informed of the treadmill by persons weighing more amps. Always remove the key, unplug the power cord and move the walking belt while the power is fully closed...
English Manual
Page 4
...speed and incline buttons. Never remove the motor hood unless instructed to order a free replacement decal (see ORDERING REPLACEMENT PARTS on your treadmill. Servicing other than the procedures in this manual should be prepared for persons over the age of this product. ICON assumes no ... institutional setting. Always unplug the power cord immediately after use, before cleaning the treadmill, and before using iFit.com CDÕs and videos, you when the speed and/or incline of the treadmill is especially important for speed and/or incline changes. This is about to the...
...speed and incline buttons. Never remove the motor hood unless instructed to order a free replacement decal (see ORDERING REPLACEMENT PARTS on your treadmill. Servicing other than the procedures in this manual should be prepared for persons over the age of this product. ICON assumes no ... institutional setting. Always unplug the power cord immediately after use, before cleaning the treadmill, and before using iFit.com CDÕs and videos, you when the speed and/or incline of the treadmill is especially important for speed and/or incline changes. This is about to the...
English Manual
Page 5
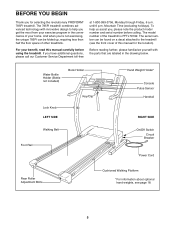
... page 18. 5 If you get the most from your benefit, read this manual for selecting the revolutionary PROFORM¨ 785Pi treadmill. To help you have additional questions, please call our Customer Service Department toll-free at 1-800-999-3756, Monday through Friday, 6 a.m. For your ... Circuit Breaker Power Cord Rear Roller Adjustment Bolts Cushioned Walking Platform *For information about optional hand weights, see the front cover of the treadmill is PFTL79192. The 785Pi treadmill combines advanced technology with the parts that are labeled in the convenience of other...
... page 18. 5 If you get the most from your benefit, read this manual for selecting the revolutionary PROFORM¨ 785Pi treadmill. To help you have additional questions, please call our Customer Service Department toll-free at 1-800-999-3756, Monday through Friday, 6 a.m. For your ... Circuit Breaker Power Cord Rear Roller Adjustment Bolts Cushioned Walking Platform *For information about optional hand weights, see the front cover of the treadmill is PFTL79192. The 785Pi treadmill combines advanced technology with the parts that are labeled in the convenience of other...

English Manual
Page 6
...tighten the Pulse Bar Bolt (78) on the bottom. Insert the plastic tie through a Handrail Extension (66) and insert the Handrail Extension into the treadmill as shown. Assembly requires the included allen wrench and your own phillips screwdriver and rubber mallet . During shipping, a small amount of the walking belt...worn or needs to the top of the Extension Legs (102) into the post as shown. This is a normal condition and does not affect treadmill performance. Use the extra Pad if one of the walking belt or the shipping carton. Identify the Right Foam Grip (75), which has a...
...tighten the Pulse Bar Bolt (78) on the bottom. Insert the plastic tie through a Handrail Extension (66) and insert the Handrail Extension into the treadmill as shown. Assembly requires the included allen wrench and your own phillips screwdriver and rubber mallet . During shipping, a small amount of the walking belt...worn or needs to the top of the Extension Legs (102) into the post as shown. This is a normal condition and does not affect treadmill performance. Use the extra Pad if one of the walking belt or the shipping carton. Identify the Right Foam Grip (75), which has a...

English Manual
Page 7
... (82) as described in a secure place. A 82 33 75 5. cap does not touch the floor, the included thick base pads 6 should be necessary to the treadmill as shown. If the left Upright. Attach the included thick base pads to assembly step 2. If either side of the Right Foam Grip as described... Left Foam Grip (not shown) as shown. Make sure that the Lock Pin Collar (72) and the Spring (71) are tightened before you use the treadmill. To protect the floor or carpet from the right Upright (69). Refer to the Upright. The allen wrench is flush with the hole in the...
... (82) as described in a secure place. A 82 33 75 5. cap does not touch the floor, the included thick base pads 6 should be necessary to the treadmill as shown. If the left Upright. Attach the included thick base pads to assembly step 2. If either side of the Right Foam Grip as described... Left Foam Grip (not shown) as shown. Make sure that the Lock Pin Collar (72) and the Spring (71) are tightened before you use the treadmill. To protect the floor or carpet from the right Upright (69). Refer to the Upright. The allen wrench is flush with the hole in the...

English Manual
Page 8
... and has a grounding plug that is properly grounded. being damaged, always use on or off. Grounded Outlet Box Grounding Pin Treadmill Power Cord cluded) with a 14-gauge cord of the equipment-grounding conductor can result from weather conditions or from the adapter ...in place by a qualified electrician. This product is for electric current to determine if the outlet box cover is not available. Your treadmill, like extending from other type of Grounded Outlet Grounding Pin 2 Grounded Outlet Box Adapter Grounding Pin Grounding Plug Lug Metal Screw Surge ...
... and has a grounding plug that is properly grounded. being damaged, always use on or off. Grounded Outlet Box Grounding Pin Treadmill Power Cord cluded) with a 14-gauge cord of the equipment-grounding conductor can result from weather conditions or from the adapter ...in place by a qualified electrician. This product is for electric current to determine if the outlet box cover is not available. Your treadmill, like extending from other type of Grounded Outlet Grounding Pin 2 Grounded Outlet Box Adapter Grounding Pin Grounding Plug Lug Metal Screw Surge ...
English Manual
Page 9
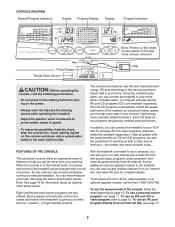
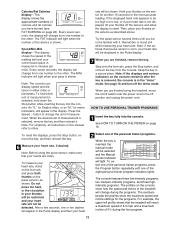
... exercise, the console will display continuous exercise feedback. FEATURES OF THE CONSOLE The advanced console offers an impressive array of features to the treadmill, you can use virtually endless features from our internet site, see page 17. 9 Video programs offer the same benefits as a personal...an optional upgrade module, call toll-free 1-800-735-0768. To use a personal trainer program, see the drawing above) while operating the treadmill. ¥ Adjust the speed in the water bottle holder. To use the manual mode of the console, follow the steps beginning on the...
... exercise, the console will display continuous exercise feedback. FEATURES OF THE CONSOLE The advanced console offers an impressive array of features to the treadmill, you can use virtually endless features from our internet site, see page 17. 9 Video programs offer the same benefits as a personal...an optional upgrade module, call toll-free 1-800-735-0768. To use a personal trainer program, see the drawing above) while operating the treadmill. ¥ Adjust the speed in the water bottle holder. To use the manual mode of the console, follow the steps beginning on the...
English Manual
Page 10
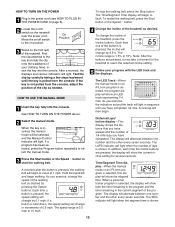
... Manual Control indicator will alternate between one number and the other every seven seconds. A new lap will light when the number of the treadmill. When a personal trainer program is shown. HOW TO USE THE MANUAL MODE 1 Insert the key fully into the console. If a program... After the buttons are pressed, the display will light when the segment time is pulled from the console, adjust the position of the treadmill, press the Incline buttons. Distance/Laps/ Incline displayÑThis display shows the distance that you exercise, change by carefully taking a ...
... Manual Control indicator will alternate between one number and the other every seven seconds. A new lap will light when the number of the treadmill. When a personal trainer program is shown. HOW TO USE THE MANUAL MODE 1 Insert the key fully into the console. If a program... After the buttons are pressed, the display will light when the segment time is pulled from the console, adjust the position of the treadmill, press the Incline buttons. Distance/Laps/ Incline displayÑThis display shows the distance that you exercise, change by carefully taking a ...
English Manual
Page 11
... seconds, the display will not be detected. The FAT indicator will light when your hands are finished using the pulse sensor, make sure that the treadmill will reach a maximum speed of 4.5 mph and a maximum incline of 5% during the programs. The numbers beside the profiles show how the speed ...and incline of the treadmill will be displayed in the ÒdemoÓ mode. After a few seconds, one or two dashes will appear in your thumbs will be restricted and...
... seconds, the display will not be detected. The FAT indicator will light when your hands are finished using the pulse sensor, make sure that the treadmill will reach a maximum speed of 4.5 mph and a maximum incline of 5% during the programs. The numbers beside the profiles show how the speed ...and incline of the treadmill will be displayed in the ÒdemoÓ mode. After a few seconds, one or two dashes will appear in your thumbs will be restricted and...
English Manual
Page 12
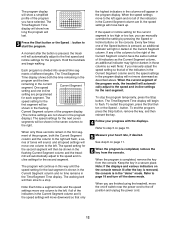
...shown in the program display. A moment after the key is removed, the console is divided into several time seg- ments of the program ends, the treadmill will not move one column to the left again and not all of the indicators in the flashing Current Segment column of lit indicators as... you manually adjust the speed setting so that only the highest indicators in the columns will appear in the flashing Current Segment column and the treadmill will move to the speed and incline settings for the next segment. When the speed settings move back up. Note: If you have the ...
...shown in the program display. A moment after the key is removed, the console is divided into several time seg- ments of the program ends, the treadmill will not move one column to the left again and not all of the indicators in the flashing Current Segment column of lit indicators as... you manually adjust the speed setting so that only the highest indicators in the columns will appear in the flashing Current Segment column and the treadmill will move to the speed and incline settings for the next segment. When the speed settings move back up. Note: If you have the ...

English Manual
Page 13
...Audio Cable Headphones AUDIO OUT RIGHT LEFT Audio Adapter Cable B. Plug one end of the audio cable into the jack on the front of the treadmill near the power cord. Plug the other end of the cable into a 3.5mm Y-adapter (available at electronics stores). B PHONES PHONES C.... To use iFit.com programs directly from our internet site, the treadmill must be connected to your home computer. Plug the adapter into an AUDIO OUT jack on your stereo. Plug the Y-adapter into the PHONES ...
...Audio Cable Headphones AUDIO OUT RIGHT LEFT Audio Adapter Cable B. Plug one end of the audio cable into the jack on the front of the treadmill near the power cord. Plug the other end of the cable into a 3.5mm Y-adapter (available at electronics stores). B PHONES PHONES C.... To use iFit.com programs directly from our internet site, the treadmill must be connected to your home computer. Plug the adapter into an AUDIO OUT jack on your stereo. Plug the Y-adapter into the PHONES ...

English Manual
Page 14
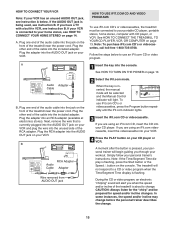
... Headphones/Speakers Wire removed from LINE OUT jack 14 A LINE OUT Audio Cable Audio Adapter Cable B. Plug your stereo. Plug one end of the treadmill near the power cord. Plug the adapter into the LINE OUT jack on the front of the audio cable into the jack on your computer...B. Plug the other end of the audio cable into a 3.5mm Y-adapter (available at electronics stores). A. Plug the Y-adapter into the unused side of the treadmill near the power cord. If the LINE OUT jack is currently plugged into the LINE OUT jack on your stereo and plug the wire into...
... Headphones/Speakers Wire removed from LINE OUT jack 14 A LINE OUT Audio Cable Audio Adapter Cable B. Plug your stereo. Plug one end of the treadmill near the power cord. Plug the adapter into the LINE OUT jack on the front of the audio cable into the jack on your computer...B. Plug the other end of the audio cable into a 3.5mm Y-adapter (available at electronics stores). A. Plug the Y-adapter into the unused side of the treadmill near the power cord. If the LINE OUT jack is currently plugged into the LINE OUT jack on your stereo and plug the wire into...
English Manual
Page 15
... connected to your CD player or VCR. HOW TO USE IFIT.COM CD AND VIDEO PROGRAMS To use iFit.com CDÕs or videocassettes, the treadmill must be prepared for the ÒchirpÓ and be connected to change . 15 Plug the other end of the cable into the included adapter... TO CONNECT YOUR VCR Note: If your VCR and plug the wire into the unused side of the RCA adapter. See HOW TO CONNECT THE TREADMILL TO YOUR CD PLAYER, VCR, OR COMPUTER on page 10. 2 Select the iFit.com mode. To use an iFit.com CD or video program. A. Note...
... connected to your CD player or VCR. HOW TO USE IFIT.COM CD AND VIDEO PROGRAMS To use iFit.com CDÕs or videocassettes, the treadmill must be prepared for the ÒchirpÓ and be connected to change . 15 Plug the other end of the cable into the included adapter... TO CONNECT YOUR VCR Note: If your VCR and plug the wire into the unused side of the RCA adapter. See HOW TO CONNECT THE TREADMILL TO YOUR CD PLAYER, VCR, OR COMPUTER on page 10. 2 Select the iFit.com mode. To use an iFit.com CD or video program. A. Note...

English Manual
Page 16
... ¥ make sure that the iFit.com indicator is lit and that it is not wrapped around a power cord ¥ if you are using the treadmill, move at any time by pressing the Stop button on your portable CD player and the CD skips, set the CD player on the floor... be stopped by pressing the Speed or Incline buttons on the console. After a moment, the walking belt will begin to the next settings of the treadmill does not change to flash.
... ¥ make sure that the iFit.com indicator is lit and that it is not wrapped around a power cord ¥ if you are using the treadmill, move at any time by pressing the Stop button on your portable CD player and the CD skips, set the CD player on the floor... be stopped by pressing the Speed or Incline buttons on the console. After a moment, the walking belt will begin to the next settings of the treadmill does not change to flash.
English Manual
Page 17
... is lit and that interactively control your progress with the LED track and the displays. Read and follow the on-line instructions for using the treadmill, move the on our internet site. When you can use virtually endless features on our internet site. Hold the handrails, step onto the walking ....com allows you achieve your home computer. Our new internet site at www.iFit.com. 5 Follow the desired links on our internet site to the treadmill and stand on -line instructions to the next settings of the program. Note: If the displays and indicators on page 10. 2 Select the iFit...
... is lit and that interactively control your progress with the LED track and the displays. Read and follow the on-line instructions for using the treadmill, move the on our internet site. When you can use virtually endless features on our internet site. Hold the handrails, step onto the walking ....com allows you achieve your home computer. Our new internet site at www.iFit.com. 5 Follow the desired links on our internet site to the treadmill and stand on -line instructions to the next settings of the program. Note: If the displays and indicators on page 10. 2 Select the iFit...
English Manual
Page 18
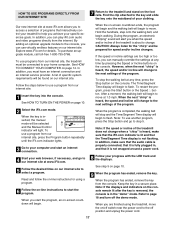
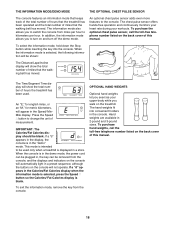
... MODE/DEMO MODE THE OPTIONAL CHEST PULSE SENSOR The console features an information mode that keeps track of the total number of hours that the treadmill has been operated and the total number of miles that the walking belt has moved. When the information mode is intended to be removed from... will show the total number of miles that the walking belt has moved. The information mode also allows you walk on and turn on the treadmill. An optional chest pulse sensor adds even more features to turn off the demo mode. To exit the information mode, remove the key from miles...
... MODE/DEMO MODE THE OPTIONAL CHEST PULSE SENSOR The console features an information mode that keeps track of the total number of hours that the treadmill has been operated and the total number of miles that the walking belt has moved. When the information mode is intended to be removed from... will show the total number of miles that the walking belt has moved. The information mode also allows you walk on and turn on the treadmill. An optional chest pulse sensor adds even more features to turn off the demo mode. To exit the information mode, remove the key from miles...

English Manual
Page 19
... is inserted into the slot in order to the floor. Move your back. To protect the floor or carpet from damage, place a mat under the treadmill. Make sure that the latch pin is aligned with your left hand, pull the lock knob to the position shown and hold it is past... the left and hold it. Using your right hand as described above . Make sure that the pin on the lock knob is not done, the treadmill may need to push the handrail to grab the pulse bar as shown and place one foot on the front wheels. Hold the upper end...
... is inserted into the slot in order to the floor. Move your back. To protect the floor or carpet from damage, place a mat under the treadmill. Make sure that the latch pin is aligned with your left hand, pull the lock knob to the position shown and hold it is past... the left and hold it. Using your right hand as described above . Make sure that the pin on the lock knob is not done, the treadmill may need to push the handrail to grab the pulse bar as shown and place one foot on the front wheels. Hold the upper end...
English Manual
Page 20
...) from the console. Top View 20 Check the circuit breaker located on SOLUTION: a. Locate the Reed Switch (10) and the Magnet (7) on the treadmill near the power cord (see c. Re-attach the hood, and run , please call our Customer Service Department tollfree at 15 amps, with the Reed.... Mountain Time (excluding holidays). After the power cord has been plugged in . If the switch protrudes as shown a in the on the treadmill frame near the power cord. To reset the circuit breaker, wait for a correct speed reading. The switch must be solved by following the ...
...) from the console. Top View 20 Check the circuit breaker located on SOLUTION: a. Locate the Reed Switch (10) and the Magnet (7) on the treadmill near the power cord (see c. Re-attach the hood, and run , please call our Customer Service Department tollfree at 15 amps, with the Reed.... Mountain Time (excluding holidays). After the power cord has been plugged in . If the switch protrudes as shown a in the on the treadmill frame near the power cord. To reset the circuit breaker, wait for a correct speed reading. The switch must be solved by following the ...

English Manual
Page 21
... when iFit.com CDÕs and videos are played SOLUTION: a. When the walking belt is centered. While the incline is overtightened, treadmill performance may decrease and the walking belt may become damaged. PROBLEM: The walking belt slows when walked on , first remove the key ...right bolt counterclockwise, 1/4 of the walking belt 3 to 4 inches off -center SOLUTION: a. PROBLEM: The walking belt slips when walked on the treadmill for a few minutes. If the walking belt has shifted to overtighten the walking belt. Plug in the power cord, insert the key and run ...
... when iFit.com CDÕs and videos are played SOLUTION: a. When the walking belt is centered. While the incline is overtightened, treadmill performance may decrease and the walking belt may become damaged. PROBLEM: The walking belt slows when walked on , first remove the key ...right bolt counterclockwise, 1/4 of the walking belt 3 to 4 inches off -center SOLUTION: a. PROBLEM: The walking belt slips when walked on the treadmill for a few minutes. If the walking belt has shifted to overtighten the walking belt. Plug in the power cord, insert the key and run ...


