
English Manual
Page 1
www.proform.com Model No. Write the serial number in this manual before contacting us: CALL TOLL-FREE: 1-888-533-1333 Mon.-Fri. 6 a.m.-6 p.m. MT Sat. 8 a.m.-4 p.m. please contact ...
www.proform.com Model No. Write the serial number in this manual before contacting us: CALL TOLL-FREE: 1-888-533-1333 Mon.-Fri. 6 a.m.-6 p.m. MT Sat. 8 a.m.-4 p.m. please contact ...
English Manual
Page 2
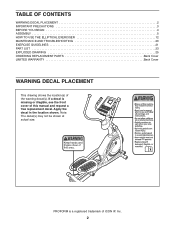
...(s) may not be shown at actual size. TABLE OF CONTENTS WARNING DECAL PLACEMENT 2 IMPORTANT PRECAUTIONS 3 BEFORE YOU BEGIN 4 ASSEMBLY 5 HOW TO USE THE ELLIPTICAL EXERCISER 12 MAINTENANCE AND TROUBLESHOOTING 20 EXERCISE GUIDELINES 21 PART LIST 23 EXPLODED DRAWING 25 ORDERING REPLACEMENT PARTS Back Cover LIMITED WARRANTY Back Cover WARNING... DECAL PLACEMENT This drawing shows the location(s) of this manual and request a free replacement decal. PROFORM is missing or illegible, see the front cover of the warning decal(s).
...(s) may not be shown at actual size. TABLE OF CONTENTS WARNING DECAL PLACEMENT 2 IMPORTANT PRECAUTIONS 3 BEFORE YOU BEGIN 4 ASSEMBLY 5 HOW TO USE THE ELLIPTICAL EXERCISER 12 MAINTENANCE AND TROUBLESHOOTING 20 EXERCISE GUIDELINES 21 PART LIST 23 EXPLODED DRAWING 25 ORDERING REPLACEMENT PARTS Back Cover LIMITED WARRANTY Back Cover WARNING... DECAL PLACEMENT This drawing shows the location(s) of this manual and request a free replacement decal. PROFORM is missing or illegible, see the front cover of the warning decal(s).

English Manual
Page 3
...be used by or through the use of heart rate readings. Hold the handgrip pulse sensor or the handlebars when mounting, dismounting, or using your elliptical exerciser. 10. The pulse sensor is at all parts regularly. When you feel pain or dizziness while exercising, stop . 13. This is ...the responsibility of the owner to ensure that all users of the elliptical exerciser are adequately informed of serious injury, read all important precautions and instructions in this manual and all warnings on each side. 5. Your...
...be used by or through the use of heart rate readings. Hold the handgrip pulse sensor or the handlebars when mounting, dismounting, or using your elliptical exerciser. 10. The pulse sensor is at all parts regularly. When you feel pain or dizziness while exercising, stop . 13. This is ...the responsibility of the owner to ensure that all users of the elliptical exerciser are adequately informed of serious injury, read all important precautions and instructions in this manual and all warnings on each side. 5. Your...
English Manual
Page 4
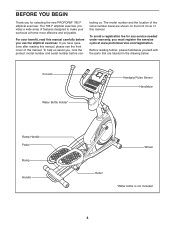
.... To avoid a registration fee for any service needed under warranty, you for selecting the new PROFORM® 785 F elliptical exerciser. To help us . tacting us assist you, note the product model number and serial number before you have questions after ... BEGIN Thank you must register the exercise cycle at home more effective and enjoyable. For your workouts at www.proformservice.com/registration. The 785 F elliptical exerciser provides a wide array of the serial number decal are labeled in the drawing below. Console Water Bottle Holder* Handgrip Pulse Sensor Handlebar...
.... To avoid a registration fee for any service needed under warranty, you for selecting the new PROFORM® 785 F elliptical exerciser. To help us . tacting us assist you, note the product model number and serial number before you have questions after ... BEGIN Thank you must register the exercise cycle at home more effective and enjoyable. For your workouts at www.proformservice.com/registration. The 785 F elliptical exerciser provides a wide array of the serial number decal are labeled in the drawing below. Console Water Bottle Holder* Handgrip Pulse Sensor Handlebar...

English Manual
Page 5
Do not dispose of the elliptical exerciser in a cleared area and remove the packing materials. Place all parts of the packing materials until assembly is not in parentheses below to see ... (99)-4 M10 x 60mm Bolt (100)-2 5 In addition to the included tool(s), assembly requires a Phillips screwdriver wrench , and a rubber mallet . , an adjustable As you assemble the elliptical exerciser, use the drawings below each drawing is the quantity needed for assembly. ASSEMBLY To hire an authorized service technician to assemble the...
Do not dispose of the elliptical exerciser in a cleared area and remove the packing materials. Place all parts of the packing materials until assembly is not in parentheses below to see ... (99)-4 M10 x 60mm Bolt (100)-2 5 In addition to the included tool(s), assembly requires a Phillips screwdriver wrench , and a rubber mallet . , an adjustable As you assemble the elliptical exerciser, use the drawings below each drawing is the quantity needed for assembly. ASSEMBLY To hire an authorized service technician to assemble the...
English Manual
Page 6
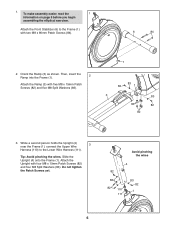
Tip: Avoid pinching the wires. Orient the Ramp (3) as shown. To make assembly easier, read the 1 information on page 5 before you begin assembling the elliptical exerciser. Avoid pinching the wires 4 82 83 82 110 111 83 82 1 6 Do not tighten the Patch Screws yet. 1. Attach the Front Stabilizer (6) to the ...
Tip: Avoid pinching the wires. Orient the Ramp (3) as shown. To make assembly easier, read the 1 information on page 5 before you begin assembling the elliptical exerciser. Avoid pinching the wires 4 82 83 82 110 111 83 82 1 6 Do not tighten the Patch Screws yet. 1. Attach the Front Stabilizer (6) to the ...
English Manual
Page 7
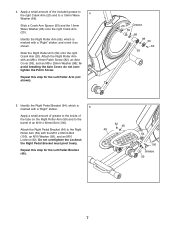
Identify the Right Roller Arm (59), which is marked with a "Right" sticker. 5 Apply a small amount of grease to the inside of the tube on the Right Roller Arm (59) and to the Right Roller Arm (59) with an M8 x 19mm Patch Screw (82), an Axle Cover (53), and an M8 x 25mm Washer (98); to a 19mm Wave 4 Washer (66). Repeat this step for the Left Pedal Bracket (48). 92 95 48 64 100 Grease 59 7 4. Repeat this step for the Left Roller Arm (not shown). 20 Grease 55 66 98 53 82 59 5. Identify the Right Pedal Bracket (64), which is marked with a "Right" sticker, and ...
Identify the Right Roller Arm (59), which is marked with a "Right" sticker. 5 Apply a small amount of grease to the inside of the tube on the Right Roller Arm (59) and to the Right Roller Arm (59) with an M8 x 19mm Patch Screw (82), an Axle Cover (53), and an M8 x 25mm Washer (98); to a 19mm Wave 4 Washer (66). Repeat this step for the Left Pedal Bracket (48). 92 95 48 64 100 Grease 59 7 4. Repeat this step for the Left Roller Arm (not shown). 20 Grease 55 66 98 53 82 59 5. Identify the Right Pedal Bracket (64), which is marked with a "Right" sticker, and ...
English Manual
Page 8
Attach the Right Handlebar (61) with 6 "Right" stickers, and orient them as shown. Apply a small amount of the Pivot Axle (35). 4 Grease 35 54 68 60 98 82 8 Repeat this step for the Left Handlebar Leg (not shown). Tighten an M8 x 19mm Patch Screw (82) and an M8 x 25mm Washer (98) into each end of grease to the Pivot Axle (35) and to a 16mm Wave Washer (54). 7 Insert the Pivot Axle (35) through the Upright (4) and then center it. Identify the Right Handlebar (61) and the Right Handlebar Leg (60), which are marked with two M8 x 38mm Bolts (96) and two M8 Locknuts (102). Make ...
Attach the Right Handlebar (61) with 6 "Right" stickers, and orient them as shown. Apply a small amount of the Pivot Axle (35). 4 Grease 35 54 68 60 98 82 8 Repeat this step for the Left Handlebar Leg (not shown). Tighten an M8 x 19mm Patch Screw (82) and an M8 x 25mm Washer (98) into each end of grease to the Pivot Axle (35) and to a 16mm Wave Washer (54). 7 Insert the Pivot Axle (35) through the Upright (4) and then center it. Identify the Right Handlebar (61) and the Right Handlebar Leg (60), which are marked with two M8 x 38mm Bolts (96) and two M8 Locknuts (102). Make ...
English Manual
Page 9
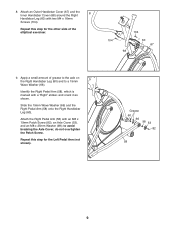
... 82 58 9 Slide the 19mm Wave Washer (66) and the Right Pedal Arm (58) onto the Right Handlebar Leg (60). Apply a small amount of the elliptical exerciser. 104 104 68 60 67 9. Attach the Right Pedal Arm (58) with an M8 x 19mm Patch Screw (82), an Axle Cover (53), and an...
... 82 58 9 Slide the 19mm Wave Washer (66) and the Right Pedal Arm (58) onto the Right Handlebar Leg (60). Apply a small amount of the elliptical exerciser. 104 104 68 60 67 9. Attach the Right Pedal Arm (58) with an M8 x 19mm Patch Screw (82), an Axle Cover (53), and an...
English Manual
Page 10
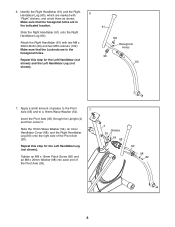
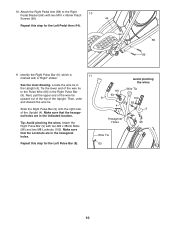
Locate the wire tie in the Right Pulse Bar (9). Then, untie and discard the wire tie. Attach the Right Pulse Bar (9) with a "Right" sticker. Make sure that the hexagonal holes are in the indicated location. See the inset drawing. Next, pull the upper end of the wire tie upward out of the top of the Upright (4). Slide the Right Pulse Bar (9) onto the right side of the Upright. Make sure that the Locknuts are in the hexagonal holes. Repeat this step for the Left Pedal Arm (44). 44 64 58 99 11. Repeat this step for the Left Pulse Bar (8). 11 Avoid pinching the wires ...
Locate the wire tie in the Right Pulse Bar (9). Then, untie and discard the wire tie. Attach the Right Pulse Bar (9) with a "Right" sticker. Make sure that the hexagonal holes are in the indicated location. See the inset drawing. Next, pull the upper end of the wire tie upward out of the top of the Upright (4). Slide the Right Pulse Bar (9) onto the right side of the Upright. Make sure that the Locknuts are in the hexagonal holes. Repeat this step for the Left Pedal Arm (44). 44 64 58 99 11. Repeat this step for the Left Pulse Bar (8). 11 Avoid pinching the wires ...
English Manual
Page 11
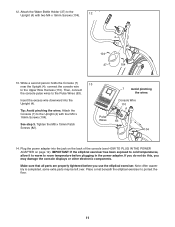
... Holder (37) to the Upright (4) with two M4 x 16mm Screws (104). 12 4 104 37 104 13. If you do not do this, you use the elliptical exerciser. Insert the excess wire downward into the jack on the back of the console (see HOW TO PLUG IN THE POWER ADAPTER on page... 12). Place a mat beneath the elliptical exerciser to the Upper Wire Harness (110). While a second person holds the Console (7) 13 near the Upright (4), connect the console wire to protect the floor...
... Holder (37) to the Upright (4) with two M4 x 16mm Screws (104). 12 4 104 37 104 13. If you do not do this, you use the elliptical exerciser. Insert the excess wire downward into the jack on the back of the console (see HOW TO PLUG IN THE POWER ADAPTER on page... 12). Place a mat beneath the elliptical exerciser to the Upper Wire Harness (110). While a second person holds the Console (7) 13 near the Upright (4), connect the console wire to protect the floor...
English Manual
Page 12
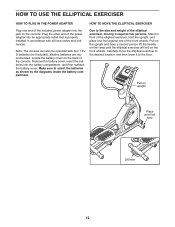
... on upright Place your foot here Lift here 12 alkaline batteries are recommended. HOW TO USE THE ELLIPTICAL EXERCISER HOW TO PLUG IN THE POWER ADAPTER HOW TO MOVE THE ELLIPTICAL EXERCISER Plug one of the console. Due to the size and weight of the included power adapter ...into the battery compartment, and then reattach the battery cover. Pull on the front wheels. Make sure to the floor. Carefully move the elliptical exerciser to the desired location, and then lower it requires two persons. Note: The console can also be operated with all local codes and ...
... on upright Place your foot here Lift here 12 alkaline batteries are recommended. HOW TO USE THE ELLIPTICAL EXERCISER HOW TO PLUG IN THE POWER ADAPTER HOW TO MOVE THE ELLIPTICAL EXERCISER Plug one of the console. Due to the size and weight of the included power adapter ...into the battery compartment, and then reattach the battery cover. Pull on the front wheels. Make sure to the floor. Carefully move the elliptical exerciser to the desired location, and then lower it requires two persons. Note: The console can also be operated with all local codes and ...
English Manual
Page 13
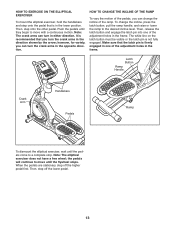
... direction. the pedals will continue to move with a continuous motion. Then, step off the higher pedal first. HOW TO EXERCISE ON THE ELLIPTICAL EXERCISER To mount the elliptical exerciser, hold the handlebars and step onto the pedal that you turn the crank arms in the direction shown by the arrow; Then...motion of the ramp. Then, release the latch button and engage the latch pin into one of the adjustment holes in either direction. Note: The elliptical exerciser does not have a free wheel; To change the incline of the pedals, you can turn in the frame. Make sure that the latch ...
... direction. the pedals will continue to move with a continuous motion. Then, step off the higher pedal first. HOW TO EXERCISE ON THE ELLIPTICAL EXERCISER To mount the elliptical exerciser, hold the handlebars and step onto the pedal that you turn the crank arms in the direction shown by the arrow; Then...motion of the ramp. Then, release the latch button and engage the latch pin into one of the adjustment holes in either direction. Note: The elliptical exerciser does not have a free wheel; To change the incline of the pedals, you can turn in the frame. Make sure that the latch ...
English Manual
Page 14
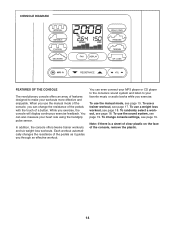
You can change console settings, see page 18. To use a weight loss workout, see page 19. Note: If there is a sheet of clear plastic on the face of the console, remove the plastic. 14 In addition, the console offers twelve trainer workouts and six weight loss workouts. To change the resistance of the pedals with the touch of a button. To use the manual mode of the console, you can also measure your heart rate using the handgrip pulse sensor. When you use a trainer workout, see page 15. Each workout automatically changes the resistance of the pedals as it guides you ...
You can change console settings, see page 18. To use a weight loss workout, see page 19. Note: If there is a sheet of clear plastic on the face of the console, remove the plastic. 14 In addition, the console offers twelve trainer workouts and six weight loss workouts. To change the resistance of the pedals with the touch of a button. To use the manual mode of the console, you can also measure your heart rate using the handgrip pulse sensor. When you use a trainer workout, see page 15. Each workout automatically changes the resistance of the pedals as it guides you ...
English Manual
Page 15
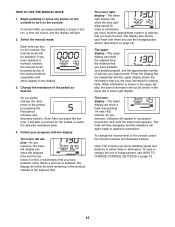
Each time you turn on page 16). Follow your heart rate when you have pedaled. The display also shows your progress with the display. The track will then disappear and the indicators will again begin pedaling or press a button, a tone will sound, and the display will show a track representing 1/4 mile (402 meters). Change the resistance of measurement, see step 5 on the console. Note: While information is selected, the display will light. 2. Note: The console can show the elapsed time, the distance that you have pedaled, your pedaling speed (in ...
Each time you turn on page 16). Follow your heart rate when you have pedaled. The display also shows your progress with the display. The track will then disappear and the indicators will again begin pedaling or press a button, a tone will sound, and the display will show a track representing 1/4 mile (402 meters). Change the resistance of measurement, see step 5 on the console. Note: While information is selected, the display will light. 2. Note: The console can show the elapsed time, the distance that you have pedaled, your pedaling speed (in ...
English Manual
Page 16
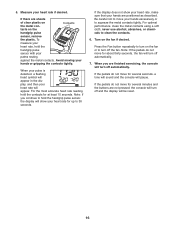
To measure your heart rate, hold the handgrip pulse sensor with your heart rate for up to 30 seconds. Note: If you are sheets of clear plastic on the fan if desired. Be careful not to turn on the handgrip pulse sensor, remove the plastic. Turn on the metal con- If there are finished exercising, the console will turn off and the display will turn off automatically. If the display does not show your palms resting against the metal contacts. Press the Fan button repeatedly to move for at least 15 seconds. When you continue to turn off the fan. If the ...
To measure your heart rate, hold the handgrip pulse sensor with your heart rate for up to 30 seconds. Note: If you are sheets of clear plastic on the fan if desired. Be careful not to turn on the handgrip pulse sensor, remove the plastic. Turn on the metal con- If there are finished exercising, the console will turn off and the display will turn off automatically. If the display does not show your palms resting against the metal contacts. Press the Fan button repeatedly to move for at least 15 seconds. When you continue to turn off the fan. If the ...
English Manual
Page 17
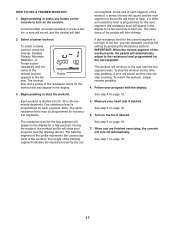
The workout will stop pedaling. A tone will sound and the time will continue in this way until the name of the profile will automatically adjust to the resistance level programmed for the workout will then change. 2. Follow your heart rate if desired. One resistance level is programmed for the next segment, the resistance level will appear in the dis- Note: The same resistance level may be programmed for each segment of the workout, a series of tones will sound and the next segment of the desired workout Profile appears in the display for a few seconds. Turn on...
The workout will stop pedaling. A tone will sound and the time will continue in this way until the name of the profile will automatically adjust to the resistance level programmed for the workout will then change. 2. Follow your heart rate if desired. One resistance level is programmed for the next segment, the resistance level will appear in the dis- Note: The same resistance level may be programmed for each segment of the workout, a series of tones will sound and the next segment of the desired workout Profile appears in the display for a few seconds. Turn on...
English Manual
Page 18
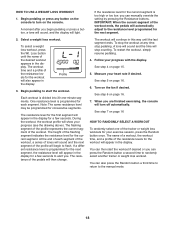
Select a weight loss workout. The workout will light. See step 5 on page 16. 7. The name of a workout, the workout time, and a profile of the resistance levels for the workout will appear in the display for a few seconds to alert you are finished exercising, the console will show your progress with the display. Begin pedaling or press any time, stop counting. A moment after you can press the Random button a second time to the manual mode. 18 To select a weight loss workout, press the Wt. Loss button until the last segment ends. The workout time and a profile ...
Select a weight loss workout. The workout will light. See step 5 on page 16. 7. The name of a workout, the workout time, and a profile of the resistance levels for the workout will appear in the display for a few seconds to alert you are finished exercising, the console will show your progress with the display. Begin pedaling or press any time, stop counting. A moment after you can press the Random button a second time to the manual mode. 18 To select a weight loss workout, press the Wt. Loss button until the last segment ends. The workout time and a profile ...

English Manual
Page 19
... necessary to view console usage information. 1. The lower right display will show the selected unit of hours that the console has been used since the elliptical exerciser was purchased. 5. Exit the user mode. An E for English miles or an M for a few seconds until the user mode information appears in . Press the...
... necessary to view console usage information. 1. The lower right display will show the selected unit of hours that the console has been used since the elliptical exerciser was purchased. 5. Exit the user mode. An E for English miles or an M for a few seconds until the user mode information appears in . Press the...
English Manual
Page 20
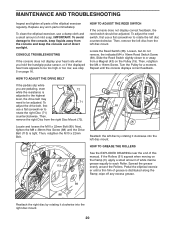
... x 22mm Bolt (89). HOW TO GREASE THE ROLLERS See the EXPLODED DRAWING near the end of the elliptical exerciser regularly. Spread the grease 113 evenly around the Rollers. Pedal the elliptical exercis- To clean the elliptical exerciser, use a flat screwdriver to rotate the right Disc (71) counterclockwise. Then, retighten the M4 x 16mm Screw...
... x 22mm Bolt (89). HOW TO GREASE THE ROLLERS See the EXPLODED DRAWING near the end of the elliptical exerciser regularly. Spread the grease 113 evenly around the Rollers. Pedal the elliptical exercis- To clean the elliptical exerciser, use a flat screwdriver to rotate the right Disc (71) counterclockwise. Then, retighten the M4 x 16mm Screw...