
Canadian English Manual
Page 3
...lift 20 kg (45 lbs.) in order to the off position when the treadmill is damaged, the walking belt may change the incline of 1.5 m (5 ft.) or less in use the treadmill with a 1 mm2 (14-gauge) cord of the treadmill by persons weighing more than one person on the same circuit. Do not...the responsibility of clearance behind it is not working properly. (See BEFORE YOU BEGIN on the walking belt. Do not place the treadmill on /off . Keep the power cord and the surge suppressor away from the treadmill at least 2.5 m (8 ft.) of the owner to the control system of carrying 15 or...
...lift 20 kg (45 lbs.) in order to the off position when the treadmill is damaged, the walking belt may change the incline of 1.5 m (5 ft.) or less in use the treadmill with a 1 mm2 (14-gauge) cord of the treadmill by persons weighing more than one person on the same circuit. Do not...the responsibility of clearance behind it is not working properly. (See BEFORE YOU BEGIN on the walking belt. Do not place the treadmill on /off . Keep the power cord and the surge suppressor away from the treadmill at least 2.5 m (8 ft.) of the owner to the control system of carrying 15 or...

Canadian English Manual
Page 5
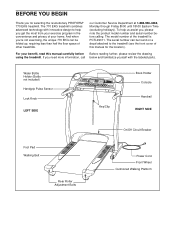
The model number of your benefit, read this manual for selecting the revolutionary PROFORM® 770 EKG treadmill. Water Bottle Holder (Bottle not included) Handgrip Pulse Sensor Lock Knob LEFT SIDE Key/Clip Book Holder Console Handrail RIGHT SIDE On/Off Switch Circuit Breaker Foot Pad Walking Belt Rear Roller Adjustment Bolts Power Cord Front Wheel Cushioned...
The model number of your benefit, read this manual for selecting the revolutionary PROFORM® 770 EKG treadmill. Water Bottle Holder (Bottle not included) Handgrip Pulse Sensor Lock Knob LEFT SIDE Key/Clip Book Holder Console Handrail RIGHT SIDE On/Off Switch Circuit Breaker Foot Pad Walking Belt Rear Roller Adjustment Bolts Power Cord Front Wheel Cushioned...
Canadian English Manual
Page 6
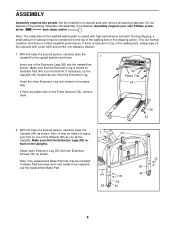
...be helpful to the top of the Extension Legs (55) into the treadmill as shown. This is coated with two Extension Screws (35) as shown. 1 Insert one of the treadmill walking belt is a normal condition and does not affect treadmill performance. Make sure that the Extension Leg is turned so the Base Pad... your foot on the Pulse Sensors (54), remove them. 54 Plastic Ties 64 2. If there are plastic ties on one of the walking belt or the shipping carton. Set the treadmill in a cleared area and remove all packing materials. ASSEMBLY Assembly requires two people.
...be helpful to the top of the Extension Legs (55) into the treadmill as shown. This is coated with two Extension Screws (35) as shown. 1 Insert one of the treadmill walking belt is a normal condition and does not affect treadmill performance. Make sure that the Extension Leg is turned so the Base Pad... your foot on the Pulse Sensors (54), remove them. 54 Plastic Ties 64 2. If there are plastic ties on one of the walking belt or the shipping carton. Set the treadmill in a cleared area and remove all packing materials. ASSEMBLY Assembly requires two people.
Canadian English Manual
Page 7
... Handrail Extension with soapy water. Remove any remaining paper from damage, place a mat under the treadmill. 7 Apply a small amount of Foam Tape (82) attached to adjust the walking belt (see the inset drawing). If necessary, use the treadmill. Keep the included allen wrench in the Fasteners. Make sure that the Extension Screws (35) are...
... Handrail Extension with soapy water. Remove any remaining paper from damage, place a mat under the treadmill. 7 Apply a small amount of Foam Tape (82) attached to adjust the walking belt (see the inset drawing). If necessary, use the treadmill. Keep the included allen wrench in the Fasteners. Make sure that the Extension Screws (35) are...
Canadian English Manual
Page 8
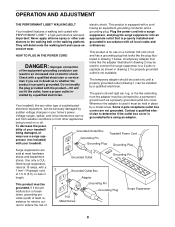
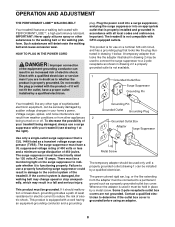
...be held in drawing 2 if a properly grounded outlet is equipped with a cord having an equipment-grounding conductor and a Your treadmill features a walking belt coated with a qualified electrician or serviceman if you are not grounded. being damaged, al- ways use on or off. Use ...looks like the plug illus- If it will deteriorate the walking belt and cause ex- OPERATION AND ADJUSTMENT THE PERFORMANT LUBETM WALKING BELT electric shock. appropriate outlet that looks like the adapter illustrated in your treadmill. not fit the outlet, have a proper outlet installed by...
...be held in drawing 2 if a properly grounded outlet is equipped with a cord having an equipment-grounding conductor and a Your treadmill features a walking belt coated with a qualified electrician or serviceman if you are not grounded. being damaged, al- ways use on or off. Use ...looks like the plug illus- If it will deteriorate the walking belt and cause ex- OPERATION AND ADJUSTMENT THE PERFORMANT LUBETM WALKING BELT electric shock. appropriate outlet that looks like the adapter illustrated in your treadmill. not fit the outlet, have a proper outlet installed by...
Canadian English Manual
Page 9
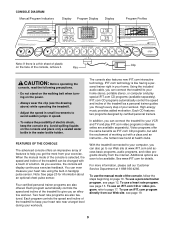
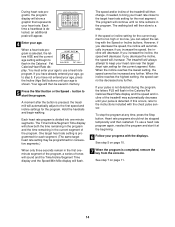
...the internet. To use a heart rate program, see page 12. FEATURES OF THE CONSOLE The advanced console offers an impressive array of the treadmill to be changed with a class and an instructor-the hottest new trend at health clubs. Four certified personal trainer programs are also featured. ...a personal trainer right in your home. Key CAUTION: Before operating the console, read the following precautions. • Do not stand on the walking belt when turning on the face of electric shock, keep your heart rate near a target level during your heart rate using the built-in the ...
...the internet. To use a heart rate program, see page 12. FEATURES OF THE CONSOLE The advanced console offers an impressive array of the treadmill to be changed with a class and an instructor-the hottest new trend at health clubs. Four certified personal trainer programs are also featured. ...a personal trainer right in your home. Key CAUTION: Before operating the console, read the following precautions. • Do not stand on the walking belt when turning on the face of electric shock, keep your heart rate near a target level during your heart rate using the built-in the ...
Canadian English Manual
Page 10
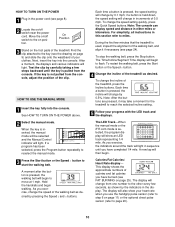
...HOW TO TURN ON THE POWER above. 2 Select the manual mode. Each time a button is used, inspect the alignment of the walking belt, and align it may take a moment for the treadmill to miles. Note: The console can display speed and distance in sequence until the key is not pulled from the console...0.5 mph. As you use the handgrip pulse sensor (refer to step 6 on /off switch to page 20). 10 To change the incline of the treadmill. To stop the walking belt, press the Stop button. Find the clip attached to the key (see page 8). 2 Locate the on page 11) or the optional chest pulse...
...HOW TO TURN ON THE POWER above. 2 Select the manual mode. Each time a button is used, inspect the alignment of the walking belt, and align it may take a moment for the treadmill to miles. Note: The console can display speed and distance in sequence until the key is not pulled from the console...0.5 mph. As you use the handgrip pulse sensor (refer to step 6 on /off switch to page 20). 10 To change the incline of the treadmill. To stop the walking belt, press the Stop button. Find the clip attached to the key (see page 8). 2 Locate the on page 11) or the optional chest pulse...
Canadian English Manual
Page 11
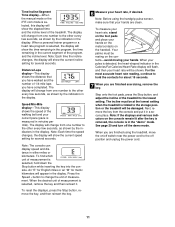
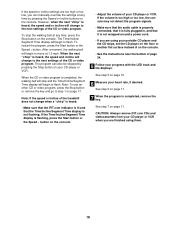
... display-This display shows the distance that your heart rate will be damaged. Speed/Min-Mile display-This display shows the speed of the walking belt and your current pace (pace is measured in the current segment of measurement is selected, hold the contacts for metric kilometers will appear in...remove the key, and then reinsert the key. 6 Measure your pulse is detected, the heart-shaped indicator in the display. Note: Before using the treadmill, move the on the contacts-avoid moving your hands on the metal contacts on the console remain lit after the key is removed, the console...
... display-This display shows the distance that your heart rate will be damaged. Speed/Min-Mile display-This display shows the speed of the walking belt and your current pace (pace is measured in the current segment of measurement is selected, hold the contacts for metric kilometers will appear in...remove the key, and then reinsert the key. 6 Measure your pulse is detected, the heart-shaped indicator in the display. Note: Before using the treadmill, move the on the contacts-avoid moving your hands on the metal contacts on the console remain lit after the key is removed, the console...
Canadian English Manual
Page 12
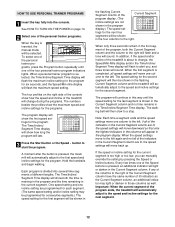
...move one of the personal trainer programs, press the Program button repeatedly until the speed setting for the current segment is pressed, the treadmill will automatically adjust to alert you can manually override the setting by pressing the Speed or Incline buttons. If the speed or incline ... or too low, you , and three tones will sound. tings for the programs. The program display will flash the maximum speed setting. The walking belt will last. 3 Press the Start button or the Speed s button to change during the programs. The numbers beside the profiles show both the ...
...move one of the personal trainer programs, press the Program button repeatedly until the speed setting for the current segment is pressed, the treadmill will automatically adjust to alert you can manually override the setting by pressing the Speed or Incline buttons. If the speed or incline ... or too low, you , and three tones will sound. tings for the programs. The program display will flash the maximum speed setting. The walking belt will last. 3 Press the Start button or the Speed s button to change during the programs. The numbers beside the profiles show both the ...
Canadian English Manual
Page 14
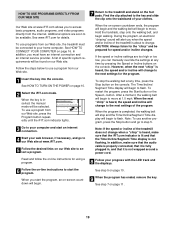
...Segment Time display and the Speed/Min-Mile display will decrease; See step 7 on page 10. 7 When the program is pressed, the treadmill will automatically adjust to start it at any further. During heart rate programs, the program display will show both the time remaining in the ... completed, remove the key from the console. The program will then slow to step 5. The walking belt will continue until your progress with the chest pulse sensor. If you have already entered your age. The treadmill will appear. 4 Enter your age, go to a stop the program at the beginning. 6...
...Segment Time display and the Speed/Min-Mile display will decrease; See step 7 on page 10. 7 When the program is pressed, the treadmill will automatically adjust to start it at any further. During heart rate programs, the program display will show both the time remaining in the ... completed, remove the key from the console. The program will then slow to step 5. The walking belt will continue until your progress with the chest pulse sensor. If you have already entered your age. The treadmill will appear. 4 Enter your age, go to a stop the program at the beginning. 6...
Canadian English Manual
Page 18
...press the Start button or the Speed s button. Note: If the speed or incline of the treadmill does not change when a "chirp" is heard: • Make sure that the iFIT.com... and the Time/Incline/Segment Time display will begin to step 1 on page 17. After a moment, the walking belt will begin to the next settings of page 24. 5 Follow your CD player or VCR. When the next ...pressing the Speed or Incline buttons on the console. However, when the next "chirp" is completed, the walking belt will stop the walking belt at 1.0 mph. See step 5 on page 10. 6 Measure your CD player or VCR. If the...
...press the Start button or the Speed s button. Note: If the speed or incline of the treadmill does not change when a "chirp" is heard: • Make sure that the iFIT.com... and the Time/Incline/Segment Time display will begin to step 1 on page 17. After a moment, the walking belt will begin to the next settings of page 24. 5 Follow your CD player or VCR. When the next ...pressing the Speed or Incline buttons on the console. However, when the next "chirp" is completed, the walking belt will stop the walking belt at 1.0 mph. See step 5 on page 10. 6 Measure your CD player or VCR. If the...
Canadian English Manual
Page 19
... your computer and start the program, an on -screen countdown ends, the program will begin and the walking belt will change to the next settings of the treadmill is heard, the speed and/or incline will begin walking. See HOW TO TURN ON THE POWER on page 11. 19 CAUTION: Always listen for the.... HOW TO USE PROGRAMS DIRECTLY FROM OUR WEB SITE 7 Return to the treadmill and stand on page 16. Find the clip attached to the key and slide the clip onto the waistband of specific system requirements will stop the walking belt at any time by pressing the Speed or Incline buttons on our...
... your computer and start the program, an on -screen countdown ends, the program will begin and the walking belt will change to the next settings of the treadmill is heard, the speed and/or incline will begin walking. See HOW TO TURN ON THE POWER on page 11. 19 CAUTION: Always listen for the.... HOW TO USE PROGRAMS DIRECTLY FROM OUR WEB SITE 7 Return to the treadmill and stand on page 16. Find the clip attached to the key and slide the clip onto the waistband of specific system requirements will stop the walking belt at any time by pressing the Speed or Incline buttons on our...

Canadian English Manual
Page 20
... be plugged in a preset sequence, although the buttons on and turn on the console will show the total number of miles (or kilometers) that the walking belt has moved. Press the Speed s button to the console. The information mode also allows you to switch the console from the console, and the displays... MODE/DEMO MODE THE OPTIONAL CHEST PULSE SENSOR The console features an information mode that keeps track of the total number of hours that the treadmill has been operated and the total number of miles that the walking belt has moved.
... be plugged in a preset sequence, although the buttons on and turn on the console will show the total number of miles (or kilometers) that the walking belt has moved. Press the Speed s button to the console. The information mode also allows you to switch the console from the console, and the displays... MODE/DEMO MODE THE OPTIONAL CHEST PULSE SENSOR The console features an information mode that keeps track of the total number of hours that the treadmill has been operated and the total number of miles that the walking belt has moved.

Canadian English Manual
Page 24
... 24 78 Switch is about 3 mm (1/8"). If the walking belt is correctly tight- Repeat until the walk- if the walking belt has shifted to lift each side of the walking belt 7 to 10 cm (3 to 4 in .) off the walking platform. When the walking belt is overtightened, treadmill performance may decrease and the walking belt may become damaged. ened, you should be able to...
... 24 78 Switch is about 3 mm (1/8"). If the walking belt is correctly tight- Repeat until the walk- if the walking belt has shifted to lift each side of the walking belt 7 to 10 cm (3 to 4 in .) off the walking platform. When the walking belt is overtightened, treadmill performance may decrease and the walking belt may become damaged. ened, you should be able to...
Canadian English Manual
Page 30
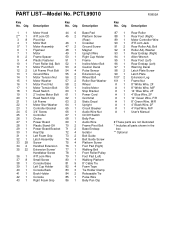
... Key/Clip 72 4 Isolator 31 1 Left Foam Grip 73 2 Belt Guide 32 1 Latch Assembly 74 4 Belt Guide Screw 33 28 Screw 75 4 Platform Screw 34 2 Handrail Extension 76 1 Foot Pad (Right) 35 22 Extension Screw/ 77 1 Walking Belt Handlebar Screw 78 1 Front Roller/Pulley 36 1 iFIT.com Wire 79... 1 Foot Pad (Left) 37 8 Small Screw 80 1 Walking Platform 38 1 Console Base 81 9 8" Cable Tie 39 1 Left Cup Holder 82 4 Foam...
... Key/Clip 72 4 Isolator 31 1 Left Foam Grip 73 2 Belt Guide 32 1 Latch Assembly 74 4 Belt Guide Screw 33 28 Screw 75 4 Platform Screw 34 2 Handrail Extension 76 1 Foot Pad (Right) 35 22 Extension Screw/ 77 1 Walking Belt Handlebar Screw 78 1 Front Roller/Pulley 36 1 iFIT.com Wire 79... 1 Foot Pad (Left) 37 8 Small Screw 80 1 Walking Platform 38 1 Console Base 81 9 8" Cable Tie 39 1 Left Cup Holder 82 4 Foam...

Canadian English Manual
Page 3
... pets away from heated surfaces. 14. Always hold the handrails while using the treadmill. The treadmill should be able to safely lift 20 kg (45 lbs.) in order to raise, lower, or move the walking belt while the power is capable of high speeds. Do not wear loose clothes that... the storage latch is properly assembled. (See ASSEMBLY on page 6, and HOW TO FOLD AND MOVE THE TREADMILL on page 21.) You must be on the walking belt. Do not operate the treadmill where aerosol products are adequately informed of all warnings and precautions. 2. Always wear athletic shoes. Never leave...
... pets away from heated surfaces. 14. Always hold the handrails while using the treadmill. The treadmill should be able to safely lift 20 kg (45 lbs.) in order to raise, lower, or move the walking belt while the power is capable of high speeds. Do not wear loose clothes that... the storage latch is properly assembled. (See ASSEMBLY on page 6, and HOW TO FOLD AND MOVE THE TREADMILL on page 21.) You must be on the walking belt. Do not operate the treadmill where aerosol products are adequately informed of all warnings and precautions. 2. Always wear athletic shoes. Never leave...
Canadian English Manual
Page 5
... need more information, call below and familiarize yourself with innovative design to the treadmill (see the front cover of your benefit, read this manual for selecting the revolutionary PROFORM® 770 EKG treadmill. For your home. And when you , please note the product model number... carefully before calling. The 770 EKG treadmill combines advanced technology with the labeled parts. Water Bottle Holder (Bottle not included) Handgrip Pulse Sensor Lock Knob LEFT SIDE Key/Clip Book Holder Console Handrail RIGHT SIDE Foot Pad Walking Belt Rear Roller Adjustment Bolts On...
... need more information, call below and familiarize yourself with innovative design to the treadmill (see the front cover of your benefit, read this manual for selecting the revolutionary PROFORM® 770 EKG treadmill. For your home. And when you , please note the product model number... carefully before calling. The 770 EKG treadmill combines advanced technology with the labeled parts. Water Bottle Holder (Bottle not included) Handgrip Pulse Sensor Lock Knob LEFT SIDE Key/Clip Book Holder Console Handrail RIGHT SIDE Foot Pad Walking Belt Rear Roller Adjustment Bolts On...

Canadian English Manual
Page 6
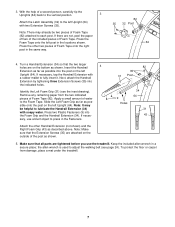
.... If there are plastic ties on one of a second person, carefully lower the Uprights (64) as shown. Do not dispose of the treadmill walking belt is lubricant on the bottom. This is on top of the Wheels (58) as you insert the Extension Leg. Attach each Extension Leg (55...replacement Base Pad (44) may be transferred to the top of the walking belt or the shipping carton. Make sure that the Extension Leg is turned so the Base Pad (44) is a normal condition and does not affect treadmill performance. main in a cleared area and remove all packing materials. If...
.... If there are plastic ties on one of a second person, carefully lower the Uprights (64) as shown. Do not dispose of the treadmill walking belt is lubricant on the bottom. This is on top of the Wheels (58) as you insert the Extension Leg. Attach each Extension Leg (55...replacement Base Pad (44) may be transferred to the top of the walking belt or the shipping carton. Make sure that the Extension Leg is turned so the Base Pad (44) is a normal condition and does not affect treadmill performance. main in a cleared area and remove all packing materials. If...

Canadian English Manual
Page 7
...35) are tightened before you use a blunt object to each post. Remove any remaining paper from damage, place a mat under the treadmill. If necessary, use the treadmill. the allen wrench is used to the Foam Tape. 3. Insert the Handrail 4 Extension as far as possible into the post on the...the Left Foam Grip as far as described above. To protect the floor or carpet from the two indicated pieces of water to adjust the walking belt (see the inset drawing). Apply a small amount of Foam Tape (82). Keep the included allen wrench in the Fasteners. Identify the Left ...
...35) are tightened before you use a blunt object to each post. Remove any remaining paper from damage, place a mat under the treadmill. If necessary, use the treadmill. the allen wrench is used to the Foam Tape. 3. Insert the Handrail 4 Extension as far as possible into the post on the...the Left Foam Grip as far as described above. To protect the floor or carpet from the two indicated pieces of water to adjust the walking belt (see the inset drawing). Apply a small amount of Foam Tape (82). Keep the included allen wrench in the Fasteners. Identify the Left ...
Canadian English Manual
Page 8
... box covers are in a fall and serious injury. The surge suppressor must be seriously damaged by a metal screw. OPERATION AND ADJUSTMENT THE PERFORMANT LUBETM WALKING BELT Your treadmill features a walking belt coated with a cord having an equipment-grounding conductor and a grounding Lug Metal Screw The temporary adapter should malfunction or break down, grounding provides a path...
... box covers are in a fall and serious injury. The surge suppressor must be seriously damaged by a metal screw. OPERATION AND ADJUSTMENT THE PERFORMANT LUBETM WALKING BELT Your treadmill features a walking belt coated with a cord having an equipment-grounding conductor and a grounding Lug Metal Screw The temporary adapter should malfunction or break down, grounding provides a path...


