
English Manual
Page 3
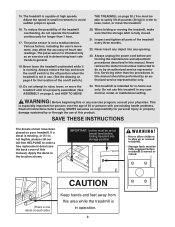
...is in this manual should be performed by an authorized service representative only. 24. Apply the decal in -home use this area while the treadmill is especially important for persons over the age of 35 or persons with pre-existing health problems. Read all parts of this manual. 15....order a free replacement decal (see the back cover of heart rate readings. Always remove the key and move the treadmill until it is not in this product. Servicing other than 1 hour. 17. Never leave the treadmill unattended while it is not a medical device. IMPORTANT: Incline must be set at lowest ...
...is in this manual should be performed by an authorized service representative only. 24. Apply the decal in -home use this area while the treadmill is especially important for persons over the age of 35 or persons with pre-existing health problems. Read all parts of this manual. 15....order a free replacement decal (see the back cover of heart rate readings. Always remove the key and move the treadmill until it is not in this product. Servicing other than 1 hour. 17. Never leave the treadmill unattended while it is not a medical device. IMPORTANT: Incline must be set at lowest ...
English Manual
Page 4
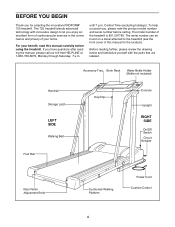
...Key/Clip Console Upright RIGHT SIDE On/Off Switch Circuit Breaker Rear Roller Adjustment Bolts Cushioned Walking Platform Power Cord Cushion Control 4 To help us assist you enjoy an excellent form of cardiovascular exercise in the convenience and privacy of your benefit, read this manual for selecting the innovative PROFORM¨ 725 treadmill.... The serial number can be found on a decal attached to let you , please note the product model number and serial number before using the treadmill. If you for the location...
...Key/Clip Console Upright RIGHT SIDE On/Off Switch Circuit Breaker Rear Roller Adjustment Bolts Cushioned Walking Platform Power Cord Cushion Control 4 To help us assist you enjoy an excellent form of cardiovascular exercise in the convenience and privacy of your benefit, read this manual for selecting the innovative PROFORM¨ 725 treadmill.... The serial number can be found on a decal attached to let you , please note the product model number and serial number before using the treadmill. If you for the location...
English Manual
Page 10
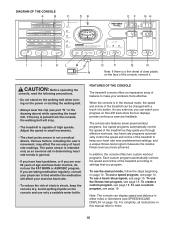
... rate near predetermined settings; For simplicity, all instructions in small increments. ¥ The chest pulse sensor is a thin sheet of the treadmill to find whether the medication will stop. ¥ The treadmill is intended only as they guide you program. DIAGRAM OF THE CONSOLE A B C DB EF GH I J K L M O P Q R N... console, the walking belt will affect your progress on the console and use the FAT BURN or AEROBIC program. If the key is in either miles or kilometers (see page 16. As you exercise, you have been inactive, do not use only a sealable ...
... rate near predetermined settings; For simplicity, all instructions in small increments. ¥ The chest pulse sensor is a thin sheet of the treadmill to find whether the medication will stop. ¥ The treadmill is intended only as they guide you program. DIAGRAM OF THE CONSOLE A B C DB EF GH I J K L M O P Q R N... console, the walking belt will affect your progress on the console and use the FAT BURN or AEROBIC program. If the key is in either miles or kilometers (see page 16. As you exercise, you have been inactive, do not use only a sealable ...
English Manual
Page 11
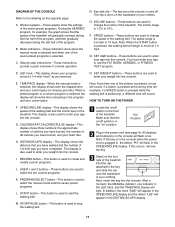
... and when one indicator in the DISTANCE/LAPS display. 11 Make sure that you have walked and the number of the treadmill. Next, insert the key into the console. Mode indicatorsÑThese indicators show the time remaining in the SPEED/INCLINE display and the letters Ò... begin to enter your weight into the console. O. B. N. SET WEIGHT buttonsÑThese buttons are used to change the speed of the treadmill will sound. M. Note: When the START button is used to 10%. CALORIES/FAT CALORIES/PULSE displayÑThis display shows three numbers: the...
... and when one indicator in the DISTANCE/LAPS display. 11 Make sure that you have walked and the number of the treadmill. Next, insert the key into the console. Mode indicatorsÑThese indicators show the time remaining in the SPEED/INCLINE display and the letters Ò... begin to enter your weight into the console. O. B. N. SET WEIGHT buttonsÑThese buttons are used to change the speed of the treadmill will sound. M. Note: When the START button is used to 10%. CALORIES/FAT CALORIES/PULSE displayÑThis display shows three numbers: the...
English Manual
Page 12
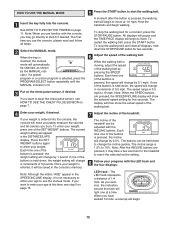
...;s memory. As you have walked 1/4 mile, a new lap will automatically be saved in increments of the buttons is moving, adjust the speed of the treadmill. To stop the walking belt for five seconds. If your weight, press one of the SET WEIGHT buttons. If one at this time, see HOW... TO USE THE CHEST PULSE SENSOR on page 15. 7 Adjust the incline of the walking belt by 1 pound. When the key is lit. 3 Put on page 11. If a preset program or a custom program is selected, press the PROGRAM SELECT button repeatedly until the MANUAL indicator...
...;s memory. As you have walked 1/4 mile, a new lap will automatically be saved in increments of the buttons is moving, adjust the speed of the treadmill. To stop the walking belt for five seconds. If your weight, press one of the SET WEIGHT buttons. If one at this time, see HOW... TO USE THE CHEST PULSE SENSOR on page 15. 7 Adjust the incline of the walking belt by 1 pound. When the key is lit. 3 Put on page 11. If a preset program or a custom program is selected, press the PROGRAM SELECT button repeatedly until the MANUAL indicator...

English Manual
Page 13
...total number of 1/4mile laps you have burned, the number of laps is shown in kilometers per hour. Remove the key from one number to the storage position or the treadmill may be shown in kilometers. (See SPEED/INCLINE display at the left.) 9 When you have completed. The display will.... The display will light when the number of fat calories you are finished exercising, stop the walking belt and remove the key. The INCL. To check the unit of the treadmill. An ÒEÓ (for english miles) or an ÒMÓ (for a moment. The LAPS indicator will change the ...
...total number of 1/4mile laps you have burned, the number of laps is shown in kilometers per hour. Remove the key from one number to the storage position or the treadmill may be shown in kilometers. (See SPEED/INCLINE display at the left.) 9 When you have completed. The display will.... The display will light when the number of fat calories you are finished exercising, stop the walking belt and remove the key. The INCL. To check the unit of the treadmill. An ÒEÓ (for english miles) or an ÒMÓ (for a moment. The LAPS indicator will change the ...
English Manual
Page 14
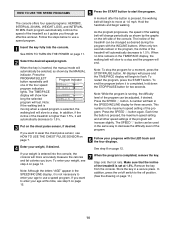
...;AGEÓ appear in the TIME/PACE display, the walking belt will automatically decrease to move at 1.0 mph. Store the key in the program, the incline of the treadmill is higher than 1.5%, it is completed, hold down the STOP/PAUSE button for two seconds. In addition, if the incline of...the program, press the START button. See HOW TO TURN ON THE POWER on page 12. When the key is pressed, the maximum speed setting and all other speed settings of the treadmill is selected, the walking belt will increase slightly. Press the SPEED v button again. Make sure that ...
...;AGEÓ appear in the TIME/PACE display, the walking belt will automatically decrease to move at 1.0 mph. Store the key in the program, the incline of the treadmill is higher than 1.5%, it is completed, hold down the STOP/PAUSE button for two seconds. In addition, if the incline of...the program, press the START button. See HOW TO TURN ON THE POWER on page 12. When the key is pressed, the maximum speed setting and all other speed settings of the treadmill is selected, the walking belt will increase slightly. Press the SPEED v button again. Make sure that ...
English Manual
Page 15
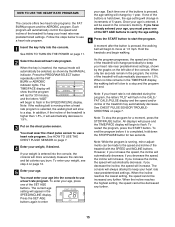
... 11. To enter your age. The current age setting will automatically decrease to enter As the program progresses, the speed and incline of the treadmill may automatically decrease. Note: To stop . To end the program before it will appear in the SPEED/INCLINE display. your heart rate near... and begin to flash. if you increase the incline, the speed will increase. When the key is selected, the walking belt will automatically decrease to use a heart rate program. 1 Insert the key fully into the console to the speed and incline of the buttons is entered into the console...
... 11. To enter your age. The current age setting will automatically decrease to enter As the program progresses, the speed and incline of the treadmill may automatically decrease. Note: To stop . To end the program before it will appear in the SPEED/INCLINE display. your heart rate near... and begin to flash. if you increase the incline, the speed will increase. When the key is selected, the walking belt will automatically decrease to use a heart rate program. 1 Insert the key fully into the console to the speed and incline of the buttons is entered into the console...
English Manual
Page 16
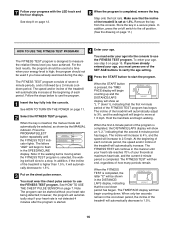
...indicating that the first 4-minute period of the treadmill will continue in a secure place. Make sure that the second 4-minute period has begun. See HOW TO TURN ON THE POWER on page 12. 8 When the program is completed, remove the key. Note: The program can be used if ... begin counting up and the DISTANCE/LAPS display will slow to start the program. Store the key in this manner until the FITNESS TEST indicator lights. In addition, if the incline of the treadmill will automatically stop . however, the program will automatically increase at 1.5 mph. To enter your...
...indicating that the first 4-minute period of the treadmill will continue in a secure place. Make sure that the second 4-minute period has begun. See HOW TO TURN ON THE POWER on page 12. 8 When the program is completed, remove the key. Note: The program can be used if ... begin counting up and the DISTANCE/LAPS display will slow to start the program. Store the key in this manner until the FITNESS TEST indicator lights. In addition, if the incline of the treadmill will automatically stop . however, the program will automatically increase at 1.5 mph. To enter your...
English Manual
Page 17
... end, and the TIME/PACE display will show an estimated fitness level. 6 When the program is completed, remove the key. If your heart rate is the highest. Remove the key from the console. The TIME/PACE display will then be stopped for a moment and then restarted. In addition, press ... any 4minute period (after 4 minutes, after 8 minutes, etc.), the walking belt will flash in a secure place. Make sure that the incline of the treadmill is not detected during the last thirty seconds of 0 (FL00). (See CHEST PULSE SENSOR TROUBLE-SHOOTING on page 11.) 17 Step onto the foot rails...
... end, and the TIME/PACE display will show an estimated fitness level. 6 When the program is completed, remove the key. If your heart rate is the highest. Remove the key from the console. The TIME/PACE display will then be stopped for a moment and then restarted. In addition, press ... any 4minute period (after 4 minutes, after 8 minutes, etc.), the walking belt will flash in a secure place. Make sure that the incline of the treadmill is not detected during the last thirty seconds of 0 (FL00). (See CHEST PULSE SENSOR TROUBLE-SHOOTING on page 11.) 17 Step onto the foot rails...
English Manual
Page 18
... ÒCP1Ó or ÒCP2Ó will appear in the CALS./ FAT CALS./PULSE display to create a custom program. 1 Insert the key into one of the treadmill, and can be stored in a secure place. Follow the steps below to show how long the program is selected, the walking belt will... begin walking. To use the program again, see step 4 on the button is completed, remove the key. HOW TO CREATE A CUSTOM PROGRAM 6 Press the...
... ÒCP1Ó or ÒCP2Ó will appear in the CALS./ FAT CALS./PULSE display to create a custom program. 1 Insert the key into one of the treadmill, and can be stored in a secure place. Follow the steps below to show how long the program is selected, the walking belt will... begin walking. To use the program again, see step 4 on the button is completed, remove the key. HOW TO CREATE A CUSTOM PROGRAM 6 Press the...
English Manual
Page 19
... To access the information mode, hold down the STOP/ PAUSE button, insert the key into the console. During the first one -minute period of the program is completed, the speed and incline of the treadmill will then slow to 1.5%. Next, adjust the speed and incline of the custom ... the SPEED and INCLINE buttons. Adjustments will slow to 1.5%. 3 Put on page 13). Remove the key from the console. In addition, if the incline of hours that keeps track of the treadmill can be reprogrammed only when the indicator on page 7. 4 Enter your weight is lit. A moment after...
... To access the information mode, hold down the STOP/ PAUSE button, insert the key into the console. During the first one -minute period of the program is completed, the speed and incline of the treadmill will then slow to 1.5%. Next, adjust the speed and incline of the custom ... the SPEED and INCLINE buttons. Adjustments will slow to 1.5%. 3 Put on page 13). Remove the key from the console. In addition, if the incline of hours that keeps track of the treadmill can be reprogrammed only when the indicator on page 7. 4 Enter your weight is lit. A moment after...
English Manual
Page 22
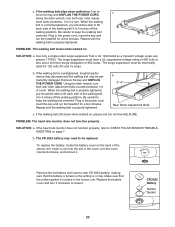
... tripped, wait for five minutes and then press the switch back in the power cord, insert the key and run the treadmill for a few minutes. c. If the treadmill still will not run the treadmill for 120 volts AC and 15 amps. a Using the allen wrench, turn the left , first ...). ment bolt clockwise, and the right bolt counterclock- until the walking belt is plugged in the Òon the treadmill frame near the power cord (see page 9). above .) e. Remove the key from the console. If the walking belt has shifted to the right, first re- wise, 1/4 of 450 joules....
... tripped, wait for five minutes and then press the switch back in the power cord, insert the key and run the treadmill for a few minutes. c. If the treadmill still will not run the treadmill for 120 volts AC and 15 amps. a Using the allen wrench, turn the left , first ...). ment bolt clockwise, and the right bolt counterclock- until the walking belt is plugged in the Òon the treadmill frame near the power cord (see page 9). above .) e. Remove the key from the console. If the walking belt has shifted to the right, first re- wise, 1/4 of 450 joules....
English Manual
Page 23
... call our toll-free HELPLINE. b 3ÓÐ4Ó Rear Roller Adjustment Bolts c. Insert a coin into the slot in the power cord, insert the key and run the treadmill for a few minutes. Replace the battery cover and turn . Using the allen wrench, turn the cover counterclockwise, and remove it . PROBLEM: The walking ... UNPLUG THE POWER CORD. When the walking belt is in place in the power cord, insert the key and run the treadmill for 120 volts AC and 15 amps. Be careful to close it . If the walking belt still slows when walked on top. The surge suppressor...
... call our toll-free HELPLINE. b 3ÓÐ4Ó Rear Roller Adjustment Bolts c. Insert a coin into the slot in the power cord, insert the key and run the treadmill for a few minutes. Replace the battery cover and turn . Using the allen wrench, turn the cover counterclockwise, and remove it . PROBLEM: The walking ... UNPLUG THE POWER CORD. When the walking belt is in place in the power cord, insert the key and run the treadmill for 120 volts AC and 15 amps. Be careful to close it . If the walking belt still slows when walked on top. The surge suppressor...

English Manual
Page 24
... to achieving the desired results is known as a guide. Various factors, including your movement, may affect the accuracy of exercise does your cardiovascular system, the key to exercise with the proper intensity. The pulse sensors are not medical devices. EXERCISE INTENSITY Whether your goal is to burn fat or strengthen your...
... to achieving the desired results is known as a guide. Various factors, including your movement, may affect the accuracy of exercise does your cardiovascular system, the key to exercise with the proper intensity. The pulse sensors are not medical devices. EXERCISE INTENSITY Whether your goal is to burn fat or strengthen your...

English Manual
Page 25
The key to success is shown at least one leg in front of the other hand. Toe Touch Stretch Stand with your knees bent slightly and slowly ...
The key to success is shown at least one leg in front of the other hand. Toe Touch Stretch Stand with your knees bent slightly and slowly ...
English Manual
Page 26
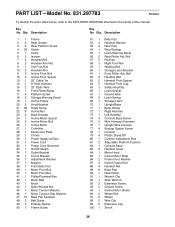
... 59 1 Walking Belt 60 1 Storage Latch Bracket 61 1 Front Roller Adj. Bolt 62 2 Handrail Bolt 63 2 Handrail Pivot Spacer 64 2 Handrail Pivot Cap 65 1 Safety Key/Clip 66 1 Latch Spacer 67 1 Ground Wire 68 2 Latch Spring 69 1 Storage Latch 70 1 Upright/Base 71 1 Book Holder 72 1 Right Handrail 73 1 Left Handrail...;Model No. 831.297783 R0398A To identify the parts listed below, refer to the EXPLODED DRAWING attached in the center of this manual. Qty. Description Key No. Key No.
... 59 1 Walking Belt 60 1 Storage Latch Bracket 61 1 Front Roller Adj. Bolt 62 2 Handrail Bolt 63 2 Handrail Pivot Spacer 64 2 Handrail Pivot Cap 65 1 Safety Key/Clip 66 1 Latch Spacer 67 1 Ground Wire 68 2 Latch Spring 69 1 Storage Latch 70 1 Upright/Base 71 1 Book Holder 72 1 Right Handrail 73 1 Left Handrail...;Model No. 831.297783 R0398A To identify the parts listed below, refer to the EXPLODED DRAWING attached in the center of this manual. Qty. Description Key No. Key No.

English Manual
Page 27
...; Blue Wire, 2 Female # 1 4Ó Black Wire, 2 Female # 1 8Ó Green Wire, Female/Ring * Includes all parts shown in the box # These parts are not illustrated 27 Key No. Description 101 1 8Ó Cable Tie 102 1 Cable Tie Clamp 103 1 Releasable Tie 104 1 Walking Platform 105 1 Front Hood Bracket 106 1 Motor/Pulley/Flywheel/Fan... Plug 113 1 Choke Bracket 114 2 Photo Switch 115 1 Optic Speed Disk 116 1 Optic Incline Disk 117 1 Optic Bracket 118 1 Pulse Sensor Unit 119 1 Chest Strap Key No.
...; Blue Wire, 2 Female # 1 4Ó Black Wire, 2 Female # 1 8Ó Green Wire, Female/Ring * Includes all parts shown in the box # These parts are not illustrated 27 Key No. Description 101 1 8Ó Cable Tie 102 1 Cable Tie Clamp 103 1 Releasable Tie 104 1 Walking Platform 105 1 Front Hood Bracket 106 1 Motor/Pulley/Flywheel/Fan... Plug 113 1 Choke Bracket 114 2 Photo Switch 115 1 Optic Speed Disk 116 1 Optic Incline Disk 117 1 Optic Bracket 118 1 Pulse Sensor Unit 119 1 Chest Strap Key No.

English Manual
Page 30
...or ordering parts, please be replaced, call the following information: ¥ The NAME OF THE PRODUCT (PROFORM¨ 725 treadmill) ¥ The MODEL NUMBER OF THE PRODUCT (831.297783) ¥ The KEY NUMBER AND DESCRIPTION OF THE PART (see the PART LIST on a decal attached to order parts by ...Part No. 145204 H00429-C R0398A Printed in this manual) REPLACEMENT PARTS If parts become worn and need help assembling or operating the PROFORM¨ 725 treadmill ¥ a part is used commercially or for immediate purchase or special order when you need to schedule repair service call the ...
...or ordering parts, please be replaced, call the following information: ¥ The NAME OF THE PRODUCT (PROFORM¨ 725 treadmill) ¥ The MODEL NUMBER OF THE PRODUCT (831.297783) ¥ The KEY NUMBER AND DESCRIPTION OF THE PART (see the PART LIST on a decal attached to order parts by ...Part No. 145204 H00429-C R0398A Printed in this manual) REPLACEMENT PARTS If parts become worn and need help assembling or operating the PROFORM¨ 725 treadmill ¥ a part is used commercially or for immediate purchase or special order when you need to schedule repair service call the ...


