
English Manual
Page 3
... Wear appropriate exercise clothing when using the treadmill. 16. Always remove the key, unplug the power cord and move the walking belt while the power is damaged, the walking belt may change the incline of the on page 5 if the treadmill is not a medical device. Do not use the treadmill with...the handrails while using the treadmill. Never use an extension cord. 19. Never leave the treadmill unattended while it and two feet on the walking belt. When connecting the power cord (see your local WESLO dealer or call 1-800-8063651 and order part number 146148. 20. When folding or ...
... Wear appropriate exercise clothing when using the treadmill. 16. Always remove the key, unplug the power cord and move the walking belt while the power is damaged, the walking belt may change the incline of the on page 5 if the treadmill is not a medical device. Do not use the treadmill with...the handrails while using the treadmill. Never use an extension cord. 19. Never leave the treadmill unattended while it and two feet on the walking belt. When connecting the power cord (see your local WESLO dealer or call 1-800-8063651 and order part number 146148. 20. When folding or ...
English Manual
Page 5
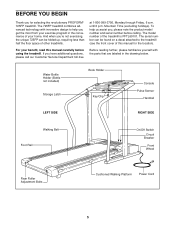
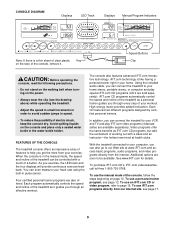
...). Mountain Time (excluding holidays). Water Bottle Holder (Bottle not included) Storage Latch Book Holder Key/Clip Console Pulse Sensor Handrail LEFT SIDE RIGHT SIDE Walking Belt Foot Rail On/Off Switch Circuit Breaker Front Wheel Rear Roller Adjustment Bolts Cushioned Walking Platform Power Cord 5 BEFORE YOU BEGIN Thank you 're not..., 6 a.m. The 725FP treadmill combines advanced technology with the parts that are labeled in the convenience of your benefit, read this manual for selecting the revolutionary PROFORM® 725FP treadmill.
...). Mountain Time (excluding holidays). Water Bottle Holder (Bottle not included) Storage Latch Book Holder Key/Clip Console Pulse Sensor Handrail LEFT SIDE RIGHT SIDE Walking Belt Foot Rail On/Off Switch Circuit Breaker Front Wheel Rear Roller Adjustment Bolts Cushioned Walking Platform Power Cord 5 BEFORE YOU BEGIN Thank you 're not..., 6 a.m. The 725FP treadmill combines advanced technology with the parts that are labeled in the convenience of your benefit, read this manual for selecting the revolutionary PROFORM® 725FP treadmill.
English Manual
Page 6
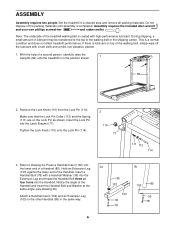
..., carefully raise the 1 Uprights (82) until assembly is completed. With the help of the treadmill walking belt is in the position shown. 82 2. Remove the Lock Knob (110) from the Lock Pin (114).... packing materials. Press a Handrail Insert (102) into the lower end of the walking belt or the shipping carton. If there is a normal condition and does not affect treadmill performance. Notice the angle... of the walking belt, simply wipe off the lubricant with a Handrail Washer (36) into the Extension Leg ...
..., carefully raise the 1 Uprights (82) until assembly is completed. With the help of the treadmill walking belt is in the position shown. 82 2. Remove the Lock Knob (110) from the Lock Pin (114).... packing materials. Press a Handrail Insert (102) into the lower end of the walking belt or the shipping carton. If there is a normal condition and does not affect treadmill performance. Notice the angle... of the walking belt, simply wipe off the lubricant with a Handrail Washer (36) into the Extension Leg ...
English Manual
Page 7
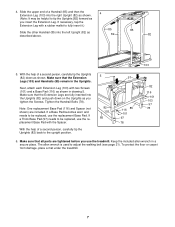
... (101) and a Base Pad (116) as shown. Make sure that the Extension Legs are included. If a Thick Base Pad (97) needs to adjust the walking belt (see page 21). Keep the included allen wrench in the Uprights. The allen wrench is used to be replaced, use the treadmill.
... (101) and a Base Pad (116) as shown. Make sure that the Extension Legs are included. If a Thick Base Pad (97) needs to adjust the walking belt (see page 21). Keep the included allen wrench in the Uprights. The allen wrench is used to be replaced, use the treadmill.

English Manual
Page 8
...are in doubt as to a 2-pole receptacle as a transient voltage surge suppressor (TVSS). Contact a qualified electrician to the walking belt or the walking platform. HOW TO PLUG IN THE POWER CORD DANGER: Improper connection of 450 joules. Grounding Pin Grounded Outlet Grounding...damage to reduce the risk of the treadmill. If it must be grounded. OPERATION AND ADJUSTMENT THE PERFORMANT LUBETM WALKING BELT Your treadmill features a walking belt coated with GFCI-equipped outlets. IMPORTANT: Never apply silicone spray or other appli- an equipment-grounding conductor and a ...
...are in doubt as to a 2-pole receptacle as a transient voltage surge suppressor (TVSS). Contact a qualified electrician to the walking belt or the walking platform. HOW TO PLUG IN THE POWER CORD DANGER: Improper connection of 450 joules. Grounding Pin Grounded Outlet Grounding...damage to reduce the risk of the treadmill. If it must be grounded. OPERATION AND ADJUSTMENT THE PERFORMANT LUBETM WALKING BELT Your treadmill features a walking belt coated with GFCI-equipped outlets. IMPORTANT: Never apply silicone spray or other appli- an equipment-grounding conductor and a ...
English Manual
Page 9
... jumps in the water bottle holder. Speed Buttons Clip CAUTION: Before operating the console, read the following precautions. • Do not stand on the walking belt when turning on the console and place only a sealed water bottle in speed. To use iFIT.com programs directly from the internet. To use a personal...
... jumps in the water bottle holder. Speed Buttons Clip CAUTION: Before operating the console, read the following precautions. • Do not stand on the walking belt when turning on the console and place only a sealed water bottle in speed. To use iFIT.com programs directly from the internet. To use a personal...
English Manual
Page 10
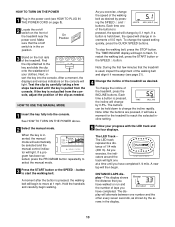
... between one at 1 mph. The TIME/INCLINE display will then begin walking. Each time a button is used, inspect the alignment of the walking belt and align it will change the incline of 1/4 mile (400 m). Note: During the first few steps backward until you have completed 1/4 mile.... A new lap will begin to start the walking belt. Next, insert the key into the console. To change by pressing the SPEED v and w buttons. Hold the handrails and carefully begin . See ...
... between one at 1 mph. The TIME/INCLINE display will then begin walking. Each time a button is used, inspect the alignment of the walking belt and align it will change the incline of 1/4 mile (400 m). Note: During the first few steps backward until you have completed 1/4 mile.... A new lap will begin to start the walking belt. Next, insert the key into the console. To change by pressing the SPEED v and w buttons. Hold the handrails and carefully begin . See ...

English Manual
Page 11
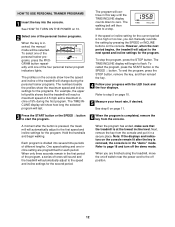
... desired. If the displayed heart rate appears to reset. Step onto the foot rails, press the STOP button, and adjust the incline of the walking belt and your current pace (pace is measured in minutes per mile). Every seven seconds, the display will not be too high or too low, or...
... desired. If the displayed heart rate appears to reset. Step onto the foot rails, press the STOP button, and adjust the incline of the walking belt and your current pace (pace is measured in minutes per mile). Every seven seconds, the display will not be too high or too low, or...
English Manual
Page 12
... or incline setting for the program. When only three seconds remain in the "demo" mode. Note: If the displays and indicators on 10. The walking belt will then slow to the first speed and incline settings for the current period is pressed, the treadmill will adjust to zero. When the program...
... or incline setting for the program. When only three seconds remain in the "demo" mode. Note: If the displays and indicators on 10. The walking belt will then slow to the first speed and incline settings for the current period is pressed, the treadmill will adjust to zero. When the program...
English Manual
Page 16
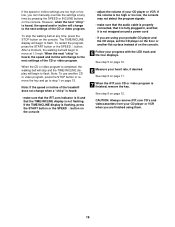
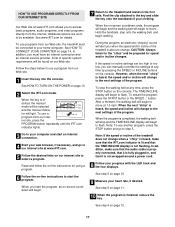
Note: To use another flat surface instead of the CD or video program. After a moment, the walking belt will begin to flash. When the CD or video program is heard, the speed and/or incline will change to the next settings of on ... step 5 on the console • adjust the volume of the CD or video program. However, when the next "chirp" is completed, the walking belt will stop the walking belt at any time, press the STOP button on the console. When the next "chirp" is heard, the speed and incline will change when...
Note: To use another flat surface instead of the CD or video program. After a moment, the walking belt will begin to flash. When the CD or video program is heard, the speed and/or incline will change to the next settings of on ... step 5 on the console • adjust the volume of the CD or video program. However, when the next "chirp" is completed, the walking belt will stop the walking belt at any time, press the STOP button on the console. When the next "chirp" is heard, the speed and incline will change when...
English Manual
Page 17
...www.iFIT.com. 5 Follow the desired links on our Web site. To stop and the TIME/INCLINE display will begin . After a moment, the walking belt will begin to your heart rate, if desired. Note: To use a program from the internet. Note: If the speed or incline of specific system ... key is not wrapped around a power cord. 8 Follow your progress with the LED track and the four displays. Hold the handrails, step onto the walking belt, and begin to move . See step 5 on -screen countdown will light. To restart the program, press the START button or the SPEED v button. ...
...www.iFIT.com. 5 Follow the desired links on our Web site. To stop and the TIME/INCLINE display will begin . After a moment, the walking belt will begin to your heart rate, if desired. Note: To use a program from the internet. Note: If the speed or incline of specific system ... key is not wrapped around a power cord. 8 Follow your progress with the LED track and the four displays. Hold the handrails, step onto the walking belt, and begin to move . See step 5 on -screen countdown will light. To restart the program, press the START button or the SPEED v button. ...
English Manual
Page 18
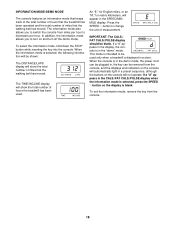
The TIME/INCLINE display will show the total number of miles that the walking belt has moved. To exit the information mode, remove the key from the console, and the displays and indicators on the console will be used . In ... the STOP button while inserting the key into the console. The information mode also allows you to change the unit of miles that the walking belt has moved. Press the SPEED v button to turn on the console will appear in the display, the console is blank. An "E," for English miles, or...
The TIME/INCLINE display will show the total number of miles that the walking belt has moved. To exit the information mode, remove the key from the console, and the displays and indicators on the console will be used . In ... the STOP button while inserting the key into the console. The information mode also allows you to change the unit of miles that the walking belt has moved. Press the SPEED v button to turn on the console will appear in the display, the console is blank. An "E," for English miles, or...
English Manual
Page 21
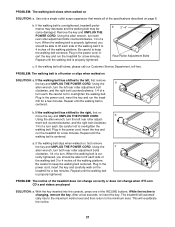
.... PROBLEM: The incline of a turn each side of a turn . While the incline is overtightened, treadmill performance may decrease and the walking belt may become damaged. Be careful to lift each . Plug in the power cord, insert the key and run the treadmill for a few minutes.... the right bolt clockwise, 1/4 of a turn the left , first remove the key and UNPLUG THE POWER CORD. Repeat until the walking belt is cor- When the walking belt is centered. Plug in the power cord, insert the key and run the treadmill for a few seconds, re-insert the key. With ...
.... PROBLEM: The incline of a turn each side of a turn . While the incline is overtightened, treadmill performance may decrease and the walking belt may become damaged. Be careful to lift each . Plug in the power cord, insert the key and run the treadmill for a few minutes.... the right bolt clockwise, 1/4 of a turn the left , first remove the key and UNPLUG THE POWER CORD. Repeat until the walking belt is cor- When the walking belt is centered. Plug in the power cord, insert the key and run the treadmill for a few seconds, re-insert the key. With ...
English Manual
Page 23
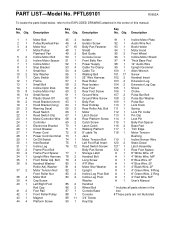
... Latch # 1 8" White Wire, 2F 34 1 Upright Wire Harness 78 2 Handrail Bolt # 1 4" White Wire, M/F 35 1 Front Roller Adj. Description 1 1 Motor Belt 45 4 Isolator 91 1 Incline Motor Plate 2 1 Pulley/Flywheel/Fan 46 4 Isolator Screw 92 1 Audio Wire Nut 3 4 Motor Nut 47 15 Belly Pan Fastener 93 1... Book Holder 4* 1 Motor/Pulley/ 48 1 Shield 94 1 Motor Hood Flywheel/ Fan 49 2 Belt Guide 95 2 Front Wheel 5 2 Incline Motor Bolt 50 1 Console Cover 96 1 Incline Motor Shield 6 2 Incline Motor Spacer 51 1 Front Belly Pan 97...
... Latch # 1 8" White Wire, 2F 34 1 Upright Wire Harness 78 2 Handrail Bolt # 1 4" White Wire, M/F 35 1 Front Roller Adj. Description 1 1 Motor Belt 45 4 Isolator 91 1 Incline Motor Plate 2 1 Pulley/Flywheel/Fan 46 4 Isolator Screw 92 1 Audio Wire Nut 3 4 Motor Nut 47 15 Belly Pan Fastener 93 1... Book Holder 4* 1 Motor/Pulley/ 48 1 Shield 94 1 Motor Hood Flywheel/ Fan 49 2 Belt Guide 95 2 Front Wheel 5 2 Incline Motor Bolt 50 1 Console Cover 96 1 Incline Motor Shield 6 2 Incline Motor Spacer 51 1 Front Belly Pan 97...


