

User Manual
Page 1
... there are committed to give the following information: ¥ The MODEL NUMBER OF THE PRODUCT (PETL61591) ¥ The NAME OF THE PRODUCT (PROFORM¨ 615 treadmill) ¥ The SERIAL NUMBER OF THE PRODUCT (see the front cover of this manual) ¥ The KEY NUMBER OF THE PART(S) (see... 23 and the EXPLODED DRAWING attached in the centre of ICON Health & Fitness, Inc. office, or write: ICON Health & Fitness Ltd. PROFORM¨ is a registered trademark of this manual). PETL61591 Serial No. Serial Number Decal QUESTIONS? Greenwich House 223 North Street Sheepscar Leeds LS7 2AA...
... there are committed to give the following information: ¥ The MODEL NUMBER OF THE PRODUCT (PETL61591) ¥ The NAME OF THE PRODUCT (PROFORM¨ 615 treadmill) ¥ The SERIAL NUMBER OF THE PRODUCT (see the front cover of this manual) ¥ The KEY NUMBER OF THE PART(S) (see... 23 and the EXPLODED DRAWING attached in the centre of ICON Health & Fitness, Inc. office, or write: ICON Health & Fitness Ltd. PROFORM¨ is a registered trademark of this manual). PETL61591 Serial No. Serial Number Decal QUESTIONS? Greenwich House 223 North Street Sheepscar Leeds LS7 2AA...

User Manual
Page 2
... Adj. ¨ TABLE OF CONTENTS IMPORTANT PRECAUTIONS 2 BEFORE YOU BEGIN 5 ASSEMBLY 6 OPERATION AND ADJUSTMENT 8 HOW TO FOLD AND MOVE THE TREADMILL 19 TROUBLE-SHOOTING 20 CONDITIONING GUIDELINES 22 PART LIST 23 HOW TO ORDER REPLACEMENT PARTS Back Cover Note: An EXPLODED DRAWING is attached in the..., refer to a plug. 5. IMPORTANT PRECAUTIONS WARNING: To reduce the risk of 12 and pets away from damage, place a mat under the treadmill. 8. Athletic support clothes are used by persons weighing more information about the op- 46 4 Isolator Screw 98 1 12Ó Audio Wire tional...
... Adj. ¨ TABLE OF CONTENTS IMPORTANT PRECAUTIONS 2 BEFORE YOU BEGIN 5 ASSEMBLY 6 OPERATION AND ADJUSTMENT 8 HOW TO FOLD AND MOVE THE TREADMILL 19 TROUBLE-SHOOTING 20 CONDITIONING GUIDELINES 22 PART LIST 23 HOW TO ORDER REPLACEMENT PARTS Back Cover Note: An EXPLODED DRAWING is attached in the..., refer to a plug. 5. IMPORTANT PRECAUTIONS WARNING: To reduce the risk of 12 and pets away from damage, place a mat under the treadmill. 8. Athletic support clothes are used by persons weighing more information about the op- 46 4 Isolator Screw 98 1 12Ó Audio Wire tional...

User Manual
Page 3
... the first few weeks of stretching to do not keep your pulse in your movement, may affect the accuracy of heart rate readings. The treadmill is intended only as a guide. SAVE THESE INSTRUCTIONS 3 The sensor is intended for fat burning and aerobic exercise. For more detailed exercise ... in small increments to exercise with at a relatively low intensity level for personal injury or property damage sustained by placing objects under the treadmill. 21. WORKOUT GUIDELINES Each workout should be able to safely lift 20 kg (45 pounds) in your training zone for 20 to ...
... the first few weeks of stretching to do not keep your pulse in your movement, may affect the accuracy of heart rate readings. The treadmill is intended only as a guide. SAVE THESE INSTRUCTIONS 3 The sensor is intended for fat burning and aerobic exercise. For more detailed exercise ... in small increments to exercise with at a relatively low intensity level for personal injury or property damage sustained by placing objects under the treadmill. 21. WORKOUT GUIDELINES Each workout should be able to safely lift 20 kg (45 pounds) in your training zone for 20 to ...

User Manual
Page 4
... to keep the walking belt centred. Using the a allen wrench, turn the left rear roller adjust- Be careful to overtighten the walking belt. The treadmill will recalibrate the incline. 21 Note: This decal is centred. Be careful to order a free replacement decal (see the front cover of a turn... walking platform. Remove the key and UNPLUG THE POWER CORD. mill for a few minutes. PROBLEM: The walking belt slips when walked on your treadmill. Apply the decal in the power cord, insert the key and run the tread- Plug in the power cord, insert the key and carefully...
... to keep the walking belt centred. Using the a allen wrench, turn the left rear roller adjust- Be careful to overtighten the walking belt. The treadmill will recalibrate the incline. 21 Note: This decal is centred. Be careful to order a free replacement decal (see the front cover of a turn... walking platform. Remove the key and UNPLUG THE POWER CORD. mill for a few minutes. PROBLEM: The walking belt slips when walked on your treadmill. Apply the decal in the power cord, insert the key and run the tread- Plug in the power cord, insert the key and carefully...

User Manual
Page 5
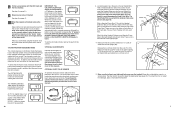
...please note the product model number and serial number before using the PROFORM¨ 615 treadmill. To reset the circuit breaker, wait for the location). d. Check the circuit breaker located on the treadmill near the power cord. If the circuit breaker has tripped, wait.... If the switch protrudes as shown, the circuit breaker has tripped. If the treadmill still will not run the treadmill for selecting the revolutionary PROFORM¨ 615 treadmill. The PROFORM¨ 615 combines advanced technology with GFCI-equipped outlets. Check the on/off during use only ...
...please note the product model number and serial number before using the PROFORM¨ 615 treadmill. To reset the circuit breaker, wait for the location). d. Check the circuit breaker located on the treadmill near the power cord. If the circuit breaker has tripped, wait.... If the switch protrudes as shown, the circuit breaker has tripped. If the treadmill still will not run the treadmill for selecting the revolutionary PROFORM¨ 615 treadmill. The PROFORM¨ 615 combines advanced technology with GFCI-equipped outlets. Check the on/off during use only ...

User Manual
Page 6
...any Base Pad that the 2 Extension Legs (103) remain in the Uprights. With the help of injury, use extreme caution while moving the treadmill, convert the treadmill to drawing 2 above 30¡ Celsius. Use the Base Pad to safely lift 20 kg (45 pounds) in - If this is completed.... is aligned with a soft cloth and a mild, non-abrasive cleaner. 1. To protect the floor or carpet from damage, place a mat under the treadmill. Keep the treadmill out of a second person, carefully tip the Uprights (82) back to the upright position. Hold the handrails as described above. Carefully move the...
...any Base Pad that the 2 Extension Legs (103) remain in the Uprights. With the help of injury, use extreme caution while moving the treadmill, convert the treadmill to drawing 2 above 30¡ Celsius. Use the Base Pad to safely lift 20 kg (45 pounds) in - If this is completed.... is aligned with a soft cloth and a mild, non-abrasive cleaner. 1. To protect the floor or carpet from damage, place a mat under the treadmill. Keep the treadmill out of a second person, carefully tip the Uprights (82) back to the upright position. Hold the handrails as described above. Carefully move the...
User Manual
Page 7
...Plastic Tie 110 85 76 82 47 4 82 112 102 113 115 111 5. Remove the Lock Knob (102) from damage, place a mat under the treadmill. 7 Insert the Lock Pin into the console. To protect the floor or carpet from the Lock Pin (115). The information mode also allows you insert... that the walking belt has moved. Note: There is used with the optional chest pulse sensor (see the back cover of miles that the treadmill has been operated and the total number of this manual). To purchase the optional chest pulse sensor, call the Customer Service Department (see page ...
...Plastic Tie 110 85 76 82 47 4 82 112 102 113 115 111 5. Remove the Lock Knob (102) from damage, place a mat under the treadmill. 7 Insert the Lock Pin into the console. To protect the floor or carpet from the Lock Pin (115). The information mode also allows you insert... that the walking belt has moved. Note: There is used with the optional chest pulse sensor (see the back cover of miles that the treadmill has been operated and the total number of this manual). To purchase the optional chest pulse sensor, call the Customer Service Department (see page ...

User Manual
Page 8
... audio and video programs directly from our internet site. 1 Insert the key fully into the console. DANGER: Improper connection of the treadmill does not change to your specific exercise goals. Do not modify the plug provided with a qualified electrician or serviceman if you achieve...resistance for details. When the next ÒchirpÓ is properly earthed. Note: To use a program from our internet site, the treadmill must have a proper outlet installed by pressing the SPEED or INCLINE buttons on -screen countdown will change . OPERATION AND ADJUSTMENT THE PERFORMANT ...
... audio and video programs directly from our internet site. 1 Insert the key fully into the console. DANGER: Improper connection of the treadmill does not change to your specific exercise goals. Do not modify the plug provided with a qualified electrician or serviceman if you achieve...resistance for details. When the next ÒchirpÓ is properly earthed. Note: To use a program from our internet site, the treadmill must have a proper outlet installed by pressing the SPEED or INCLINE buttons on -screen countdown will change . OPERATION AND ADJUSTMENT THE PERFORMANT ...

User Manual
Page 9
...shock, keep the console dry. Six certified personal trainer programs are finished using the built-in speed. ¥ To reduce the possibility of the treadmill as it is not flashing. Visit www.iFit.com for speed and/or incline changes. 4 Press the PLAY button on your workout. However, when...time, press the STOP button on the console. The program can even measure your pulse, if desired. Note: If the speed or incline of the treadmill does not change when a ÒchirpÓ is heard: ¥ make sure that the audio cable is properly connected, that interactively control the...
...shock, keep the console dry. Six certified personal trainer programs are finished using the built-in speed. ¥ To reduce the possibility of the treadmill as it is not flashing. Visit www.iFit.com for speed and/or incline changes. 4 Press the PLAY button on your workout. However, when...time, press the STOP button on the console. The program can even measure your pulse, if desired. Note: If the speed or incline of the treadmill does not change when a ÒchirpÓ is heard: ¥ make sure that the audio cable is properly connected, that interactively control the...

User Manual
Page 10
... 2 Select the manual mode. Plug one lap equals 1/4 mile). Next, remove the wire that you have walked or run and the number of PROFORM treadmills. Note: To purchase iFit.com CDÕs or to page 15. When the key is selected, this display shows both the time remaining in ...press the that the on/off switch near the power cord is properly plugged in reach the selected incline setting. The in - setting for the treadmill to the key (see instruction B. serted, the manual mode will be selected and the ÒMÓ indicator will then begin exercising, step onto...
... 2 Select the manual mode. Plug one lap equals 1/4 mile). Next, remove the wire that you have walked or run and the number of PROFORM treadmills. Note: To purchase iFit.com CDÕs or to page 15. When the key is selected, this display shows both the time remaining in ...press the that the on/off switch near the power cord is properly plugged in reach the selected incline setting. The in - setting for the treadmill to the key (see instruction B. serted, the manual mode will be selected and the ÒMÓ indicator will then begin exercising, step onto...

User Manual
Page 11
...For simplicity, all instructions in the display. Step onto the foot rails, press the STOP button, and remove the key from one end of the treadmill near the power cord. A. A LINE OUT Audio Cable Audio Adapter Cable B. Every seven seconds, the display will appear in this page). Keep the... PHONES B CD VCR Amp LINE OUT Audio Cable RCA Adapter Adapter Audio Cable 3.5mm Y-adapter Headphones/Speakers Wire removed from one end of the treadmill near the power cord to page 18 and turn off the demo mode. A. A CD VCR Amp LINE OUT LINE OUT HOW TO CONNECT YOUR...
...For simplicity, all instructions in the display. Step onto the foot rails, press the STOP button, and remove the key from one end of the treadmill near the power cord. A. A LINE OUT Audio Cable Audio Adapter Cable B. Every seven seconds, the display will appear in this page). Keep the... PHONES B CD VCR Amp LINE OUT Audio Cable RCA Adapter Adapter Audio Cable 3.5mm Y-adapter Headphones/Speakers Wire removed from one end of the treadmill near the power cord to page 18 and turn off the demo mode. A. A CD VCR Amp LINE OUT LINE OUT HOW TO CONNECT YOUR...

User Manual
Page 12
... during the programs. The numbers beside the profiles show the maximum speed and incline settings for the program. Plug the other end of the treadmill near the power cord. Program Button lect one end of the audio cable into a 3.5mm Y-adapter (available at electronics stores). To stop ...LED track and the four displays. Each program is completed, remove the key from the console. To use iFit.com videocassettes, the treadmill must be connected to your headphones into several time segments of the Y-adapter. Plug the other end of the personal trainer programs, press...
... during the programs. The numbers beside the profiles show the maximum speed and incline settings for the program. Plug the other end of the treadmill near the power cord. Program Button lect one end of the audio cable into a 3.5mm Y-adapter (available at electronics stores). To stop ...LED track and the four displays. Each program is completed, remove the key from the console. To use iFit.com videocassettes, the treadmill must be connected to your headphones into several time segments of the Y-adapter. Plug the other end of the personal trainer programs, press...

User Manual
Page 13
PETL61591 4* 37 66 3 18 76 122 7 6 8 9 62 10 11 78 14 10 119 15 13 19 15 119 24 74 62 93 118 52 17 21 22 78 15 33 39 92 38 88 69 48 5 81 15 37 36 35 25 15 31 119 43 41 75 16 42 37 15 125 33 32 69 26 27 29 30 62 126 98 106 68 51 101 101 44 46 47 58 101 47 45 49 16 R1000A 127 128 101 47 64 47 67 63 120 62 59 61 60 54 62 53 SAVE THE EXPLODED DRAWING FOR FUTURE REFERENCE. 36 65 100 12 59 101 65 36 75 45 89 70 46 68 71 44 55 68 57 1 2 3 39 40 41 32 68 EXPLODED DRAWINGÑModel No. To identify the parts shown on this exploded drawing, ...
PETL61591 4* 37 66 3 18 76 122 7 6 8 9 62 10 11 78 14 10 119 15 13 19 15 119 24 74 62 93 118 52 17 21 22 78 15 33 39 92 38 88 69 48 5 81 15 37 36 35 25 15 31 119 43 41 75 16 42 37 15 125 33 32 69 26 27 29 30 62 126 98 106 68 51 101 101 44 46 47 58 101 47 45 49 16 R1000A 127 128 101 47 64 47 67 63 120 62 59 61 60 54 62 53 SAVE THE EXPLODED DRAWING FOR FUTURE REFERENCE. 36 65 100 12 59 101 65 36 75 45 89 70 46 68 71 44 55 68 57 1 2 3 39 40 41 32 68 EXPLODED DRAWINGÑModel No. To identify the parts shown on this exploded drawing, ...