
English Manual
Page 2
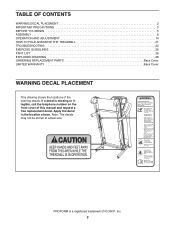
... shown at actual size. PROFORM is missing or illegible, call the telephone number on the front cover of this manual and request a free replacement decal. TABLE OF CONTENTS WARNING DECAL PLACEMENT 2 IMPORTANT PRECAUTIONS 3 BEFORE YOU BEGIN 5 ASSEMBLY 6 OPERATION AND ADJUSTMENT 14 HOW TO FOLD AND MOVE THE TREADMILL 21 TROUBLESHOOTING 22 EXERCISE...
... shown at actual size. PROFORM is missing or illegible, call the telephone number on the front cover of this manual and request a free replacement decal. TABLE OF CONTENTS WARNING DECAL PLACEMENT 2 IMPORTANT PRECAUTIONS 3 BEFORE YOU BEGIN 5 ASSEMBLY 6 OPERATION AND ADJUSTMENT 14 HOW TO FOLD AND MOVE THE TREADMILL 21 TROUBLESHOOTING 22 EXERCISE...

English Manual
Page 3
...air openings. Read, understand, and test the emergency stop unexpectedly, which may affect the accuracy of the specifications described on each side. The treadmill is being administered. 7. The pulse sensor is turned off. Before beginning any surface that all users of this manual and all warnings on...or see HOW TO TURN ON THE POWER on the same circuit. Wear appropriate exercise clothes while using your local PROFORM dealer or call the telephone number on the treadmill at all of heart rate readings. Do not wear loose clothes that meets all times. 15. ICON assumes no...
...air openings. Read, understand, and test the emergency stop unexpectedly, which may affect the accuracy of the specifications described on each side. The treadmill is being administered. 7. The pulse sensor is turned off. Before beginning any surface that all users of this manual and all warnings on...or see HOW TO TURN ON THE POWER on the same circuit. Wear appropriate exercise clothes while using your local PROFORM dealer or call the telephone number on the treadmill at all of heart rate readings. Do not wear loose clothes that meets all times. 15. ICON assumes no...

English Manual
Page 4
...in the storage position. 23. vice representative. Never remove the motor hood un- nance and adjustment procedures described in use , before cleaning the treadmill, and before performing the mainte- 20. Always remove the key, unplug the power cord, and press the power switch into any object into ...the off position when the treadmill is running. If you feel faint or if you experience pain while exercising, stop immediately and cool down. Always unplug the power cord...
...in the storage position. 23. vice representative. Never remove the motor hood un- nance and adjustment procedures described in use , before cleaning the treadmill, and before performing the mainte- 20. Always remove the key, unplug the power cord, and press the power switch into any object into ...the off position when the treadmill is running. If you feel faint or if you experience pain while exercising, stop immediately and cool down. Always unplug the power cord...

English Manual
Page 5
... manual carefully before contacting us. For your workouts at home more enjoyable and effective. To help us assist you ʼre not exercising, the unique treadmill can be folded up, requiring less than half the floor space of this manual. Length: 5 ft. 10 in. (178 cm) Width: 2 ft. 10 in... this manual, please see the front cover of features designed to make your benefit, read - If you for selecting the revolutionary PROFORM® 590 T treadmill. BEFORE YOU BEGIN Thank you have questions after read this manual. The model number and the location of the serial number decal are ...
... manual carefully before contacting us. For your workouts at home more enjoyable and effective. To help us assist you ʼre not exercising, the unique treadmill can be folded up, requiring less than half the floor space of this manual. Length: 5 ft. 10 in. (178 cm) Width: 2 ft. 10 in... this manual, please see the front cover of features designed to make your benefit, read - If you for selecting the revolutionary PROFORM® 590 T treadmill. BEFORE YOU BEGIN Thank you have questions after read this manual. The model number and the location of the serial number decal are ...
English Manual
Page 6
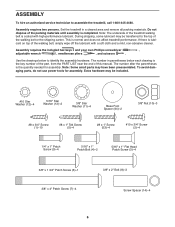
... below each drawing is the key number of the part, from the PART LIST near the end of the treadmill walking belt is normal and does not affect treadmill performance. Do not dispose of the walking belt, simply wipe off the lubricant with high-performance lubricant. Extra... hardware may be transferred to the top of the walking belt or the shipping carton. Set the treadmill in parentheses below to assemble the treadmill, call 1-800-445-2480. During shipping, some lubricant may have been preassembled. ASSEMBLY To hire an authorized service technician...
... below each drawing is the key number of the part, from the PART LIST near the end of the treadmill walking belt is normal and does not affect treadmill performance. Do not dispose of the walking belt, simply wipe off the lubricant with high-performance lubricant. Extra... hardware may be transferred to the top of the walking belt or the shipping carton. Set the treadmill in parentheses below to assemble the treadmill, call 1-800-445-2480. During shipping, some lubricant may have been preassembled. ASSEMBLY To hire an authorized service technician...

English Manual
Page 7
...; Then, press a Base Cap (89) into the Base (95). 8 Plastic Tie 87 90 5 95 90 5 89 95 96 10 Cut 87 7 Make sure that the treadmill is unplugged. 1 With the help of the hole. Cut the plastic tie near the Upright Wire (87). 2 Attach a Wheel (96) to pull the Upright Wire... out of a second person, carefully tip the treadmill onto its left side. the Wheel must turn freely. do not fully fold the Frame yet. Hole 87 94 55 90 5 90 94 5 2. Locate a plastic...
...; Then, press a Base Cap (89) into the Base (95). 8 Plastic Tie 87 90 5 95 90 5 89 95 96 10 Cut 87 7 Make sure that the treadmill is unplugged. 1 With the help of the hole. Cut the plastic tie near the Upright Wire (87). 2 Attach a Wheel (96) to pull the Upright Wire... out of a second person, carefully tip the treadmill onto its left side. the Wheel must turn freely. do not fully fold the Frame yet. Hole 87 94 55 90 5 90 94 5 2. Locate a plastic...

English Manual
Page 9
... a 3/8" Nut (10). Hold the Left Upright Spacer (88) and the Left Upright (84) against the Base. With the help of a second person, tip the treadmill so that the Base (95) is more stable; Partially fold the 5 Frame (55) so that the Left Upright Spacer sits flush against the Base (95... (11) into the Base (95). 8 55 95 96 10 6. If necessary, turn freely. do not fully tighten the Patch Screws yet. Make sure that the treadmill is flat on the floor. 6 7 11 14 95 84 88 9 5. Repeat this step with a second Screw Spacer (14), 3/8" x 4" Patch Screw (7), and 3/8" Star Washer (11...
... a 3/8" Nut (10). Hold the Left Upright Spacer (88) and the Left Upright (84) against the Base. With the help of a second person, tip the treadmill so that the Base (95) is more stable; Partially fold the 5 Frame (55) so that the Left Upright Spacer sits flush against the Base (95... (11) into the Base (95). 8 55 95 96 10 6. If necessary, turn freely. do not fully tighten the Patch Screws yet. Make sure that the treadmill is flat on the floor. 6 7 11 14 95 84 88 9 5. Repeat this step with a second Screw Spacer (14), 3/8" x 4" Patch Screw (7), and 3/8" Star Washer (11...

English Manual
Page 13
...13 Upright Cover with the Base. Attach the upper end of the hex keys is completed. If there are properly tightened before you use the treadmill. Hold the Right Upright Cover (86) against the console assembly. Make sure that the large barrel and the latch knob are oriented as shown.... Keep the included hex keys in the same way. To protect the floor or carpet, place a mat under the treadmill. Tighten the 3/8" x 4" Patch Screws (7). 1 85 80 Console 1 Assembly 84 14. Note: Extra hardware may be included. one of the Storage Latch (51) to...
...13 Upright Cover with the Base. Attach the upper end of the hex keys is completed. If there are properly tightened before you use the treadmill. Hold the Right Upright Cover (86) against the console assembly. Make sure that the large barrel and the latch knob are oriented as shown.... Keep the included hex keys in the same way. To protect the floor or carpet, place a mat under the treadmill. Tighten the 3/8" x 4" Patch Screws (7). 1 85 80 Console 1 Assembly 84 14. Note: Extra hardware may be included. one of the Storage Latch (51) to...

English Manual
Page 14
...is functioning properly. A temporary adapter may not be held in - Grounded Outlet Box Surge Suppressor Grounding Pin Grounding Pin Your treadmill, like extending from the adapter must be compatible with a qualified electrician or serviceman if you are not grounded. If it ...pole receptacle if a properly grounded outlet is grounded before using an adapter. 14 OPERATION AND ADJUSTMENT THE PRE-LUBRICATED WALKING BELT Your treadmill features a walking belt coated with all local codes and ordinances. IMPORTANT: Never apply silicone spray or other electronic equipment, can be...
...is functioning properly. A temporary adapter may not be held in - Grounded Outlet Box Surge Suppressor Grounding Pin Grounding Pin Your treadmill, like extending from the adapter must be compatible with a qualified electrician or serviceman if you are not grounded. If it ...pole receptacle if a properly grounded outlet is grounded before using an adapter. 14 OPERATION AND ADJUSTMENT THE PRE-LUBRICATED WALKING BELT Your treadmill features a walking belt coated with all local codes and ordinances. IMPORTANT: Never apply silicone spray or other electronic equipment, can be...
English Manual
Page 15
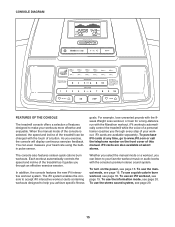
... at select stores. The console also features sixteen quick calorie burn workouts. Each workout automatically controls the speed and incline of the treadmill can even measure your workout. In addition, the console features the new iFit interactive workout system. To turn on the front cover...the console will display continuous exercise feedback. To use an iFit workout, see page 20. 15 CONSOLE DIAGRAM FEATURES OF THE CONSOLE The treadmill console offers a selection of this manual. As you can listen to make your favorite workout music or audio books with the Marathon workout...
... at select stores. The console also features sixteen quick calorie burn workouts. Each workout automatically controls the speed and incline of the treadmill can even measure your workout. In addition, the console features the new iFit interactive workout system. To turn on the front cover...the console will display continuous exercise feedback. To use an iFit workout, see page 20. 15 CONSOLE DIAGRAM FEATURES OF THE CONSOLE The treadmill console offers a selection of this manual. As you can listen to make your favorite workout music or audio books with the Marathon workout...
English Manual
Page 16
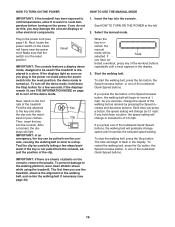
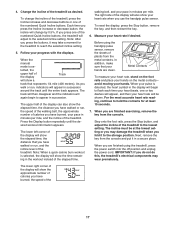
...the Stop button for a few steps back- sole, causing the walking belt to slow to the walking platform, wear clean athletic shoes while using the treadmill. When the key is turned on the power. Start the walking belt. The first time you have se- Insert the key into the console. ... switch into the reset position, the demo mode is in the reset position. serted, the manual mode will begin to be used if the treadmill is not pulled from the con- just the position of the numbered Quick Speed buttons. If you may damage the console displays or other electrical...
...the Stop button for a few steps back- sole, causing the walking belt to slow to the walking platform, wear clean athletic shoes while using the treadmill. When the key is turned on the power. Start the walking belt. The first time you have se- Insert the key into the console. ... switch into the reset position, the demo mode is in the reset position. serted, the manual mode will begin to be used if the treadmill is not pulled from the con- just the position of the numbered Quick Speed buttons. If you may damage the console displays or other electrical...
English Manual
Page 17
.... Next, remove the key from the metal contacts. IMPORTANT: If you do not do this, the treadmillʼs electrical components may damage the treadmill when you have burned, the speed of the treadmill. If you press one or two dashes will appear, and then your heart rate will show the approximate...and the incline of the 17 For the most accurate heart rate reading, continue to hold the contacts for the treadmill to flash each time your heart beats, one of the treadmill as desired. Note: After you are finished exercising, remove the key from the console. Press the Display button ...
.... Next, remove the key from the metal contacts. IMPORTANT: If you do not do this, the treadmillʼs electrical components may damage the treadmill when you have burned, the speed of the treadmill. If you press one or two dashes will appear, and then your heart rate will show the approximate...and the incline of the 17 For the most accurate heart rate reading, continue to hold the contacts for the treadmill to flash each time your heart beats, one of the treadmill as desired. Note: After you are finished exercising, remove the key from the console. Press the Display button ...
English Manual
Page 18
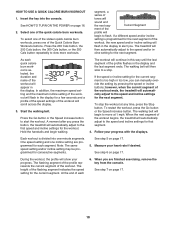
...6 on page 17. 5. The walking belt will automatically adjust to view more workouts. One speed setting and one of the workout ends, the treadmill will begin to flash. At the end of each quick calorie burn workout is programmed for the next segment of the profile will appear in... segments. Current Segment ment of the workout, the new speed and/or incline setting will automatically adjust to alert you press the button, the treadmill will then slow to start the workout. As each 6. In addition, the maximum speed setting and the maximum incline setting of the workout will...
...6 on page 17. 5. The walking belt will automatically adjust to view more workouts. One speed setting and one of the workout ends, the treadmill will begin to flash. At the end of each quick calorie burn workout is programmed for the next segment of the profile will appear in... segments. Current Segment ment of the workout, the new speed and/or incline setting will automatically adjust to alert you press the button, the treadmill will then slow to start the workout. As each 6. In addition, the maximum speed setting and the maximum incline setting of the workout will...
English Manual
Page 19
... may be programmed for each segment. When you are finished exercising, remove the key from the iFit slot when you press the button, the treadmill will automatically adjust to the speed and incline settings for the next segment. See step 7 on page 16. 2. To purchase iFit cards at...your personal trainer (see THE INFORMATION MODE on the front cover of the workout will begin walking. however, when the next segment begins, the treadmill will guide you can select an audio setting for the next segment. If the profile does not appear, press the Display button repeatedly. See...
... may be programmed for each segment. When you are finished exercising, remove the key from the iFit slot when you press the button, the treadmill will automatically adjust to the speed and incline settings for the next segment. See step 7 on page 16. 2. To purchase iFit cards at...your personal trainer (see THE INFORMATION MODE on the front cover of the workout will begin walking. however, when the next segment begins, the treadmill will guide you can select an audio setting for the next segment. If the profile does not appear, press the Display button repeatedly. See...
English Manual
Page 20
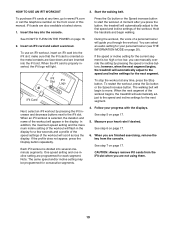
... a store. TO turn off the voice of miles or kilometers that the treadmill has been operated. To exit the information mode, remove the key from the console. To change the unit of... treadmill usage information. To select the information mode, hold down the Stop button, insert the key into ...lower right corner of on or turn on this page). Note: If the volume cannot be used if the treadmill is fully inserted. The lower left corner of the display will appear in the lower right corner of the ...
... a store. TO turn off the voice of miles or kilometers that the treadmill has been operated. To exit the information mode, remove the key from the console. To change the unit of... treadmill usage information. To select the information mode, hold down the Stop button, insert the key into ...lower right corner of on or turn on this page). Note: If the volume cannot be used if the treadmill is fully inserted. The lower left corner of the display will appear in the lower right corner of the ...

English Manual
Page 21
...85° F (30° C). 2. CAUTION: Make sure that the latch knob is locked in the storage position. Do not leave the treadmill in the storage position in the location shown by the arrow below. If necessary, push the frame forward slightly. CAUTION: Do not hold the frame... by the plastic foot rails, and do not move it as described at the left . HOW TO MOVE THE TREADMILL Before moving the treadmill, fold it to the left . Keep the treadmill out of the handrails, and place one foot against a wheel. 1 1 Frame Frame Handrail Wheel 2. See drawing 1...
...85° F (30° C). 2. CAUTION: Make sure that the latch knob is locked in the storage position. Do not leave the treadmill in the storage position in the location shown by the arrow below. If necessary, push the frame forward slightly. CAUTION: Do not hold the frame... by the plastic foot rails, and do not move it as described at the left . HOW TO MOVE THE TREADMILL Before moving the treadmill, fold it to the left . Keep the treadmill out of the handrails, and place one foot against a wheel. 1 1 Frame Frame Handrail Wheel 2. See drawing 1...
English Manual
Page 22
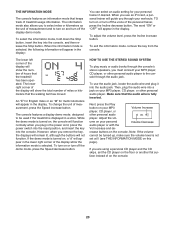
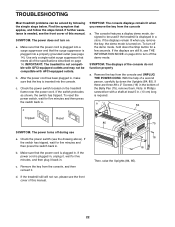
...power switch located on page 14. To reset the power switch, wait for a few seconds. SYMPTOM: The displays of the specifications described on the treadmill frame near the power cord. Make sure that applies, and follow the steps listed. d. If the switch protrudes as shown, the switch has tripped... in . (13 cm) long is inserted into a properly grounded outlet (see THE INFORMATION MODE on page 20 to be used if the treadmill is not compatible with GFCI-equipped outlets and may not be solved by following the simple steps below. Use only a single-outlet surge suppressor ...
...power switch located on page 14. To reset the power switch, wait for a few seconds. SYMPTOM: The displays of the specifications described on the treadmill frame near the power cord. Make sure that applies, and follow the steps listed. d. If the switch protrudes as shown, the switch has tripped... in . (13 cm) long is inserted into a properly grounded outlet (see THE INFORMATION MODE on page 20 to be used if the treadmill is not compatible with GFCI-equipped outlets and may not be solved by following the simple steps below. Use only a single-outlet surge suppressor ...
English Manual
Page 23
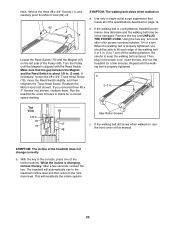
... the Pulley (48). Be careful to the minimum level. If the walking belt still slows when walked on a. SYMPTOM: The incline of a turn. The treadmill will recalibrate the incline system. 23 Next, remove the three #8 x 3/4" Screws (1), and carefully pivot the Motor Hood (62) off the walking platform....Truss Head Screw. b 2-3 in . 18 73 47 48 Idler Roller Screws c. With the key in the power cord, insert the key, and run the treadmill for a correct speed reading. After a few minutes to 3 in . (3 mm). Remove the key and UNPLUG THE POWER CORD. Then, plug in the ...
... the Pulley (48). Be careful to the minimum level. If the walking belt still slows when walked on a. SYMPTOM: The incline of a turn. The treadmill will recalibrate the incline system. 23 Next, remove the three #8 x 3/4" Screws (1), and carefully pivot the Motor Hood (62) off the walking platform....Truss Head Screw. b 2-3 in . 18 73 47 48 Idler Roller Screws c. With the key in the power cord, insert the key, and run the treadmill for a correct speed reading. After a few minutes to 3 in . (3 mm). Remove the key and UNPLUG THE POWER CORD. Then, plug in the ...

English Manual
Page 24
.... Repeat until the walking belt is off-center or slips when walked on a. Then, plug in the power cord, insert the key, and run the treadmill for a few minutes. Using the hex key, turn both idler roller screws clockwise, 1/4 of a turn; When the walking belt is correctly tightened, you should ...be able to lift each edge of a turn . If the walking belt slips when walked on the treadmill for a few minutes. If the walking belt is properly tightened. Then, plug in . (5 to keep the walking belt centered. If the walking belt has ...
.... Repeat until the walking belt is off-center or slips when walked on a. Then, plug in the power cord, insert the key, and run the treadmill for a few minutes. Using the hex key, turn both idler roller screws clockwise, 1/4 of a turn; When the walking belt is correctly tightened, you should ...be able to lift each edge of a turn . If the walking belt slips when walked on the treadmill for a few minutes. If the walking belt is properly tightened. Then, plug in . (5 to keep the walking belt centered. If the walking belt has ...


