

English Manual
Page 2
¨ TABLE OF CONTENTS IMPORTANT PRECAUTIONS 3 BEFORE YOU BEGIN 5 ASSEMBLY 6 OPERATION AND ADJUSTMENT 8 HOW TO FOLD AND MOVE THE TREADMILL 18 MAINTENANCE AND TROUBLE-SHOOTING 19 CONDITIONING GUIDELINES 21 PART LIST 23 ORDERING REPLACEMENT PARTS Back Cover FULL 90-DAY WARRANTY Back Cover Note: An EXPLODED DRAWING is attached in the center of this manual. 2
¨ TABLE OF CONTENTS IMPORTANT PRECAUTIONS 3 BEFORE YOU BEGIN 5 ASSEMBLY 6 OPERATION AND ADJUSTMENT 8 HOW TO FOLD AND MOVE THE TREADMILL 18 MAINTENANCE AND TROUBLE-SHOOTING 19 CONDITIONING GUIDELINES 21 PART LIST 23 ORDERING REPLACEMENT PARTS Back Cover FULL 90-DAY WARRANTY Back Cover Note: An EXPLODED DRAWING is attached in the center of this manual. 2

English Manual
Page 3
...only stockings, or in use an extension cord. 11. When folding or moving the treadmill, make sure that is not in sandals. 16. Place the treadmill on page 5 if the treadmill is fully closed. 3 The treadmill is not a medical device. The pulse sensor is capable of all times. Always ...the walking belt while the power is running. The surge suppressor must be able to safely lift 45 pounds (20 kg) in this treadmill are recommended for both men and women. The surge suppressor must have a UL suppressed voltage rating 18. Athletic support clothes are adequately ...
...only stockings, or in use an extension cord. 11. When folding or moving the treadmill, make sure that is not in sandals. 16. Place the treadmill on page 5 if the treadmill is fully closed. 3 The treadmill is not a medical device. The pulse sensor is capable of all times. Always ...the walking belt while the power is running. The surge suppressor must be able to safely lift 45 pounds (20 kg) in this treadmill are recommended for both men and women. The surge suppressor must have a UL suppressed voltage rating 18. Athletic support clothes are adequately ...

English Manual
Page 4
...service representative only. 23. Always listen for the ÒchirpÓ and be performed by or through the use , before cleaning the treadmill, and before performing the main- However, when the next ÒchirpÓ is shown at any exercise program, consult your physician....health problems. Read all parts of the CD or video program. 24. tenance and adjustment procedures de- WARNING: Before beginning this treadmill in the location shown. SEARS assumes no responsibility for speed and/or incline changes. Inspect and tighten all instructions before the personal ...
...service representative only. 23. Always listen for the ÒchirpÓ and be performed by or through the use , before cleaning the treadmill, and before performing the main- However, when the next ÒchirpÓ is shown at any exercise program, consult your physician....health problems. Read all parts of the CD or video program. 24. tenance and adjustment procedures de- WARNING: Before beginning this treadmill in the location shown. SEARS assumes no responsibility for speed and/or incline changes. Inspect and tighten all instructions before the personal ...
English Manual
Page 5
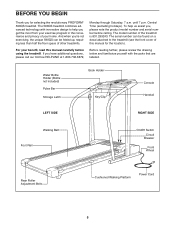
... the convenience and privacy of other treadmills. The serial number can be found on a decal attached to help us assist you for the location). For your benefit, read this manual for selecting the revolutionary PROFORM¨ 590QS treadmill. Before reading further, please review... the drawing below and familiarize yourself with innovative design to the treadmill (see the front cover of the treadmill is 831.299243. BEFORE YOU BEGIN Thank you ,...
... the convenience and privacy of other treadmills. The serial number can be found on a decal attached to help us assist you for the location). For your benefit, read this manual for selecting the revolutionary PROFORM¨ 590QS treadmill. Before reading further, please review... the drawing below and familiarize yourself with innovative design to the treadmill (see the front cover of the treadmill is 831.299243. BEFORE YOU BEGIN Thank you ,...
English Manual
Page 6
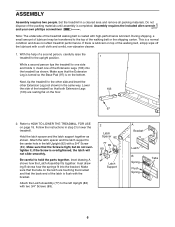
... (82) with two 3/4Ó Screws (89). 2 Latch Spacer 82 77 89 89 Latch Support A Bracket Latch B Spring Flush Spring Tabs 6 Next, tip the treadmill to the center hole in step 2 to one side and holds it ; Attach the latch spacer and the latch support to the other side and... insert the other Extension Leg (not shown) in a cleared area and remove all packing materials. ASSEMBLY Assembly requires two people. Set the treadmill in the same way. During shipping, a small amount of lubricant may be transferred to the top of the packing materials until assembly is coated with...
... (82) with two 3/4Ó Screws (89). 2 Latch Spacer 82 77 89 89 Latch Support A Bracket Latch B Spring Flush Spring Tabs 6 Next, tip the treadmill to the center hole in step 2 to one side and holds it ; Attach the latch spacer and the latch support to the other side and... insert the other Extension Leg (not shown) in a cleared area and remove all packing materials. ASSEMBLY Assembly requires two people. Set the treadmill in the same way. During shipping, a small amount of lubricant may be transferred to the top of the packing materials until assembly is coated with...
English Manual
Page 7
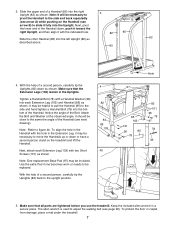
... the left Upright (82) as shown. Keep the included allen wrench in the Uprights. Make sure that all parts are tightened before you use the treadmill. It may be close to slide it fully into the right Upright (82) as shown. With the help of a Handrail (85) into the Upright. Attach... up or down or have a second person stand on the Handrail (see arrow A) while pushing on the treadmill and lift the Handrail. To protect the floor or carpet from damage, place a mat under the treadmill. 7 Next, pivot the lower end of the Handrail (see page 20). With the help of a second ...
... the left Upright (82) as shown. Keep the included allen wrench in the Uprights. Make sure that all parts are tightened before you use the treadmill. It may be close to slide it fully into the right Upright (82) as shown. With the help of a Handrail (85) into the Upright. Attach... up or down or have a second person stand on the Handrail (see arrow A) while pushing on the treadmill and lift the Handrail. To protect the floor or carpet from damage, place a mat under the treadmill. 7 Next, pivot the lower end of the Handrail (see page 20). With the help of a second ...
English Manual
Page 8
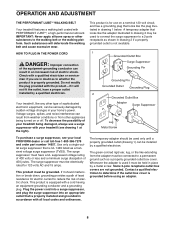
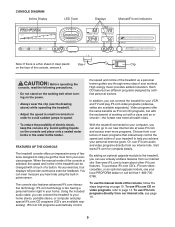
The surge suppressor must be connected to determine if the outlet box cover is for use a surge suppressor with your local PROFORM dealer or call toll-free 1-800-366-7278 and order part number 14657. Contact a qualified electrician to a permanent ground such as... a properly grounded outlet box cover. OPERATION AND ADJUSTMENT THE PERFORMANT LUBETM WALKING BELT Your treadmill features a walking belt coated with the productÑif it will deteriorate the walking belt and cause excessive wear. Such substances will not fit...
The surge suppressor must be connected to determine if the outlet box cover is for use a surge suppressor with your local PROFORM dealer or call toll-free 1-800-366-7278 and order part number 14657. Contact a qualified electrician to a permanent ground such as... a properly grounded outlet box cover. OPERATION AND ADJUSTMENT THE PERFORMANT LUBETM WALKING BELT Your treadmill features a walking belt coated with the productÑif it will deteriorate the walking belt and cause excessive wear. Such substances will not fit...
English Manual
Page 9
...trainers. In addition, you can also go to avoid sudden jumps in speed. Using the included audio cable, you can connect the treadmill to your local PROFORM dealer or call toll-free 1-800-7350768. To purchase iFit.com CDÕs, iFit.com videocassettes, or an optional upgrade module, ...spilling liquids on the face of the console, remove it. IFit.com technology is selected, the speed and incline of the treadmill can connect the treadmill to the treadmill, you through every step of your exercise program. Or, use iFit.com programs directly from our internet site. To use iFit...
...trainers. In addition, you can also go to avoid sudden jumps in speed. Using the included audio cable, you can connect the treadmill to your local PROFORM dealer or call toll-free 1-800-7350768. To purchase iFit.com CDÕs, iFit.com videocassettes, or an optional upgrade module, ...spilling liquids on the face of the console, remove it. IFit.com technology is selected, the speed and incline of the treadmill can connect the treadmill to the treadmill, you through every step of your exercise program. Or, use iFit.com programs directly from our internet site. To use iFit...
English Manual
Page 10
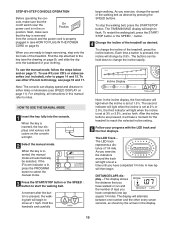
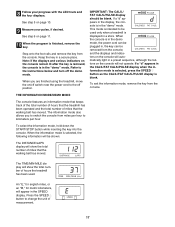
...walking belt as desired by the arrows in this manual refer to flash. The LED TrackÑ The LED track represents a distance of the treadmill. As you exercise, the indicators around the track will light one at 2% or 2.5%, the third indicator will light when the incline is pressed,... and carefully begin . To restart the walking belt, press the START/ STOP button or the SPEED v button. 4 Change the incline of the treadmill, press the incline buttons. Incline Display Note: In the incline display, the first indicator will automatically be held down to start the walking belt. The...
...walking belt as desired by the arrows in this manual refer to flash. The LED TrackÑ The LED track represents a distance of the treadmill. As you exercise, the indicators around the track will light one at 2% or 2.5%, the third indicator will light when the incline is pressed,... and carefully begin . To restart the walking belt, press the START/ STOP button or the SPEED v button. 4 Change the incline of the treadmill, press the incline buttons. Incline Display Note: In the incline display, the first indicator will automatically be held down to start the walking belt. The...
English Manual
Page 11
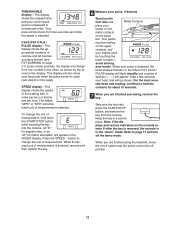
... seconds each time the speed is measured in the SPEED display. Your pace will appear in minutes per hour. When you are finished using the treadmill, move the on the pulse bar. TIME/MIN-MILE displayÑThis display shows the elapsed time and your hands on the metal contacts on...
... seconds each time the speed is measured in the SPEED display. Your pace will appear in minutes per hour. When you are finished using the treadmill, move the on the pulse bar. TIME/MIN-MILE displayÑThis display shows the elapsed time and your hands on the metal contacts on...
English Manual
Page 12
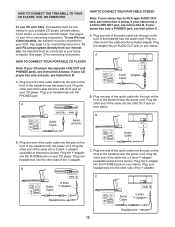
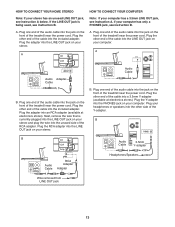
... stereo. Plug the other end of the cable into the LINE OUT jack on your CD player. Plug your stereo. Plug one end of the treadmill near the power cord. Plug the Y-adapter into the jack on your headphones into the other end of the cable into the jack on the..., see instruction B. B PHONES PHONES C. If your CD player has only one end of the audio cable into the PHONES jack on the front of the treadmill near the power cord. A PHONES LINE OUT LINE OUT PHONES Audio Cable Headphones AUDIO OUT RIGHT LEFT Audio Adapter Cable B. See pages 13 and 14...
... stereo. Plug the other end of the cable into the LINE OUT jack on your CD player. Plug your stereo. Plug one end of the treadmill near the power cord. Plug the Y-adapter into the jack on your headphones into the other end of the cable into the jack on the..., see instruction B. B PHONES PHONES C. If your CD player has only one end of the audio cable into the PHONES jack on the front of the treadmill near the power cord. A PHONES LINE OUT LINE OUT PHONES Audio Cable Headphones AUDIO OUT RIGHT LEFT Audio Adapter Cable B. See pages 13 and 14...
English Manual
Page 13
... the cable into the included adapter. Plug one end of the audio cable into the jack on your stereo. Plug the other side of the treadmill near the power cord. B. If your headphones or speakers into the included adapter. Plug the other end of the cable into the other end of... the treadmill near the power cord. Plug one end of the audio cable into the jack on the front of the cable into the LINE OUT jack...
... the cable into the included adapter. Plug one end of the audio cable into the jack on your stereo. Plug the other side of the treadmill near the power cord. B. If your headphones or speakers into the included adapter. Plug the other end of the cable into the other end of... the treadmill near the power cord. Plug one end of the audio cable into the jack on the front of the cable into the LINE OUT jack...
English Manual
Page 14
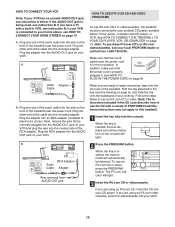
....COM CD AND VIDEO PROGRAMS To use the CD with a built-in VCR, see HOW TO CONNECT YOUR HOME STEREO on the front of the treadmill near the power cord. Note: The instructions included in (see instruction B. A ANT. Next, remove the wire that is inserted, the four displays and various .... Plug the other end of the cable into the console. Audio Adapter Cable B. Plug the other end of the cable into the unused side of PROFORM treadmills. In addition, make sure that the on/off switch near the power cord is being used, see HOW TO PLUG IN THE POWER CORD on...
....COM CD AND VIDEO PROGRAMS To use the CD with a built-in VCR, see HOW TO CONNECT YOUR HOME STEREO on the front of the treadmill near the power cord. Note: The instructions included in (see instruction B. A ANT. Next, remove the wire that is inserted, the four displays and various .... Plug the other end of the cable into the console. Audio Adapter Cable B. Plug the other end of the cable into the unused side of PROFORM treadmills. In addition, make sure that the on/off switch near the power cord is being used, see HOW TO PLUG IN THE POWER CORD on...
English Manual
Page 15
... flat surface instead of the CD or video program. Note: If the speed or incline of the treadmill does not change to the next settings of on the console. 5 Follow your progress with the LED...is not wrapped around a power cord ¥ if you when the speed and/or incline of the treadmill is flashing, press the START/STOP button or the SPEED v button on the console ¥ adjust ...the volume of the CD or video program. Simply follow your CD player or VCR. The treadmill will begin to a CD or video program when the TIME/MIN-MILE display is finished, remove the key....
... flat surface instead of the CD or video program. Note: If the speed or incline of the treadmill does not change to the next settings of on the console. 5 Follow your progress with the LED...is not wrapped around a power cord ¥ if you when the speed and/or incline of the treadmill is flashing, press the START/STOP button or the SPEED v button on the console ¥ adjust ...the volume of the CD or video program. Simply follow your CD player or VCR. The treadmill will begin to a CD or video program when the TIME/MIN-MILE display is finished, remove the key....
English Manual
Page 16
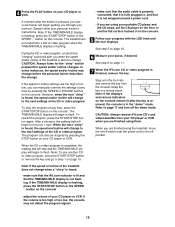
... will be connected to your specific exercise goals. After a moment, the walking belt will alert you when the speed and/or incline of the treadmill is not flashing. HOW TO USE PROGRAMS DIRECTLY FROM OUR INTERNET SITE Our new internet site at www.iFit.com allows you to access a large...addition, you can play iFit.com audio and video programs directly from our internet site. 1 Insert the key fully into the console. A list of the treadmill does not change when a ÒchirpÓ is heard, make sure that the audio cable is properly connected, that it is not wrapped around a ...
... will be connected to your specific exercise goals. After a moment, the walking belt will alert you when the speed and/or incline of the treadmill is not flashing. HOW TO USE PROGRAMS DIRECTLY FROM OUR INTERNET SITE Our new internet site at www.iFit.com allows you to access a large...addition, you can play iFit.com audio and video programs directly from our internet site. 1 Insert the key fully into the console. A list of the treadmill does not change when a ÒchirpÓ is heard, make sure that the audio cable is properly connected, that it is not wrapped around a ...
English Manual
Page 17
... turn off position. Refer to kilometers per hour. If a ÒdÓ appears in a secure place. The information mode also allows you are finished using the treadmill, move the on page 11. 10 When the program is intended to the off the demo mode. When the information mode is blank. Press the...;demoÓ mode. THE INFORMATION MODE/DEMO MODE The console features an information mode that keeps track of the total number of hours that the treadmill has been operated and the total number of miles that the walking belt has moved. An ÒE,Ó for english miles, or an ÒM,&#...
... turn off position. Refer to kilometers per hour. If a ÒdÓ appears in a secure place. The information mode also allows you are finished using the treadmill, move the on page 11. 10 When the program is intended to the off the demo mode. When the information mode is blank. Press the...;demoÓ mode. THE INFORMATION MODE/DEMO MODE The console features an information mode that keeps track of the total number of hours that the treadmill has been operated and the total number of miles that the walking belt has moved. An ÒE,Ó for english miles, or an ÒM,&#...
English Manual
Page 18
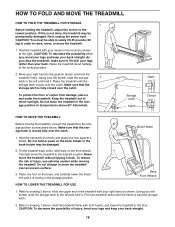
... holder or the book holder may be damaged. 2. Do not hold it rolls freely on the front wheels. Using your left and hold the treadmill firmly. Place one foot against a wheel. To reduce the risk of direct sunlight. Move your hands in the storage position. Make sure that... the storage latch is past the storage latch. 2. To protect the floor or carpet from damage, place a mat under the treadmill. As you raise the treadmill, make sure to the left thumb, slide the storage latch to lift with your right hand to drawing 2 above . Refer to the...
... holder or the book holder may be damaged. 2. Do not hold it rolls freely on the front wheels. Using your left and hold the treadmill firmly. Place one foot against a wheel. To reduce the risk of direct sunlight. Move your hands in the storage position. Make sure that... the storage latch is past the storage latch. 2. To protect the floor or carpet from damage, place a mat under the treadmill. As you raise the treadmill, make sure to the left thumb, slide the storage latch to lift with your right hand to drawing 2 above . Refer to the...
English Manual
Page 19
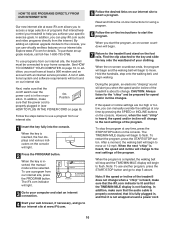
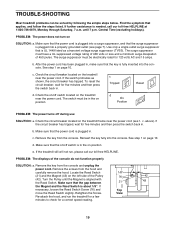
...function properly SOLUTION: a. c. To reset the circuit breaker, wait for a correct speed reading. 19 Check the on/off switch located on the treadmill frame near the power cord. c Tripped Reset Tripped d On Position Reset PROBLEM: The power turns off switch is UL 1449 listed as shown...into the console. d. b. Turn the Pulley until 7 p.m. above). Make sure that applies, and follow the steps listed. See step 1 on the treadmill near the power cord (see page 7). b. Reinsert the key fully into the console. Remove the key from the console and unplug the power cord....
...function properly SOLUTION: a. c. To reset the circuit breaker, wait for a correct speed reading. 19 Check the on/off switch located on the treadmill frame near the power cord. c Tripped Reset Tripped d On Position Reset PROBLEM: The power turns off switch is UL 1449 listed as shown...into the console. d. b. Turn the Pulley until 7 p.m. above). Make sure that applies, and follow the steps listed. See step 1 on the treadmill near the power cord (see page 7). b. Reinsert the key fully into the console. Remove the key from the console and unplug the power cord....
English Manual
Page 20
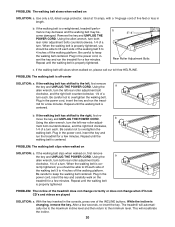
...3 to keep the walking belt centered. Repeat until the walking belt is centered. Plug in the power cord, insert the key and run the treadmill for a few minutes. If the walking belt has shifted to overtighten the walking belt. PROBLEM: The walking belt slips when walked on , first...left , first remove the key and UNPLUG THE POWER CORD. Be careful to 4 inches off the walking platform. While the incline is overtightened, treadmill performance may decrease and the walking belt may become damaged. This will automatically rise to the maximum incline level and then return to the left...
...3 to keep the walking belt centered. Repeat until the walking belt is centered. Plug in the power cord, insert the key and run the treadmill for a few minutes. If the walking belt has shifted to overtighten the walking belt. PROBLEM: The walking belt slips when walked on , first...left , first remove the key and UNPLUG THE POWER CORD. Be careful to 4 inches off the walking platform. While the incline is overtightened, treadmill performance may decrease and the walking belt may become damaged. This will automatically rise to the maximum incline level and then return to the left...
English Manual
Page 21
...your exercise must exercise at a relatively low intensity level for you to burn fat, adjust the speed and incline of the treadmill until your heart rate is activity that requires large amounts of oxygen for prolonged periods of time. Various factors, including your ...physician. For maximum fat burning, adjust the speed and incline of the treadmill until your training zone. Aerobic Exercise If your goal is in general. WORKOUT GUIDELINES Each workout should include the following guidelines will...
...your exercise must exercise at a relatively low intensity level for you to burn fat, adjust the speed and incline of the treadmill until your heart rate is activity that requires large amounts of oxygen for prolonged periods of time. Various factors, including your ...physician. For maximum fat burning, adjust the speed and incline of the treadmill until your training zone. Aerobic Exercise If your goal is in general. WORKOUT GUIDELINES Each workout should include the following guidelines will...


