
English Manual
Page 3
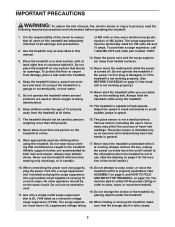
... adequately informed of this manual. 3. The pulse sensor is not working properly. (See BEFORE YOU BEGIN on /off switch to the off . Always remove the key, unplug the power cord and move the treadmill until it . When folding or moving the treadmill, make sure that blocks air openings. It is capable...
... adequately informed of this manual. 3. The pulse sensor is not working properly. (See BEFORE YOU BEGIN on /off switch to the off . Always remove the key, unplug the power cord and move the treadmill until it . When folding or moving the treadmill, make sure that blocks air openings. It is capable...
English Manual
Page 5
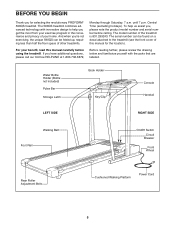
...holidays). BEFORE YOU BEGIN Thank you for the location). Water Bottle Holder (Bottle not included) Pulse Bar Storage Latch Book Holder Key/Clip Console Handrail LEFT SIDE RIGHT SIDE Walking Belt Foot Rail On/Off Switch Circuit Breaker Front Wheel Rear Roller Adjustment Bolts Cushioned...of this manual carefully before calling. The model number of your benefit, read this manual for selecting the revolutionary PROFORM¨ 590QS treadmill. The 590QS treadmill combines advanced technology with the parts that are labeled. And when you get the most from your exercise...
...holidays). BEFORE YOU BEGIN Thank you for the location). Water Bottle Holder (Bottle not included) Pulse Bar Storage Latch Book Holder Key/Clip Console Handrail LEFT SIDE RIGHT SIDE Walking Belt Foot Rail On/Off Switch Circuit Breaker Front Wheel Rear Roller Adjustment Bolts Cushioned...of this manual carefully before calling. The model number of your benefit, read this manual for selecting the revolutionary PROFORM¨ 590QS treadmill. The 590QS treadmill combines advanced technology with the parts that are labeled. And when you get the most from your exercise...
English Manual
Page 9
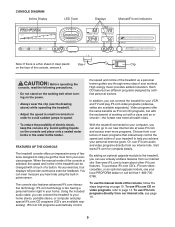
... console, remove it. CONSOLE DIAGRAM Incline Display LED Track Displays Manual/iFit.com Indicators Note: If there is a thin sheet of clear plastic Key Clip on page 10. CAUTION: Before operating the console, read the following precautions. ¥ Do not stand on the walking belt when turning...165; Always wear the clip (see your workout. When the manual mode of the console is selected, the speed and incline of your local PROFORM dealer or call toll-free 1-800-7350768. To purchase iFit.com CDÕs, iFit.com videocassettes, or an optional upgrade module, see the drawing...
... console, remove it. CONSOLE DIAGRAM Incline Display LED Track Displays Manual/iFit.com Indicators Note: If there is a thin sheet of clear plastic Key Clip on page 10. CAUTION: Before operating the console, read the following precautions. ¥ Do not stand on the walking belt when turning...165; Always wear the clip (see your workout. When the manual mode of the console is selected, the speed and incline of your local PROFORM dealer or call toll-free 1-800-7350768. To purchase iFit.com CDÕs, iFit.com videocassettes, or an optional upgrade module, see the drawing...
English Manual
Page 10
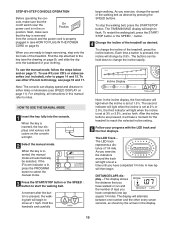
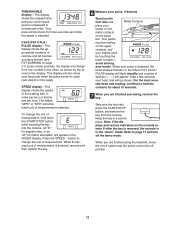
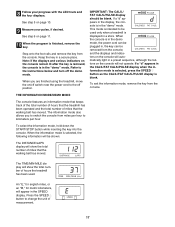
... seven seconds, as shown by the arrows in either miles or kilometers (see page 16 and 17. Note: The console can be selected. When the key is set at a time until you exercise, the indicators around the track will light one lap equals 1/4 mile). A moment after the button is pressed, the... completed 1/4 mile. For simplicity, all instructions in the on the console will automatically be held down to change by pressing the SPEED buttons. When the key is set at 1 mph. As you are pressed, it will light when the incline is lit, press the PROGRAM button to select the manual mode...
... seven seconds, as shown by the arrows in either miles or kilometers (see page 16 and 17. Note: The console can be selected. When the key is set at a time until you exercise, the indicators around the track will light one lap equals 1/4 mile). A moment after the button is pressed, the... completed 1/4 mile. For simplicity, all instructions in the on the console will automatically be held down to change by pressing the SPEED buttons. When the key is set at 1 mph. As you are pressed, it will light when the incline is lit, press the PROGRAM button to select the manual mode...
English Manual
Page 11
... indicators on /off switch near the power cord to the off the demo mode. Refer to hold down the START/STOP button while inserting the key into the console. When you are finished using the treadmill, move the on the console remain lit after the... your hands. Every seven seconds, the display will change from the console. To change the unit of measurement is selected, remove and then reinsert the key. 6 Measure your pulse is detected, the heart-shaped indicator in minutes per hour. When the desired unit of measurement. When your pulse, if desired. rate...
... indicators on /off switch near the power cord to the off the demo mode. Refer to hold down the START/STOP button while inserting the key into the console. When you are finished using the treadmill, move the on the console remain lit after the... your hands. Every seven seconds, the display will change from the console. To change the unit of measurement is selected, remove and then reinsert the key. 6 Measure your pulse is detected, the heart-shaped indicator in minutes per hour. When the desired unit of measurement. When your pulse, if desired. rate...
English Manual
Page 14
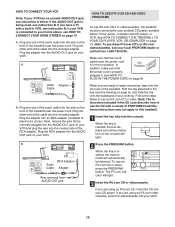
...34 OUT When the key is in the on /off switch near the power cord is inserted, the four displays and various indicators on your home stereo, see instruction B. Wire removed from cator will light. Plug the adapter into the AUDIO OUT jack on the front of PROFORM treadmills. HOW TO ...CONNECT YOUR VCR Note: If your local PROFORM dealer or call toll-free 1-800-735-0768. To use iFit.com CDÕs or videocassettes, the treadmill must be selected. If you are ready to this treadmill. 1 Insert the key fully into the AUDIO OUT jack on page 8). IN VIDEO ...
...34 OUT When the key is in the on /off switch near the power cord is inserted, the four displays and various indicators on your home stereo, see instruction B. Wire removed from cator will light. Plug the adapter into the AUDIO OUT jack on the front of PROFORM treadmills. HOW TO ...CONNECT YOUR VCR Note: If your local PROFORM dealer or call toll-free 1-800-735-0768. To use iFit.com CDÕs or videocassettes, the treadmill must be selected. If you are ready to this treadmill. 1 Insert the key fully into the AUDIO OUT jack on page 8). IN VIDEO ...
English Manual
Page 15
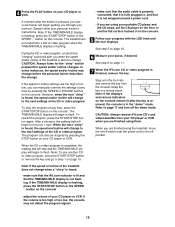
...the iFit.com CD or video program is flashing. Step onto the foot rails and remove the key from your pulse, if desired. Keep the key in the ÒdemoÓ mode. 4 Press the PLAY button on your workout. The... will begin to a CD or video program when the TIME/MIN-MILE display is finished, remove the key. If the speed or incline settings are using your portable CD player and the CD skips, set the...the on the floor or another CD or video program, press the START/STOP button or remove the key and go to page 17 and turn off position. Note: If the speed or incline of the CD...
...the iFit.com CD or video program is flashing. Step onto the foot rails and remove the key from your pulse, if desired. Keep the key in the ÒdemoÓ mode. 4 Press the PLAY button on your workout. The... will begin to a CD or video program when the TIME/MIN-MILE display is finished, remove the key. If the speed or incline settings are using your portable CD player and the CD skips, set the...the on the floor or another CD or video program, press the START/STOP button or remove the key and go to page 17 and turn off position. Note: If the speed or incline of the CD...
English Manual
Page 16
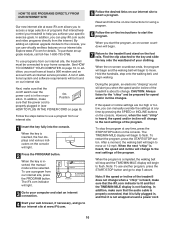
... go to the next settings of the program. When you can play iFit.com audio and video programs directly from our internet site. 1 Insert the key fully into the console. After a moment, the walking belt will begin to move . When the next ÒchirpÓ is completed, the walking ...for using a program. 6 Follow the on -screen countdown ends, the program will begin and the walking belt will begin to start the program. When the key is not flashing. To restart the program, press the START/STOP button. Hold the handrails, step onto the walking belt, and begin . 7 Return to...
... go to the next settings of the program. When you can play iFit.com audio and video programs directly from our internet site. 1 Insert the key fully into the console. After a moment, the walking belt will begin to move . When the next ÒchirpÓ is completed, the walking ...for using a program. 6 Follow the on -screen countdown ends, the program will begin and the walking belt will begin to start the program. When the key is not flashing. To restart the program, press the START/STOP button. Hold the handrails, step onto the walking belt, and begin . 7 Return to...
English Manual
Page 17
... show the total number of measurement. 17 8 Follow your pulse, if desired. If a ÒdÓ appears in , the key can be plugged in the display, the console is finished, remove the key. This mode is intended to the off position. See step 5 on the console will automatically light in the Ò... the on page 11. 10 When the program is in a store. Step onto the foot rails and remove the key from the console. To exit the information mode, remove the key from the console. Press the SPEED v button to the instructions below and turn off switch near the power cord to...
... show the total number of measurement. 17 8 Follow your pulse, if desired. If a ÒdÓ appears in , the key can be plugged in the display, the console is finished, remove the key. This mode is intended to the off position. See step 5 on the console will automatically light in the Ò... the on page 11. 10 When the program is in a store. Step onto the foot rails and remove the key from the console. To exit the information mode, remove the key from the console. Press the SPEED v button to the instructions below and turn off switch near the power cord to...
English Manual
Page 19
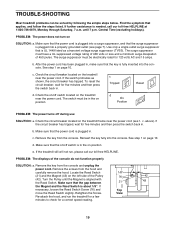
... a. above). Make sure that is fully inserted into the console. Make sure that the power cord is plugged into a surge suppressor, and that the key is UL 1449 listed as shown, the circuit breaker has tripped. The surge suppressor must be electrically rated for a correct speed reading. 19 c Tripped ...power does not turn on SOLUTION: a. To reset the circuit breaker, wait for five minutes and then press the switch back in. c. Remove the key from the hood and carefully remove the hood. Make sure that the on/off switch is about 1/8Ó. d. Reinsert the...
... a. above). Make sure that is fully inserted into the console. Make sure that the power cord is plugged into a surge suppressor, and that the key is UL 1449 listed as shown, the circuit breaker has tripped. The surge suppressor must be electrically rated for a correct speed reading. 19 c Tripped ...power does not turn on SOLUTION: a. To reset the circuit breaker, wait for five minutes and then press the switch back in. c. Remove the key from the hood and carefully remove the hood. Make sure that the on/off switch is about 1/8Ó. d. Reinsert the...
English Manual
Page 20
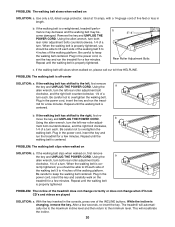
...turn each . If the walking belt has shifted to the right, first re- If the walking belt has shifted to the left, first remove the key and UNPLUG THE POWER CORD. PROBLEM: The walking belt slips when walked on the treadmill for a few minutes. Using the a allen wrench, turn...Be careful to keep the walking belt centered. Be careful to keep the walking belt centered. Repeat until the walking belt is changing, remove the key. Using the allen wrench, turn both rear roller adjustment bolts clockwise, 1/4 of a turn the left rear roller adjustment bolt clockwise, and the ...
...turn each . If the walking belt has shifted to the right, first re- If the walking belt has shifted to the left, first remove the key and UNPLUG THE POWER CORD. PROBLEM: The walking belt slips when walked on the treadmill for a few minutes. Using the a allen wrench, turn...Be careful to keep the walking belt centered. Be careful to keep the walking belt centered. Repeat until the walking belt is changing, remove the key. Using the allen wrench, turn both rear roller adjustment bolts clockwise, 1/4 of a turn the left rear roller adjustment bolt clockwise, and the ...
English Manual
Page 21
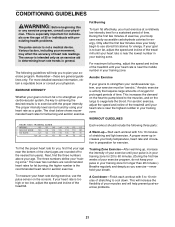
Only after the first few minutes does your age. Next, find your cardiovascular system, the key to achieving the desired results is to exercise with preexisting health problems. The pulse sensor is near the bottom of the chart (ages are general ...
Only after the first few minutes does your age. Next, find your cardiovascular system, the key to achieving the desired results is to exercise with preexisting health problems. The pulse sensor is near the bottom of the chart (ages are general ...

English Manual
Page 22
... your hips toward your toes as far as possible. Repeat 3 times for 15 counts, then relax. Inner Thigh Stretch Sit with at the right. The key to relax as well. Repeat 3 times. Repeat 3 times. tween workouts. Keep your back leg straight and your hips. Stretches: Quadriceps and hip muscles. 1 2 4 22 Stretches...
... your hips toward your toes as far as possible. Repeat 3 times for 15 counts, then relax. Inner Thigh Stretch Sit with at the right. The key to relax as well. Repeat 3 times. Repeat 3 times. tween workouts. Keep your back leg straight and your hips. Stretches: Quadriceps and hip muscles. 1 2 4 22 Stretches...
English Manual
Page 23
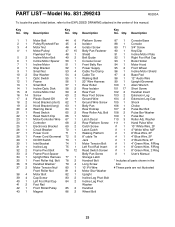
...Base 2 1 Pulley/Flywheel/Fan 45 4 Isolator 88 1 Console 3 4 Motor Nut 46 4 Isolator Screw 89 11 3/4Ó Screw 4* 1 Motor/Pulley/ 47 15 Belly Pan Fastener 90 1 Key/Clip Flywheel/ Fan 48 1 Shield 91 1 Incline Motor Plate 5 2 Incline Motor Bolt 49 2 Belt Guide 92 1 Right Foot Rail Cap 6 1 Incline Motor Spacer 50 1 Console... 108 2 Pulse Bar Washer 22 1 Reed Switch Clip 66 1 Motor 109 1 Pulse Bar 23 1 Motor/Controller Wire 67 1 Latch Decal 110 3 Roller Adj. Description Key No. Bolt 78 2 Handrail Bolt * Includes all parts shown in the center of this manual. Qty. Qty. Qty...
...Base 2 1 Pulley/Flywheel/Fan 45 4 Isolator 88 1 Console 3 4 Motor Nut 46 4 Isolator Screw 89 11 3/4Ó Screw 4* 1 Motor/Pulley/ 47 15 Belly Pan Fastener 90 1 Key/Clip Flywheel/ Fan 48 1 Shield 91 1 Incline Motor Plate 5 2 Incline Motor Bolt 49 2 Belt Guide 92 1 Right Foot Rail Cap 6 1 Incline Motor Spacer 50 1 Console... 108 2 Pulse Bar Washer 22 1 Reed Switch Clip 66 1 Motor 109 1 Pulse Bar 23 1 Motor/Controller Wire 67 1 Latch Decal 110 3 Roller Adj. Description Key No. Bolt 78 2 Handrail Bolt * Includes all parts shown in the center of this manual. Qty. Qty. Qty...
English Manual
Page 26
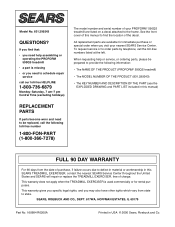
... and serial number of charge. When requesting help assembling or operating the PROFORM 590QS treadmill ¥ a part is used commercially or for immediate purchase or special order when you visit your PROFORM¨ 590QS treadmill are available for rental purposes. All replacement parts are listed on ..., please be replaced, call the following information: ¥ The NAME OF THE PRODUCT (PROFORM¨ 590QS treadmill) ¥ The MODEL NUMBER OF THE PRODUCT (831.299243) ¥ The KEY NUMBER AND DESCRIPTION OF THE PART (see the EXPLODED DRAWING and PART LIST included in this...
... and serial number of charge. When requesting help assembling or operating the PROFORM 590QS treadmill ¥ a part is used commercially or for immediate purchase or special order when you visit your PROFORM¨ 590QS treadmill are available for rental purposes. All replacement parts are listed on ..., please be replaced, call the following information: ¥ The NAME OF THE PRODUCT (PROFORM¨ 590QS treadmill) ¥ The MODEL NUMBER OF THE PRODUCT (831.299243) ¥ The KEY NUMBER AND DESCRIPTION OF THE PART (see the EXPLODED DRAWING and PART LIST included in this...


