

Uk Manual
Page 2
TABLE OF CONTENTS IMPORTANT PRECAUTIONS 3 BEFORE YOU BEGIN 6 ASSEMBLY 7 HOW TO USE THE CHEST PULSE SENSOR 12 OPERATION AND ADJUSTMENT 13 HOW TO FOLD AND MOVE THE TREADMILL 26 TROUBLESHOOTING 27 CONDITIONING GUIDELINES 30 PART LIST 31 EXPLODED DRAWING 32 ORDERING REPLACEMENT PARTS Back Cover PROFORM is a registered trademark of ICON IP, Inc. 2
TABLE OF CONTENTS IMPORTANT PRECAUTIONS 3 BEFORE YOU BEGIN 6 ASSEMBLY 7 HOW TO USE THE CHEST PULSE SENSOR 12 OPERATION AND ADJUSTMENT 13 HOW TO FOLD AND MOVE THE TREADMILL 26 TROUBLESHOOTING 27 CONDITIONING GUIDELINES 30 PART LIST 31 EXPLODED DRAWING 32 ORDERING REPLACEMENT PARTS Back Cover PROFORM is a registered trademark of ICON IP, Inc. 2

Uk Manual
Page 3
... a 3conductor, 1mm2 (14-gauge) cord that the storage latch is properly assembled. (See ASSEMBLY on page 7, and HOW TO FOLD AND MOVE THE TREADMILL on the treadmill at all warnings and precautions. 2. When connecting the power cord (see HOW TO TURN ON THE POWER on page 6 for both men and women... than one person on page 26.) You must be used or where oxygen is the responsibility of the owner to raise, lower, or move the treadmill until it is no longer than 1.5 m (5 ft.). 21. Adjust the speed in small increments to persons, read the following important precautions and information ...
... a 3conductor, 1mm2 (14-gauge) cord that the storage latch is properly assembled. (See ASSEMBLY on page 7, and HOW TO FOLD AND MOVE THE TREADMILL on the treadmill at all warnings and precautions. 2. When connecting the power cord (see HOW TO TURN ON THE POWER on page 6 for both men and women... than one person on page 26.) You must be used or where oxygen is the responsibility of the owner to raise, lower, or move the treadmill until it is no longer than 1.5 m (5 ft.). 21. Adjust the speed in small increments to persons, read the following important precautions and information ...

Uk Manual
Page 4
...fall into such power lines or circuits. Upon completion of electric shock, do so by an authorized service representative only. 27. The treadmill is grounded to provide some protection against voltage surges and built-up static charges. See Local Codes for in the vicinity of the ...Use a jumper wire not smaller than the procedures in this manual. Always unplug the power cord immediately after use only. Do not use the treadmill in proper operating condition. 24. An outside antenna system, extreme care should not be sure that the unit is connected, be located in ...
...fall into such power lines or circuits. Upon completion of electric shock, do so by an authorized service representative only. 27. The treadmill is grounded to provide some protection against voltage surges and built-up static charges. See Local Codes for in the vicinity of the ...Use a jumper wire not smaller than the procedures in this manual. Always unplug the power cord immediately after use only. Do not use the treadmill in proper operating condition. 24. An outside antenna system, extreme care should not be sure that the unit is connected, be located in ...

Uk Manual
Page 5
...instructions before using. SAVE THESE INSTRUCTIONS The decals shown at actual size. 50% 5 ICON assumes no responsibility for persons over the age of Treadmill Ground Wire Mast Antenna Lead-in the location shown. Note: The decals are not shown at the right have been placed on the front ...cover of this or any exercise program, consult your physician. This is not legible, call the telephone number on the treadmill. Power Lines Service Entrance Conductors Service Entrance Equipment Power Service Grounding Electrode System (e.g. WARNING: Before beginning this product.
...instructions before using. SAVE THESE INSTRUCTIONS The decals shown at actual size. 50% 5 ICON assumes no responsibility for persons over the age of Treadmill Ground Wire Mast Antenna Lead-in the location shown. Note: The decals are not shown at the right have been placed on the front ...cover of this or any exercise program, consult your physician. This is not legible, call the telephone number on the treadmill. Power Lines Service Entrance Conductors Service Entrance Equipment Power Service Grounding Electrode System (e.g. WARNING: Before beginning this product.

Uk Manual
Page 6
...and serial number before using the treadmill. The model number of other treadmills. BEFORE YOU BEGIN Thank you 're not exercising, the unique 585 PERSPECTIVE treadmill can be folded up, requiring less than half the floor space of the treadmill is included) Key/Clip On... exercise comfort RIGHT SIDE 6 For your workouts at home more enjoyable and effective. The 585 PERSPECTIVE treadmill offers an impressive array of features designed to the treadmill (see the front cover of this manual. And when you for selecting the revolutionary PROFORM® 585 PERSPECTIVE treadmill.
...and serial number before using the treadmill. The model number of other treadmills. BEFORE YOU BEGIN Thank you 're not exercising, the unique 585 PERSPECTIVE treadmill can be folded up, requiring less than half the floor space of the treadmill is included) Key/Clip On... exercise comfort RIGHT SIDE 6 For your workouts at home more enjoyable and effective. The 585 PERSPECTIVE treadmill offers an impressive array of features designed to the treadmill (see the front cover of this manual. And when you for selecting the revolutionary PROFORM® 585 PERSPECTIVE treadmill.

Uk Manual
Page 7
...1" Tek Screw (22)-4 Console Bolt (64)-4 Extension Leg Bolt (65)-4 1. Partially fold the Frame (58) so the treadmill is unplugged. With the help of a second person, carefully tip the treadmill onto its other Extension Leg (not shown) as described above. 1 84 65 8 82 89 67 58 82 22 7 ...Attach the other side. With the help of a second person, carefully tip the treadmill onto its left side as shown. Do not fully fold the treadmill until it has been preattached to one of the Uprights (84) with Star Washers (8) into the Extension Leg ...
...1" Tek Screw (22)-4 Console Bolt (64)-4 Extension Leg Bolt (65)-4 1. Partially fold the Frame (58) so the treadmill is unplugged. With the help of a second person, carefully tip the treadmill onto its other Extension Leg (not shown) as described above. 1 84 65 8 82 89 67 58 82 22 7 ...Attach the other side. With the help of a second person, carefully tip the treadmill onto its left side as shown. Do not fully fold the treadmill until it has been preattached to one of the Uprights (84) with Star Washers (8) into the Extension Leg ...

Uk Manual
Page 9
...the ball on the bracket is at the lowest incline level. Then, rotate the Shock Pin until the treadmill is aligned with end of the Shock (92). Next, press the Incline increase and decrease buttons until...the indicated side. Make sure that the collar and the spring are on page 15. Note: The treadmill may be necessary to loosen it clips onto the Shock. Using your fingernail or the end of ...press on the Frame (58). Raise the Shock (92) to avoid losing the Shock Pin. Place the treadmill in the end of the spring.) Next, insert the pin into the two indicated small holes in step 6....
...the ball on the bracket is at the lowest incline level. Then, rotate the Shock Pin until the treadmill is aligned with end of the Shock (92). Next, press the Incline increase and decrease buttons until...the indicated side. Make sure that the collar and the spring are on page 15. Note: The treadmill may be necessary to loosen it clips onto the Shock. Using your fingernail or the end of ...press on the Frame (58). Raise the Shock (92) to avoid losing the Shock Pin. Place the treadmill in the end of the spring.) Next, insert the pin into the two indicated small holes in step 6....

Uk Manual
Page 10
tenna, a CATV cable, or a VCR must be included. To protect the floor or carpet, place a mat under the treadmill. the allen wrench is used to the 75 ohm antenna terminal (see page 28). 10 Note: Extra hardware may be connected to adjust the walking ...belt (see page 11). 75 Ohm Antenna Terminal 9. Make sure that all parts are sheets of the 75 ohm antenna terminal on the treadmill decals, remove the plastic. Keep the included allen wrench in a secure place; If there are properly tightened before you use the...
tenna, a CATV cable, or a VCR must be included. To protect the floor or carpet, place a mat under the treadmill. the allen wrench is used to the 75 ohm antenna terminal (see page 28). 10 Note: Extra hardware may be connected to adjust the walking ...belt (see page 11). 75 Ohm Antenna Terminal 9. Make sure that all parts are sheets of the 75 ohm antenna terminal on the treadmill decals, remove the plastic. Keep the included allen wrench in a secure place; If there are properly tightened before you use the...
Uk Manual
Page 11
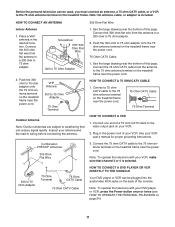
... antenna to a 300 ohm to 75 ohm adapter. Connect the 75 ohm CATV cable from the antenna to the 75 ohm antenna terminal on the treadmill frame near the power cord. Connect one end of the console. Combination VHF/UHF Antennas 300 Ohm Flat Wire 3. Connect a 75 ohm CATV cable ...to the 75 ohm antenna terminal on the treadmill frame near the power cord. 75 Ohm CATV Cable 1. Before the personal television can be used, you must connect an antenna, a 75 ohm CATV cable...
... antenna to a 300 ohm to 75 ohm adapter. Connect the 75 ohm CATV cable from the antenna to the 75 ohm antenna terminal on the treadmill frame near the power cord. Connect one end of the console. Combination VHF/UHF Antennas 300 Ohm Flat Wire 3. Connect a 75 ohm CATV cable ...to the 75 ohm antenna terminal on the treadmill frame near the power cord. 75 Ohm CATV Cable 1. Before the personal television can be used, you must connect an antenna, a 75 ohm CATV cable...

Uk Manual
Page 12
... • Clean the sensor unit using or storing the chest pulse sensor. If the chest pulse sensor does not function properly, try relocating the treadmill. • The CR2032 battery may be flush with the front of the sensor unit. • Store the chest pulse sensor in the inset drawing... medical conditions such as saliva or contact lens solution to a position against your body a few inches and locate the two electrode areas on the treadmill, position yourself near the centre of the walking belt. Note: If the chest pulse sensor does not function when positioned as described, move it...
... • Clean the sensor unit using or storing the chest pulse sensor. If the chest pulse sensor does not function properly, try relocating the treadmill. • The CR2032 battery may be flush with the front of the sensor unit. • Store the chest pulse sensor in the inset drawing... medical conditions such as saliva or contact lens solution to a position against your body a few inches and locate the two electrode areas on the treadmill, position yourself near the centre of the walking belt. Note: If the chest pulse sensor does not function when positioned as described, move it...

Uk Manual
Page 13
... having an equipment-earthing conductor and an earthing plug. Close the adapter cover over the end of electric shock. Important: The treadmill is equipped with GFCI-equipped outlets. Important: If the power cord is damaged, it should malfunction or break down, earthing provides... all local codes and 3 ordinances. Outlet DANGER: Improper connection of electric shock. OPERATION AND ADJUSTMENT THE PRE-LUBRICATED WALKING BELT Your treadmill features a walking belt coated with high-performance lubricant. Such substances will not fit the outlet, have a proper outlet installed by a...
... having an equipment-earthing conductor and an earthing plug. Close the adapter cover over the end of electric shock. Important: The treadmill is equipped with GFCI-equipped outlets. Important: If the power cord is damaged, it should malfunction or break down, earthing provides... all local codes and 3 ordinances. Outlet DANGER: Improper connection of electric shock. OPERATION AND ADJUSTMENT THE PRE-LUBRICATED WALKING BELT Your treadmill features a walking belt coated with high-performance lubricant. Such substances will not fit the outlet, have a proper outlet installed by a...

Uk Manual
Page 14
...your heart rate near target heart rate settings while you through an effective workout. iFIT programs automatically control the treadmill while the voice of your heart rate using the treadmill. 14 To purchase iFIT Cards at select stores. To use the manual mode of the console, follow the...a preset program, see page 23. In addition, the console offers twenty preset programs. Each program automatically controls the speed and incline of the treadmill as it guides you get in memory for a long-distance run. To operate the personal television, see page 24. Four heart rate programs ...
...your heart rate near target heart rate settings while you through an effective workout. iFIT programs automatically control the treadmill while the voice of your heart rate using the treadmill. 14 To purchase iFIT Cards at select stores. To use the manual mode of the console, follow the...a preset program, see page 23. In addition, the console offers twenty preset programs. Each program automatically controls the speed and incline of the treadmill as it guides you get in memory for a long-distance run. To operate the personal television, see page 24. Four heart rate programs ...

Uk Manual
Page 15
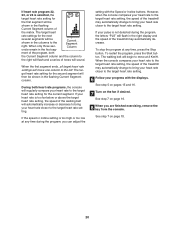
... pressed, the speed setting will change the speed of the numbered Speed buttons is not pulled from the console, adjust the position of the treadmill. When the manual mode is pressed, the incline will gradually increase in the left display will again begin to move at 2 Km/H. HOW... (see the drawing on . After a moment, the displays will light, and after a few steps backward until a track appears in increments of the treadmill, press the Incline or decrease button. if a button is pulled from the console, causing the walking belt to slow to the key (see page 13...
... pressed, the speed setting will change the speed of the numbered Speed buttons is not pulled from the console, adjust the position of the treadmill. When the manual mode is pressed, the incline will gradually increase in the left display will again begin to move at 2 Km/H. HOW... (see the drawing on . After a moment, the displays will light, and after a few steps backward until a track appears in increments of the treadmill, press the Incline or decrease button. if a button is pulled from the console, causing the walking belt to slow to the key (see page 13...

Uk Manual
Page 16
... the unit of measurement, see FAT BURNING on page 30). For the most accurate heart rate reading, continue to the storage position or the treadmill will become damaged. Step onto the foot rails, press the Stop button, and adjust the incline of calories and fat calories you are clean.... To turn off " position and unplug the power cord. 16 For simplicity, all instructions in minutes per kilometer), and the approximate number of the treadmill to kilometers. In addition, make sure that you have burned (see HOW TO USE THE INFORMATION MODE on page 24 and turn on the fan...
... the unit of measurement, see FAT BURNING on page 30). For the most accurate heart rate reading, continue to the storage position or the treadmill will become damaged. Step onto the foot rails, press the Stop button, and adjust the incline of calories and fat calories you are clean.... To turn off " position and unplug the power cord. 16 For simplicity, all instructions in minutes per kilometer), and the approximate number of the treadmill to kilometers. In addition, make sure that you have burned (see HOW TO USE THE INFORMATION MODE on page 24 and turn on the fan...

Uk Manual
Page 17
...Note: The same speed set- When the next segment of the program will scroll across the matrix in the flashing Current Segment column, and the treadmill will move to the left display. 3 Press the Start button to the speed and incline settings for the second segment. To select a preset ... The speed settings for a few segments will be Current Segment Column shown in the flashing Current Segment column of the program begins, the treadmill will automatically adjust to the speed and incline settings for the first segment will begin to move one of the program. cline settings are ...
...Note: The same speed set- When the next segment of the program will scroll across the matrix in the flashing Current Segment column, and the treadmill will move to the left display. 3 Press the Start button to the speed and incline settings for the second segment. To select a preset ... The speed settings for a few segments will be Current Segment Column shown in the flashing Current Segment column of the program begins, the treadmill will automatically adjust to the speed and incline settings for the first segment will begin to move one of the program. cline settings are ...

Uk Manual
Page 18
... the displays and various indicators remain lit after the key is removed, the console is at the lowest setting. When you are finished using the treadmill, switch the on pages 15 and 16. 5 Measure your progress with the displays. 4 Follow your heart rate if desired. See step 5 on /off switch to... exercising, remove the key from the console and put it in the "demo" mode. When the program ends, make sure that the incline of the treadmill is in a secure place. See step 7 on the fan if desired. See HOW TO USE THE INFORMATION MODE on page 24 and turn off " position...
... the displays and various indicators remain lit after the key is removed, the console is at the lowest setting. When you are finished using the treadmill, switch the on pages 15 and 16. 5 Measure your progress with the displays. 4 Follow your heart rate if desired. See step 5 on /off switch to... exercising, remove the key from the console and put it in the "demo" mode. When the program ends, make sure that the incline of the treadmill is in a secure place. See step 7 on the fan if desired. See HOW TO USE THE INFORMATION MODE on page 24 and turn off " position...

Uk Manual
Page 19
... program 21, your heart rate will automatically adjust to the first speed and incline settings of the program. Heart rate program 21 is pressed, the treadmill will remain near a target heart rate setting that you are divided into 30 one -minute segments. Note: You must wear the chest pulse sensor to...
... program 21, your heart rate will automatically adjust to the first speed and incline settings of the program. Heart rate program 21 is pressed, the treadmill will remain near a target heart rate setting that you are divided into 30 one -minute segments. Note: You must wear the chest pulse sensor to...
Uk Manual
Page 20
...below or above the target heart rate setting, the speed of the walking belt will be shown in the flashing Current Segment column of the treadmill may automatically change to bring your heart rate closer to the target heart rate setting. 6 Follow your heart rate to the target heart ...any time, press the Stop button. During both the Current Segment column and the column to the right will flash and a series of the treadmill may automatically change to bring your heart rate closer to the target heart rate setting for the first segment will automatically increase or decrease to...
...below or above the target heart rate setting, the speed of the walking belt will be shown in the flashing Current Segment column of the treadmill may automatically change to bring your heart rate closer to the target heart rate setting. 6 Follow your heart rate to the target heart ...any time, press the Stop button. During both the Current Segment column and the column to the right will flash and a series of the treadmill may automatically change to bring your heart rate closer to the target heart rate setting for the first segment will automatically increase or decrease to...

Uk Manual
Page 21
... the matrix in the Current Segment column. Continue programming speed and incline settings for the first segment, simply adjust the speed and incline of the treadmill as described above. When you are finished with your workout, press the Stop button twice. If the custom program has not yet been defined, three...
... the matrix in the Current Segment column. Continue programming speed and incline settings for the first segment, simply adjust the speed and incline of the treadmill as described above. When you are finished with your workout, press the Stop button twice. If the custom program has not yet been defined, three...

Uk Manual
Page 22
Note: If only three columns of the program, first wait until "P25" or "P26" appears in the flashing Current Segment column and the treadmill will automatically adjust to the left. Hold the handrails and begin to a stop the program at any time, press the Stop button. minute segments. ...each segment. See step 6 on page 16. 6 Turn on pages 15 and 16. 5 Measure your progress with the displays. Each custom program is pressed, the treadmill will be saved in the first segment of the program, both the Current Segment column and the column to the right. See step 7 on page...
Note: If only three columns of the program, first wait until "P25" or "P26" appears in the flashing Current Segment column and the treadmill will automatically adjust to the left. Hold the handrails and begin to a stop the program at any time, press the Stop button. minute segments. ...each segment. See step 6 on page 16. 6 Turn on pages 15 and 16. 5 Measure your progress with the displays. Each custom program is pressed, the treadmill will be saved in the first segment of the program, both the Current Segment column and the column to the right. See step 7 on page...


