

Uk Manual
Page 2
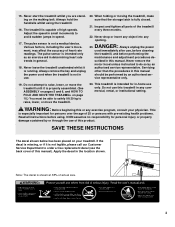
...away from heated sur- products are recommended for meters of clearance behind it into an earthed circuit. Keep the power cord away from mois- The treadmill should be used only by persons the power cord or plug is being administered. 13. Do not wear loose cloth- placing the fuse, an ASTA... (14 gauge) cord that could become caught in a garage or covered patio, or near water. 12. Save the EXPLODED DRAWING and PART LIST for the treadmill, 7), plug it . type should be fitted to a plug. A 13 amp fuse should be used or where oxygen is damaged, or if the weighing ...
...away from heated sur- products are recommended for meters of clearance behind it into an earthed circuit. Keep the power cord away from mois- The treadmill should be used only by persons the power cord or plug is being administered. 13. Do not wear loose cloth- placing the fuse, an ASTA... (14 gauge) cord that could become caught in a garage or covered patio, or near water. 12. Save the EXPLODED DRAWING and PART LIST for the treadmill, 7), plug it . type should be fitted to a plug. A 13 amp fuse should be used or where oxygen is damaged, or if the weighing ...
Uk Manual
Page 3
...with pre-existing health problems. Read all parts of actual size. 3 Servicing other than the procedures in -home use . 20. This treadmill is intended only as an exercise aid in determining heart rate trends in the location shown. This is capable of heart rate readings. ...scribed in speed. 17. Do not attempt to raise, lower, or move the treadmill. 24. The treadmill is especially important for in this product. Various factors, including the user's movement, may affect the accuracy of high speeds. When ...
...with pre-existing health problems. Read all parts of actual size. 3 Servicing other than the procedures in -home use . 20. This treadmill is intended only as an exercise aid in determining heart rate trends in the location shown. This is capable of heart rate readings. ...scribed in speed. 17. Do not attempt to raise, lower, or move the treadmill. 24. The treadmill is especially important for in this product. Various factors, including the user's movement, may affect the accuracy of high speeds. When ...
Uk Manual
Page 4
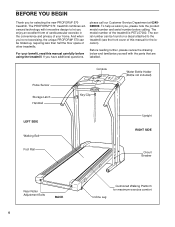
... and familiarise yourself with innovative design to the treadmill (see the front cover of other treadmills. For your home. If you for selecting the new PROFORM® 570 treadmill. The serial number can be found on a decal attached to let you 're not exercising, the unique PROFORM® 570 can be folded up, requiring less than half...
... and familiarise yourself with innovative design to the treadmill (see the front cover of other treadmills. For your home. If you for selecting the new PROFORM® 570 treadmill. The serial number can be found on a decal attached to let you 're not exercising, the unique PROFORM® 570 can be folded up, requiring less than half...
Uk Manual
Page 5
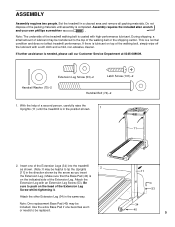
...tip the Uprights 2 [11] in a cleared area and remove all packing materials. ASSEMBLY Assembly requires two people. Do not dispose of the treadmill walking belt is completed. Assembly requires the included allen wrench and your own phillips screwdriver . If further assistance is a normal condition and does ...the Uprights (11) until assembly is coated with high-performance lubricant. Be sure to the top of the Extension Legs (34) into the treadmill as you insert the Extension Leg.) Make sure that the Base Pad (40) is lubricant on top of the Extension Leg. This is ...
...tip the Uprights 2 [11] in a cleared area and remove all packing materials. ASSEMBLY Assembly requires two people. Do not dispose of the treadmill walking belt is completed. Assembly requires the included allen wrench and your own phillips screwdriver . If further assistance is a normal condition and does ...the Uprights (11) until assembly is coated with high-performance lubricant. Be sure to the top of the Extension Legs (34) into the treadmill as you insert the Extension Leg.) Make sure that the Base Pad (40) is lubricant on top of the Extension Leg. This is ...
Uk Manual
Page 6
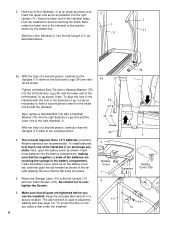
...vertical as described above. 3a. Keep the included allen wrench in the battery compartment. To protect the floor or carpet, place a mat under the treadmill. 6 3a 34 74 75 34 4 Battery Cover 1 5 11 34 11 1 Batteries Battery Cover Tab 101 14 Alkaline batteries are touching the springs...a second person, carefully tip the Uprights (11) down so the Extension Legs (34) are tightened before you use the treadmill. Close the battery cover, push up on the treadmill and lift the Handrail. 3. With the help of the batteries are recommended. Hold one of a second person, carefully raise...
...vertical as described above. 3a. Keep the included allen wrench in the battery compartment. To protect the floor or carpet, place a mat under the treadmill. 6 3a 34 74 75 34 4 Battery Cover 1 5 11 34 11 1 Batteries Battery Cover Tab 101 14 Alkaline batteries are touching the springs...a second person, carefully tip the Uprights (11) down so the Extension Legs (34) are tightened before you use the treadmill. Close the battery cover, push up on the treadmill and lift the Handrail. 3. With the help of the batteries are recommended. Hold one of a second person, carefully raise...
Uk Manual
Page 7
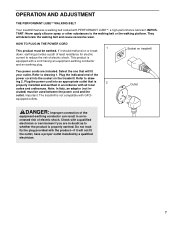
...is not compatible with GFCI- Outlet DANGER: Improper connection of electric shock. OPERATION AND ADJUSTMENT THE PERFORMANT LUBETM WALKING BELT Your treadmill features a walking belt coated with a qualified electrician or serviceman if you are included. Select the one that is 2 properly ...equipped outlets. They will deteriorate the walking belt and cause excessive wear. Refer to draw- Refer to drawing 1. Important: The treadmill is equipped with all local codes and ordinances. cluded) must be used between the power cord and the outlet. Plug the power...
...is not compatible with GFCI- Outlet DANGER: Improper connection of electric shock. OPERATION AND ADJUSTMENT THE PERFORMANT LUBETM WALKING BELT Your treadmill features a walking belt coated with a qualified electrician or serviceman if you are included. Select the one that is 2 properly ...equipped outlets. They will deteriorate the walking belt and cause excessive wear. Refer to draw- Refer to drawing 1. Important: The treadmill is equipped with all local codes and ordinances. cluded) must be used between the power cord and the outlet. Plug the power...
Uk Manual
Page 8
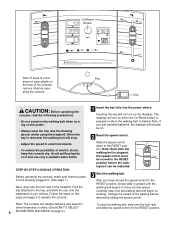
... before operating the console. Avoid spilling liquids on the power. • Always wear the clip (see the drawing above) whilst using the treadmill. Carefully step onto the walking belt and begin exercising. STEP-BY-STEP CONSOLE OPERATION Before operating the console, make sure that the power cord...slowly slide it before the walking belt can display distance and speed in . (See page 7.) Next, step onto the foot rails of the treadmill. Change the speed of electric shock, keep the console dry. When the key is started. Find the clip attached to the RESET position. ...
... before operating the console. Avoid spilling liquids on the power. • Always wear the clip (see the drawing above) whilst using the treadmill. Carefully step onto the walking belt and begin exercising. STEP-BY-STEP CONSOLE OPERATION Before operating the console, make sure that the power cord...slowly slide it before the walking belt can display distance and speed in . (See page 7.) Next, step onto the foot rails of the treadmill. Change the speed of electric shock, keep the console dry. When the key is started. Find the clip attached to the RESET position. ...
Uk Manual
Page 9
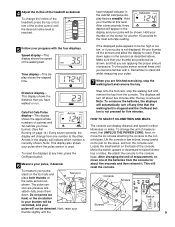
To change the incline of the treadmill, press the top or bottom of the incline control until the desired incline level is not displayed, lift your thumbs off the sensors and allow ... your thumbs will be too high or too low, or if your pulse is reached. 5 Follow your pulse, if desired. 4 Adjust the incline of the treadmill as shown. Speed display-This display shows the speed of the console. Cals/Fat Cals/Pulse display-This display Arrow shows the approximate numbers of...
To change the incline of the treadmill, press the top or bottom of the incline control until the desired incline level is not displayed, lift your thumbs off the sensors and allow ... your thumbs will be too high or too low, or if your pulse is reached. 5 Follow your pulse, if desired. 4 Adjust the incline of the treadmill as shown. Speed display-This display shows the speed of the console. Cals/Fat Cals/Pulse display-This display Arrow shows the approximate numbers of...
Uk Manual
Page 10
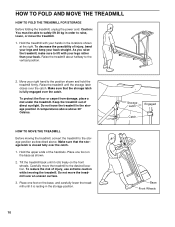
... storage latch is fully engaged over an uneven surface. 3. Carefully move the treadmill over the catch. To reduce the risk of direct sunlight. HOW TO MOVE THE TREADMILL Before moving the treadmill. Do not move the treadmill to the storage position as shown. 2. Storage Latch Engaged Catch Base Front...30° Celsius. To protect the floor or carpet from damage, place a mat under the treadmill. HOW TO FOLD AND MOVE THE TREADMILL HOW TO FOLD THE TREADMILL FOR STORAGE Before folding the treadmill, unplug the power cord. Caution: You must be able to safely lift 20 kg in ...
... storage latch is fully engaged over an uneven surface. 3. Carefully move the treadmill over the catch. To reduce the risk of direct sunlight. HOW TO MOVE THE TREADMILL Before moving the treadmill. Do not move the treadmill to the storage position as shown. 2. Storage Latch Engaged Catch Base Front...30° Celsius. To protect the floor or carpet from damage, place a mat under the treadmill. HOW TO FOLD AND MOVE THE TREADMILL HOW TO FOLD THE TREADMILL FOR STORAGE Before folding the treadmill, unplug the power cord. Caution: You must be able to safely lift 20 kg in ...

Uk Manual
Page 11
Pivot the treadmill until the frame and foot rail are past the storage latch. 2. Storage Latch Unlatched 11 Using your back straight. Hold the treadmill firmly with your right hand as shown. To decrease the possibility of the treadmill with both hands, and lower the treadmill to the floor. Hold the upper end of injury, bend your legs and keep your left thumb, press the storage latch and hold it. HOW TO LOWER THE TREADMILL FOR USE 1.
Pivot the treadmill until the frame and foot rail are past the storage latch. 2. Storage Latch Unlatched 11 Using your back straight. Hold the treadmill firmly with your right hand as shown. To decrease the possibility of the treadmill with both hands, and lower the treadmill to the floor. Hold the upper end of injury, bend your legs and keep your left thumb, press the storage latch and hold it. HOW TO LOWER THE TREADMILL FOR USE 1.
Uk Manual
Page 12
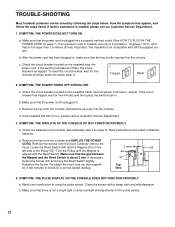
... longer than 1.5 meters (5 feet). SYMPTOM: THE POWER DOES NOT TURN ON a. Clean the sensor with GFCI-equipped outlets. TROUBLE-SHOOTING Most treadmill problems can be solved by following the steps below. If the circuit breaker has tripped, wait for five minutes and then press the switch back...not compatible with a damp cloth and mild detergent. After the power cord has been plugged in . Check the circuit breaker located on the treadmill near the power cord (see assembly step 4 on the left side of drained batteries. d. Remove the key from the console and UNPLUG THE...
... longer than 1.5 meters (5 feet). SYMPTOM: THE POWER DOES NOT TURN ON a. Clean the sensor with GFCI-equipped outlets. TROUBLE-SHOOTING Most treadmill problems can be solved by following the steps below. If the circuit breaker has tripped, wait for five minutes and then press the switch back...not compatible with a damp cloth and mild detergent. After the power cord has been plugged in . Check the circuit breaker located on the treadmill near the power cord (see assembly step 4 on the left side of drained batteries. d. Remove the key from the console and UNPLUG THE...
Uk Manual
Page 13
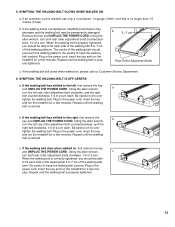
...wrench, c turn both rear roller adjustment bolts counterclockwise, 1/4 of a turn each . Plug in the power cord, insert the key and run the treadmill for a few min- 5. Be careful to the left rear roller adjustment bolt counterclockwise, and the right bolt clockwise, 1/4 of the walking belt should ...of a turn each . When the walking belt is centred. The centre of a turn . Plug in the power cord, insert the key and run the treadmill for a few minutes. b 5 -7 cm Rear Roller Adjustment Bolts c. If the walking belt still slows when walked on , first remove the key and...
...wrench, c turn both rear roller adjustment bolts counterclockwise, 1/4 of a turn each . Plug in the power cord, insert the key and run the treadmill for a few min- 5. Be careful to the left rear roller adjustment bolt counterclockwise, and the right bolt clockwise, 1/4 of the walking belt should ...of a turn each . When the walking belt is centred. The centre of a turn . Plug in the power cord, insert the key and run the treadmill for a few minutes. b 5 -7 cm Rear Roller Adjustment Bolts c. If the walking belt still slows when walked on , first remove the key and...
Uk Manual
Page 14
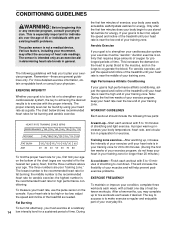
...in determining heart rate trends in general. WORKOUT GUIDELINES Each workout should include the following guidelines will increase the flexibility of the treadmill until your training zone. the highest number is not a medical device. Fat Burning Training zone exercise-After warming up -Start ... beginning this or any exercise program, consult your "training zone." This is especially important for individuals over the age of the treadmill as a guide. Aerobic Exercise If your everyday life. Aerobic exercise is the recommended heart rate for high performance conditioning. This ...
...in determining heart rate trends in general. WORKOUT GUIDELINES Each workout should include the following guidelines will increase the flexibility of the treadmill until your training zone. the highest number is not a medical device. Fat Burning Training zone exercise-After warming up -Start ... beginning this or any exercise program, consult your "training zone." This is especially important for individuals over the age of the treadmill as a guide. Aerobic Exercise If your everyday life. Aerobic exercise is the recommended heart rate for high performance conditioning. This ...
Uk Manual
Page 16
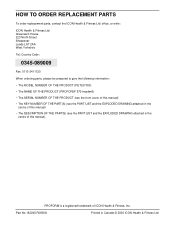
..., please be prepared to give the following information: • The MODEL NUMBER OF THE PRODUCT (PETL57000) • The NAME OF THE PRODUCT (PROFORM® 570 treadmill) • The SERIAL NUMBER OF THE PRODUCT (see the front cover of this manual) • The DESCRIPTION OF THE PART(S) (see the... PART LIST and the EXPLODED DRAWING attached in the centre of ICON Health & Fitness, Inc. PROFORM is a registered trademark of this manual) • ...
..., please be prepared to give the following information: • The MODEL NUMBER OF THE PRODUCT (PETL57000) • The NAME OF THE PRODUCT (PROFORM® 570 treadmill) • The SERIAL NUMBER OF THE PRODUCT (see the front cover of this manual) • The DESCRIPTION OF THE PART(S) (see the... PART LIST and the EXPLODED DRAWING attached in the centre of ICON Health & Fitness, Inc. PROFORM is a registered trademark of this manual) • ...


