

Uk Manual
Page 2
... caught in sandals. conductor, 1mm2 (14 gauge) cord that blocks any air shoes. Save the EXPLODED DRAWING and PART LIST for the treadmill, 7), plug it . ing that the location and position per- When choosing a location for future reference. TABLE OF CONTENTS IMPORTANT PRECAUTIONS ...2 BEFORE YOU BEGIN 4 ASSEMBLY 5 OPERATION AND ADJUSTMENT 7 HOW TO FOLD AND MOVE THE TREADMILL 10 TROUBLE-SHOOTING 12 CONDITIONING GUIDELINES 14 HOW TO ORDER REPLACEMENT PARTS Back Cover Note: An EXPLODED DRAWING and a PART LIST are ...
... caught in sandals. conductor, 1mm2 (14 gauge) cord that blocks any air shoes. Save the EXPLODED DRAWING and PART LIST for the treadmill, 7), plug it . ing that the location and position per- When choosing a location for future reference. TABLE OF CONTENTS IMPORTANT PRECAUTIONS ...2 BEFORE YOU BEGIN 4 ASSEMBLY 5 OPERATION AND ADJUSTMENT 7 HOW TO FOLD AND MOVE THE TREADMILL 10 TROUBLE-SHOOTING 12 CONDITIONING GUIDELINES 14 HOW TO ORDER REPLACEMENT PARTS Back Cover Note: An EXPLODED DRAWING and a PART LIST are ...
Uk Manual
Page 3
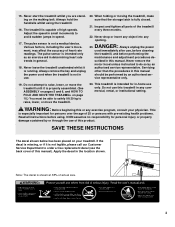
...-home use of high speeds. WARNING: Before beginning this manual. This is especially important for in this product. 15. Never start the treadmill whilst you are standing on your physician. Always hold the handrails whilst using . Always remove the key and unplug the power cord when the...If the decal is missing, or if it is properly assembled. (See ASSEMBLY on pages 5 and 6, and HOW TO FOLD AND MOVE THE TREADMILL on page 10.) You must be performed by an authorised service representative. Adjust the speed in general. 18. Various factors, including the user's movement...
...-home use of high speeds. WARNING: Before beginning this manual. This is especially important for in this product. 15. Never start the treadmill whilst you are standing on your physician. Always hold the handrails whilst using . Always remove the key and unplug the power cord when the...If the decal is missing, or if it is properly assembled. (See ASSEMBLY on pages 5 and 6, and HOW TO FOLD AND MOVE THE TREADMILL on page 10.) You must be performed by an authorised service representative. Adjust the speed in general. 18. Various factors, including the user's movement...
Uk Manual
Page 4
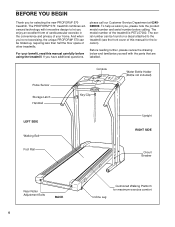
...SIDE Foot Rail Circuit Breaker Rear Roller Adjustment Bolts BACK 4 Incline Leg Cushioned Walking Platform for selecting the new PROFORM® 570 treadmill. The model number of the treadmill is PETL57000. If you enjoy an excellent form of cardiovascular exercise in the convenience and privacy of your benefit... for maximum exercise comfort BEFORE YOU BEGIN Thank you 're not exercising, the unique PROFORM® 570 can be folded up, requiring less than half the floor space of other treadmills. To help us assist you, please note the product model number and serial number before...
...SIDE Foot Rail Circuit Breaker Rear Roller Adjustment Bolts BACK 4 Incline Leg Cushioned Walking Platform for selecting the new PROFORM® 570 treadmill. The model number of the treadmill is PETL57000. If you enjoy an excellent form of cardiovascular exercise in the convenience and privacy of your benefit... for maximum exercise comfort BEFORE YOU BEGIN Thank you 're not exercising, the unique PROFORM® 570 can be folded up, requiring less than half the floor space of other treadmills. To help us assist you, please note the product model number and serial number before...
Uk Manual
Page 5
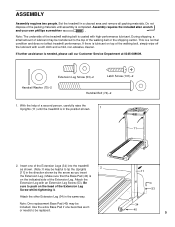
...Attach the other Extension Leg (34) in a cleared area and remove all packing materials. If there is on top of the packing materials until the treadmill is needed, please call our Customer Service Department at 0345-089009. With the help of the Extension Leg. ASSEMBLY Assembly requires two people. If further..., simply wipe off the lubricant with an Extension Leg Screw (53). Use the extra Base Pad if one of the Extension Legs (34) into the treadmill as shown. (Note: It may be transferred to be replaced. 11 53 34 40 5 Be sure to tip the Uprights 2 [11] in the position...
...Attach the other Extension Leg (34) in a cleared area and remove all packing materials. If there is on top of the packing materials until the treadmill is needed, please call our Customer Service Department at 0345-089009. With the help of the Extension Leg. ASSEMBLY Assembly requires two people. If further..., simply wipe off the lubricant with an Extension Leg Screw (53). Use the extra Base Pad if one of the Extension Legs (34) into the treadmill as shown. (Note: It may be transferred to be replaced. 11 53 34 40 5 Be sure to tip the Uprights 2 [11] in the position...
Uk Manual
Page 6
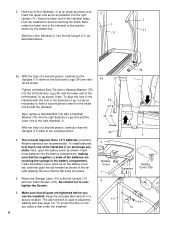
...negative (-) ends of a second person, carefully tip the Uprights (11) down so the Extension Legs (34) are tightened before you use the treadmill. Alkaline batteries are touching the springs in the Handrail with two Latch Screws (101). Next, rotate the lower end of the right Handrail (1). With... of the batteries are recommended. 3. Attach the Storage Latch (14) to the vertical position. 4. Hold one of the Handrail away 1 from the treadmill to adjust the walking belt (see page 13). With the help of the Handrails (1) at an angle as shown and 3 insert the upper end ...
...negative (-) ends of a second person, carefully tip the Uprights (11) down so the Extension Legs (34) are tightened before you use the treadmill. Alkaline batteries are touching the springs in the Handrail with two Latch Screws (101). Next, rotate the lower end of the right Handrail (1). With... of the batteries are recommended. 3. Attach the Storage Latch (14) to the vertical position. 4. Hold one of the Handrail away 1 from the treadmill to adjust the walking belt (see page 13). With the help of the Handrails (1) at an angle as shown and 3 insert the upper end ...
Uk Manual
Page 7
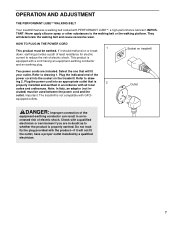
IMPORTANT: Never apply silicone spray or other substances to reduce the risk of electric shock. Socket on the treadmill. Plug the indicated end of electric shock. cluded) must be used between the power cord and the outlet. Outlet DANGER: Improper connection of ...This product must be earthed. Select the one that is equipped with GFCI- Refer to drawing 1. Important: The treadmill is properly earthed. Refer to draw- Plug the power cord into the socket on treadmill Two power cords are in - Note: In Italy, an adaptor (not in doubt as to whether the product...
IMPORTANT: Never apply silicone spray or other substances to reduce the risk of electric shock. Socket on the treadmill. Plug the indicated end of electric shock. cluded) must be used between the power cord and the outlet. Outlet DANGER: Improper connection of ...This product must be earthed. Select the one that is equipped with GFCI- Refer to drawing 1. Important: The treadmill is properly earthed. Refer to draw- Plug the power cord into the socket on treadmill Two power cords are in - Note: In Italy, an adaptor (not in doubt as to whether the product...
Uk Manual
Page 8
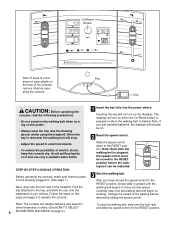
...SELECT 8 KILOMETRES AND MILES on page 9.) To stop . • Adjust the speed in . (See page 7.) Next, step onto the foot rails of the treadmill. Note: Each time the walking belt is started. Avoid spilling liquids on it upward until the walking belt begins to move at slow speed. Inserting... you just installed batteries, the displays will turn on the power. • Always wear the clip (see the drawing above) whilst using the treadmill. Note: If you have moved the speed control to the RESET position. Find the clip attached to the RESET position before operating the console. The...
...SELECT 8 KILOMETRES AND MILES on page 9.) To stop . • Adjust the speed in . (See page 7.) Next, step onto the foot rails of the treadmill. Note: Each time the walking belt is started. Avoid spilling liquids on it upward until the walking belt begins to move at slow speed. Inserting... you just installed batteries, the displays will turn on the power. • Always wear the clip (see the drawing above) whilst using the treadmill. Note: If you have moved the speed control to the RESET position. Find the clip attached to the RESET position before operating the console. The...
Uk Manual
Page 9
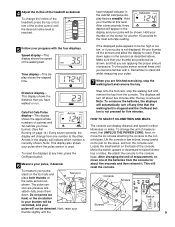
...any time, press the On/Reset button. 6 Measure your thumbs at any time that you are positioned as desired. To change the incline of the treadmill, press the top or bottom of pressure. Press down . Console Screws Screws Switch 9 Distance display- Step onto the foot rails, stop the walking... have walked or run. This display shows the distance that you are pressure acti- Speed display-This display shows the speed of the treadmill as shown, and that the walking belt is stopped and the On/Reset button is not pressed for about five minutes after the key...
...any time, press the On/Reset button. 6 Measure your thumbs at any time that you are positioned as desired. To change the incline of the treadmill, press the top or bottom of pressure. Press down . Console Screws Screws Switch 9 Distance display- Step onto the foot rails, stop the walking... have walked or run. This display shows the distance that you are pressure acti- Speed display-This display shows the speed of the treadmill as shown, and that the walking belt is stopped and the On/Reset button is not pressed for about five minutes after the key...
Uk Manual
Page 10
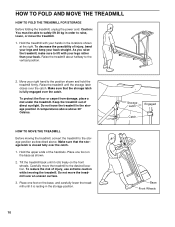
... ends of direct sunlight. Place one foot on the base as described above 30° Celsius. HOW TO MOVE THE TREADMILL Before moving the treadmill. Make sure that the storage latch is resting in temperatures above above . Storage Latch Engaged Catch Base Front Wheels 10 Raise... the treadmill until it rolls freely on the base, and carefully lower the treadmill until the storage latch closes over an uneven surface. 3. To decrease the possibility of injury, use...
... ends of direct sunlight. Place one foot on the base as described above 30° Celsius. HOW TO MOVE THE TREADMILL Before moving the treadmill. Make sure that the storage latch is resting in temperatures above above . Storage Latch Engaged Catch Base Front Wheels 10 Raise... the treadmill until it rolls freely on the base, and carefully lower the treadmill until the storage latch closes over an uneven surface. 3. To decrease the possibility of injury, use...

Uk Manual
Page 11
Pivot the treadmill until the frame and foot rail are past the storage latch. 2. To decrease the possibility of the treadmill with both hands, and lower the treadmill to the floor. Hold the upper end of injury, bend your legs and keep your back straight. Storage Latch Unlatched 11 Hold the treadmill firmly with your left thumb, press the storage latch and hold it. Using your right hand as shown. HOW TO LOWER THE TREADMILL FOR USE 1.
Pivot the treadmill until the frame and foot rail are past the storage latch. 2. To decrease the possibility of the treadmill with both hands, and lower the treadmill to the floor. Hold the upper end of injury, bend your legs and keep your back straight. Storage Latch Unlatched 11 Hold the treadmill firmly with your left thumb, press the storage latch and hold it. Using your right hand as shown. HOW TO LOWER THE TREADMILL FOR USE 1.
Uk Manual
Page 12
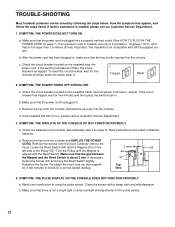
...1. Make sure that there is plugged in , make sure that the power cord is not a bright light or direct sunlight shining directly on the treadmill near the power cord (see assembly step 4 on page 7.) If an extension cord is not compatible with GFCI-equipped outlets. SYMPTOM: THE POWER ... sure that is aligned with a damp cloth and mild detergent. Find the symptom that the power cord is plugged into the console. Important: The treadmill is needed , please call our Customer Service Department. 3. Remove the key from the console and UNPLUG THE POWER CORD. SYMPTOM: THE DISPLAYS OF ...
...1. Make sure that there is plugged in , make sure that the power cord is not a bright light or direct sunlight shining directly on the treadmill near the power cord (see assembly step 4 on page 7.) If an extension cord is not compatible with GFCI-equipped outlets. SYMPTOM: THE POWER ... sure that is aligned with a damp cloth and mild detergent. Find the symptom that the power cord is plugged into the console. Important: The treadmill is needed , please call our Customer Service Department. 3. Remove the key from the console and UNPLUG THE POWER CORD. SYMPTOM: THE DISPLAYS OF ...
Uk Manual
Page 13
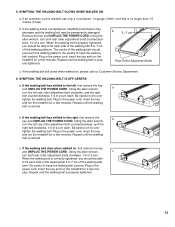
...properly tightened. If the walking belt has shifted to keep the walking belt centred. Plug in the power cord, insert the key and run the treadmill for a few minutes. b. Using the allen wrench, b turn the left rear roller adjustment bolt clockwise, and the right bolt counterclockwise, 1/4 ... properly tightened, you should be able to lift each side of a turn . Plug in the power cord, insert the key and run the treadmill for a few minutes. Repeat until the walking belt is no longer than 1.5 meters (5 feet). SYMPTOM: THE WALKING BELT IS OFF-CENTRE a....
...properly tightened. If the walking belt has shifted to keep the walking belt centred. Plug in the power cord, insert the key and run the treadmill for a few minutes. b. Using the allen wrench, b turn the left rear roller adjustment bolt clockwise, and the right bolt counterclockwise, 1/4 ... properly tightened, you should be able to lift each side of a turn . Plug in the power cord, insert the key and run the treadmill for a few minutes. Repeat until the walking belt is no longer than 1.5 meters (5 feet). SYMPTOM: THE WALKING BELT IS OFF-CENTRE a....
Uk Manual
Page 14
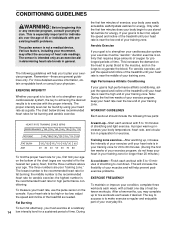
... a medical device. High Performance Athletic Conditioning If your goal is high performance athletic conditioning, adjust the speed and incline of the treadmill until your heart rate is to strengthen your cardiovascular system, your body temperature, heart rate, and circulation in general. WORKOUT GUIDELINES ... between workouts. Fat Burning Training zone exercise-After warming up increases your exercise must exercise at least one day of the treadmill as an exercise aid in determining heart rate trends in preparation for energy. During To measure your training zone. Remember-these...
... a medical device. High Performance Athletic Conditioning If your goal is high performance athletic conditioning, adjust the speed and incline of the treadmill until your heart rate is to strengthen your cardiovascular system, your body temperature, heart rate, and circulation in general. WORKOUT GUIDELINES ... between workouts. Fat Burning Training zone exercise-After warming up increases your exercise must exercise at least one day of the treadmill as an exercise aid in determining heart rate trends in preparation for energy. During To measure your training zone. Remember-these...
Uk Manual
Page 16
PROFORM is a registered trademark of this manual) • The DESCRIPTION OF THE PART(S) (see the PART LIST and the EXPLODED DRAWING attached in Canada © 2000 ... When ordering parts, please be prepared to give the following information: • The MODEL NUMBER OF THE PRODUCT (PETL57000) • The NAME OF THE PRODUCT (PROFORM® 570 treadmill) • The SERIAL NUMBER OF THE PRODUCT (see the front cover of this manual) • The KEY NUMBER OF THE PART(S) (see the PART...
PROFORM is a registered trademark of this manual) • The DESCRIPTION OF THE PART(S) (see the PART LIST and the EXPLODED DRAWING attached in Canada © 2000 ... When ordering parts, please be prepared to give the following information: • The MODEL NUMBER OF THE PRODUCT (PETL57000) • The NAME OF THE PRODUCT (PROFORM® 570 treadmill) • The SERIAL NUMBER OF THE PRODUCT (see the front cover of this manual) • The KEY NUMBER OF THE PART(S) (see the PART...


