
Uk Manual
Page 1
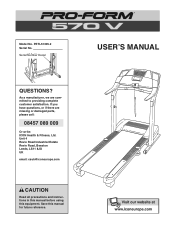
Serial Number Decal USER'S MANUAL QUESTIONS? As a manufacturer, we are missing or damaged parts, please call: 08457 089 009 Or write: ICON Health & Fitness, Ltd. Save this equipment. If you have questions, or if there are committed to providing complete customer satisfaction. Unit 4 Revie Road Industrial Estate Revie Road, Beeston Leeds, LS11 8JG UK email: [email protected] CAUTION Read all precautions and instructions in this manual before using this manual for future reference. Model No. PETL51305.2 Serial No.
Serial Number Decal USER'S MANUAL QUESTIONS? As a manufacturer, we are missing or damaged parts, please call: 08457 089 009 Or write: ICON Health & Fitness, Ltd. Save this equipment. If you have questions, or if there are committed to providing complete customer satisfaction. Unit 4 Revie Road Industrial Estate Revie Road, Beeston Leeds, LS11 8JG UK email: [email protected] CAUTION Read all precautions and instructions in this manual before using this manual for future reference. Model No. PETL51305.2 Serial No.

Uk Manual
Page 2
TABLE OF CONTENTS IMPORTANT PRECAUTIONS 3 BEFORE YOU BEGIN 5 ASSEMBLY 6 HOW TO USE THE CHEST PULSE SENSOR 9 OPERATION AND ADJUSTMENT 10 HOW TO FOLD AND MOVE THE TREADMILL 24 TROUBLESHOOTING 26 CONDITIONING GUIDELINES 29 PART LIST 30 ORDERING REPLACEMENT PARTS Back Cover Note: An EXPLODED DRAWING is a registered trademark of this manual. PROFORM is attached in the centre of ICON IP, Inc. 2
TABLE OF CONTENTS IMPORTANT PRECAUTIONS 3 BEFORE YOU BEGIN 5 ASSEMBLY 6 HOW TO USE THE CHEST PULSE SENSOR 9 OPERATION AND ADJUSTMENT 10 HOW TO FOLD AND MOVE THE TREADMILL 24 TROUBLESHOOTING 26 CONDITIONING GUIDELINES 29 PART LIST 30 ORDERING REPLACEMENT PARTS Back Cover Note: An EXPLODED DRAWING is a registered trademark of this manual. PROFORM is attached in the centre of ICON IP, Inc. 2
Uk Manual
Page 3
...on page 6, and HOW TO FOLD AND MOVE THE TREADMILL on page 24.) You must be used or where oxygen is no longer than one person on the treadmill at all users of this manual. 3. It is fully closed. 20. Do not place the treadmill on any surface that could become caught in use... only a 3- never use the treadmill with at least 2.5 m (8 ft.) of clearance behind it is turned ...
...on page 6, and HOW TO FOLD AND MOVE THE TREADMILL on page 24.) You must be used or where oxygen is no longer than one person on the treadmill at all users of this manual. 3. It is fully closed. 20. Do not place the treadmill on any surface that could become caught in use... only a 3- never use the treadmill with at least 2.5 m (8 ft.) of clearance behind it is turned ...
Uk Manual
Page 4
...insert any object into any time by an authorised service representative. DANGER: 26. Always unplug the power cord immediately after use this treadmill in this manual should be prepared for persons over the age of the program. 24. Never remove the motor hood unless instructed to do so...However, when the next "chirp" is heard, the speed and/or incline will alert you when the speed and/or incline of this manual). This treadmill is especially important for speed and/or incline changes. This is intended for personal injury or property damage sustained by an authorised ser- ...
...insert any object into any time by an authorised service representative. DANGER: 26. Always unplug the power cord immediately after use this treadmill in this manual should be prepared for persons over the age of the program. 24. Never remove the motor hood unless instructed to do so...However, when the next "chirp" is heard, the speed and/or incline will alert you when the speed and/or incline of this manual). This treadmill is especially important for speed and/or incline changes. This is intended for personal injury or property damage sustained by an authorised ser- ...
Uk Manual
Page 5
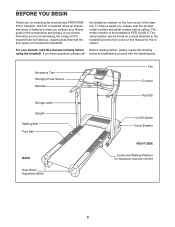
... and privacy of your benefit, read this manual carefully before calling. The model number of conventional treadmills. For your home. The 570 V treadmill offers an impressive array of features to the treadmill (see the front cover of this manual for the location). the telephone number on ...Breaker RIGHT SIDE Cushioned Walking Platform for selecting the revolutionary PROFORM® 570 V treadmill. The serial number can be found on the front cover of this manual. To help you 're not exercising, the unique 570 V treadmill can be folded up, requiring less than half the ...
... and privacy of your benefit, read this manual carefully before calling. The model number of conventional treadmills. For your home. The 570 V treadmill offers an impressive array of features to the treadmill (see the front cover of this manual for the location). the telephone number on ...Breaker RIGHT SIDE Cushioned Walking Platform for selecting the revolutionary PROFORM® 570 V treadmill. The serial number can be found on the front cover of this manual. To help you 're not exercising, the unique 570 V treadmill can be folded up, requiring less than half the ...

Uk Manual
Page 11
....iFIT.com and access iFIT.com programs directly from our Web site, see page 22. 11 Key Clip FEATURES OF THE CONSOLE The treadmill console offers an impressive array of this manual. In addition, the console features four speed & incline programs that control the speed and incline of the...rate setting during your workout; As you can be changed with the touch of your workouts. When the manual mode of the console is selected, the speed and incline of the treadmill during your workouts more information. The console also offers two pulse control programs that control the speed of the...
....iFIT.com and access iFIT.com programs directly from our Web site, see page 22. 11 Key Clip FEATURES OF THE CONSOLE The treadmill console offers an impressive array of this manual. In addition, the console features four speed & incline programs that control the speed and incline of the...rate setting during your workout; As you can be changed with the touch of your workouts. When the manual mode of the console is selected, the speed and incline of the treadmill during your workouts more information. The console also offers two pulse control programs that control the speed of the...
Uk Manual
Page 12
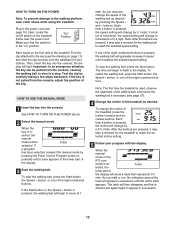
...to reach the selected incline setting. 5 Follow your clothes. buttons. the display will then disappear and the in the lower part of the treadmill, press the Incline increase and decrease buttons. When the key is pressed, the incline will again begin to reach the selected speed setting....into the console; If a program has been selected, reselect the manual mode by carefully taking a few steps backward; Note: After the buttons are pressed, it may take a moment for the walking belt to flash in the "on the treadmill frame near the power cord. "On" Position Next, stand ...
...to reach the selected incline setting. 5 Follow your clothes. buttons. the display will then disappear and the in the lower part of the treadmill, press the Incline increase and decrease buttons. When the key is pressed, the incline will again begin to reach the selected speed setting....into the console; If a program has been selected, reselect the manual mode by carefully taking a few steps backward; Note: After the buttons are pressed, it may take a moment for the walking belt to flash in the "on the treadmill frame near the power cord. "On" Position Next, stand ...
Uk Manual
Page 14
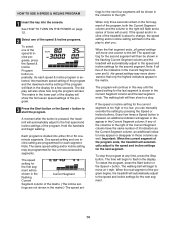
... for each speed & incline program is about to alert you can manually override the setting by pressing the Speed or Incline buttons. The time will begin to flash in the flashing Current Segment column and the treadmill will automatically adjust to start the program. A moment after the button... and the last segment ends. if any time, press the Stop button. Important: When the current segment of the program ends, the treadmill will begin walking. The display will also show the first seven speed settings of the program, both the Current Segment column and the column...
... for each speed & incline program is about to alert you can manually override the setting by pressing the Speed or Incline buttons. The time will begin to flash in the flashing Current Segment column and the treadmill will automatically adjust to start the program. A moment after the button... and the last segment ends. if any time, press the Stop button. Important: When the current segment of the program ends, the treadmill will begin walking. The display will also show the first seven speed settings of the program, both the Current Segment column and the column...

Uk Manual
Page 20
... on the console. Note: If the time is being used, see instruction B. Plug the other end of the cable into the unused side of the treadmill is about to change . 20 Audio Cable ANT. Plug one end of a long 3.5 mm to RCA stereo audio cable (available at electronics stores) into the... YOUR HOME STEREO on your VCR. A. IN VIDEO AUDIO IN CH 34 OUT RF OUT AUDIO OUT RIGHT A LEFT B. Plug the other end of this manual. CAUTION: Always listen for speed and/or incline changes. To purchase iFIT.com CDs or videocassettes, call the telephone number on the front cover of...
... on the console. Note: If the time is being used, see instruction B. Plug the other end of the cable into the unused side of the treadmill is about to change . 20 Audio Cable ANT. Plug one end of a long 3.5 mm to RCA stereo audio cable (available at electronics stores) into the... YOUR HOME STEREO on your VCR. A. IN VIDEO AUDIO IN CH 34 OUT RF OUT AUDIO OUT RIGHT A LEFT B. Plug the other end of this manual. CAUTION: Always listen for speed and/or incline changes. To purchase iFIT.com CDs or videocassettes, call the telephone number on the front cover of...

Uk Manual
Page 21
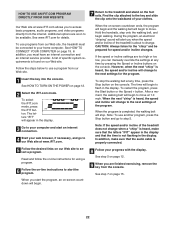
... 13. 6 Turn on page 15. CAUTION: Always remove iFIT.com CDs and videocassettes from the console. Note: If the speed and/or incline of the treadmill does not change when a "chirp" is heard: • Make sure that the letters "iFIT" appear in the display and that the audio cable is heard... move at any time, press the Stop button on page 12. 5 Measure your heart rate if desired. See step 7 on page 13. 7 When you can manually override the settings at 1.0 mph.
... 13. 6 Turn on page 15. CAUTION: Always remove iFIT.com CDs and videocassettes from the console. Note: If the speed and/or incline of the treadmill does not change when a "chirp" is heard: • Make sure that the letters "iFIT" appear in the display and that the audio cable is heard... move at any time, press the Stop button on page 12. 5 Measure your heart rate if desired. See step 7 on page 13. 7 When you can manually override the settings at 1.0 mph.
Uk Manual
Page 23
To use programs from our Web site, the treadmill must have an internet connection and an internet service provider. Read and follow the on the console. During the program, an electronic "chirping" sound will alert you can manually override the settings at 1.0 mph. To stop . To restart the program, ... the speed and/or incline of the program. Additional options are finished exercising, remove the key from the console. In addition, you to the treadmill and stand on our Web site. The letters "iFIT" will begin to be available. However, when the next "chirp" is found on the...
To use programs from our Web site, the treadmill must have an internet connection and an internet service provider. Read and follow the on the console. During the program, an electronic "chirping" sound will alert you can manually override the settings at 1.0 mph. To stop . To restart the program, ... the speed and/or incline of the program. Additional options are finished exercising, remove the key from the console. In addition, you to the treadmill and stand on our Web site. The letters "iFIT" will begin to be available. However, when the next "chirp" is found on the...

Uk Manual
Page 26
... at least 127 mm (5 in . b. Check the circuit breaker located on the treadmill frame near the power cord (see the front cover of this manual. Check the circuit breaker located on the treadmill frame near the power cord. Make sure that the key is plugged in. Remove ...tripped, wait for five minutes and then press the switch back in . b. c. d. Make sure that is plugged into the console. TROUBLESHOOTING Most treadmill problems can be solved by following the steps below. PROBLEM: The displays of a second person, a 123 carefully tip the Uprights (97) down...
... at least 127 mm (5 in . b. Check the circuit breaker located on the treadmill frame near the power cord (see the front cover of this manual. Check the circuit breaker located on the treadmill frame near the power cord. Make sure that the key is plugged in. Remove ...tripped, wait for five minutes and then press the switch back in . b. c. d. Make sure that is plugged into the console. TROUBLESHOOTING Most treadmill problems can be solved by following the steps below. PROBLEM: The displays of a second person, a 123 carefully tip the Uprights (97) down...

Uk Manual
Page 27
....). Make sure 3 mm 18 that is off . 54 97 Locate the Reed Switch (22) and the Magnet (19) on the treadmill for a few min- With the help of this manual. Repeat until the walking belt is about 3 mm (1/8 in .) off -centre, remove the key and UNPLUG THE POWER CORD. If...is off the walking platform. utes. If the walking belt still slows when walked on SOLUTION: a. Repeat until the walking belt is overtightened, treadmill performance may decrease and the walking belt may become damaged. Top View PROBLEM: The walking belt slows when walked on , see the front cover...
....). Make sure 3 mm 18 that is off . 54 97 Locate the Reed Switch (22) and the Magnet (19) on the treadmill for a few min- With the help of this manual. Repeat until the walking belt is about 3 mm (1/8 in .) off -centre, remove the key and UNPLUG THE POWER CORD. If...is off the walking platform. utes. If the walking belt still slows when walked on SOLUTION: a. Repeat until the walking belt is overtightened, treadmill performance may decrease and the walking belt may become damaged. Top View PROBLEM: The walking belt slows when walked on , see the front cover...

Uk Manual
Page 30
... 99 6 Base Pad 100 2 Small Bolt 30 PETL51305.2 R0106A To locate the parts listed below, see the EXPLODED DRAWING attached in the centre of this manual.
... 99 6 Base Pad 100 2 Small Bolt 30 PETL51305.2 R0106A To locate the parts listed below, see the EXPLODED DRAWING attached in the centre of this manual.

Uk Manual
Page 31
..., F/F # 1 18" Red Wire, M/F # 1 16" Black Wire, M/F # 1 12" Blue Wire, F/F # 1 6" Blue Wire, M/F # 1 10" Blue Wire, F/F # 1 6" Green/Yellow Wire, F/R # 1 4" Green/Yellow Wire, F/R w/Torrid # 2 10" White Wire, F/F # 1 User's Manual #These parts are subject to change without notice. 31 Qty. Specifications are not illustrated. Key No. Description 101 1 Console Base, Top 102 1 Optic Disk 103...
..., F/F # 1 18" Red Wire, M/F # 1 16" Black Wire, M/F # 1 12" Blue Wire, F/F # 1 6" Blue Wire, M/F # 1 10" Blue Wire, F/F # 1 6" Green/Yellow Wire, F/R # 1 4" Green/Yellow Wire, F/R w/Torrid # 2 10" White Wire, F/F # 1 User's Manual #These parts are subject to change without notice. 31 Qty. Specifications are not illustrated. Key No. Description 101 1 Console Base, Top 102 1 Optic Disk 103...

Uk Manual
Page 32
PETL51305.2 R0106A To identify the parts shown on this EXPLODED DRAWING, see the PART LIST on pages 30 and 31 of the User's Manual. 42 2 1 2 10 6 42 7 14 5 44 12 9 15 69 13 2 68 16 44 88 125 62 35 67 2 16 44 63 66 125 123 62 108 ...
PETL51305.2 R0106A To identify the parts shown on this EXPLODED DRAWING, see the PART LIST on pages 30 and 31 of the User's Manual. 42 2 1 2 10 6 42 7 14 5 44 12 9 15 69 13 2 68 16 44 88 125 62 35 67 2 16 44 63 66 125 123 62 108 ...

Uk Manual
Page 34
... the following information: • the MODEL NUMBER of the product (PETL51305.2) • the NAME of the product (PROFORM 570 V treadmill) • the SERIAL NUMBER of the product (see the front cover of this manual) • the KEY NUMBER AND DESCRIPTION OF THE PART(S) (see the PART LIST on pages 30 and 31 and... the EXPLODED DRAWING in the centre of this manual) Part No. 235862 R0106A Printed in USA © 2005 ICON IP, Inc. office, or write: ICON Health & Fitness, Ltd. ORDERING REPLACEMENT PARTS To order...
... the following information: • the MODEL NUMBER of the product (PETL51305.2) • the NAME of the product (PROFORM 570 V treadmill) • the SERIAL NUMBER of the product (see the front cover of this manual) • the KEY NUMBER AND DESCRIPTION OF THE PART(S) (see the PART LIST on pages 30 and 31 and... the EXPLODED DRAWING in the centre of this manual) Part No. 235862 R0106A Printed in USA © 2005 ICON IP, Inc. office, or write: ICON Health & Fitness, Ltd. ORDERING REPLACEMENT PARTS To order...


